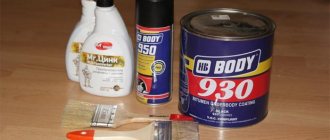
Types of materials for gluing
To glue the headlight, glue is most often used. The following basic substances are used to glue car headlights:
- Terostat - 8600 2K;
- Terostat - 8599, 8597, 8596
- Terodicht - Black;
- Terodicht - Elastik;
- Permatex;
- Abro;
- Body.
Adhesive sealant for glasses and headlights PERMATEX 65 AR Silicone Glass Sealer
The second way to glue cracks in car headlights is with butyl tape. According to the manufacturers, it has enough advantages:
- ensures durability and reliability of fasteners;
- resistant to significant temperature changes;
- quickly sets to the surface;
- seals glass.
Butyl tape for gluing car optics
There are 2 types of sealed glue:
- one-component. Sold in a tube and initially ready for use, presented as a liquid mass;
- two-component. Presented in the form of a paste or dry mixture. As a rule, it is sold together with a solvent. Before gluing, it is diluted to the desired consistency before use.
One-component adhesive for car optics
Review of popular brands
There are several popular brands that are often used to repair car headlights.
Abro WS-904
Abro is the most popular manufacturer of sealants. The product is produced and sold in the form of a tape, which is rolled into a small roll. Abro WS-904 contains butyl alcohol, thanks to which the product dries quickly. Other advantages of the sealant include the following:
- cheapness;
- resistance to temperature changes;
- resistance to dampness.
Orgavyl
This is another tape sealant that is often used for headlight assembly. This tape is very similar in quality to the products produced by Abro. However, formulations from Orgavyl are much more expensive.
Dow Corning 7091
This is a one-component silicone sealant that is suitable for gluing metal, plastic and glass products. The features of Dow Corning 7091 include ease of use, high hardening speed, good strength and elasticity. This composition is popular among motorists due to its resistance to temperature changes.
"Efimastica"
This is a polyurethane one-component adhesive composition that firmly glues parts and does not have an unpleasant odor. After application, “Efimastica” dries within half an hour. The product is sold in small tubes, the volume of which is 300-400 grams. This composition should be applied to clean and grease-free surfaces.
3M PU 590
This is an American adhesive that is used for gluing glass and headlights on cars. The advantages of 3M PU 590 include its fast hardening speed, since the composition dries completely within twenty minutes. The sealant also has disadvantages, which include poor resistance to elevated temperatures.
DoneDeal
Another American sealant, which contains components for reliable bonding of plastic or glass. DoneDeal hardens quickly after use and copes with sudden temperature changes. The only serious drawback of the adhesive is that after using it, a thin layer of sediment remains on the surface.
KOITO HOT Melt
People who want to purchase a professional headlight sealant should pay attention to KOITO HOT Melt. The sealant is used for repacking, retrofitting and restoration of car headlights
KOITO HOT Melt cleans well from the surface. For example, at room temperature you can peel it off with your fingers.
Permatex Flowable Silicone
This is a cold-curing silicone compound that is used for gluing glass, plastic and even wood. Permatex Flowable Silicone is also used in the repair of car headlights for gluing broken glass. Among the advantages of this sealant is that it penetrates into thin crevices and other hard-to-reach areas.
Instructions for use for headlight adhesive
How to seal or replace a car washer reservoir
In order for the sealant to reliably connect the bonded surfaces, you must follow the manufacturer's recommendations. However, there are some general rules to maintain the transparency and color rendering ability of headlights.
Gluing must be done using the following algorithm:
- Before starting work, wipe the parts to be glued, clearing them of dirt and degreasing them (use white spirit, solvent, nefras, in extreme cases, acetone, which will not work if the car has plexiglass), avoiding contact with the paintwork of the body and plastic;
- if the room is cold (temperature lower than specified in the instructions), warm the surface with a hairdryer;
- remove old sealant;
- if the product is liquid, use a dispenser or a disposable medical syringe.
After installing glass or collecting broken pieces, remove excess product. If during the operation of the car you notice that peeling has occurred (this is a problem with polyurethane compounds), disassemble the block using a solvent on the same PU base.
Stages of work
Conductive glue 4 homemade recipes. Conductive glue
To seal the glass you will need:
- prepare the glue itself. To do this, dilute it and, if necessary, heat it to the melting temperature indicated on the package;
- clean, dry and degrease the surface;
- To seal a crack, heat its edges, where the mixture will be applied next. This is done due to the fact that many types of glue can only be glued to hot (warm) surfaces;
- lubricate the surface and glue it without any effort;
- fix the crack on the tail light. For this purpose, fiberglass and wire are suitable, which must be secured with a frame on the damaged surface to prevent the development of cracks;
- allow the composition to dry (drying time is indicated on the packaging), then remove excess material.
Sealing glass on a car headlight
Alternative ways to glue a car headlight are as follows:
- If you want to glue imperfections on car glass the old fashioned way, you don’t have to buy glue, but get by using a soldering iron. It is suitable if your headlight is made of plastic, as it can melt its edges and glue them back together without the use of foreign substances.
- You can also glue a damaged tail light using plastic tablets. You just need to heat one tablet and then spread it on the damaged glass. After hardening, the surface is treated with a fine-grained abrasive (sandpaper, abrasive clay) to eliminate excess material.
- Sealant can seal cracks of different sizes well. The algorithm of actions here is similar to working with glue. You can choose a “native” sealant (the one used by the manufacturer of your car model) or buy a high-quality analogue. The main rule is to strictly follow the instructions, especially in terms of diluting and heating the composition.
- You can glue the cracks with a special cloth. It is laid at the crack site and filled with acetone. Acetone begins to dissolve the components of the fabric, transforming them into an adhesive composition. Car enthusiasts note the fast drying time of this mixture - approximately 1-1.5 hours.
Using plastic tablets we seal the rear light
If none of the above methods work for you, or you have not yet purchased sealant, you can temporarily seal the surface with tape. Pre-treat the surface as you would with glue and glue the crack. Scotch tape, depending on the quality of the work and the material itself, can glue a crack for a period of from several days to several months.
Why does moisture appear inside the car optics?
First, let's look at the design of modern head lighting. The headlights of the car are a single body with polycarbonate glass glued in with sealant. Inside there are reflectors, diffusers, and an adjustment mechanism.
Moisture affects all components of the optics
There are options with built-in lenses, including for gas-discharge lamps. In the case of standard xenon, there may be electronics inside the housing: control units and high-voltage lamp ignition units.
Contrary to the statements of some “experts,” the headlight housing is not sealed. The holes for installing lamps and bushings for electrical wiring are sealed with silicone or rubber gaskets. But when the lamp heats up, the air inside the housing expands and requires a hole to escape. For this purpose, any modern headlight is equipped with ventilation valves-breathers. They are located in strictly designated places, provide normal ventilation and are protected from accidental ingress of moisture.
It is better to disassemble lensed headlights according to the manual
Important! If the headlights are sweaty inside and condensation is forming, first check the breathers
- Ventilation holes clogged with dirt or blocked by the owner. Due to the temperature difference, condensation forms inside the case, and there is no ventilation.
- Cracks in glass or case. Unusual openings lead to direct water ingress and disrupt natural air circulation.
- Poor quality glass sealing after disassembling/assembling the headlight. For example, after unprofessional tuning.
- Fogging of headlights usually occurs during rain, car washing or at low air temperatures. In the first two cases, water enters directly through the damage; in the latter, condensation forms.
Condensation can accumulate both outside and inside
The best way to glue headlight glass types of sealants
How to Remove Label Adhesive from Glass
The market offers a fairly extensive range of compositions that differ in chemical properties, ease of use, and cost. What to choose? First you need to understand the classification. There are 4 types of sealants for headlights and car glass.
For better bonding, it is better to dismantle the headlight
Silicone
In terms of composition before polymerization, these are semi-liquid fluid products made from natural or artificial rubber. After application, the material hardens, turning into a kind of rubber that glues surfaces, protects from UV radiation and seals joints. But silicone products have a significant disadvantage - poor resistance to chemically aggressive environments, for example, technical oil, gasoline, diesel fuel, etc.
This is especially important if the car has a headlight washer system, which uses a special liquid that contributes to the process of destruction of the sealant, but sometimes oil-resistant products are found. In winter, it is also affected by anti-ice reagents
The main advantage of silicone compounds is their low cost and the ability not to lose their properties over a wide temperature range - up to +100°C. Ideal for mounting fog lamp lenses.
Polyurethane
These automotive sealants are very helpful in situations where you need to glue individual fragments of broken headlight glass or simply repair a chip or crack. The main advantage of polyurethane compounds is high adhesion (stickability) and good adhesive properties. Dried polyurethane based sealant is water resistant.
There are other advantages:
- The adhesive material can be used in a wide temperature range - from minus 60 to plus 80°C;
- service life reaches several years;
- the composition is resistant to the effects of motor oil, fuel, alcohol washer fluid and anti-ice agents;
- good fluidity before polymerization makes it possible to connect fragments of the most complex configuration;
- frost resistance;
- The glued structure reliably resists vibration.
Polyurethane sealant: everything is written on the package
What about the disadvantages? They are also available. The first is toxicity, which requires compliance with special safety rules: you need to work in rubber gloves, goggles, and sometimes a respirator (if the amount of work is large, for example, in a machine shop). And another disadvantage is poor resistance to high (more than +120°C) temperatures, which is typical for halogen lamps. However, the product is quite suitable for repairing mirrors.
Anaerobic
These compositions are characterized by high strength and resistance to high temperatures (up to +200°C). Sealants of this type are used for sealing joints and seams. Before polymerization, anaerobic sealants are in liquid form. Because of this, there are some inconveniences during use. But the chemical composition of the product is harmless to humans, and additional protection in the form of gloves and glasses is not required. The only requirement is to prevent the sealant from getting into your mouth and eyes.
Heat resistant (high temperature)
The main advantage of these sealants for headlights and car glass follows from their name. Compositions of this type can easily withstand temperatures up to +300 and even +400°C. That is, these heat sealants are well suited for working with headlight lenses that contain halogen lamps. The heat-resistant product is quite durable and is not afraid of vibration and mechanical impact. Heat-resistant sealants are produced in paste form or in two-component form. There is also a drawback to high-temperature auto sealant - a long hardening time, reaching up to 8-12 hours.
All the features of do-it-yourself headlight restoration and repair
Restoring headlights is required when the car has a high mileage or as a result of an accident. You can mask cracks, chips, broken fasteners and abrasions of glass on your own. Complex defects require dismantling and repair of the optics, while minor defects are corrected on site.
Reasons for optics failure
Modern car optics consists of a plastic body and a transparent front cover made of glass or polymer. A crack in the glass is the result of a stone hitting you while driving on the highway. They appear due to an accident or mechanical impact. If a defect is detected, you need to seal the area with transparent tape. This will protect the internal parts from penetration of moisture, dust, and sand.
If a plastic headlight is cracked, you need to turn off the light bulb or not use the light. Heating will deform the part, and it will be impossible to restore its original appearance. A defect in a plastic headlight appears due to a sudden temperature change, impact or strong pressure on the mask.
Breakage of headlight mounts is caused by abruptly closing the hood with a forgotten tool on the optics housing or when ice freezes in winter. The retaining tendrils can be torn off by a person leaning against a car or by an accident.
DIY headlight repair
Small abrasions can be removed by abrasive polishing. This does not require dismantling the optics or purchasing expensive components. Repairing fog lights by sealing chips is often impractical. In this case, you should remove the old glass and install a new one.
Repairing diode headlights is very difficult due to the large number of elements and microblocks. If the lens cracks or burns out, you will need to remove the protective glass and re-glue the LED panels.
Defects are divided into:
- cracks;
- scratches;
- cloudiness;
- fastener failures;
- souring of the corrector;
- contamination of internal surfaces.
Eliminating serious defects requires removing the headlights and using special compounds and repair kits.
Cracks
You can remove microcracks yourself using repair compounds that are sold in car dealerships. The 3M glass and plastic restoration kit consists of a dispenser, polymer, cleaner and syringe.
Before starting work, you need to complete the following preparatory steps:
- Wash the car.
- Buy gloves and a respirator.
- Make sure you have a warm garage with a constant air temperature of +15 °C.
Repairs are carried out in a closed, windless room, so it is important not to inhale vapors from the liquid and avoid contact with the eyes and skin of the hands.
Materials and tools:
- clean cloth;
- glass cleaner;
- respirator;
- kit for repairing cracks and chips;
- blade;
- cosmetic hair dryer.
For best results, wash the headlights thoroughly, paying special attention to the damaged area.
Repairing cracks in headlights:
- A frame with suction cups is installed on the cleaned optics.
- Car headlight adhesive is carefully applied.
- For better penetration of the composition, the area is heated with a hairdryer.
- After filling the crack, the frame is removed and tape is placed on top.
- The hardening time is indicated in the instructions or on the packaging of the liquid.
After the crystallization process is completed, you need to remove the tape and sharpen the excess with a blade. After repair, headlight glasses will require polishing with an abrasive paste.
Scratches
You can remove scratches using sandpaper, soap solution and a special polish.
When choosing a polishing paste, you need to pay attention to the size of the abrasive and take at least 3 types of composition:
- for rough processing;
- shine restorer;
- protective composition.
To remove deep scratches and clouding, you need to follow the steps:
- Wash the headlights.
- Gently sand the headlights using vertical and horizontal movements using sandpaper soaked in soapy water.
- Apply and polish roughing compound.
- Restore shine with the following type of polish.
- Treat the glass with a protective compound.
Sanding should begin with a grain size of 1500 microns and gradually increase to 2500 microns. Polishing paste should be used in conjunction with foam pads.
Glass replacement
Deep scratches cannot be removed by polishing, and large cracks spoil the appearance and compromise the integrity of the structure. You can repair broken optics by replacing the glass.
To do this, you will need to remove the headlight or fog lamp and disassemble it as follows:
- Place the part in a cardboard box with a pre-cut hole of small diameter.
- Use an industrial hair dryer to warm up the headlight housing.
- After 10-15 minutes of heating, remove the part and carefully pry off the glass with a screwdriver or sharp knife.
- Cut off the old sealant and thoroughly clean the internal parts from dust.
When removing glass, you should use gloves to avoid burning your hands or cutting yourself on the broken glass.
Replacement masks are sold in auto parts stores or on Internet pages with built-in catalogs.
When reassembling, car owners often wonder how to glue the glass to the body. For such tasks, black sealant is produced, and transparent options are also available. DoneDeal offers various compounds that are suitable for glass and plastic headlights.
We understand the types of sealant to glue headlights on
Headlight glass adhesive helps repair damaged headlight glass. The use of this composition is due to the fact that the optical device is not allowed to pass through liquids and air. If this happens, condensation will form on the glass. This, in turn, will greatly deteriorate the quality of lighting and weaken the diffuser. In addition, such a defect will significantly spoil the appearance of the vehicle.
Today on the automotive market there is a wide range of similar products for every taste. These include liquid sealants for windshields, for replacing gaskets in the engine and other car parts. If the composition is produced in liquid format, it is equipped with special removable dispensers. Those who decide to buy headlight sealant in paste format should be prepared to dilute it with a special substance that comes with the product.
It is customary to glue optical instruments with one-component sealants, which are immediately ready for use. for headlights is available in different packaging options: you can find it both in bottles and tubes, and in the form of rolled tapes. Let's take a closer look at which sealant is best for headlights.
Professional headlight sealant by category
Silicone sealants. With their help, you can create an elastic adhesive pad that can replace the old one. Once it hardens, the product gains flexibility comparable to that of rubber. The main advantage of this sealant is simplicity and ease of use, resistance to various temperature conditions. The disadvantages include poor tolerance to gasoline, antifreeze and oil, so silicone cannot be used when repairing a gearbox or radiator.
Sealants for headlight glasses made of polyurethane. Such compositions are characterized by an increased level of adhesiveness and increased moisture resistance. The materials are perfect for gluing headlight lenses. Motorists and auto mechanics note the reliability of the connection and long service life
It is important that such sealants are not recommended for fixing moving auto parts.
Anaerobic compositions differ in their properties in that they do not solidify upon contact with air. Therefore, you can not be afraid to apply them to spare parts, because hardening occurs exactly when the parts to be glued begin to come into contact with each other
Such sealants can withstand both low and very high temperatures without changing their original qualities. How long an anaerobic sealant takes to dry is indicated in the composition instructions.
Heat-resistant sealants. Thermal sealant for headlights is characterized by increased resistance to load and vibration. Can withstand temperatures up to 375 degrees Celsius. Available in aerosol, powder or paste format. If the buyer chooses powder, it will have to be diluted first. The main disadvantage of this type of sealant is the long drying period, which takes at least ten hours.
Advantages and disadvantages of anaerobic composition for engine repair
When repairing an engine using automotive sealant, the following advantages are highlighted:
- The flexibility of the seam has a positive effect on the quality and reliability of the connection.
- The presence of oxygen leaves it in a soft state, which allows assembly and adjustment to be carried out slowly.
- Provides adhesion when there is a lack of air.
- A reliable, homogeneous shell is formed on the motor elements.
- High temperature.
Flaws:
- With a thick layer, it is difficult to block the complete access of oxygen, so its thickness does not exceed 0.5 mm.
- Increased pressure on the connection will lead to its destruction.
- Careful, even application is required. Since air will leak onto the uneven part, and the sealant will remain in its original condition.
- Before application, the surface must be completely cleaned, otherwise the ingress of debris will lead to partial sealing.
- For the engine sump, application is carried out immediately before assembly.
Therefore, for the first time, the use of an anaerobic composition is carried out with extreme caution in order to avoid certain difficulties
What else to look for when choosing a product
When buying headlight sealant, in addition to its composition, as described above, it is necessary to take into account other criteria:
- Vibration resistance. When driving, the headlights shake and the sealant should not burst on the first bump.
- “Tolerance” to high temperatures: if you have halogen optics, choose an appropriate sealant.
- The volume of one package should be enough to repair at least one headlight.
- Removing excess. Particles of the product should be easily removed from any surface - metal or glass.
- Transparency. This point is important when repairing cracks in glass. If the product interferes with the emission of light, the efficiency of the headlight will be low, so a colorless composition is needed.
- Brand. Expensive does not mean good. However, cheap products will not provide reliable sealing, and the procedure will have to be repeated again and again, which is fraught with unnecessary financial expenses.
How to remove sealant from a headlight or glass
One of the most effective methods is to heat the sealant. After softening it can be removed freely
When doing this, be careful not to melt the plastic elements of the headlight unit. Residues can be removed with any automotive solvent and a flat screwdriver: the main thing is not to scratch the surface and wait 10-15 minutes. Then you can carefully scrape off the excess with a knife.
The choice of one or another sealing composition depends on the type of lamp in the headlight. In normal cases, polyurethane or silicone products are suitable, but if the optics are halogen-filled, use heat-resistant sealants, which can be found at any auto store.
Useful tips
When working in a cool workshop or garage, it is recommended to slightly warm the surface and sealant before working to increase their elasticity.
It is not recommended to glue the glass of halogen headlights yourself, because Heat-resistant products are difficult to work with and require stable drying conditions. Traces of glue that are on the outside of the headlight or on the car body should be removed only after the layer has completely hardened.
What sealant is convenient for you when working with car headlights?
- Rating of passenger trailers price quality
- Which car covers are better from which material reviews
- Automotive heat-resistant sealant
- Engine Cooling System Sealant
How to properly replace glass on a headlight
There are only two methods, one of which involves quick dismantling of the auto glass and replacement, the second will require complete disassembly of the headlight unit. The use of one or another method depends on the tasks facing the motorist and the degree of glass damage (example on a VAZ 2107):
- Remove the radiator grille.
- Unscrew the bumper mounting bolts and remove it.
- Find the 3 bolts holding the headlight unit and remove them.
- Recess the headlight into the engine compartment.
- Take the eyelash and pull the block towards the center of the car.
- Using a screwdriver, pry up the eyelashes, then remove the headlight, freeing it from the bumper.
- Unscrew the lower fastening nut.
- Disconnect the connectors.
- Pull out the headlight.
Removed headlight 2107
Then you can remove the glass, check the rubber gasket and clean it. If it is torn, buy a new one. Assembly is carried out in reverse order. Assembly will be faster if you hook the headlight brackets to its housing, then lightly press and snap into place. Reinstall the glass in the opposite order.