Why do you need to replace the canopy glass?
Let's figure it out first, why is it necessary to replace the headlight glass of a VAZ 2110 or 2114:
- It's simple - glass separately is cheap and there is no need to buy expensive headlights entirely. The reason why headlight repair is needed is some pebble that has fallen on the glass or other foreign object. When the glass of the lamp cracks, the light from the headlights becomes dim.
- In addition, the headlight glass of a VAZ 2114 or VAZ 2110 may fade over time and then again, by the way, there will only be a replacement. Polishing rarely helps in this case, and this process is not so easy. It’s easier to buy headlight glass and quickly replace it.
- It’s easier to buy disassembled flashlights at flea markets. There you can find the glass you need and buy it very cheap. The assembled headlight itself costs about 5,000 rubles each. Why, one might ask, buy an expensive accessory if you can simply replace the glass?
Every motorist sooner or later faces problems with headlights. And he does what is best for him. If the headlight has become unusable, you can replace it as an assembly. To do this, you just need to buy a new model, sealant, film. Then dismantle the old headlight, apply sealant to the new lamp, and then calmly glue it in place. During the process, you need to ensure that no dust or dirt gets between the connections.
How to change the glass on a VAZ 2114 headlight
Replace headlights on a VAZ-2114 yourself
Many car enthusiasts were faced with the fact that they had to change the headlight glass on a VAZ-2114. There are many reasons for replacement. from accidents to sunburns that can't be buffed out. Not all motorists can perform this procedure on their own, since it is a scary process, but, as practice shows, it is quite simple.
Video on how to remove headlight glass from a VAZ-2114:
Video explains how to replace your glass headlights
The VAZ-2114 car, as well as some of the nuances and subtleties of the process.
Replacing headlight glass on a VAZ-2114
The headlight is removed during disassembly.
Replacing headlight glass on a car. this means a complete dismantling process. So, let's consider the sequence of actions aimed at glass repair:
- The first thing to do is remove the top grill.
Repair of VAZ 2114 headlights Replacement of VAZ 2114 glass headlights
Broke one glass headlight
and the second one is darkening with age, so I decided to replace it and make a good video on this topic.
How about replacement glass in the headlights?
Using the example of Lada Samara-2.
Remove the damaged headlight.
grease glass
lamps with glue or sealant. Photo. Headlight VAZ-2109, but the work is similar.
Gently press the new glass into the headlight and wait until it dries.
You can remove the glue without a knife. There are special products that dissolve frozen liquid. The variety of manufacturers today is quite large, so the car enthusiast will have to choose.
Glass selection
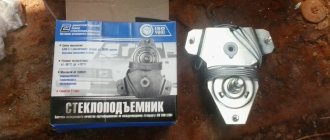
A glass replacement kit is required.
Glasses for VAZ headlights can be sold in originals or analogues. Thus, the analogue is 20-30% cheaper, but it is not a fact that the kit includes sealing rubber. This element is necessary because it prevents moisture from entering the headlights of the device.
Reasons for replacement
The most common reason for replacing headlight lenses is gravel on the highway.
The glass on a car's headlights can change for several reasons. Therefore, sooner or later the motorist will have to face this process. Of course, one of the options. This is to go to a car service center, where they will definitely tell you to completely change the product, but many do not want to do this. So, let's look at the main reasons for replacing glass headlights:
- Over time, glass acquires the property of coloring. . The top layer does not help with the same shine, so you have to replace the glass.
- Broken light . Cheap glass replacement is cheaper than completely replacing the entire headlight assembly, which is why many car owners tend to do it.
One of the cheapest replacement options is purchasing floodlights during disassembly , since in most cases the housing becomes unsuitable, the glass surface remains intact.
Replacing headlight glass on a VAZ-2114 is quite simple, and you do not need to change the entire product, which gives you a lot of money for all the little things and the work of a car service center. Glassware can be found at demonstrations or in the automobile market for relatively little money.
How to replace headlight glass
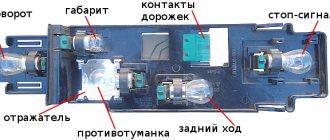
Now we’ll find out how to replace the glass itself. First, let’s find out the design of the lantern, what it consists of.
What does the headlight consist of?
As you know, the main link of any lantern is its reflector or reflector. It is a concave mirror component, which serves to form a light beam of the desired shape.
Types of lamps for flashlights
As for the light source, they are car lamps. They can also be different. Currently known:
A conventional incandescent lamp is a sealed bulb containing a vacuum or inert gas. Inside the lamp there is a tungsten spiral, which, under the influence of electric current, is heated to a temperature of 2600-3000 K, thus emitting light and heat. As for the efficiency of such lamps, it is about 3400 K.
A halogen incandescent lamp operates similarly to a conventional incandescent lamp. Such a lamp contains minor additions of halogens, such as bromine, chlorine, etc. With the help of these substances, the bulb and glass of the headlamp are darkened. According to experts, the use of halogen headlights on car headlights doubles their service life and prevents rapid failure of the bulb.
Finally, a xenon lamp is a gas-charging version that contains xenon. Such lamps are also called HID lamps and their emission spectrum is identical to that of daytime sunlight. This lamp consists of two bulbs and quartz glass. Such a lamp consumes only 35 W of electrical power, instead of 55 W for a halogen lamp.
Lantern glass
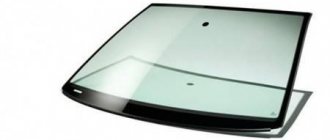
The headlight also consists of corrugated glass, which will be discussed in this article. The most popular types of glass are transparent.
Although tinting headlights is becoming more and more fashionable now.
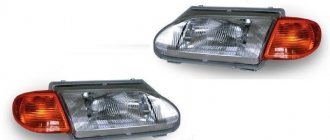
Transparent glass headlights VAZ 2114
Although reflective options are also known, crystal, modular, lensed, etc.
How to replace a VAZ 2114 headlight - step-by-step instructions
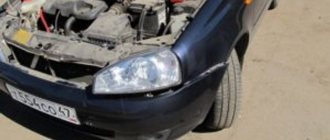
Headlights are constantly at risk of damage, small pebbles flying into the air from cars in front turn into something like bullets that mercilessly shoot at rear cars, causing a lot of trouble for motorists.
One of these troubles is broken headlight optics. Today I will tell you how to replace a VAZ 2114 headlight if it malfunctions, or in my case, when the headlight glass is damaged.
Replacement timing and choice of optics
In addition to the difficulties described above, which are familiar to motorists who drive long distances, there are more banal reasons related to the depreciation of the headlight itself. This mechanism does not have a specific shelf life, but the lamps “burn out” over time, and the reflector material and diffuser become unusable.
The last two elements have a shelf life directly related to the material from which they are made and the methods of car care. At the same time, even the best of them are still susceptible to the ingress of dirt associated with depressurization of the headlight structure.
IMPORTANT! If you have working headlights, but you still can’t see anything, visit a good car service center that has a light debugging stand. It may just be necessary to clean the structure and adjust it.
The choice of headlights is extremely important for the convenience of the motorist. To be more precise, it is not the manufacturer itself that is important (although it affects the characteristics of the light), but the identity of the lighting fixtures. If your car has standard headlights, but you decide to replace only one, then find the original ones. You should not take AUTO SVET or BOSCH, which are similar in appearance.
Human vision and the brain have a number of characteristics, and in this case they will manifest themselves in the fact that a more powerful headlight will create a “twilight zone” instead of a dimmer light. Consequently, there will be no improvement in visibility, and the brain will perceive the “blind spot” almost the same way if it did not exist at all.
Algorithm for replacing the front headlight of a VAZ 2114
When we have decided on the timing and reasons for the replacement, and also know what to follow when choosing new optics, it’s time to move on to the question of how to change the headlight on a VAZ 2114.
REMEMBER! The vehicle's lighting system is part of its electrical network, therefore, we must not forget about the standard safety measures required to work with this part of the car. You need to at least remove the terminal from the battery, and if you have to work with the right handicap (in the direction of travel), you will have to completely remove the battery, otherwise it will be impossible to dismantle it.
So, let's remove the headlight:
- We remove the radiator trim - to do this you need to unscrew 4 screws.
IMPORTANT! If for one reason or another you cannot remove the turn signal separately, do not break the latches. Later, you can dismantle the entire lighting system in one block and separate them separately. This will be less convenient, but much better than a turn signal dangling from the housing.
This is done as follows:
- disconnect the wire from the headlight itself and fix it in the engine compartment;
- We find the corrector latch and clamp it, after which we turn it counterclockwise. If everything is done correctly, it will be removed easily and without the need for physical force;
- Unscrew the fastening nuts using a spanner. There are three nuts in total and finding them is not difficult;
- Use a screwdriver to unscrew the screw connecting the headlight to the bracket;
- carefully remove the headlight through the “face” of the car.
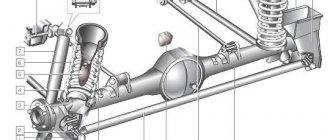
There is another method for removing headlights, which involves removing the entire headlight unit along with the middle frame.
To do this, you must immediately disconnect the wires from the headlight and turn signal, then remove the hydraulic corrector, and then:
- Unscrew the four bolts located behind the headlight group.
- We remove the headlight together with the middle frame and unscrew its fasteners outside the car.
- After removing the fasteners, carefully remove the headlight itself.
After replacement (repair), you must assemble the car in the reverse order of the method you used. Also note that the headlight may need to be repaired and you just need to replace the glass of the VAZ 2114 headlight, which is often found in the practice of operating this car.
Replacing headlight glass on a VAZ-2114
Removed headlight during disassembly.
Replacing a headlight glass on a car means a complete process of disassembling the housing. So, let’s consider the sequence of actions aimed at carrying out repair work to replace glass:
- The first thing you need to do is remove the upper radiator grille.
We remove our damaged headlight.
Lubricate the headlight glass with glue or sealant. The photo shows a VAZ-2109 headlight, but the work is similar.
Replacing the taillight of a VAZ 2114
This procedure is much simpler than that of its front brother.
Removing the rear light:
- Unscrew the fabric cover.
- Unscrew the 4 nuts with a “10” wrench.
- We remove the rear light, and if necessary, unfasten the latch and remove the lamp holder.
Everything is assembled in the reverse order, and completely replacing both taillights will take no more than 10 minutes. Everything is done easily and without physical effort, the main thing is not to drop the flashlight on the rear bumper when it is removed.
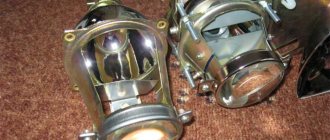
How to remove glass from a VAZ 2109 headlight
1200 rub. for the photo report
We pay for photo reports on car repairs. Earnings from 10,000 rubles/month.
Write:
The principle of replacing glass in a VAZ headlight, whether on the 2107 or on the VAZ 2114, or in this case on the VAZ 2109/08, is the same. Glass installation is carried out using sealant. But when choosing it, you need to be very careful and not stick it on anything, otherwise your headlight will quickly fall apart.
Before applying glue (sealant), you need to clean and degrease the surface. It is more convenient to change the glass on a removed headlight, of course, but you can install new glass on a mounted headlight without much difficulty. This quick method of replacing glass on a Lada Samara headlight will come in handy on the road.
Replacing the headlight glass
If you see that the headlight itself is working, and its cloudiness is due to glass defects, you need to know how to remove the glass from a VAZ 2114 headlight and then replace it.
- We dismantle the headlight using one of the methods described above.
- Take a thin flat screwdriver (spatula, knife) and pry up the corner of the glass.
- Insert the tip of a utility knife into the resulting gap and cut through the old sealant (if there is a lot of sealant left, take a hairdryer and heat the edges of the glass).
The glass is now removed, but remember that reassembly will involve applying sealant (can be replaced with a rubber seal), so be sure to get some in advance. Also, some manufacturers' headlights have headlights with clips, so don't use brute force, just look where they are and tighten them.
Replacing headlights
Lyrics: “how I swore, how I swore at myself for taking them... these beautiful Chinese toys...”
Of the things that are most bad about them (the flint in the ointment):
- The rings are not reliable, or rather the wiring in the headlights. All wiring. and ignition blocks for these neon rings.
- All wiring is very flimsy and not reliable. Repeating myself!
- Flimsy plastic and thin bendable metal.
- There is no space for the lamp in the lenses. The lamp can jump out - hence the crappy light, as many write.
Let’s immediately talk about the “honey” (in terms of appearance) - by the way, they shine no worse than their relatives, but only on condition that everything is set up and the lamps are positioned correctly in the lens! I don’t know why everyone here was scolding their light so much?!
So, a guide for those who have to change their original headlights to tuning ones:
For simplicity and convenience, I removed the plastic trim above the radiator.
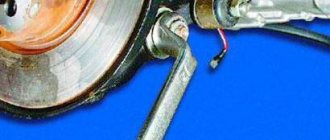
We climb from the bottom under the front bumper, look for the “cross” screw there that holds the lower eyelash of the headlight, it is located right under the turn signal almost... This screw holds the eyelash together with the headlight, because the eyelash is attached to the headlight with two clips. So we unscrew these bolts.
DO NOT REMOVE THE TURNER SEPARATELY! — in addition to the spring on the back of the headlight, it is also fixed with a latch from the bottom of the headlight... Here it is (the latch) in the photo.
Next, unscrew the bolt from the side of the radiator, which fastens the headlight and the middle frame above the bumper (the one that smoothly goes on the sides into the lower eyelashes).
Don’t forget to disconnect all 2 plugs (to the headlight and to the turn signal) and the hydraulic corrector. The hydraulic corrector is not difficult to remove - you clamp the curved clip and turn the corrector plug down and remove it from the socket.
Now, using a 10mm head, unscrew the 4 bolts at the back of the headlight. Then you will see that the headlight has only 3 bolts, and the 4th (if you look at the right headlight, then at the top right; and if at the left, then at the top left.) holds that same middle frame above the bumper.
We repeat the operations with another headlight.
With the right headlight it is more difficult to get there because of the air intake, we just pull it deep into the hood, it just snaps there!
In order not to scratch the paint anywhere and everything was neat, the two of us take out a little of the headlight from its seat, remove the fasteners of the middle frame from the joint with the headlight.
Remove the middle frame. (I did one and in some places under the headlight I scratched the varnish on the bumper.
Now we take out the headlights along with the lower eyelashes.
” />
Now you can carefully remove the eyelashes from the headlights, helping the clips... At the right headlight I tried to first remove the clip, and then the headlight... (because, for some reason, the turn signal just came off - so clumsily, after breaking the latch with the headlight, the service “specialists” installed white turn signals auto shop). I broke the short clip on one eyelash.
If there was such a guide, everything would be done more carefully.
Regarding ProSport... The kit really had everything for easy connection to standard places...
only, for some reason, the turn signals were not made just for the turn signal plug, but to insert the emulation of the turn signal bulb into the socket from the original turn signal... Well... I didn’t understand anything myself...
The kit also comes with an ignition unit for neon rings, at the end of which there are simply stripped wires, I immediately paralleled them with the dimensions, a la LEDs. And having soldered everything thoroughly, I insulated it well! It’s scary... so everything is flimsy - but this is current...)
On the main plug there is a “mother” for the standard connector; a separate relay for low/high beam (by the way, on these headlights my dream is that the high beam lights up together with the low beam, apparently that’s what the relay is for); two plugs for low and high, which are plugged into the lamps on the headlights (H7); a flat connector for connecting a size “a la LEDs” (I paralleled the “angel eyes” there); connection to “+” to a battery with a fuse (for relay operation). In general, then I put everything in place, connected everything, and carefully wrapped it with electrical tape.
Attention ! The third bolt (shared with the holders of the middle frame above the bumper), when tightened, can turn the aluminum holder of the new headlight - this is the kind of iron used in CHINA. Be careful.
Don't forget to check everything before assembly! Don't forget to connect everything!
Don't forget to check whether the low beam and high beam bulbs fit well in the grooves!
Why did I take these headlights? Yes, this will do for now (for the summer), and then I just want to use them as a good idea for location and a beautiful case for inserting hella modules and real LEDs there! What do you think?