Adjusting the fog lights
The installation and connection of the fog lights are complete, but that's not all.
Now we need to adjust our headlights so that they shine and do not blind oncoming drivers. This is a very responsible and important operation, since both our lives and the lives of oncoming traffic participants depend on it. You can, of course, turn to a service station for help, but if you have patience, you can do everything yourself. To work, we need a vertical wall and a flat horizontal area in front of it. The dimensions of the site should allow you to park the car at a distance of 10 m from the wall. Take a piece of chalk and make the necessary markings on the wall.
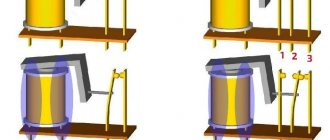
- We draw a vertical line corresponding to the central axis of the machine (line 1 in the figure below).
- We draw two vertical lines that pass through the center of the fog lights (lines 2 and 3 in the figure below).
- Draw a horizontal line H at the height of the centers of the fog lights from the road surface.
- We draw a horizontal line 4 at a height that depends on the distance from the car to the wall and on the installation height of the fog lights. We chose a distance of 10 m. If the headlights are located at a height of 250-500 mm from the road surface, which corresponds to the standard installation height of PTF on a Gazelle, then the height of line 4 will be about 100 mm.
Marking the wall for setting the fog lights
The marking is complete. The remaining operations are carried out in the dark. We place the car at a distance of 10 m from the wall as horizontally as possible and so that its central axial line coincides with the central vertical line on the wall.
We turn on the PTF, cover one headlight with a piece of dense material, and adjust the second so that its light spot coincides with the yellow oval marked in the figure. We change the headlight tilt using the adjusting screw, which is marked with an arrow in the photo below.
We repeat the operation for the other headlight, covering the adjusted one with a cloth. Then we open both headlights and make sure that the light spots with centers A and B are in their place.
That's all, now our Gazelle Business is equipped with a fog light. This will ensure safe driving in any weather for both us and other road users.
Previous Fog lightsHow to install fog lights on a Priora Next Fog lightsHow to install PTF on a VAZ 2114 and change the bulbs in them
If PTFs are inoperative
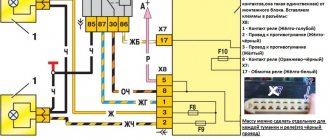
Connection via a 4-pin relay connection diagram
Let's briefly consider the main reasons for the failure of fog lights or problems in the operation of control mechanisms (see photo). Unfortunately, long-term use and not always favorable climate cause corrosion and oxidation of wires and contacts.
- Each fog light has its own fuse located in a block under the hood. Check first to see if it is faulty. If both headlights do not work at once, then the problem is different, since the fuses do not fail in pairs.
- If the lamps burn out, you can’t think of anything else other than replacing them, and the reason may be in the breaker relay. There should be a clicking sound when the headlights are turned on. If not, then either it is not working, or there is no power to it, or, as an option, there is no normal mass on the body, or from the relay.
The main stages of connection work
Here are sample connection instructions:
- First of all, in symmetrical places on the bumper we cut out two holes in which the light sources will be attached and thoroughly lubricate them with an anti-corrosion agent.
- We connect the purchased pair of foglights with wires. Check that the cross-section of the main wiring of the car is the same as that supplied with the headlights. It is generally accepted that the minimum cross-section diameter should be at least 0.75 mm.
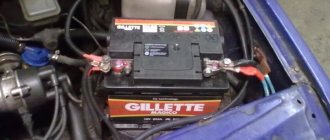
- We de-energize the car battery.
- Wiring is carried out in accordance with the diagram that comes with the package.
Decoding connectors for connecting headlights to Gazelle
- You need to open the housing of each headlight and pull out its optical element. This will be required so that you can carefully insert the halogen light bulb and not damage the housing with glass during the installation process.
- After tightening the headlight housings, install the contact relay with the wiring facing down. This way we will protect it from moisture.
- When you insert a halogen lamp into its optical element, do not allow your fingers to contact the surface of the bulb. Wear gloves or even wrap a rag around the flask. Grease on the surface of the bulb will significantly shorten the life of the light bulb.
- We connect the wiring kit to the lamp and install the optical element.
- Gazelle fog lights will be considered installed when you have completed all stages of work and provided power to the battery again. Now you can check the functionality of the device. Turn on the headlight only after complete assembly. This article will give you the opportunity to visually see some of the work.
The role of relays and buttons
If the fog light kit you purchased does not have a relay, purchase one for the 3302. There it operates the rear fog lights. Normally, each kit should be equipped with electrical wiring with connectors, a relay breaker, a power button and a detailed instruction diagram for the assembly steps.
Pay close attention to the quality of wiring
Note! The wiring harness is not only possible, but also necessary to be routed into the space under the hood.
After this, decide on the place where the breaker relay will be attached:
- The wiring from the relay will be led into the cabin through a specially designed technological hole.
- You now need to find out where the button that turns on the fog light will be located in order to find out how to connect it to the standard electrical wiring of the Gazelle.
- We need a relay for the reason that it saves the button - it may not withstand the current consumed by the fog lights. Some are used to connect a 3-position key: 1 wire is stretched to the dimensions circuit, the 2nd to the ignition, and the 3rd to the relay itself. This achieves 3 operating modes.
Light control unit for Gazelle
Choosing an installation location
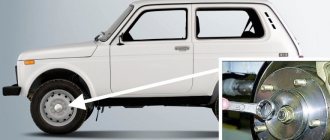
How to install fog lights on a VAZ 2109
The time has come to decide on the installation location of the fog lights. On many cars that are not equipped with fog lights, there are places for installing PTFs. They are closed with decorative plugs. But some modifications of Gazelle Business have bumpers without such plugs - place the fog lights where you want and how you want. There are two options here:
- Buy a bumper with plugs.
- Cut windows for lights in any place on the bumper.
The first option is a little more expensive, but along with the seats we get headlight mounting points.
Bumper with seats for installing PTF
The second one is cheaper, but you will have to do something tricky with attaching the lanterns - do not nail them down with nails that will stick out.
Important! If we decide to choose the installation location of the PTF arbitrarily, then we need to be well aware of the requirements and standards for installing fog lights
Requirements for fog lights
There are few requirements regulating the installation location of fog lights, but they exist. Open GOST R41.48-2004 clause 6.3 and read:
- 6.3.4.1 Width - that point of the surface visible in the direction of the reference axis, which is furthest away from the median longitudinal plane of the vehicle, must be at a distance of no more than 400 mm from the edge of the overall width of the vehicle;
- 6.3.4.2 In height - not less than 250 mm above the ground surface and not more than 800 mm above the ground surface.
- 6.3.4.2.1. No point on the surface visible in the direction of the reference axis shall be higher than the highest point of the surface visible in the direction of the reference axis of the passing beam headlamp;
- 6.3.4.3 Lengthwise – in front of the vehicle. This condition is considered to be satisfied if the emitted light does not interfere with the driver either directly or indirectly through reflection from rear-view mirrors and/or other reflective surfaces of the vehicle.
The wording is quite abstruse, but in fact everything is simple, just look at the figure below:
Choosing a location for installing headlights
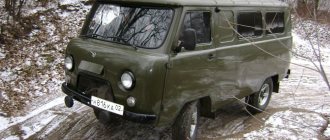
An important point in the configuration of any car is the installation of fog lights. "Gazelle" is no exception in this matter, taking into account the commercial all-weather nature of its operation.
There are two options for installing headlights on the Gazelle: on the bumper and on the roof. Traditionally the first one is used.
The second option does not fit well with the traffic rules, since this document establishes restrictions on the placement on the vehicle of lighting equipment not provided by the factory. Installation of headlights on the roof is permitted only if the vehicle is operated in difficult conditions: gravel road surface, off-road.
The first option also has limitations: you can install fog lights on a Gazelle no higher than the level of conventional headlights, while the dimensions of the car are not violated by more than 400 mm, and the distance from the headlights to the road surface should not be less than 250 mm.
Replacing the headlight
How to install fog lights on a Priora
Headlights on a GAZ-3302 with an on-board 12 V power supply are marked by type: 0 301 215 203 for the right unit, 0 301 215 204 for the left unit. The DRL lamp unit provides the following illumination:
- high beam - H1 12 V, 55 W lamps are used;
- low beam lighting - H7 12 V, 55 W bulbs are installed;
- front marker – W5W 12 V, 5 W;
- front turn signal - a PY21W 12 V, 21 W bulb is used.
Light elements change independently. After replacement, the light beam is adjusted through a gear wheel for the vertical and horizontal planes.
Main stages of work execution
The old-style GAZelle has standard headlights with a soft reflector, which gradually rusts. Often blocks lose the tightness of the lid connection, and drivers often complain about incorrect connection of wires. To correct the situation, the structure is disassembled, all the light bulbs are removed and a complete reinstallation is carried out.
Self-replacement begins with the preparation of new elements; an LED strip is installed as side lights:
- Thoroughly degrease the inner surface.
- Wait 3 minutes until the solvent evaporates.
- Apply double-sided tape to the LED strip.
- Place the LED strip along the edge of the turn signal.
Removing glass for the GAZ-3302 model:
- Warm up the old headlights with a hairdryer, directing the air flow onto the glass.
- Use a thin screwdriver to pry the glass, lift it, and run the tool around the perimeter.
- Clean the reflector or replace the part.
- Prepare the seat, remove any remaining glue.
- Apply a layer of sealant to new glass.
- Twist the wires and bring them out behind the reflector.
- Install the glass into the seat; use a tourniquet to tighten the structure.
- Install the turn signal.
- Connect the new dimensions: the plus is connected to the yellow wire of the marker wire, the minus is connected to the common cathode of the headlight.
What to consider when connecting
When connecting, keep in mind that the new Gazelle instrument panels are equipped with a central switch, which has a separate position for the fog lights, so you don’t have to embed a separate button.
A number of points regulate where and how additional lighting fixtures should be installed:
- First of all, this is the height, which must be at least 25 centimeters from the surface of the roadway.
- Fog lights should be installed in such a way as to maintain symmetry with the axis of the vehicle itself.
- These and any other devices cannot protrude beyond the external dimensions of the machine by more than 40 cm.
- And in any case, the flow of light cannot be higher than the flow of the main low-beam headlights.
In some cases, traffic regulations allow the installation of fog lights on the roof of a vehicle. For example, if we are talking about an all-wheel drive vehicle with high cross-country ability. Or its operating conditions are so harsh that even making stickers for the headlights is not able to protect them from stones.
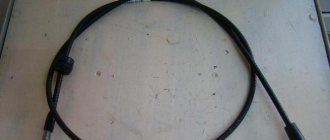
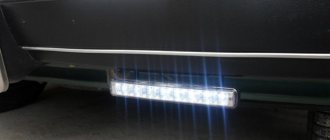
PTF before installation
Install on the front bumper
At the same time, in the first photo you can see that the manufacturer has already designated places for future foglight mounts in the bumper. You can choose another place, not forgetting the recommendations of the traffic police officers stated above.
Again, there is quite a variety of headlights on the market, based on shape and size. Most often, headlights of rectangular, square or oval shape are installed on Gazelle. But after the purchase you will have to decide where your lighting fixtures can be placed.
For example, a Gazelle Business fog light will require mounting holes, but the front bumper does not always provide this. Therefore, there are 3 main ways out of this situation:
- cut the required hole with your own hands;
- attach the fog lights to the top of the bumper;
- buy a bumper prepared for the installation of fog lights.
Option with seats
So, if we have established for ourselves the mounting location for the foglights, then it’s time to assemble the electrical circuit, and then introduce it into the standard one. Each kit, which is designed for additional lighting in bad weather conditions, includes not only headlights, but also electrical wiring to connect them, as well as an interrupt relay and a button to start the lighting.
The kit usually also contains instructions that help you correctly connect and route the wiring to the Gazelle - this will also be useful.
We fix the relay in the engine compartment
Basic sequence of actions
The work itself on connecting the fog lights to the Business Gazelle will be carried out as follows:
- Installed headlights must be connected with wires.
- The block with wires must be brought under the hood.
- We mark a place for installing the interrupting relay (this element must be included in the circuit, so if your kit does not have it, purchase it separately).
Connecting the PTF to the control unit in the cabin
- We connect the wiring between the relay and the headlights.
- The wiring from the relay will be routed into the interior through the process input.
- We designate a place for installing the power button.
- We mount the button and connect it to the standard electrical wiring.
Once we have the entire circuit assembled, we need to check its operation and the correct connection of the wiring to the relay.
Where to post
We need to start by choosing the place where our new foglights will be located. Traditionally, either a car bumper or a cab roof is used for these purposes. However, with the second option there may be difficulties in coordinating with traffic rules.
Note! According to these standards, the use of the roof is permitted for vehicles with all-wheel drive or in difficult operating conditions - dirt roads, potholes, etc.
Additionally, you need to know other requirements of the traffic police rules.
So, the installation of Gazelle fog lights must meet the following standards:
- the light flow should not be greater than that from the main light source of the car;
- the headlights must be installed so that they are parallel to the axis of symmetry of the car;
- the height must be at least 25 cm, and fog lights cannot protrude from the side of the vehicle by more than 40 cm.
Replacement of rear light glass
The part is replaced in the second year. The rear light glass for the GAZelle is made of high-strength plastic, but it also fails: the surface cracks from vibrations due to leaky installation and damage during driving.
For replacement, an original part is selected that covers all rear light optics: dimensions, stops, turn signals. A total of 4 technical light lamps are installed on the block. During repairs, it is recommended to go through all the electrical wiring: the connectors on the rear lights in the GAZelle oxidize within 6 months, the electrical wiring often breaks due to incorrect connection and installation of the line.
Sequencing
When disassembling the element, the negative terminal from the battery is first removed. The glass is held on the block with 4 screws. The algorithm is as follows:
- Remove the fastening bolts.
- Remove the diffuser.
- Prepare corrugation for packaging the electrical wiring harness.
- Clean the unit and change lamps if necessary.
- Install a new diffuser.
- Screw the glass.
GAZelle drivers note frequent malfunctions of the signal lighting. During factory assembly, the left rear turn signal is powered directly from the front one and they forget to properly hide the wires in the engine compartment, as a result the elements quickly fail.
Installation Guidelines
Fog lights on the Gazelle are installed with the obligatory consideration of the power of their flow. The use of PTF is prohibited if this indicator exceeds the power of the main light sources.
Headlights must be installed symmetrically relative to the axis of the car.
If the factory has already provided and marked on the bumper the installation locations for fog lights, then you should follow the factory recommendations and install the headlights in these areas.
After fixing the PTFs, the correctness of their adjustment must be checked. It is advisable that this be done at a service station by a qualified electrician. This step is perhaps the most important of the previous ones, since the quality of the fog lights depends on it. Only in this case will they be useful equipment.
Installation process
To install the kit yourself, you can:
- Use the places in the front bumper designated by the manufacturer;
- Choose the mounting location on the bumper yourself (taking into account traffic regulations).
The fact is that the shape of the fog lights is different both in size and shape. Therefore, the connection of fog lights on the Gazelle will be carried out by you based on the dimensions of the selected lighting devices.
Today you can find the following products on sale:
- Rectangular shape;
- Square shape;
- Oval shape.
And the question after purchasing the set you like is how to install lighting fixtures in places not intended for them. The thing is that companies strive to produce universal lighting devices, while there is no uniform standard among automotive manufacturers.
Bumper mounting methods
The difficulty is that the standard front bumper does not have slots for installing additional lighting fixtures.
Therefore, Gazelle owners have two options:
- Cut them out yourself, or install fog lights on top of the bumper;
- Buy an improved bumper.
Advice! If the second option seems too expensive for you, since price is a decisive factor, then you still have the option of installing fog lights directly on the bumper using homemade fasteners.
Integration into the electrical circuit
Having figured out the mounting location, you have to connect the electrical components into a single circuit and integrate it into the standard one.
To do this, the fog lights come with:
- Electrical wiring with connectors for connection to the Gazelle circuit;
- Relay interrupter;
- Power button designed for installation on the instrument panel;
- Instructions for connecting and pinouting terminals.
The work algorithm will be as follows:
- We connect the installed headlights with wires;
- We bring the wiring harness into the engine compartment;
- We determine the location of the relay installation;
Advice! If the kit does not include a relay, then purchase one from Gazelle 3302 - this relay is responsible for the operation of the rear foglights.
- We connect the wires to the relay from the headlights;
- We start the wires from the relay through the technological hole into the passenger compartment;
- We determine the installation location of the power button;
- We install it and connect it to the standard Gazelle wiring diagram.
Let's figure out how to connect the wires to the relay. The fact is that the relay itself is required to protect the power button, since it is not designed for the current that powerful fog lights consume.
Having assembled the entire circuit together, check that the wires are connected correctly to the relay installed under the hood:
- Contact 86 – relay coil circuit;
- Contact 87 – to “plus” via a button;
- Pin 30 – to “plus” through a fuse;
- Contact 85 – ground (“minus”).
Types of fog lights
Based on their shape, Gazelle fog lights are divided into rectangular, square and oval, but the shape of the body does not play a special role and does not give any special advantages to one over the other.
“Fog lights” may differ in optical designs. Thanks to the use of different options, the issue of the optimal ratio of the maximum luminous flux and the minimum power consumed to provide it is resolved to varying degrees.
The most widely used headlights are those with a parabolic reflector. With this scheme, the installation location of the light bulb is aligned with the focal point, which allows the luminous flux to be formed in the form of a horizontal strip. A special screen limits its upward spread. The headlight efficiency is 27%.
Fog lights with a free-form reflector have higher efficiency (up to 45%). The design allows the use of a significant amount of light, providing a maximum area of its distribution. However, headlights with this optical design are expensive and have not yet become widespread.