The problem with standard Niva wheel bearings (VAZ 2121, 2131) is that they need to be constantly adjusted during vehicle operation. If this is not done in time, they will fail, creating a howl or hum when moving. You can save yourself from such problems by installing non-adjustable hubs or double-row bearings.
Car "Niva"
“Niva” is perhaps one of the most popular SUVs, not only in Russia, but also abroad. Since the late seventies, this car began to be produced. The very first model was named VAZ-2121.
It was almost impossible for an ordinary resident of the Soviet Union to get this car: almost eighty percent went for export, and the remaining twenty were released one by one. At the price at that time, this model was second only to the Volga, that is, the car that was used by the state apparatus as the main car. In the West, there were real legends about the new SUV - it was valued even where there was its own auto industry (for example, France, Germany or England).
In the mid-eighties, Niva cars with Soviet racers inside took all three prizes at the Australian rally raid. Sales of the car soared: in Australia itself - twofold, in Europe - fourfold or more, depending on the country.
Indeed, this was a new word in the annals of the development of light SUVs, and it was written precisely by Soviet designers.
Essential tool for DIY repairs
Replacing a Niva Chevrolet axle bearing does not always go smoothly, so you should make sure you have a special tool in advance.
We will need:
- a set of keys and screwdrivers;
- Bulgarian;
- reverse hammer or inertial puller;
- metalworking tools – hammer, chisel, file;
- gas burner or blowtorch;
- pipe with a diameter of 40 mm and about a meter long, wall thickness 3-4 mm;
- lubricant like litol24 or analogues.
Connoisseurs of tuned cars are often able to make radical changes to their cars. And few restrictions exist for them. Owners of Niva Chevrolet are no exception. Tuning fans also took a look at the design of the front hub assembly. Often on online forums in discussions you can find advice (and even corresponding training videos) about replacing the bearing using a hub mechanism that has a steering knuckle from a VAZ 2121 car, since it is believed that this design is better in terms of reliability.
However, this is a misconception. Yes, tightening will occur without any difficulties, but this will make it impossible to adjust the camber of the front wheel of the car. The fact is that each fist has distinct differences in size and axial angles. But much more stupid are the tips that require turning the hub and shaft on a lathe.
Repairs such as replacing a wheel bearing in a field can be done independently without much difficulty. Wheel bearings on the VAZ 2121 and Chevrolet Niva have a very short resource due to the suspension design, compared to other all-wheel drive vehicles, therefore, these parts need to be given increased attention in order to identify the fault in time.
Replacing a wheel bearing in the field does not involve anything complicated if you follow the instructions strictly. Anyone, even a novice car owner, can cope with such repairs. Not all vases have wheel bearings changed the same way. The design of the Niva car hub differs from the design of other VAZ models, so the process of replacing the bearing will also have its differences.
Symptoms and identification of a worn wheel bearing
When the life of the hub bearing is running out, a hum is clearly audible when driving, this is the main sign. If you listen, you can understand which direction this hum is coming from. When driving at low speeds, it is not too noticeable, and it can easily be confused with noise from rubber, but as speed increases, the hum increases, which is reminiscent of flying in an airplane. You can’t drive with a humming bearing, because soon it may simply break into pieces, and this implies a lot of other problems.
If there is an assumption that the bearing has exhausted its service life, then you can check this with the car parked. To do this, you need to jack up the wheel whose bearing is suspected and pull the wheel vertically with your hands. If there is play, then the bearing is most likely to blame.
Necessary tools for work
- Jack and supports. To replace the front bearing, you need to lift both wheels, otherwise the stabilizer will interfere, pinching the suspension elements;
- Wrench for unscrewing wheel nuts;
- Flathead screwdriver. To remove the protective cap;
- Head 27;
- Locksmith's beard. To straighten the collar of the hub nut;
- Hammer;
- Wrenches for 10, 17, 19 and 22;
- Chisel and wooden spacer. To avoid damaging other parts when knocking out;
- Vise;
- A piece of pipe for pressing in bearing retaining rings.
Bearing replacement process
- Loosen the nuts on the wheel where replacement is planned and jack up both wheels of the axle. Remove the desired wheel;
- We dismantle the caliper and guide. To avoid damaging the brake hose, we tie the caliper to the upper arm with wire;
- Having removed the protective cap, use a 27mm head to unscrew the hub bearing nut and remove the conical bushing;
- Using a chisel, unbend the locking plate of the front and rear lever mounting nuts. Using a 19mm wrench, unscrew the front and rear nuts securing the lever. After this, remove the locking plate;
- When the lever is released, it must be moved away from the steering knuckle, freeing the brake hose;
- Disconnect the ball joints (upper and lower) from the lever;
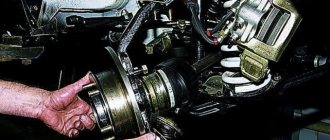
- Now you can remove the entire steering knuckle assembly, along with the ball joints and the brake disc, by removing it from the CV joint splines;
- Separate the steering knuckle from the hub with the brake disc. If the parts do not separate freely, then we clamp the fist in a vice and, using a soft metal drift or chisel, through a spacer from wood, knock out the hub with the brake disc;
- Next, pull out the bolts securing the lever and knock down the protective ring with a chisel;
- Using a 10mm wrench, unscrew the bolt that secures the casing and remove the casing itself;
- We hold the fist in a vice and, using a flat-head screwdriver, pry up and remove the wheel bearing seal. There is a metal ring behind the oil seal, we also remove it;
- The next step is to remove the inner ring of the outer bearing assembly from the well. Next, we also remove the oil seal, metal ring and inner bearing ring assembly;
- Using a punch and a hammer, we knock out the metal rings of the outer and inner bearings. At this point, dismantling is considered complete.
After cleaning the well from old grease, you can proceed to installing a new bearing. Replacing a wheel bearing in a field occurs in the reverse order; it is only important not to forget to fill it with fresh Litol 24 grease and, after installing the steering knuckle on the car, adjust the clearance in the bearings.
Thematic materials:
What happens if you pour gasoline into a diesel engine? Car engine cooling system What malfunctions prohibit the use of a car Orion on-board computers Pressure reduction valves, selection and operation issues Installation of additional headlights Reviews: Chrysler engine on a Gazelle Electronic speedometers for a car
103583
If you notice an error, select a piece of text and press Ctrl Enter
First changes and Lada 4x4
Since the mid-nineties, or more precisely since 1995, changes began to be made to the design of the car. Firstly, if previously the car had a 1.6-liter 4-cylinder 73-horsepower gasoline engine, now the volume has been increased to 1.7. The manual transmission now had five steps instead of the previous four. Secondly, they changed the dashboard, installed more comfortable seats in the cabin, and replaced the taillights with more modern ones in order to externally try to get closer to the Western automobile industry.
In 2006, “Niva” was officially renamed “Lada” 4x4, and models exported were called “Lada Taiga” 4x4 - this is what the car is now called in European countries. Externally and internally, the car has changed, if at all, only slightly: new mirrors have appeared - larger ones, the indicators and instruments on the panel have been changed. The new car model released in 2015 called “Lada 4x4 Urban”, which is considered “luxury”, did not receive any major changes - except for new bumpers, electric windows and air conditioning in the cabin.
"Niva Chevrolet": creation and reviews
In general, AvtoVAZ tried to come up with a car to replace the Niva back in the late eighties. It was quite logical that the glory of a new SUV at that time would not last long, and in order not to “lose face,” a replacement was necessary. But at first the project remained only in paper form.
In 1998, a sample of the VAZ-2123 was presented, which was considered “the same replacement.” But until 2002, mass production was not established.
In 2002, the license for this model, and at the same time the Niva brand, were sold to the General Motors concern. The technicians of this company made about a thousand different changes to the appearance and “filling” of the SUV, which allowed the new car to be considered an independent and independent model from now on. In September 2002, a conveyor was launched, from which the Chevrolet Niva began to roll off.
In 2009, the car's design underwent changes.
According to the reviews of those who purchased this car, it was still the same AvtoVAZ, and even attempts to intervene and bring about changes for the better in terms of electronics and design did not bring good results. But, as noted by car owners, this did not affect the off-road qualities - the Niva is still passable in impassable conditions.
Which ones are better to choose for Chevy Niva?
Front-wheel drive parts for Shnivy are produced by dozens of companies. Products differ in prices, quality, permissible loads and service life. The standard configuration of the SUV includes adjustable hub units, the tightening torque of which must be controlled after 2-3 thousand kilometers. For those who value reliability and are not ready for regular maintenance, manufacturers have introduced non-adjustable (maintenance-free) wheel hubs. They differ in the following indicators:
- The possibility of wear of the bearing seat in the steering knuckle is eliminated.
- The unit does not require lubrication or adjustment during its entire service life.
- The non-removable design of the bearings prevents them from turning.
- Increased service life of the unit.
- Reduced friction due to the use of ball bearings.
The non-adjustable hub has a reinforced cross-section, which prevents its deformation under the influence of shock loads. This is very important when regularly driving off-road or on broken asphalt roads.
Parts with catalog numbers 2123-3103014 and 21230-3103014 are produced by the following companies: IVECO, SKF, Leader, GM-Avtovaz, VolgaAvtoProm and other companies. The cost of the part depends on the manufacturer and design (adjustable and non-adjustable). The price of the products is 1000-6000 rubles. You can also find more expensive units that include brake discs.
The maximum mileage of unregulated IVECO hubs is 100-120 thousand kilometers. Adjustable ones last less and their durability depends on the frequency, correct maintenance, quality of lubricant and manufacturer.
Also interesting: Lada 4×4 and Chevrolet Niva: how are they similar and how are they different? — KOLESA.ru – automobile magazine
What is a hub
The front hub is the part of the suspension that holds the car's wheels. Bearings are installed inside this part to ensure the car runs smoothly. The strength of the hub itself, and therefore the reliability of the wheel fastening, depends on the diameter of the so-called hub disk. Typically, manufacturers make the size of such a disk slightly larger than the diameter of the installation hole, so that distortion does not occur.
The pads and flanges of the axle shafts are attached to the front hub. This allows you to securely fasten the wheel rim and ensure smooth rotation of the wheel. All parts of this design are made from cast iron or other alloys on machine tools. The front hubs are attached to the car using parts such as bearings. Like any part, they wear out, which leads to breakdowns. Having tried to fundamentally solve this problem, manufacturers of various brands of cars are installing non-adjustable wheel bearings. "Niva Chevrolet" is one of these brands. Now let's take a closer look.
Pressing out and dismantling old bearings
The removed assembly and steering knuckle do not require further disassembly. The only thing you need to do is remove the old oil seal using a regular flathead screwdriver, holding the hub assembly in a vice. It is not recommended to use them in the future; new ones are installed, just like the bearing.
Inside the fist, there are two tapered angular contact roller bearings. They are installed at random and form a hub unit.
- To begin dismantling, it is enough to separate the brake disc mounts from the wheel turning mechanism.
- Don't forget to remove the seals.
- The small race of the inner bearing can be removed without any problems by hand.
- Next, at the same time, using the adapter, you need to knock out the outer roller bearing race from the pipe, as shown in the photo below.
- After separation, one ring with a separator remains on the hub, and the second remains inside the knuckle. The old clip is pulled off with a special puller equipped with grips.
- The second part of the part is knocked out of the trunnion through a spacer made of soft metal in the form of a rod or carefully with a screwdriver.
- The attachment is placed against the clip and light blows are applied, moving it in a circle.
- After this, the old grease should be carefully removed from the cavity.
Non-adjustable hubs for Niva
Every car has weaknesses. In this case, these are the front hubs, which previously required periodic adjustment for normal operation, which, of course, could not but affect the reviews of car owners. That is why the designers created a non-adjustable hub for the Chevrolet Niva in order to avoid unnecessary fuss in terms of repairing the car.
In general, independent adjustment of bearings is almost impossible, due to the very complex design. Also, do not tighten the bearings all the way. And, besides this, there is a whole bunch of difficulties that are difficult to solve without the intervention of experts. It was precisely in order to make life easier for motorists that non-adjustable hubs were installed on the Niva. Reviews from those who purchased a car already with this innovation can be summarized into a specific list:
- there is no need to engage in constant minor repairs and maintenance of this part, be it lubrication or adjustment;
- the bearing will not turn on the hub;
- there is no need to constantly lubricate the hub, and even suffer, choosing a better quality lubricant;
- no friction occurs;
- there will be no need to replace the bearing.
There are a whole bunch of advantages if your car has this mechanism. But now the Niva is producing a reinforced non-adjustable hub. But if the car owner is confident in his abilities, then everything can be done with his own hands.
We identify a malfunction on the VAZ 2123
Every driver must understand that a completely destroyed unit will lead to disconnection of the hub. If this happens at speed, the consequences can be disastrous. That is why it is important to recognize the first signs of a malfunction and carry out repair work in a timely manner.
Also interesting: ☰ The operating principle of the power steering pump
The bearing life can be about hundreds of thousands of kilometers, since all elements are made of durable hardened steel. However, in practice, the node fails much earlier. There are several main causes of failure.
- The manufacturer supplies non-adjustable bearings with a sufficient amount of lubricant, which cannot be said about adjustable ones. It is the lack of lubrication that can cause the unit to quickly fail.
- The oil seal, on the one hand, retains the lubricant, and on the other hand, prevents the penetration of foreign bodies into the separator. Even a small grain of sand can lead to accelerated wear of moving parts.
- The presence of lubricant does not guarantee long-term operation, since everything depends on its quality.
- Prolonged absence of work to adjust the gap will lead to increasing play and subsequent wear.
- Features of the operation of the Chevrolet Niva imply disabling the differential lock when driving at high speed. If you do not follow this recommendation, the bearings will fail.
The first sign of a malfunction is extraneous noise when the car is moving. Over time, it intensifies, but it is difficult to guess from which side the bearing comes under suspicion. On a free and fairly wide road, you will have to make maneuvers by slightly turning the steering wheel left and right. If the sound gets louder when you turn right, the first thing you should do is check the left unit and vice versa. Finally, you can verify the malfunction by hanging the wheel. It is rocked in a plane perpendicular to the axis, checking for play.
You should also determine if there is any grinding, crunching or noise when the wheel rotates. These symptoms indicate the need to replace the bearing.
As garage mechanics say, “The knock will always come out.” You should not wait for this, otherwise you will have to call a tow truck or repair the unit in the field. In fact, it is easy to diagnose the problem yourself. The first sign of bearing failure is increased noise, unpleasant metallic sounds from the hub, and increased heating of the metal at the place where it is installed.
The following steps will help you accurately determine the source of the noise:
- hang out the rear wheel by jacking up the car;
- We begin to turn the wheel with our hands (the gearbox is in the neutral position) - extraneous noise is unacceptable, rotation should be easy without biting;
- pull the wheel towards you, play in the axial direction of more than 1 mm indicates wear of the bearing race and its imminent failure;
- An oil leak from under the rubber seal of the axle shaft also serves as a basis for removing and disassembling the unit with subsequent troubleshooting.
You should not delay repairs if at least one of these signs appears. The savings in this case are questionable, and a bearing that fails in motion can result in expensive repairs with the replacement of the entire axle shaft assembly.
Non-adjustable hubs for Niva: homemade
Externally, the difference looks like this:
This is if everything is turned on a machine, with the help of craftsmen. This “thickening” is more reliable.
The article provides drawings according to which you can make non-adjustable hubs for the Niva with your own hands.
To do this, you need such things as a double-row bearing from the Moskvich 2141 car and retaining rings (two pieces) from the same car.
We take the drawings and go with them to the craftsmen, whose task is to bore the hub to fit new bearings, grind the steering knuckles and make all the parts according to these diagrams.
After making all the parts, you need to press in the double-row bearing and assemble everything in the reverse order.
The hub nut is tightened as much as possible, because there will be no need to adjust it - you have a non-adjustable front hub (Niva) ready.
If you strictly follow all the recommendations, then your Niva will run, no longer requiring you to “climb in and move it.”
And the final diagram is an illustration of the final assembly of the non-adjustable hub.
Design Features
The product is a complex-shaped part that rotates on a pair of tapered roller bearings. Their outer diameter is pressed into the steering knuckle. The standard equipment of the Chevrolet Niva includes adjustable hubs. In it, the bearing clearance depends on the position of the adjusting nut.
The latter is equipped with a fixation belt that prevents spontaneous loosening or tightening of the threaded connection. This mechanism requires adjustment during maintenance. An incorrectly adjusted unit wears out quickly:
- Excessive tightening torque makes it difficult for the wheel to rotate, leading to overheating and destruction of the bearings.
- A loose nut causes play and knocking noise in the bearings. Impact loads accelerate wear of the roller metal.
The drive axle shaft transmits torque to the hub due to the presence of splines on the inside of the central hole.
There are 22 of them in the standard design, and 24 in the reinforced design. The second, more durable type of design is equipped with double-row bearings from IVECO trucks. Reinforced hubs are used on VAZ 2121, 2123, 2131, 21213 and 21214.
Some owners re-equip their cars by equipping them with hub units themselves. This avoids damage in the form of broken splines. However, this modification is fraught with drawbacks. The strength of the standard hub is lower than that of the transfer mechanism parts. Therefore, it serves as a kind of “fuse” against overload.
The mounting design for the rear wheels of the Chevrolet Niva is radically different from the front. No hubs are used here. The wheel is attached to the flange of the axle shaft, which rotates in a special bearing.
Torque is transmitted from the rear axle gearbox to the wheels through a spline connection. However, in this case, the splines are cut not in the hub, but in the gears of the gearbox.
The hub on a car is the element that connects the wheel and the drive shaft. It has two bearings, which reduce the friction force when rotating on the shaft.
Diagram of hub assembly.
This gap may increase over time and due to wear and tear of parts. In this case, the wheels begin to vibrate on the axles, which is the cause of premature tire wear. To correct the situation, the wheel bearings should be changed in a timely manner.
Hub assembly on steering knuckle
And if you buy
Of course, you don’t have to worry, don’t look for parts from Moskvich, but just go to the store and buy what you need to install non-adjustable hubs on the Niva.
This hub assembly, if purchased, should consist of knuckles with pressed bearings, hubs and anthers - there should be two of each item. You need to know how many splines the hub on your car has, so that you don’t make a mistake when buying new ones. Specifically for the Niva, there are kits that come with twenty-two and twenty-four splines.
It is best, of course, to install non-adjustable hubs on the Niva at any service center. But if you have enough knowledge and experience, the driver can handle it himself. It is advisable to use new nuts and studs when installing new parts. And also - lubricate all elements of the mechanism to prevent them from souring. Before you install the caliper, it is better to clean it, because it affects the movement of your car's pads.
What may put you off from this option is the price. For a hub assembly, it is very high, even in car markets, where prices are always slightly lower than in stores, for example, in AvtoVAZ stores, where they also have parts for the Niva Chevrolet car. A non-adjustable front hub costs about three thousand rubles and more.
Installation
When the turning work is completed, we begin assembling the unit. Everything is simpler here - no adjustment is required, and the locknut is tightened “from the heart.” There is no need to worry about over-tightening the hub; it is almost impossible.
During installation, installing an oil seal is not necessary, because the Iveco bearing is a closed type, dust and dirt do not penetrate there. However, to increase the service life of the unit, it is recommended to install at least the cheapest oil seals.
We carry out similar work on the opposite side of the car. After the installation is completed, we go and enjoy - now replacement may be required no earlier than after 100 thousand kilometers, and maybe later. The manufacturer provides the same warranty provided that the installation was carried out correctly.
And finally, if you contact a turner, do not forget to take the drawings with you. They are presented below:
Source
As a result
The non-adjustable hub on the Chevrolet Niva is a very important detail. It makes car trips more comfortable. Nevertheless, the hub unit, which is factory-installed, especially from older models, is not to the liking of many who own a Chevrolet Niva car. A non-adjustable hub means the absence of unnecessary noise, hum and the ability to concentrate all your attention on the road.
Replacing standard front hub tapered bearings
Many owners of the domestic Chevrolet Niva SUV know that the front hub requires special attention. There are two tapered bearings on it, which are tightened with a certain torque. If all work is carried out according to the instructions, you will need a micrometer to control the runout of the brake disc and a torque wrench.
In addition, the unit should be checked every 5 thousand km, and if you constantly drive on uneven roads, diagnostics are carried out more often. There are often situations when the hub is overtightened during repairs, which can also cause premature wear.
Today, many owners of domestic SUVs agree to a small modification - the installation of bearings produced for Iveco cars. They win in many respects and have a longer service life.
This is interesting
And as a conclusion, here are some interesting facts about Niva:
- in 1998, this car climbed under its own power to the base camp at the foot of Everest - which is 5200 meters above sea level; in 1999 - on a plateau in the Himalayas, to an altitude of 5726. This is a record to this day.
- “Niva” even visited the North Pole, as part of the world “Day of Parachutists” - the car was dropped by parachute, and after a successful landing the car started up and drove off. This happened in April 1998.
At the Russian polar station "Bellingshausen" this brand of car worked without sparing its horsepower for twelve years.
Adjusting the wheel bearing
To work, you will need an indicator and a torque wrench.
To prepare for adjusting the wheel bearing, you must perform the following operations:
- Secure the indicator by resting its leg on the hub near the adjusting nut.
- Place spanners on the studs and secure them with nuts.
- Rotate the hub and move it axially. (Screwed spanners are used as handles).
- Measure the amount of axial movement (clearance) of the hub, guided by the indicator readings.
- If the stroke exceeds 0.15 mm, adjust the play.
The adjustment is carried out as follows:
- Straighten the collar of the nut.
- Unscrew it with a spanner.
- Install a new nut and tighten with a force of 2 kgf*m.
Important: when tightening, it is necessary to rotate the hub in different directions.
- Loosen the nut and tighten again with a torque of 0.7 kgf*m.
- Loosen the tension by turning the key 20-25 degrees counterclockwise.
- Check hub play.
- Make sure that the indicator readings correspond to the norm (0.02-0.08 mm).
- Lock the nut by pressing its edge into the groove of the outer CV joint.