What does the Check Engine light mean?
When the Check Engine light, located on the dashboard, comes on, it means that the electronic control unit (ECU) has detected a problem with one of the vehicle's systems.
Reference. The light comes on when the engine starts and then goes off. It is at this time that the ECU tests the main systems of the car, and if it finds no problems, it turns off the emergency indicator.
If the ECU detects a malfunction, it records it in the internal memory in the form of a special error code and informs the driver with a lit “check”. In some cases, the indicator may be constantly on, in others it may go out and then light up again - it all depends on the specific type of malfunction.
A light coming on does not mean that you should necessarily stop the car and turn off the engine. Check Engine can be triggered in different cases, so you need to react to it differently :
- Problems with the Check Engine light coming on can be caused by objective reasons. For example, it is triggered by the installation of a new alarm system or an almost discharged battery. In this case, you can ignore the error.
- If the check light is on on the Chevrolet Niva, but the engine is running normally, you can continue driving. Such a malfunction, as a rule, is not critical. However, subsequently you need to diagnose the error using a scanner or computer and troubleshoot the problem.
- If the warning light goes off simultaneously with a sharp change in the behavior of the Niva, it is recommended to immediately stop the car and turn off the engine. A sharp drop in power, tripping, the appearance of strong detonations at idle, floating speed while driving may indicate a serious engine malfunction. It is dangerous to continue driving in such a situation.
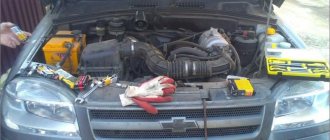
Battery disconnect method
Disconnecting the battery is an old way to reset the check engine light. Here are three steps to clear the check using this method: Step 1: Disconnect the cables from the battery. At this point, you should use a wrench to unscrew the positive and negative cables.
And also interesting: What will the new Niva 2024 be like, new details » Lada.Online - all the most interesting and useful about LADA cars
Step 2: Discharge the remaining electricity. The next thing you should do is press and hold the car horn for about 30 seconds. This action will help drain the car battery.
Step 3: Wait and reconnect the battery. After disconnecting the battery cables and draining the remaining electricity, all you have to do is wait about 15 minutes and then plug the battery back in. Error codes will be cleared. (Note: This method may not work on some vehicles.) If after this procedure the “check” lights up again, this may mean that the problem is still much more serious.
Why did the light come on and how to fix it
There are many reasons for the Check Engine light to come on . The most common reasons for a light bulb to go off include the following problems.
Refueling with low-quality fuel
Most often, the indicator light comes on after filling the gas tank with low-quality gasoline . In this case, you can correct the situation by adding high-quality fuel to the tank. You can also completely drain the gasoline, clean the fuel system, and then refuel with high-quality fuel at a reliable gas station.
Refueling with 92 gasoline
The recommended gasoline for the Chevrolet Niva engine has an octane number of 95 , but the Chevy Niva engine is capable of “digesting” 92-octane gasoline. In this case, the Check Engine warning light may be triggered, since due to insufficient octane number of gasoline, the level of fuel detonation in the engine cylinders increases. Switching to 95 gasoline helps solve the problem.
Low battery
The light may light up if the on-board network voltage is low , that is, the battery is almost discharged. If the car engine starts, then the activation of the indicator does not have any negative consequences. You just need to charge the battery, after which the problem will disappear.
Insufficient engine oil level
Lack of oil causes engine oil starvation . The low level should also be indicated by the oil pressure warning light located on the instrument panel. But sometimes it doesn’t work, and the problem only manifests itself in the Check Engine light coming on. You need to check the oil level, and it is also worth inspecting the engine compartment for leaks. If the level is insufficient, add engine oil to the filler neck.
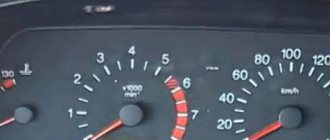
Engine overheating
It may be due to a malfunction of the radiator cooling fan, a coolant leak, or other reasons. This malfunction is easily diagnosed, since the engine temperature is displayed on the Chevy Niva dashboard. To solve the problem, you need to stop and let the engine cool. Then you should diagnose and eliminate the malfunction that caused the light bulb to blink.
Contamination of fuel injectors with tar deposits
For this reason, the pressure in the fuel line decreases . It manifests itself in complications when starting the engine, increased fuel consumption, failures during acceleration, and unstable operation of the engine at idle due to misfires in the engine cylinders. To correct the situation, you need to clean the fuel injectors.
Decoding Chevrolet Niva (LADA) error codes
- 01 April 2021 Lada.Online 9 139
- The Check Engine light is constantly on - in this case, the driver is obliged to make the vehicle available to service technicians as soon as possible.
- A flashing Check Engine Light indicates a problem that can cause serious damage to the ECM (for example, a misfire can damage the catalytic converter).
- the engine is idling;
- fuel supply control is carried out in feedback mode based on the signal from the control oxygen sensor (B_LR = “Yes”);
- the fuel supply adaptation function is activated (B_LRA = “Yes”);
- the value of the RKAT parameter is outside the lower limit of the acceptable range (-8%).
The fault indicator (Check Engine) on Chevrolet Niva cars is located in the instrument cluster. When the warning light turns on, it signals to the driver that the on-board diagnostic system has detected a malfunction of the ECM and the vehicle continues to move in emergency mode. To determine the cause, you should use a diagnostic tool, with which you can read error codes and decipher them according to the table below.
Check Engine
When the ignition is turned on, the indicator should light up, so the ECM checks the serviceability of the lamp and control circuit. After starting the engine, the indicator should go out if the controller memory does not contain the conditions for turning it on.
If:
To protect against random, short-term errors that may be caused by loss of contact in electrical connectors or unstable engine operation, the warning light turns on after a certain period of time after detecting a malfunction in the ECM. During this period, the on-board diagnostic system checks for a malfunction.
After eliminating the causes of the malfunction, the alarm will turn off after a certain delay time, during which the malfunction does not appear, and provided that there are no other fault codes in the controller’s memory that require turning on the alarm.
When clearing (deleting) fault codes from the controller’s memory using diagnostic equipment, the indicator goes off.
Self-diagnosis
To carry out repair and maintenance work on the vehicle's engine management system, a diagnostic tool should be used. In service centers this can be DST 2M (DST-10, DST-12), for self-diagnosis an OBD-II scanner ELM327 (price about 200 rubles, see the AliExpress catalog) and a smartphone with installed software (for example, OpenDiag) are suitable. or an on-board computer installed in the car.
Error code
Description
| P0030 | Oxygen sensor heater before the converter, control circuit open |
| P0031 | Oxygen sensor heater before converter, control circuit short to ground |
| P0032 | Heater of the oxygen sensor to the converter, short circuit of the control circuit to the board, network |
| P0036 | Oxygen sensor heater after the converter, control circuit open |
| P0037 | Oxygen sensor heater after converter, control circuit short to ground |
| P0038 | Heater of the oxygen sensor after the converter, short circuit of the control circuit to the board, network |
| P0102 | Mass Air Flow Sensor Circuit Low Signal |
| P0103 | Mass Air Flow Sensor Circuit High Signal |
| P0112 | Intake Air Temperature Sensor Circuit Low Signal |
| P0113 | Intake Air Temperature Sensor Circuit High Signal |
| P0116 | Coolant temperature sensor circuit, signal out of range |
| P0117 | Coolant Temperature Sensor Circuit Low Signal |
| P0118 | Coolant Temperature Sensor Circuit High |
| P0122 | Throttle Position Sensor Circuit Low Signal |
| P0123 | Throttle Position Sensor Circuit High |
| P0130 | The oxygen sensor before the converter is faulty |
| P0131 | Oxygen sensor circuit to converter, low output level |
| P0132 | Oxygen sensor circuit to converter, high output level |
| P0133 | Oxygen sensor circuit to the converter, slow response to changes in mixture composition |
| P0134 | The oxygen sensor circuit to the converter is inactive |
| P0135 | Oxygen sensor to converter, heater faulty |
| P0136 | The oxygen sensor after the converter is faulty |
| P0137 | Oxygen sensor circuit after the converter, low signal level |
| P0138 | Oxygen sensor circuit after the converter, high signal level |
| P0139 | Oxygen sensor circuit after the converter, slow response to changes in mixture composition |
| P0140 | The oxygen sensor circuit after the converter is inactive |
| P0141 | Oxygen sensor after converter, heater faulty |
| P0171 | Fuel system too lean |
| P0172 | Fuel system too rich |
| P0201, P0202, P0203, P0204 | Cylinder 1 injector (2,3,4), control circuit open |
| P0261, P0264, P0267, P0270 | Cylinder 1 injector (2,3,4), control circuit short to ground |
| P0262, P0265, P0268, P0271 | Cylinder 1 injector (2,3,4), control circuit shorted to on-board network |
| P0300 | Random/multiple misfires detected |
| P0301, P0302, P0303, P0304 | Cylinder 1 (2,3,4), misfire detected |
| P0327 | Knock Sensor Circuit Low Signal |
| P0328 | Knock Sensor Circuit High Signal |
| P0335 | Crankshaft position sensor circuit is faulty |
| P0336 | Crankshaft position sensor circuit, signal out of range |
| P0337 | Crankshaft Position Sensor Low Signal |
| P0338 | Crankshaft Position Sensor High Signal |
| P0339 | Crankshaft position sensor, no signal |
| P0340 | Camshaft position sensor is faulty |
| P0341 | Camshaft position sensor, signal out of acceptable range |
| P0342 | Camshaft Position Sensor Circuit Low Signal |
| P0343 | Camshaft Position Sensor Circuit High Signal |
| P0422 | Neutralizer efficiency below threshold |
| P0441 |
|
| P0444 | Canister purge valve, control circuit open |
| P0458 | Canister purge valve, control circuit short to ground |
| P0459 | Canister purge valve, control circuit shorted to on-board network |
| P0480 | Fan relay 1, control circuit open |
| P0481 | Fan Relay 2, Control Circuit Open |
| P0500 | Vehicle speed sensor is faulty |
| P0506 | Idle system, low engine speed |
| P0507 | Idle system, high engine speed |
| P0508 | Idle speed control, control circuit short to ground |
| P0509 | Idle air control control circuit faulty |
| P0532 | Air conditioning pressure sensor, low signal |
| P0533 | Air conditioning pressure sensor, high signal level |
| P0560 | On-board network voltage is below the system operability threshold |
| P0562 | On-board voltage, low level |
| P0563 | On-board voltage, high level |
| P0601 | CUD controller, ROM checksum error |
| P0615 | Additional starter relay, control circuit open |
| P0616 | Additional starter relay, control circuit short to ground |
| P0617 | Additional starter relay, control circuit closed to on-board network |
| P0627 | Fuel pump relay, control circuit open |
| P0628 | Fuel pump relay, control circuit short to ground |
| P0629 | Fuel pump relay, control circuit shorted to on-board network |
| P0645 | A/C compressor clutch relay, control circuit open |
| P0646 | A/C compressor clutch relay, control circuit short to ground |
| P0647 | Air conditioning compressor clutch relay, control circuit shorted to on-board network |
| P0691 | Fan Relay 1 Control Circuit Short to Ground |
| P0692 | Fan relay 1, control circuit shorted to on-board power supply |
| P0693 | Fan Relay 2 Control Circuit Short to Ground |
| P0694 | Fan relay 2, control circuit shorted to on-board power supply |
| P1386 | SUD controller, detonation detection channel error |
| P1570 | Immobilizer, circuit faulty |
| P1602 | Court controller, power supply loss |
| P1640 | COURT controller, EEPROM memory read-write error |
| P2187 | Fuel system lean at idle |
| P2188 | Fuel system rich at idle |
| P2195 | Oxygen sensor to the converter, stuck in a lean mixture |
| P2196 | Oxygen sensor to the converter, stuck in a rich mixture |
| P2270 | Oxygen sensor after the converter, stuck in a lean mixture |
| P2271 | Oxygen sensor after the converter, stuck in a rich mixture |
Error P2188
P2188 (Fuel system rich at idle) is one of the most common errors on the Chevrolet Niva.
Code P2188 is entered if:
The Check Engine light comes on after 2 drive cycles in which the check was unsuccessful.
Use the following flowchart to determine the cause of the problem:
After repair, start the engine, reset the codes and make sure there is no malfunction.
Resetting or Resetting the Check Engine Light
The indicator indicates that the ECU has detected an error and written its code to the internal memory . Therefore, even after the fault has been eliminated, the indicator remains on, since the error was not diagnosed and reset.
The easiest way to reset the error is to disconnect the battery terminal , thereby de-energizing the on-board network. In this case, the light will go out.
For this it is necessary:
- turn off the engine;
- open the hood;
- disconnect the positive terminal of the battery;
- wait a couple of minutes and then reconnect the terminal.
This method will not solve the problem that caused the indicator to light up . If the problem is not resolved, then there is a high probability that after some time the lamp will light up again. Therefore, it is better to diagnose the error code using a scanner and software installed on a computer, laptop or regular smartphone. This can be done at any service station; the procedure will cost from 500 to 1000 rubles. But you can do it on your own.
The Chevrolet Niva, like other modern cars, is equipped with an OBD2 diagnostic connector (16 pin). The connector is located next to the ignition switch and is partially covered by the steering column cover. By connecting a diagnostic scanner connected to a laptop or mobile phone to the connector, you can read all the errors recorded by the electronic control unit.
Important! After the error is read and decrypted, the control indicator should go out.
Self-diagnosis
If it is not possible to check with a special device, then this can be done using self-diagnosis, which will help to quickly identify all problems associated with the operation of the car. To do this, press the odometer button and turn on the ignition. The speedometer needle will begin to rise to the top; by pressing again, information about the firmware will appear on the screen, and by pressing again, all existing errors will appear.
Let's take a closer look at the Chevrolet Niva error codes with decoding:
During self-diagnosis, error 8 and error 14 often appear, the first informs about problems in the brake system, and the second is related to fuel consumption, quite often this is a system glitch, but in any case you need to replace the sensor responsible for these mechanisms, or reset the memory by resetting the battery terminals.
As practice shows, knowing how to perform an independent check is very useful, since this knowledge helps to quickly identify a malfunction and eliminate it in a timely manner.
If the check engine light comes on: 5 most common reasons for the “Check engine” light to turn on
Many of us have probably encountered such a problem as turning on the engine icon (“Check engine”), the appearance of which on the car dashboard scares drivers. Today we invite you to familiarize yourself with the 5 (five) most common reasons why the check engine light comes on on the dashboard.
The appearance of the engine indicator icon on the dashboard usually occurs without warning. The reason for the appearance of this “Check Engine” cannot be immediately understood. Even if the car has auto diagnostics (for example, in cars such as BMW, Audi, Porshe, Mercedes-Benz, VW), which scans all car systems for errors and their presence, displaying decryption information on the instrument panel, such reasons for the appearance The engine checks will not be deciphered.
For most drivers, the appearance of this warning icon on the instrument panel means the need to urgently go to a car repair shop for diagnosis and to eliminate the reason why the “Check Engine” warning icon appeared. But in fact, in most cases, when the “Check” indication appears, you can independently diagnose the cause of the engine failure, and in some cases it is even possible to eliminate this cause yourself without a trip to a car service center, which will certainly save you money.
Diagnostics of Niva Chevrolet
The Chevrolet Niva diagnostic connector helps you obtain information about how most units work, into which special equipment is connected via Bluetooth or a cable. Therefore, if you want to conduct independent diagnostics, it is important to know where it is.
The connector in the Niva is located under the steering wheel on the right side, and the pinout itself is under the dashboard on the driver’s side. To check the on-board computer, you need to use special equipment that transmits all the necessary information to the laptop. Data transfer is carried out using a COM port into which a K-LINE type connector is installed.
When connecting, errors may appear on the laptop screen. At this moment, there is no need to worry, since the appearance of such messages may be due to a lack of communication with the device itself. You should also check whether the standard anti-theft system is installed; if so, check the adapter itself. If there is a standard location, then it is connected to the diagnostic line between the ECU and the immobilizer. And if it is missing, a plug is installed in its place. To restore communication between the contacts, a jumper is installed, as shown in the picture below:
Depending on the year of manufacture of the model, the connectors may differ from each other.
Replace the oxygen sensor (lambda probe)
The oxygen sensor in your car is part of the exhaust system that monitors how much oxygen is not burned in the engine combustion chamber. This sensor helps control the vehicle's fuel consumption. A malfunction of the oxygen sensor (lambda probe) means that the car computer does not receive the correct data and can significantly increase fuel consumption, and at the same time reduce engine power. Most cars have 2 to 4 oxygen sensors. If you have a home car error scanner, then by connecting it to the car you can easily find out which sensor needs to be replaced.
For what reason does the oxygen sensor in a car become unusable: - Over time, the sensor becomes covered with a layer of used and regular motor oil (oil soot), which reduces the accuracy of reading sensor readings for regulating the gasoline mixture and distributing optimal fuel consumption. A malfunction of the oxygen sensor in a car leads not only to increased fuel consumption, but also to an increased content of harmful CO2 substances in the exhaust.
What needs to be done: -If you do not change a faulty car oxygen sensor, this may lead to failure of the car catalyst (it may burst), which will result in expensive repairs for you. The cost of new catalysts is very high due to the precious alloys they contain. Some cars have several of these catalysts at once and their cost can reach up to 90 thousand rubles. So gentlemen, don’t delay replacing the oxygen sensor. Although replacing the sensor itself and its cost are decent, it is still not commensurate with the cost of the exhaust gas catalyst system itself. You can save money on replacing this sensor by doing it yourself. Many car manuals have detailed instructions on how to replace the oxygen sensor yourself. If you know where the oxygen sensor is located, then it will not be difficult for you to disconnect the faulty lambda probe and replace it with a new one. Remember that you cannot delay replacing this important element!
Chip tuning
Some drivers do chip tuning of the Chevrolet Niva in order to increase engine power. The essence of this procedure is to remove the established restrictions by adjusting the optimal factory settings in the electronic control unit. This procedure helps to extract the additional performance inherent in the motor.
The whole process can be divided into several stages:
- Reading the necessary data from the electronic control unit
- Making the necessary adjustments
- Updating and recording new data
The main advantage of this procedure is:
- Engine power increases
- Speed limit removed
- You can change the fuel type
- All factory settings can be returned at any time
The disadvantages include:
- High cost of work
- The ECU may fail
- Increases fuel consumption, reduces system life
- Errors may appear
Each specialist has a different attitude towards chip tuning, some consider it useful, while others think that this procedure can negatively affect the performance of the car, while reducing its service life.
Check the fuel filler cap
Many drivers, in some cases, when the “check engine” indication appears, begin to think about serious problems with the engine; they do not even think of checking the tightness of the fuel system, which may be compromised due to a defect or an insufficiently tightened fuel tank cap. This is a very common reason for the appearance of the “Check” engine icon.
Reason for the error: - Leakage of the fuel system due to the passage of air through the filler cap of the fuel tank, as well as an increase in the fuel consumption of the vehicle, for which the vehicle’s diagnostic system will definitely display an engine error by turning on the “Check engine” indication on the vehicle’s instrument panel.
What needs to be done: -If when the “Check” indication appears, your car has not lost its power and there are no audible signs of engine damage (knocking, humming, creaking, etc. in the engine), then the first thing you need to do is check the gas tank for leaks. Your gas cap may be cracked or not tightened enough. If the gas tank cap was not tightened enough, then after tightening it all the way, you can continue driving the car for a while, and then look at the dashboard and see if the engine error disappears. To prevent the check engine light from appearing and lighting up, check the fuel filler cap regularly. Remember also that periodically this cover must be replaced with a new one!
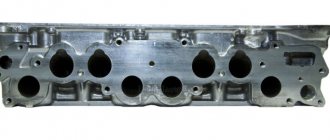
Low compression
The most unpleasant thing that an owner can expect is low compression, which can be measured with a special device. Here you cannot do without disassembling or partially disassembling the engine. The reason lies in a burnt-out valve or severe wear of the piston group.
Under no circumstances should the high-voltage wire be removed from the spark plug while the engine is running. This “old-fashioned” method of diagnosis is fraught with electric shock. As a last resort, you can unscrew the spark plug, insert it into the sealing cap and visually evaluate the spark.
A car is a complex of complex components and mechanisms. No matter how much automakers improve production technology and increase reliability, no one is immune from sudden breakdowns. This applies to all car enthusiasts. Both the owner of an expensive foreign car and a used VAZ can encounter such a malfunction as engine tripping. Well, let’s look at why the “check” blinks on a car and the engine stalls.
Car exhaust catalyst
An automobile catalytic converter helps the vehicle make this engine exhaust more environmentally friendly. It converts carbon monoxide and other harmful substances into harmless compounds. If your exhaust catalyst has become unusable, then you will notice it not only when the check engine icon appears, but also long before the moment when the power of your car drops by half. For example, when you press the gas pedal, your car will not have the same good acceleration dynamics as before.
What can cause a car catalyst to fail: -If you regularly service your car in accordance with the car company's maintenance regulations, then the catalyst in the car should not fail. The main reason for catalyst failure is untimely replacement of a faulty oxygen sensor, as well as irregular replacement of spark plugs after their expiration date. When the oxygen sensor or spark plugs are faulty, the conversion of carbon monoxide in the catalyst into harmless chemical elements stops, and this leads to overheating of the catalyst, which because of this can fail.
What needs to be done: -If your catalyst has become unusable, then you cannot drive a car, since the engine in the car will not work correctly, warning about this by an indication on the dashboard with the “check” engine icon. Also, your car's fuel consumption will greatly increase and there will be no engine traction. Although replacing the catalyst is an expensive repair, there is still no escape from this repair. Although today there is an alternative to replacing the catalyst with a flame arrester, this is not a 100% option. Unfortunately for many, if you are not an experienced auto mechanic, you will not be able to replace a faulty exhaust gas catalyst yourself. In any case, you will have to contact a car repair shop. Remember, friends, that timely replacement of oxygen sensors and spark plugs protects your catalyst from damage!
Replace the mass air flow sensor
The mass air flow sensor regulates the amount of air that must be added to the gasoline mixture for optimal combustion of the fuel. This sensor constantly reports data on the amount of oxygen supplied to the car's computer. A faulty mass air flow sensor increases this fuel consumption and also increases the level of CO2 in the exhaust gas, thereby reducing engine power and smoothness. Also, if the sensor is faulty, poor acceleration dynamics are observed. In cold weather, a car with a faulty sensor has difficulty starting.
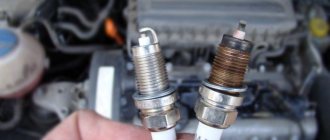
Replacing spark plugs and high-voltage wires
Spark plugs in a car are the main parts; they are designed to ignite the fuel mixture. With faulty spark plugs, the spark is not supplied correctly to ignite the gasoline mixture. With faulty spark plugs, it often happens that there is no spark or the timing of the supply of this spark is incorrect, and this affects the incorrect operation of the engine. If the spark plugs are not working correctly, you may feel slight jolts when accelerating the car, especially when starting from a standstill.
What are the reasons for the failure of spark plugs: -Most spark plugs in cars produced before 1996 must be changed every 25,000 - 30,000 thousand kilometers. In newer cars, these spark plugs last for more than 150,000 thousand km. But, nevertheless, these periods of planned replacement of spark plugs can be reduced due to various factors that are naturally associated with both fuel quality and driving style.
What needs to be done: -If your spark plugs have not been changed for a long time or you feel dips in the engine’s operation that are specifically related to the ignition, then you must immediately replace them with new ones without delay. Do not try to save money by untimely replacement of spark plugs, since the cost of the spark plugs itself is not as expensive as the work itself to replace them. By replacing old spark plugs with new ones, you will improve engine performance and reduce vehicle fuel consumption. Changing the spark plugs in your car yourself is quite easy. Basically, they are all easily accessible under the hood of the car. You only need a regular spark plug wrench to remove the spark plugs from the engine. It is also advisable to monitor the condition of high-voltage wires, since over time they can become unusable and allow electricity to pass through, which is transferred to the spark plugs, which can reduce the strength of the spark. Remember that regular replacement of spark plugs in accordance with the maintenance schedule for your car protects your exhaust catalyst from breakdowns, and at the same time improves the performance of the engine itself!
This article of ours was originally published in 2013, and was further updated with new information on 02/17/2020.
Source