The main disadvantage of the so-called Euro pens, which began to be installed on Priors instead of the usual decimal ones, is their fragility. It often happens that a passenger starts pulling on it while the door is still locked, and if you overdo it, the handle can be torn off alive! Especially such moments can arise in severe frost, when the plastic becomes more fragile.
If this handle is broken on your Priora or you are removing it for some other reason, then you will need the following tool for this:
- 8 mm head
- Extension
- Ratchet handle
- Flat blade screwdriver
Replacing the outside door handle
The main disadvantage of the so-called Euro pens, which began to be installed on Priors instead of the usual decimal ones, is their fragility.
It often happens that a passenger starts pulling on it while the door is still locked, and if you overdo it, the handle can be torn off alive! Especially such moments can arise in severe frost, when the plastic becomes more fragile. If this handle is broken on your Priora or you are removing it for some other reason, then you will need the following tool for this:
- 8 mm head
- Extension
- Ratchet handle
- Flat blade screwdriver
Replacing the door lock cylinder | Priora repair
On Lada Priora cars, the door lock cylinders are changed in exceptional cases, since most owners almost never use the “mechanical” door lock. In 99% of cases, drivers use a standard key fob, which locks and unlocks the door locks. But there are times when the key fob does not work, or it is simply lost, and then you have to use the cylinder in the door. If it fails, to replace this part you will need the following tool:
- Pliers
- Flat blade screwdriver
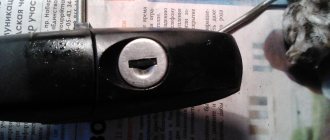
How to replace a door lock cylinder on a Lada Priora
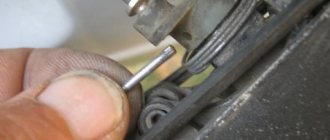
The first step is to perform the following procedure - remove the door trim. After this, from the inside you need to pry off the rod that goes to the cylinder with a screwdriver. This is clearly shown in the photo below:
As a result, we get the following result.
Now the larva is attached only with the help of one metal bracket, which is pryed up and removed using pliers.
Then we take out the larva assembly from the reverse side, as shown in the photo.
Now you can install the new cylinder in its original place and hook the door lock rod into place. It is worth considering that when replacing one cylinder you will have to constantly use a different key if you open the door manually without the help of a key fob. But, since practically no one uses this method, it is unlikely that anyone will have any special problems.
Video review of replacing the door cylinder on a Lada Priora car
Since the design of the doors, as well as the larvae themselves, is the same, the replacement with a VAZ 2110 will be no different from the Priora. Below is a video review using the tenth family as an example.
I hope that after reading both the photos and video reviews, there should be no problems when performing this repair. If there are any unclear points, you can ask questions below in the comments, or under the video on the channel!
If you replace the cylinders as a whole set, then these parts for the door and trunk lid, as well as the assembly with the ignition switch, will cost you 1,800 rubles.
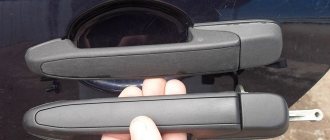
Removing and installing the door handle from the outside on a Priora
To get to the fastening of this part, we first need to remove the door trim. After that, on the far right side (if it is a right door), the fastening nuts will be accessible through two holes.
Then unscrew these nuts using an 8 mm socket.
From the reverse (outer) side, we move the handle along with the rod a little to the side, as you can clearly see in the photo below.
Now there are two ways to remove the handle:
- Disconnect it from the rod directly at the very top, which is more difficult to do
- Release the rod from below from the lock, which will be somewhat easier and more convenient
If you decide to do everything according to the first point, then for clarity you can look at the connection of the rod and the handle:
Now we remove the outer handle assembly, carefully so as not to damage the paintwork with the pull:
When installing a new one, the rod must be replaced, having first removed it from the old handle. The price of a set of new handles for a Euro-type Priora is about 1200-1500 rubles, respectively, one can be bought individually from 300 rubles.
Installation is carried out in the reverse order and will not pose any problems. Don't forget to put a rubber gasket between the handle body and the door. If this is not done, gradually due to vibration and friction, the body will begin to rub off the paint.
Lada 4×4 3D › Logbook › Installation of door handles from Priora and locks from 8ki
Somehow, imperceptibly, the driver's door began to open poorly from the outside, to the point where I had to climb into the car through the passenger door and open the left door from the inside. It is clear that it was enough to lubricate the lock and adjust it. BUT since last year I have had a set of handles from 2172 and silent locks from 2108, but I put off installing these devices due to banal laziness and the need to buy cylinders from tens or priors - because I didn’t want to leave the door opening function only on the alarm - anything can happen - from lost traction and dead batteries, to glitches of the signaling system itself. And the Priora handles do not have built-in larvae - they are located on the door itself below. But the moment came when I got tired of dancing around the door, and decided to stage it. so far only on the left door, without larvae for now. As a source of inspiration I used the article Europen Priora + 08e locks by the respected Yosak.
It didn't take long to dismantle the old locks and handles. I was too lazy to fuss with the metal and cut it out, so I bought stabilizer clamps and used a hammer to give them the required shape
I disassembled the chocolates - cut off the flaring with a drill - lubricated the inside with lithol, sharpened the bushings - the outside was flush with the plastic
On the lock mechanisms themselves, I also sharpened the bushings by 1mm.
Well, then I got so carried away by the assembly process - I forgot to take a photo) I used a rod from the handle to the lock from 2110, bending it slightly to obtain the required length. from the inner handle to the lock and the locking button rod was installed from 2109, having previously been cut to the required size. I put all the rods in heat shrink - I think this will at least slightly reduce the rattling inside the door.
Instructions: Priora car door handles - removal, installation, price
Door handles are not so much a matter of aesthetics in the appearance of the car, but rather a matter of pleasant tactile sensations and reliability. For convenience in the dark, some people go to collective farms. For example, illumination of interior handles. As for me, it’s not really needed. But the door handles on the Priora car are not of quality. I would say this is a sore spot of the car. In the cold they break easily. Some people simply do not know how to open them correctly, they pull at random - especially women. The price of the part is from 1000 rubles for a Euro model, pre-restyling ones are cheaper about 200 rubles. The door handles on the Priora were changed only with restyling - to new “Euro” types. Before this, the VAZ-2170 pleased everyone with the handles that remained with the “ten” - black. They were clumsier, but more reliable than the euro.
Until 2013, they matched the color of the rear-view mirrors, highlighting the design elements against the background of the sides of the car. Since 2013, restyling has changed a lot - the Priora’s handles began to be painted in body color, the same thing happened with the rear-view mirrors, and a few more “little things” were changed.
Car owners of different generations of Priora can easily change Priora door handles instead of the set of their generation. For some, the aesthetic component is more important - when the handles match the color of the body, but for others, reliability is important - such a person prefers the classics. Trying to meet the needs of car enthusiasts, spare parts stores willingly place on their shelves a set of Euro door handles for Lada Priora.
see also
- How to change injectors on a Priora 16 valve video
- How to change alternator brushes on a Prior
- How to bypass the immobilizer on a Priora
- Oil catcher for Priora
- Installing air suspension price on Priora
- Priora cable clutch adjustment
Priora horn does not work- Priority signal does not work, relay clicks
- Why does the EUR not work on the Priora?
- Why is the fuel pump not working on the Priora?
- The speedometer and electric power steering on the Priora do not work
Standard handles for Priora - article number and price
So, the emerging controversy around the two types of Lada Priora door handles arises from the fact that the new version has several noticeable disadvantages:
- The fasteners are not strong enough, so when a passenger starts to pull them before unlocking the central locking, they can tear them off.
- They scratch. Yes, black plastic is also scratched - even by car keys - but it doesn’t look as noticeable on it.
- Aerodynamics deteriorate. This is a subtle factor, but it is still present.
- One positive quality that cannot be “taken away” from the Euroset is beauty. The difference between the two generations of handles is clearly visible on the Priora with a white body. If it is black, they immediately catch the eye, and the all-white body looks organic.
How to remove the rear door trim on a Priora
For the rear doors, the sequence of actions is approximately the same, and even easier, but it is worth considering the design features and location:
- use a Phillips screwdriver to unscrew the bolt from the recess for the door handle;
- Two bolts are also unscrewed in the recess of the armrest. If necessary, the entire pad is removed from the clips and removed;
- If the rear windows are manual and not automatic, then the handles are simply pryed off with a flat-head screwdriver and snapped off;
- the cap from the door lock is twisted off;
- Three bolts are unscrewed from the bottom of the casing;
- Using a special puller or a flat screwdriver, the trim is carefully removed from the clips. It is done!
Assembling the door will require the same steps, but in reverse order.
How to change handles on a Priora: removal and installation - internal, regular and Euro handles
To change Priora handles, you should approach the matter with the right set of tools. So, to work on replacing the Euro pen you will need:
Do the work in the following order:
- Stop the car.
- Disassemble the door card - the one behind which there is a part to be replaced.
- Closer to the outer part, under the layer of metal, fastening nuts are visible through the holes; they need to be unscrewed.
- From the outside, pull the part towards you, but leave the part that is closer to the hinges in place.
- Climbing underneath the layer of metal, disconnect the rod.
- Take out the assembled part, and put a new one in its place. Install a new rod.
- Modify or repair the Euro handle if you want to strengthen the connection between the handle and the body:
- On the back side, unscrew the self-tapping screw that “lies” parallel to the body. It is slightly recessed into a special recess.
- Use a flathead screwdriver to pry up the lock washer, remove it, and then remove the bushing from the back.
- Also on the back side, but on the other edge, there is another part - this is a plastic latch that needs to be removed.
- The part is almost disassembled. All that remains is to unscrew the bolt from the handle.
- All you have to do is get a small metal plate about 1mm thick, drill a 3.5mm hole for the bolt, and then “drive” it under the bolt in the handle. This will make the structure more stable. You can put the door back together.
Replacing Priora handles is not difficult - even if they are of the old type. For work, prepare a “10” head and a flat-head screwdriver. Procedure:
- Remove the door card.
- Under the metal layer, disconnect the rod with a screwdriver.
- There, gently pry (do not deform) the lock bracket, then the mechanism.
- Disconnect the second end of the rod from the handle.
- Unscrew the nuts securing it with the “10” head and remove the handle.
Replacement of interior door handles on a Priora must take place on time. In older cars, the door card assembly begins to fall apart over time because the fasteners become loose. The interior of the car should be kept in order. Therefore, if you notice that parts of the door card are loose, try to fix it.
To work with door cards you will need pliers and a Phillips screwdriver. To avoid scratches, prepare a thick, soft cloth, such as a microfiber cloth.
The work looks like this:
- Remove the door card.
- Remove two screws securing the handle from above, one from below, under the handle.
- Pull it towards you, take pliers.
- Press out the clamp that is attached to the rod.
- Install the new handle.
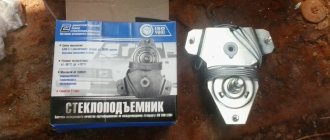
How to remove the window lifter handle on a Priora and why it can break
A broken window handle causes a lot of inconvenience, especially in the hot season. This problem can be easily fixed on your own without wasting your time on a trip to a car repair shop. The handle can be purchased at almost any store, and replacement takes a matter of minutes. It is enough to know how to remove the window lifter handle on a Priora and install a new one.
When to remove the window handle
Knowing how to remove the Priora window lifter handle can be useful in the following cases:
- replacing a broken handle with a new one;
- removing door trim for body or other repairs;
What is needed to remove the window lifter handle
To dismantle the window lifter handle on a Priora, you only need a flat-head screwdriver. No more special tools or devices are required. There is also no need for special “garage” conditions. If you know how to remove the window lifter handle on a Priora, you can do it simply in the parking lot.
If the handle is dismantled for the purpose of replacement, you will need a new handle complete with a latch and washer.
How to remove the Priora window lifter handle
The work of dismantling the handle includes several steps:
- insert a thin flat screwdriver between the handle washer and the handle lock on the side opposite the handle;
- Carefully press the latch and remove it;
- pull the window lifter handle towards you and remove it from the slots;
- Remove the window handle washer.
Installing the window handle
Installation is done as follows:
- put the washer of the window lifter handle on the axle;
- Holding the washer with your hand, place the window lifter handle onto the slots;
- raise and lower the glass once or twice, rotating the handle so that it fits tightly onto the slots;
- insert the clamp between the handle and the washer.
Reasons for handle breakage
Often, replacing the power window handle will only temporarily fix the problem. Soon the new handle also fails. The reason is that the glass goes down and up too tightly, so you have to put excessive stress on the rather fragile plastic part. In this case, you must first eliminate the cause of the stuck glass or window regulator, and then change the handle.
It’s easy to check the operation of the mechanism - just raise and lower the window.
There are several reasons for the mechanism to jam:
- twisted drive cable;
- glass distortion;
- poor lubrication in the mechanism;
- freezing of ice (in winter).
If the window regulator works hard, you need to remove the door trim, find and eliminate the cause: change the lubricant, melt the ice or replace the faulty mechanism.
Another reason for handle breakage is worn-out window drive splines. In this case, it is necessary to replace the window lifter mechanism with a new one and only then change the handle.
Internal driver's door handle Lada Priora
Payment to a Sberbank VISA card
The most convenient and profitable payment method for you.
Payment can be made through the Sberbank Online system, through a payment terminal (Sberbank ATM), provided that you have a card from this bank. If you are not a client of this bank and you do not have a card, then you can top up your balance at any bank branch through an operator; they will accept cash payment and top up your balance. Commission from 0 to 1% Cash on delivery (payment upon receipt)
Payment for the order will be made at the post office upon receipt of the goods. For cash on delivery services, Russian Post takes an additional commission - approximately 4% of the cost of the order (parcel) upon receipt.
The postal commission based on the amount of “Cash on Delivery” for your parcel is described below, i.e. In addition to the delivery cost, the post office will also charge you a commission for .
Postal commission for cash on delivery service:
· up to 1,000 rub. inclusive - 80 rub. + 5% of the amount
· over 1,000 to 5,000 rubles. inclusive - 90 rub. + 4%
· over 5,000 rub. up to 20,000 rub. inclusive -190 rub. + 2%
· over 20,000 rub. up to 500,000 rub. inclusive - 290 rub. + 1.5%
Attention! Advance payment for delivery 100% (via Sberbank payment). This is included in our Cash on Delivery terms.
Check with the manager for additional information.
Attention! Regardless of which delivery method you choose, check the integrity of the goods and packaging upon receipt of the cargo (parcel).
Replacement of the internal door handle of a VAZ Lada Priora 2170 in auto repair shops in Moscow
18 car repair companies
- TTS Motors
- Pyatnitskoe highway, 2
- +7 (495) 24… show all
- The site of the company
- Lorant
- Master motors
- Tolex tuning Lexus on Taganka
- Lexus on the market
- Auto-rad
- Ddcar
- Nivus
- Technical center gm east
- Auto complex
- Psrservice
- Atlant-m
Popular companies
Lada Priora door handle
Set of external door handles TUNING (color-matched). Euro handles Lada Priora (VAZ 2170, 2171, 2172). Tune auto. All colors are available.
Set of external door handles TUNING (color-matched). Euro handles Lada Priora (VAZ 2170, 2171, 2172). Tune auto. Installed instead of standard handles for drilling. All colors are available.
The outer euro door handle (1 piece) in the color of the car is intended for installation on VAZ 2110, 2111,2112, Lada Priora (VAZ 2170, 2171, 2172) Tune-auto.
External euro door handle (1 piece) in the color of the car, semicircle, designed for installation on Lada Priora (VAZ 2170, 2171, 2172), VAZ 2110, 2111,2112. Tune auto.
External euro door handle (1 piece) in the color of the car, for drilling, designed for installation on Lada Priora (VAZ 2170, 2171, 2172), VAZ 2110, 2111,2112. Tune auto.
Set of external door handles “LYNX” in color. car are designed for installation instead of standard handles on Lada Priora (VAZ 2170, 2171, 2172). The LYNX euro handles differ from the standard handles in that they have an ergonomic shape and a fundamentally new door opening mechanism - the direct grip method, which is widely used on a number of European car brands.
A set of external door handles “LYNX” in the color of the car, chrome plated, are intended for installation instead of standard handles on the Lada Priora (VAZ 2170, 2171, 2172). Euro handles "LYNX" differ from standard handles in that they have an ergonomic shape and a fundamentally new door opening mechanism - the direct grip method, which is widely used on a number of European car brands.
Set of external door handles TUNING (in color) Euro handles Lada Priora (VAZ 2170, 2171, 2172).Tun-auto. Semicircle. Painted using factory technology. Manufacturer: Togliatti. All colors are available.
Set of external door handles TUNING (in color) Euro handles Lada Priora (coupe) Tune-auto. Painted using factory technology. Manufacturer: Togliatti. All colors are available.
Set of external door handles TUNING (in color) Euro handles VAZ 2110, 2111, 2112. Lada Priora (VAZ 2170, 2172) Tune-auto. Semicircle. Painted using factory technology. Manufacturer: Togliatti. All colors are available.
Sometimes even details that are insignificant at first glance can give your car a new look, making it stand out from the crowd of others, and stylish Euro door handles, without a doubt, fall into this category. The Elektro-Stavr online store presents car owners with decorative interior and exterior door handles for VAZs of various models, by installing which you can see for yourself. Unusual design, modern materials, a huge range of colors, ideal quality and very reasonable prices for Euro pens allow you to make your choice and get a functional decoration for your car. Look at the catalog, we tried to make it not only large, but also user-friendly. If you have a Lada Priora or Kalina, VAZ 2105 or 2115, you just need to follow the link to the page of the door handles of your model and find the sample that suits you both in design and cost. Feel free to place your order, and we will take care of the rest.
Catalog number: 2172-6105150
Standard price:
980.00 rub. Your price
Price For registered:
910.00 rub.
Before visiting the store, check product availability!
We're sorry, but the requests coming from your IP address appear to be automated. For this reason, we are forced to temporarily block access to the site.
To continue, please enter the characters from the image in the input field and click "Submit".
Cookies are disabled in your browser
. We will not be able to remember you and correctly identify you in the future. To enable cookies, follow the tips on this page.
Removing the interior lock, lock cylinder and outer front door handle
We carry out the work when replacing the lock, its cylinder mechanism and the outer door handle. Remove the front door trim (see “Removing the front door trim”).
Use a slotted screwdriver to disconnect the rod from the cylinder mechanism of the lock.
Use a slotted screwdriver to pry up the mounting bracket for the cylinder lock mechanism...
...and remove the bracket.
We take out the cylinder lock mechanism along with the rubber sealing ring. Disconnect the lock rod from the outside door handle.
Using a 10mm socket, unscrew the two nuts securing the outer door handle...
...and remove the handle.
Using a slotted screwdriver, unfasten the clamp securing the wiring harness of the electric locking drive.
By pressing the latch... ...we disconnect the wiring harness blocks of the electric locking drive.
Using a Phillips screwdriver, unscrew the three screws securing the base of the inner handle...
...and the screw for securing the internal lock. We remove the external lock (see “Removing the external door lock”).
We remove the internal lock of the front door with rods and an electric drive for locking the lock through the technological opening of the internal door panel.
Front door lock with electric locking, external and internal door handles
Use a slotted screwdriver to disconnect the rod end of the outer handle from the lock lever.
In the same way we disconnect the rod of the cylinder mechanism of the lock.
Using a slotted screwdriver, we open the spring bracket that secures the rod of the inner handle...
...and remove the bracket. There is a spring washer under the bracket; remove it, and then the rod.
Using a slotted screwdriver, press out the plastic locking rod lock of the lock button, turning the lock around its axis.
In the same way we remove the locking electric drive rod.
Using a Phillips screwdriver, unscrew the two self-tapping screws securing the electric drive to the lock bracket and remove the electric drive.
We remove the rod from the hole in the electric drive rod of the lock.
Front door internal lock mechanism
We install the internal door lock, the lock cylinder mechanism and the external door handle in the reverse order.
Before installing the door trim, we check the functionality of the door lock mechanism. If the outer door handle or lock cylinder mechanism does not work correctly, the length of the rod should be adjusted by rotating the plastic tip of the rod.
Source