It is known that locks for VAZ-1118 car doors have an interesting property - you can replace their cylinder without removing the mechanism from the door itself. On previous models, dismantling is more difficult: you need to press the bracket holding the cylinder with a paper clip or an awl, getting into the hole on a mechanical drive. In the Kalina model, that is, VAZ-1118, this bracket is pressed out by pressing with a ruler or a screwdriver. Which, in turn, is done on the installed lock (there is no point in removing it). Next, the replacement operation is discussed in more detail.
Design of VAZ-2109 locks and disadvantages
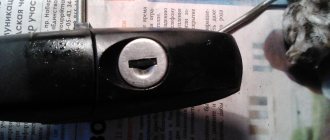
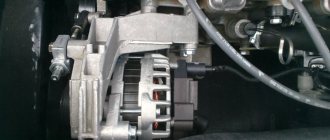
The lock cylinder is a cylinder that is equipped with a secret mechanism. In all locks with a flat key, the cylinder is replaceable. For example, on VAZ-2109 cars it is replaced like this.
The rotating part that is connected to the rod is called the “drive”. As we can see, this drive has a hole for removing the cylinder. By applying pressure with a thin axle or an awl, the larva is pulled out.
There is only one drawback - it is hardly possible to complete the steps indicated here without first removing the lock completely.
It should be noted that even when the mechanism is removed, it will not be easy to pull the larva out of it.
Therefore, before dismantling, be sure to insert a key into the cylinder and turn it left or right 90 degrees. The purpose of this action is to be able to dismantle the larva. This action is performed effortlessly, and the key is then simply pulled towards you.
Reviews
| № | Positive |
| 1. | Vyacheslav: there are no complaints about the upholstery, it’s well assembled. Once I compacted the plastic at around 65,000 km, it started knocking on the paving stones. |
| 2. | Dmitry: I’m pleased with the build quality of the interior; I fix minor defects on my own. |
| 3. | Ivan: after two years of active use of the car, the interior upholstery began to knock. I can't fault the defect, since the car is often parked in the sun. Deformation of plastic due to ultraviolet rays. |
| 4. | Gennady: I’ve been driving the car for a year and a half, there are no comments on the upholstery, the plastic doesn’t make any noise. After the purchase, I immediately ordered sound insulation from the service. |
| 5. | Vasily: despite the fact that the car is in the budget segment, the build quality and materials are good. I expected the worst. Subject to systematic maintenance, there is no plastic noise. |
| 6. | Vladlen: I have already driven 70,000 km, there are no comments about the car, the interior is quiet, the plastic is not deformed. |
| 7. | Stanislav: I’m happy with the car, periodically I reupholster the interior, plastics, and upholstery. Compared to previous VAZ models, Grant is one of the best solutions. |
| Negative | |
| 1. | Victor: the upholstery started knocking just six months after purchase at the showroom. After diagnostics, the service station discovered deformation of the plastic and replaced it with a new one. |
| 2. | Kirill: after the accident I can’t set the gaps, it’s obvious that the geometry of the body is broken. My friends advise me to buy a new door. |
| 3. | Ivan: There are no complaints about the engine, but there are a lot of complaints about the interior. Plastic constantly rattles, sound insulation is insufficient. I am constantly improving things on my own. |
Conclusion The mechanism for adjusting door gaps on the Lada Grant is typical, as for most domestic and European brands. Violations are often associated with the negative consequences of an accident, collisions, and other deformations of metal structures.
Provided there is no damage to the body geometry and systematic maintenance, drivers will not have problems with adjustment.
Sound insulation on the Lada Grant is of average quality. You can reduce the noise level yourself by covering it with more expensive material. Keep in mind that the model is in the budget segment. Installing expensive materials will automatically increase the cost of the machine.
Replacing the larva in Kalina
First of all, replacing the lock elements means that the door trim will be completely missing. Therefore, first we will figure out how to dismantle the trim on Lada Kalina cars. The second chapter is devoted to how to remove the larva and install a new one in its place. The last step will actually be the simplest.
Removing the door trim yourself
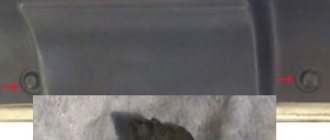
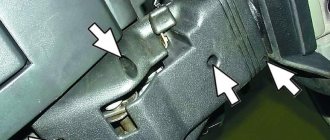
The casing is attached not only to screws, but also to plastic pistons. The number of screws holding the part in question is four:
Numbers here indicate all fastening elements. But to get to them, you need to remove the screw cap “3”, as well as the inner door handle. The pawl handle also needs to be unscrewed.
If these actions are completed successfully, the casing begins to be dismantled, moving it away from the metal. Dismantling is carried out starting from any of the corners, but care must be taken: the pistons holding the plastic are fragile.
If the package includes power windows, you will need to disconnect the connector connected to the button block. Also, another similar connector is present in most trim levels - where there is a central lock. Both connectors must be disconnected.
All the steps described here involve electronics in any case.
Therefore, at the stage before dismantling the trim, you need to open the hood, take the “10” key and unscrew the negative terminal. We are talking about the battery terminal, which can be connected last (when the last screw is screwed in). Anyone who breaks this rule will look for blown fuses. Draw a conclusion.
How to get to the door mechanism
According to the recommendation of the magazine "Behind the Wheel", in the absence of casing, access to the lock is always available. Simply put, there will be no need to remove the inner lining made of metal. The steel sheet is simply bent to the side.
The rotating part with the protrusion is called the “drive”, and this is what you will need next.
Replacing the larva will be easy:
- The key in the cylinder currently fixed in the door is turned 90 degrees;
- Using a steel ruler, knife or thin screwdriver, you need to press the locking tongue located opposite the slot in the body of the cylinder. You need to place a screwdriver between the rotating and stationary parts of the mechanism. Know that in the driver's door the slot is made from the bottom (looks “to the floor”), in the passenger doors - from the top!
- By pulling the key towards you, the larva is pulled out;
- The new cylinder is installed like this: with the key inserted, it is pushed into the lock until it stops. The locking tab will need to be pushed inward.
Lada Granta Ksilona › Logbook › Redid the rear door locks
Everyone knows about tight rear locks, so I won't say anything about them.
So I decided to get to my locks, although they weren’t very tight, some grant makers said that this was still normal, but I changed it anyway)) How I worked before the change:
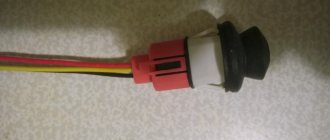
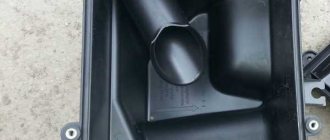
You will need the following material: - cable (I got a cable from Skoda, it connects the lock to the inside door handle).
Who needs a serial number?
Let's get to work
Remove the lock and outer handle. We make a hole in the lock rod
And we put on one end of the cable
We disassemble the door handle, removing the hook, it will no longer be needed. Knock out the pin in the indicated direction
Then I modified it a little, marked the plastic “kick” in red - we’ll take it down, and in blue - I made a hole at the end for the cable, I don’t have a specific photo, but I’ll show you more about it later.
I made a bracket to attach the other end of the cable. The quality of the photos is not very good, but the principle is visible
We put the lock with the cable and the handle in place
Layout diagram
The bracket was screwed through the standard hole
Attaching the second end of the cable to the handle.
At the end of the handle I made a hole for the thick end of the cable (red) and a slot for inserting the cable (blue)
Another cable fastening, pressed a little with a plate
Result:
There is a result: passengers no longer have such difficulty opening the door. I've been using it for about a month now and it works flawlessly.
In principle, the idea is simple, it took about half a day. You can use any cable to suit your taste and, accordingly, install and modify it according to your wishes.
Thank you for your attention!
Recommendations from the magazine “Behind the Wheel”
Let’s turn again to the “Behind the Wheel” review, which discusses how to remove door locks in a VAZ-1118 Kalina. If the casing has been dismantled, this is not bad. Next, according to the recommendations, unscrew the screw securing the inner handle:
The lock mechanism is connected to two rods made in the form of rods. Both of them are dismantled by disconnecting the plastic clips:
To disengage the latch, press on the plastic tab with a screwdriver.
At the last step, as you might guess, all that remains is to unscrew the screws holding the mechanism motionless.
But first, you need to dismantle the external handle. To do this, unscrew two bolts equipped with an “8” hex head.
By the way, if the central locking connector is attached to the mechanism module, it is also disconnected.
Let the wiring harness for the central locking drive remain in the door.
Of course, all door locks must be unlocked with one key, which is supposed to be used in the future.
The work indicated here is carried out on each of the four doors. In addition, it is very desirable that the ignition key also unlocks the doors. However, replacing the cylinder on the steering column will not be so easy. Can you handle the total amount of work that needs to be done? Decide for yourself.
Step-by-step instructions for dismantling the rear right (left) door lock on a Lada Grant
We carry out the work modularly: dismantling the card, removing the internal filling, handle, lock.
- We repeat the previous steps.
- Using a screwdriver with a Phillips bit, unscrew the fastening of the intermediate lever of the locking rod and move the base of the lever.
- We remove the locking tab from the standard hole. Use a screwdriver to unscrew 3 bolts
- From the end of the door, unscrew the three screws securing the lock at the base.
- We remove the lock assembly with an electric drive through a special technological window.
- We press the latches on the sides and disconnect the block with wires from the product.
- If necessary, remove the rod, press out the plastic lock, and turn it around the axis.
We lubricate the moving mechanisms, install a new lock, and assemble the parts in the reverse order.
The rear door lock cannot be repaired if it shows signs of deformation of the housing.
Rear door lock device
Review of Manufacturer Prices
| Name/article | Price, rub.) |
| Rear door lock 21900-6205013-10 | From 2000 |
| 21900-6205012-10 | —/— |
| 21900-6205013-00 | From 650 |
| Locking pin 11180-6105228-00 | From 150 |
| Screw 21080-6105268-00 | —/— |
| Bushing 11180-6105276-00 | From 100 |
*prices are current as of November 28, 2018.
Changing the secret code yourself
Often, after time has elapsed on a Lada Granta car, the doors begin to open and close with some effort. To fix the problem in question with this car produced by AvtoVAZ, you have to contact a service station. In this case, you need to purchase door closers and door stops for Lada Granta.
Sometimes the owners of the Lada Granta Liftback, produced by the famous AvtoVAZ company, have to deal with various modifications after purchasing the vehicle. This happens for the reason that after even a short mileage, minor breakdowns or problems often appear at first, and if they are not eliminated in time, they develop into more serious ones. Many owners consider the most common defect to be the fact that the front door locks do not function well and open with great difficulty.
You can, of course, buy Lada door closers and door stops and make repairs in accordance with the instructions. But this operation can be performed in a more productive way. To carry it out you need:
A common symptom of a broken lock is that a loud sound appears before the door opens/closes. The design of the front door lock is made in such a way that the metal can sometimes rattle. In order to eliminate this problem, you need to remove the lock itself and put rubber tubes of the required size on the levers. Immediately all sounds coming from ahead will disappear. When closing the doors, only a bang will be heard, and all sharp and loud sounds will be a thing of the past.
Step #6: Disconnecting the limiter
- We unscrew the limiter lock, the key is set to “13”.
- We unscrew the two stopper bolts directly on the door body.
- We remove the limiter through the capabilities of the technological window.
- Unscrew the nut securing the block with wires.
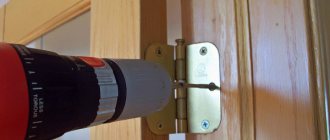
- We remove the connector housing for the block (three plastic clips).
- Using a key set to “13”, unscrew the upper and lower fastenings (hinges) of the door.
- We remove the structure from its regular place.
This completes the analysis of the front door on the Lada Grant.
Adjustment process
If the gap is smaller, lower the glass all the way down. Then close it with one click, take it by the top edge and push it towards you a couple of times with a little effort. And if the gap on the front door turns out to be wider, then you need to open it with the window down and, resting your foot on the trim, pull the door to the inside several times. Then it will be possible to move on to the main problem associated with the poor functioning of the lock.
- special screwdriver;
- Silicone Grease;
- limiters.
When there is a slight bulging outward, you need to put a soft and durable gasket in the opening and on the central post, in the place where the hinges are, and then try to close the door. If the door is slightly recessed relative to the body itself, then you need to support the outside with your knee in the hinge area and pull the open door towards you. By making such adjustments to the rear doors, you can achieve soft operation without various side effects.
You can install them either on the opening or on the door itself. Due to the presence of springs, closing/opening will be smooth and the sound will not be too loud. Basically, those who are faced with a similar problem most often try to solve it with the help of lubricant. In a way it helps, but only for a short time. And it can only get worse in the future.
The article describes the process of removing the exterior door handle of a car. The handle is removed when replacing it, as well as for the convenience of replacing the lock cylinder.
You will need: an “8” wrench, flat-blade and Phillips-blade screwdrivers.
Door lock adjustment
Another reason for poor door opening is unadjusted locks.
Required
: Phillips screwdriver (if the screws do not come off, you will need an impact screwdriver) or Torx T40 wrench
Procedure
:
- Mark the position of the lock shackle for possible return to its original state.
- Loosen the two/three bolts securing the lock bracket.
- We move the bracket (forward/backward, up/down), achieving easy and tight closure of the door.
- Upon completion of the adjustment, tighten the screws securing the lock retainer with a torque of 22 Nm.
Everything said in the article is shown in the video:
Have you ever had to adjust the door locks yourself? Let us remind you that in order to extend the life of locks and seals, they should be lubricated regularly. Do you want to improve the design? Install additional door seals (instructions for XRAY, Vesta, Granta/Kalina/Priora, Largus and Lada 4x4).
Keywords: Lada Granta doors | Lada Kalina doors | Lada Vesta doors | doors lada xray | Lada Priora doors | Lada Largus doors | doors 4x4
+1
Share on social networks:
Found an error? Select it and press Ctrl+Enter..
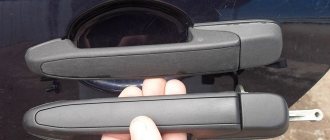
Operations for removing the outer handle of a Lada Granta
1. Remove the door trim (see the article “Removing the door trim of a Lada Granta”)
2. Use a screwdriver to pry up the plastic end of the lock switch rod and move it out of engagement with the lock switch lever.
3. Using a screwdriver, pry and disconnect the lock drive rod from the outer handle lever.
4. Unscrew the nut that secures the front handle to the door panel.
5. Remove the rear bolt securing the outer lock drive handle to the front door.
6. Pull forward in the direction of vehicle travel and remove the outer lock drive handle from the opening in the outer door panel.
7. Remove the outer lock drive handle.
8. If it is necessary to replace the switch mechanism, use a screwdriver to press the lock cylinder latch and remove it from the handle.
9. Install the removed parts in the reverse order of removal.
Rice. 1. Location of the lock (D), lock drive rods, outer (B) and inner (8) front door handles (A): 1 - outer panel of the front door; 2 — lock switch rod; 3 — external handle of the lock drive; 4 — door glass; 5 — door lock switch button; b - door trim; 7 — rod of the lock switch button; 8 — door lock; 9 — internal handle of the lock drive; 10 — rod of the internal drive of the lock; 11 — guide of the lock switch button; 12 — rod of the external handle of the lock drive; 13 — nut securing the external handle of the lock drive to the outer panel of the door; 14 — lock fastening screw
Lada Granta replacement of ignition switch and front door lock after attempted theft
Pokazuvati elementi keruvannya progravachem
- Published on Monday 18th 2017
- Replacing the ignition switch for Lada Granta. Replacement of front door locks of Lada Granta. Removing and installing the front door handles of the Lada Granta. Replacement of lock cylinders on Lada Granta. Replacement of the immobilizer chip from old Lada keys to new ones. Issue price 350 rub. Video from the series “Chronicles of Lada Granta”
- Auto and transport
COMMENTS • 22
And who can tell me, a Datsun car, the radio does not work without the ignition. Since 1919, VAZ began to produce cars with an additional ACC position, as it used to be in the classics. Here's a question: I want to replace the lock with a new one, but I'll just have to make a new key core with a chip or something else.
Handsome guy, handy
Huge like for the filming process!
Hello, what should I do? I lost my key, now I want to change the lock, how can I disable the chip?
16:00 It didn’t sink in completely, because at 15:20 the chip had to be turned with a bevel towards the center, as it was when taken out at 15:03.
You better film a detective story about the castle, like they wanted to steal it.
How I was overcome by this do-it-yourself construction kit, and for the video I got a like, it’s all to the point
Good health to you, good man! I thank you sincerely! Thanks to you, I fixed my ZZ. My key turned 180°. It turned out that a tendril had broken off inside the spring. There is such a spring inside the contact group from the classics. I bought it, pulled out the spring, replaced it, and didn’t have to change the lock!
Very cool video! Everything is detailed, everything is clear.
Thank you very much for the video. My car wasn't stolen, ugh ugh ugh, but the core of the ignition switch broke,