Procedure for replacing the timing chain ZMZ-406 Volga GAZ-31105 (+ video)
The dream of our fathers and grandfathers is the Volga.
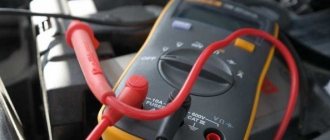
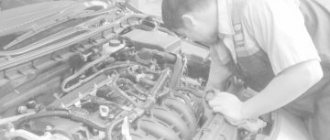
Recently, an old friend of mine visited us in his favorite GAZ 31105. The appearance of extraneous noise from the timing drive, as well as increased consumption and poor throttle response, condemns the timing chains. So, GAZ 31105, engine 406 - timing chain replacement. Let's say right away what we need: engine oil with a filter and a sump gasket, it would be better if it was cork, high-temperature sealant, gray 999 from ABRO, kerosene and a metal brush for washing parts. I have only seen a clean engine in the new Volga. It’s not for nothing that they say: “If the Volga doesn’t leak oil, it means it doesn’t exist.” Another set of keys and sockets with a reinforced 36mm, a 6mm hexagon, a lot of rags, instant coffee and several sausage sandwiches. As well as patience and a great desire to carry out this procedure yourself, since the temptation to entrust this to someone else is very great. After reading the article to the end, you will understand why.
Most importantly, this is a complete kit for repairing the gas distribution drive of ZMZ-405,406,409 engines - this is its official name. It must include the following ingredients:
- Two chain tensioners.
- Two hydraulic chain tensioners.
- Two drive chains, small and large. For ZMZ-406 there are 70 and 90 links, for ZMZ-405 there are 72 and 92 links.
- Three chain guides.
- Gaskets for the upper and lower chain covers, pump and hydraulic tensioner covers, as well as two soundproofing ones.
- Sprockets of the crankshaft, camshaft, intermediate shaft, drive and driven with a locking plate.
Under the hood there really is a ZMZ-406 engine.
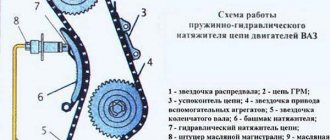
Hydraulic chain tensioner for ZMZ-406 engine
Since hydraulic tensioners constantly keep the chains in tension, regardless of chain stretch and shoe wear, there is no need to adjust the chain tension during operation.
The plunger 4 is installed in the housing 5.
A spring 6 is inserted into the plunger, which is compressed by a screw plug 1
A check ball valve 2 is installed in plug 1
The plunger 4 is fitted with a locking ring 3 and a locking ring 7.
In the figure, the tensioner is shown in a non-working “charged” state, when the locking ring 7 keeps the plunger 4 from moving.
To bring the tensioner into working condition, to “discharge” it, you need to press the end of the plunger so that the locking ring 7 moves into the groove of a smaller diameter on the plunger, and under the action of the spring 6 the plunger moves out of the body 5
The hydraulic tensioner is installed on the engine in a charged state.
Plunger 4, under the action of spring 6 and oil flowing through valve 2 from the engine lubrication system, presses on the tensioner shoe and maintains the chain in tension.
As the chain stretches and the tensioner shoe wears out, the plunger 4 further moves out of the housing 5, while the locking ring 3 moves into the next annular groove on the housing, preventing the plunger from moving in the opposite direction.
When the chain hits the tensioner shoe, for example, when the engine operating mode changes, the plunger 4 moves back into the housing 5 to the width of the groove under the locking ring 3.
At the same time, it compresses spring 6
In addition, valve 2 closes and additional damping occurs due to the fact that oil is squeezed out through the gap between the plunger and the body.
The hydraulic tensioners of the upper and lower chains are absolutely identical.
Removal and disassembly
Unscrew bolts 1, holding cover 2, as it is affected by the spring force.
Then carefully remove cover 2 with the cover gasket and the hydraulic tensioner soundproofing gasket
Remove the hydraulic tensioner from the channel in the cylinder head.
Unscrew screw plug 1.
The hydraulic tensioner must not be clamped in a vice, so you need to hold the key in a vice and insert the hydraulic tensioner into it.
Remove plug 1 and take out spring 2.
Remove plunger 1 from hydraulic tensioner housing 2
Inspection
It is prohibited to disassemble the plunger and hydraulic tensioner housing.
After disassembly, wash all parts in gasoline and dry.
Inspect the plunger, if there are burrs or nicks on its surface, the locking or retaining ring is broken, the hydraulic tensioner needs to be replaced.
Inspect the body. If there are burrs, deep scratches on the inner surface of the housing, or the annular grooves for the locking ring are damaged, replace the hydraulic tensioner.
The plunger in the housing must move freely. If the plunger “sticks” in the body in any position, the hydraulic tensioner is replaced.
The plunger should move in the body when the locking ring is engaged in the annular grooves on the body, only in the direction in which it moves under the action of the spring. If the plunger moves in the opposite direction, replace the hydraulic tensioner.
Assembly and installation
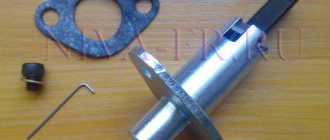
Before assembly, lubricate the plunger and the inner surface of the housing with engine oil. To assemble the hydraulic tensioner, it is recommended to make a mandrel, the dimensions of which are shown in the figure: “Charging” the hydraulic tensioner using a ring.
Clamp the mandrel vertically in a vice.
Install the hydraulic tensioner housing onto the mandrel.
Insert the plunger into the body until the plunger retaining ring stops in the mandrel.
Insert the spring into the plunger and fill the tensioner with engine oil.
Compressing the spring, tighten the screw plug. In this case, the plunger retaining ring should fit into the groove on the body and keep the plunger from moving, i.e. the tensioner will be charged.
Remove the hydraulic tensioner from the mandrel. Do not press the plunger, as this will cause the plunger retaining ring to come out of the groove on the body and the plunger will come out of the body, i.e. the hydraulic tensioner will be discharged.
If there is no mandrel for assembling the hydraulic tensioner or it is not possible to make one, you can assemble the tensioner as follows: bend a ring from a strip of metal 1.0 mm thick and about 15 mm high.
To do this, you can use a piece of tape from an old tape clamp; insert the plunger into the hydraulic tensioner housing so that the retaining ring on the plunger is positioned opposite the groove in the housing; place the bent ring on the table.
We finished the examination, let's start strength exercises
First, remove the engine protection and mudguard. Drain the antifreeze and oil from the engine. Remove the upper radiator pipe.
Disconnect all interfering pipes.
We remove the wiring harness to the side. We remember or sketch the location of the connectors on the ignition coils.
Using a 12mm socket, unscrew the eight bolts in a circle holding the valve cover and remove the last one.
While the service belt is tense, loosen the three bolts on the 10th pump pulley.
We loosen the bolt by 13, the tension roller and unscrewing the bolt by 10, we loosen the tension of the auxiliary belt.
Remove the service belt, roller and coolant pump pulley.
We unscrew the four screws of the upper timing case cover and remove the last one.
We remove the generator along with the triangular plate.
Unscrew bolt 10 of the crankshaft position sensor.
We move the sensor to the side so that it does not interfere.
Using a 36mm socket, use the pulley bolt to turn the crankshaft clockwise until the marks on the camshafts point to top dead center.
The mark on the intake camshaft should be level with the top edge of the cylinder head.
Likewise for the exhaust camshaft.
We unscrew the crankshaft pulley bolt, having previously locked the crankshaft. To do this, the assistant in the cabin engages fifth gear and presses on the brake with all his might, while we, with a slight movement of the hand, using a meter-long pipe and a 36mm socket, unscrew the bolt. We remove the crankshaft pulley, you will have to suffer because it sits tightly on the shaft.
Loosen the clamps of the pump pipes.
Use a 6mm hex to unscrew the four screws on the front side of the pump and a 12mm wrench to one on the back side and remove the coolant pump.
Unscrew the two bolts of the upper hydraulic tensioner cover. Since the tensioner in a discharged state will put pressure on the cover, we hold it so that it does not jump out.
Remove the cover and the hydraulic tensioner itself.
We unscrew the six bolts on the 14 amplifier and remove it. The oil pan mounting nuts were hidden under it.
Use a hexagon to unscrew the remaining screws of the front timing cover (5 pieces), as well as everything that holds the oil pan (11 screws and 4 nuts).
The pallet goes down about two centimeters, the beam does not go any further. But this is enough to pull out the old gasket and, remembering the kind words of the engineers from Gorkov, clean the adjacent surfaces before installing a new gasket.
This is the terrible picture that appears before our eyes.
Now remove the lower timing cover.
Using a hexagon, unscrew the screws of the upper damper and remove it.
Same with the second one. It will come off along with the chain.
The camshafts have a special 30 mm square so that the shafts can be held when unscrewing the sprocket bolt. We hold the shafts with a 30 wrench and unscrew the camshaft sprockets with a 17 wrench.
UAZ Patriot Aventurine › Logbook › Chain tensioners “Rocket”. Or not “Rocket”, HZ.
A little trouble happened in the summer.
At one time, at XX, something began to rattle in the engine, and loudly. But, as soon as you accelerate, everything calms down. I decided that I needed to change the chain tensioners. But there was no time, I drove and drove for a week. And in the morning, for about three seconds, the chain seemed to rustle.
I even took a video on my phone about what was cracking there and wanted to consult on the forum about what it is and what is best to do.
In the evening of the same day, before reaching the house about 500 meters, the engine began to rattle as usual, but not at idle, but while driving and stalled. I tried to start it, but the engine wouldn’t start, although it seemed to catch on and it seemed like it would start just a little bit longer. Error 340 was displayed on the BC, an error in the phase sensor located on the camshaft. Some guys were driving by, saw that I was trying to push my UAZ myself (unsuccessfully), they stopped and helped me push the car into my pocket, thanks to them! Reasoning that the engine was almost starting, which meant the chains were most likely not broken, I went home.
The next morning I decided to figure it out.
I took off the valve cover, the chains are intact, the camshafts are spinning with the crankshaft. But the phases in space are symmetrical and synchronous.
While I was turning the camshafts into place, I noticed that the upper chain tensioner folded all the way, offering absolutely no resistance. This is the reason for the jump.
I took out the tensioner and it turned out to be some kind of LS 406-60.01.10.
The cause was most likely a loose or worn out retaining ring.
On occasion, I looked into the service center, where they repaired my engine 2 thousand km ago and installed these tensioners, because... We couldn’t figure out how to reload the “Russian Bogatyr” I had and decided that I had some kind of bullshit. The service center said that they have a company, direct deliveries almost from the factory itself, they showed a package of 10 tensioners in a box, everything is beautiful, oiled paper, plastic caps on the spouts. Company in one word. But I can squeeze mine in my hands from end to end!
In place of the dead upper tensioner, the LS installed its own “Russian Bogatyr” unit, the lower one left this LS, there are no complaints about it yet. As I understand and read on the Internet, life is harder for the upper tensioner than for the upper one.
On the forum I wrote what and how, they answered that it was most likely a fake, because... The presented photos of the “original” were somewhat different from mine. The dog will figure out who has the original, who has the fake, and who just has a different modification.
Although the design of these HP tensioners is very simple, they are very easy to reload - you take out the piston with the spring, PUSH the bottom in and push it out after the piston. Next, insert the piston, use a piece of plastic bottle to push the retaining ring apart, insert the spring, and slam the bottom shut. Everything is very simple, without any screwdrivers, keys, vices, practically only with your hands.
PS. Here, I found a photo on the forum, the original “Rocket” is on the right. Note the thin groove. And in my “Rocket” it’s wide. So maybe what I have is a fake.
PSS. I found a photo of the original rocket. The original set includes a cap and a plastic translucent patch. but it’s better not to put a snout, otherwise it will become frayed and jam. It is better to install several washers to select the free play of the tensioner so that it works in the most “assembled” state.
source
Let's start assembly
We put on a new crankshaft sprocket and immediately set a mark.
Then we screw on the lower damper and tensioner and install a new chain.
We install the intermediate shaft sprocket and set a mark. We bend the edges of the locking plate. We put a chain on it and lubricate everything with new engine oil. The right side of the chain should be taut.
Let's check again that the marks match.
We put the upper chain on the intermediate shaft sprocket and install the damper. Lubricate everything with clean oil.
The exhaust camshaft sprocket, so that the right branch is tensioned, and the mark on the sprocket is at the level of the upper edge of the cylinder head. Same with the second camshaft.
We install the hydraulic tensioner and screw on the cover. We unscrew the plug and sharply press the hydraulic tensioner with a screwdriver until it discharges. When discharged, it will push out the screwdriver and tighten the chain.
We install the upper damper and check all the marks again.
Carefully place the front cover, having previously lubricated the gaskets and all adjacent surfaces with sealant. Putting the cover on is not easy because you need to hold the tensioner and make sure that the marks do not get lost. We turn the crankshaft two turns and, if the valves do not meet the pistons and all the marks are in place, we put everything else in the reverse order of removal. Fill with oil and antifreeze and start the engine.
Preventive measures
Preventive measures mean cleaning the tensioner and checking the functionality of the unit:
- After disassembly, the parts from each tensioner are placed in a separate container and then washed with gasoline. To clean hidden cavities, use a brush with hard synthetic bristles.
- The washed parts are wiped with a soft cloth and then undergo visual inspection. If scratches or chips are found on the surface of the elements, then the entire hydraulic tensioner mechanism must be disposed of. An attempt to install components from another product results in incorrect operation of the tensioner.
- After assembly, a test run of the device is performed; the plunger rod should not cling to the internal parts of the tensioner. If contact between parts is detected, then further operation of the tensioning device is prohibited.
- Reverse stroke of the plunger, which overcomes the force of the restrictive ring, is not allowed. With further operation of such a device, vibrations of the circuit branches will be observed, leading to damage to the structural elements of the gas distribution mechanism.
Blog about UAZ
The hydraulic tensioner on the ZMZ-40524 engine must be checked and repaired if knocking is detected in the area of the front cylinder head cover and the chain cover. A knock is clearly audible when the crankshaft speed is sharply reduced using a stethoscope placed on the cap plug of the upper or lower hydraulic tensioner. Its causes may be jamming of the plunger and leakage of the ball valve.
Hydraulic tensioner on the ZMZ-40524 engine, checking the condition, disassembling and charging, hydraulic tensioners with and without an adapter, installing a hydraulic tensioner on the engine.
In addition to the hydraulic tensioner, the causes of knocking can also be: wear of sprockets, increased chain elongation, destruction of the chain guide. To remove the hydraulic tensioner, you need to unscrew the two bolts securing the hydraulic tensioner cover, remove the cover with the gasket, then remove the hydraulic tensioner from the hole on the engine in a discharged state. After removing the hydraulic tensioner from the engine, it is necessary to check its condition.
Checking the condition, disassembling and charging hydraulic tensioners used without adapters.
If the hydraulic tensioner plunger does not move when you press on its spherical end with your finger, it is jammed. Jamming of the plunger, as a rule, is caused by skew and jamming of the locking ring, which has burrs or non-flatness at the cut ends that are difficult to see by eye, formed during the manufacture of the ring.
A jammed hydraulic tensioner on a ZMZ-40524 engine can be restored by disassembling it, washing its parts in kerosene and replacing the locking ring. The outer diameter of the ring is 16.6-0.3 mm, the material is spring wire with a diameter of 1 mm.
To check the tightness of the ball valve and the body threads, it is necessary, without pouring the oil out of the hydraulic tensioner, to remove the plunger and spring from the body. Insert the plunger with its spherical end into the hole in the hydraulic tensioner housing. By pressing on the opposite end of the plunger with your thumb, visually determine the amount of oil leakage.
Even a slight passage of oil through a valve or thread indicates a leak. A slight drop of oil is allowed through two diametrically located marks at the end of the hydraulic tensioner housing, designed to allow air to escape from its internal cavity.
Hydraulic chain tensioner for UAZ Patriot
> Engine
24.06.2019
The ZMZ 409 hydraulic chain tensioner ensures uniform tension of the gas distribution mechanism drive when the engine is running. The device is connected to the motor lubrication system; the design includes a shoe that eliminates vibrations of the free branches of the chain. During operation, the tensioner wears out, which leads to the chain drive links slipping over the drive sprockets and disrupting the valve timing.
Find out which hydraulic chain tensioner is best suited for the UAZ Patriot.
Features of the hydraulic tensioner on the UAZ Patriot
To drive camshafts in ZMZ 409 engines, a double chain drive is used. The lower tensioner (located horizontally on the mechanism cover) is used to ensure correct drive of the intermediate shaft. The device acts on the chain through a swinging lever; a plate damper is provided on the opposite part of the chain.
An additional gear is installed on the intermediate shaft gear, which rotates 2 camshafts using a secondary chain drive. The second tensioner is located in the cylinder head; there are 2 chain drive branch dampers. Both tensioners are equipped with locking rings; installation in the valve body makes it possible to dampen chain vibrations mechanically and hydraulically.
Operating principle
The device is a metal body of a cylindrical configuration, which is connected to the oil line. Inside there is a movable plunger equipped with an auxiliary spring. The design of the unit includes a transport stopper, which is used during installation or storage of the removed element.
After starting the power unit, liquid enters the internal cavity of the tensioner, which leads to the extension of the plunger body from the housing.
The element acts on a special shoe or on the tensioner lever (depending on the ZMZ 409 motor model).
The plunger is able to move backward when dampening chain vibrations. When the rotation speed changes, the timing drive oscillates, and force is transmitted to the shoe and to the plunger rod. There is a ball check valve inside the casing that closes the oil channel.
Vibration damping occurs due to spring compression and oil filtration through the gap between the plunger and the housing. The design of the unit includes a special ring that automatically limits the reverse stroke of the plunger as the camshaft drive chain wears out.
Removing the hydraulic chain tensioner
Algorithm for replacing tensioners on ZMZ 409 power units installed on Patriot SUVs with a manual transmission:
- To remove the tension devices, you will need a 12 mm box spanner and a flat blade screwdriver. To change the upper assembly, you need to unscrew 2 bolts. The body of the device is held by hand as the product is pushed out of the mounting socket by the force of a compressed spring.
- Remove the cover and remove the worn element from the standard hole. When dismantling the device, it is recommended to inspect the shoes and sprockets, since wear of the elements increases the noise of the camshaft chain drive.
- To fix the case during further disassembly, vise jaws are used, spaced apart at a distance of 19 mm. It is strictly forbidden to clamp the casing, as the material will deform and crack.
- Using a flat-head screwdriver, unscrew the screw plug with the valve installed inside.
- Pull the spring out of the housing cavity and then pull out the plunger.
What does a hydraulic tensioner consist of?
The lower tension unit is removed and disassembled according to a similar scheme. Before starting dismantling, it is recommended to prepare a rag or rag, since 15-20 ml of engine oil will spill out of the channel.
https://www.youtube.com/watch?v=9Q6UXUHUap8
The removed tensioner covers must be washed with gasoline and the bolt closing the technological channel must be unscrewed. The thread is cleaned of contaminants, coated with thick lubricant, and then the bolt is screwed into place.
Preventive measures
Preventive measures mean cleaning the tensioner and checking the functionality of the unit:
- After disassembly, the parts from each tensioner are placed in a separate container and then washed with gasoline. To clean hidden cavities, use a brush with hard synthetic bristles.
- The washed parts are wiped with a soft cloth and then undergo visual inspection. If scratches or chips are found on the surface of the elements, then the entire hydraulic tensioner mechanism must be disposed of. An attempt to install components from another product results in incorrect operation of the tensioner.
- After assembly, a test run of the device is performed; the plunger rod should not cling to the internal parts of the tensioner. If contact between parts is detected, then further operation of the tensioning device is prohibited.
- Reverse stroke of the plunger, which overcomes the force of the restrictive ring, is not allowed. With further operation of such a device, vibrations of the circuit branches will be observed, leading to damage to the structural elements of the gas distribution mechanism.
How to assemble the device
Installation of a new or cleaned tensioner is carried out after lubricating the channel in the cylinder block. To reduce the risk of oil leakage, it is recommended to replace the gasket located under the tensioner cover.
Before installation, the tensioner is charged, which is performed with a special mandrel or using improvised means.
The assembly algorithm for a cleaned tensioner for the ZMZ 409 motor consists of the following steps:
- To assemble the elements, you will need to make your own cylindrical mandrel from a steel sheet. To form the device, it is necessary to cut a strip of sheet 12-15 mm wide and 23-25 mm long. It is recommended to use a material with a thickness of about 1.0 mm to ensure structural rigidity. The mandrel is formed with pliers, the diameter of the part is equal to the diameter of the plunger.
- Insert the bushing into the body cavity, the side walls press the limit spring.
- Push the plunger according to the template (until it stops at the end of the body). During installation, it is allowed to use a thin screwdriver, which additionally bends the ring spring element.
- Remove the template from the housing.
- Mount the spring into the cavity of the plunger; the unit is installed in a vice (clamping the casing is prohibited).
- Carefully tighten the screw plug with the valve. When twisting, you feel the force caused by the compression of the spring.
- The tensioner is considered to be correctly assembled with the plunger completely pushed into the body cavity.
- Mount the part on the engine; do not apply any force to the protruding plane of the plunger. After placing the part in the channel of the block or cover, do not press the tensioner.
mechanical chain tensioners
The topic of the article is the ZMZ mechanical chain tensioner. I want to review the three main manufacturers present on the market. Namely: Medvedev tensioner (Rodos-M), “Russian hero” (Rusmash), ISAI (Isaev). All tensioners were purchased first-hand and installed by me, so we can not consider the issue of counterfeit. They were also supplied to the engines not in a single copy, but in several dozen copies, so certain statistics have accumulated.
Tensioners (from left to right) Medvedeva, Rusmash, Isaeva
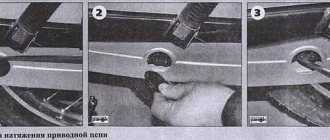
Replacing the chain tensioner on VAZ 21213, VAZ 21214, VAZ 2131
Welcome! Chain tensioner - as is already clear from its name, it is only needed to tension the chain so that it does not loosen while the engine is running, but over time this part breaks for various reasons, this happens, sometimes simply because of very heavy loads this tensioner cannot withstand breaks, for example, if you keep the engine speed in the red zone for a long time, the tensioner cannot withstand and breaks, but it can also break because it is not very durable, for example, there are a lot of very bad tensioners on the market at the moment qualities that really fail very quickly and after that they will need to be replaced with a new one, and you will learn how to do this from this article.
Note! In order to replace the chain tensioner, you will need to stock up on: A basic set of wrenches, which will contain the most basic keys that you use almost everywhere in the car!
Summary:
Where is the chain tensioner located? It is located on the side of the engine, it can be easily found by the way if you approach the car from the right side of the engine compartment (The countdown starts from the rear of the car to the front), there is also a battery installed nearby and there is a standard injection receiver in the form of curved pipes ( It is white), so when you stand on this very right side, look for the place indicated in the photo, this is the same tensioner.
Note! In the photo above there is one nuance, there is a completely different tensioner that was never installed on Niva cars, so don’t pay much attention to the shape of this tensioner, but just find out approximately where it is and that’s it! (There will still be a tube coming from the original tensioner, you will immediately understand, just take a closer look and it is all located almost in the middle part of the engine)
Medvedev tensioner (Rodos-M)
- Calibrated rod spring.
- The rack has very good steel. During my entire practice of installing these tensioners, both on ZMZ and VAZ engines, no grinding of the rack was noticed.
- There is a large “patch” on the rod shank, there is no problem of pushing through the tensioner shoe.
- Thick base plate. Eliminates the moment of deformation during reverse “blows” of the chain.
- There are no problems when the ZMZ engine is without air conditioning. But if a UAZ Patriot arrives with a horse-drawn car, shamanic dances with a tambourine begin. In front of the surprised client's eyes, the grinder is picked up, and the support plate begins to fit the cutouts in the plate on which the generator and air conditioning compressor sit.
- You need to look for the clamping bolts in advance, since the standard ones don’t fit.
Tensioner "Russian hero" (Rusmash)
- Good quality metal.
- There are no complaints about the main spring, the chain does not overtighten.
- Ease of installation. The hydraulic tensioner is removed, a mechanic is put in its place and off we go. Standard details everywhere. Both the tensioner cover and bolts.
- The coolest feature. This is an indicator of timing chain wear.
- The best price-quality ratio.
Minuses. No larger ones were seen. From the small ones.
- It is very inconvenient to pull out the pin that was invented at the manufacturing plant. I had to make my invention from welding wire and everything turned out very well.
- A small contact patch with the tensioner shoe on the tail of the rack.
- Large rubber seals on the tensioner housing. Causes some inconvenience during installation. You have to deepen the tensioner as far as possible by hand, and then press it with the lid and bolts to its final position.
Tensioner Isay (manufacturer Isaev)
- They work well on the top branch. Especially when the central gear block is made out of alignment. They practice jerks.
- They tighten the chains, both on ZMZ engines and on Niva and classic engines. The only broken double-row set I saw on the “Medvedev chains” was killed by these tensioners.
- The base plate is made of thin metal. The upper ZMZ chain does not move as smoothly as the lower one, but with elements of “impact” throughout the entire timing mechanism. The tensioner does not have time to work with the clock spring, but it works with the housing. Over time, the support plate bends and engine oil begins to pour out from under it.
- The most expensive price available.
- You need to look for your own bolts for fastening.
Mechanical chain tensioner ZMZ - summary
In terms of manufacturing quality, trouble-free operation and installation, Medvedev tensioners are in first place. Basically, they come only in his timing kits and very, very rarely, it is possible to get them separately. In St. Petersburg they learned to deal with the Isai tensioner in their own way. They are set to semi-automatic mode. That is, a car arrives for an oil change, the tensioner is unlocked, the engine runs a little, the tensioner finds a new position, and then it is fixed again. And so on until the next oil change. The ZMZ “Russian Bogatyr” mechanical chain tensioner is optimal in terms of performance, availability and price-quality ratio.
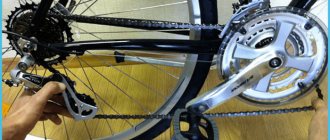
How to install a chain guide on a bicycle
Chain damper.
You can also replace the chain tensioner on a bicycle yourself. As an example, we can take the most universal fastening model “ISCG”. Installation requires very little time - half an hour. So, before installing the tensioner, you will need to prepare 3 hexagons of size 2, 4 and 5 mm, a removable carriage device, a connecting rod squeezer, a wrench, a lubricant and a thread lock. To make assembly easier, you can use step-by-step instructions:
- You must immediately remove the connecting rods and sprockets. In some cases, even a carriage.
- The largest sprocket needs to be moved to the place of the middle one, and a rockring (stabilizer part) is installed in the large area.
- The so-called “banana” is screwed to the outer projections of the carriage.
- The bolts are tightened.
- The correct installation is checked: if the travel of the suspension, which has 6 inches, is turned to 12 o'clock, and with another value to 11:30, then everything is installed correctly. Please note that when the suspension is folded, the chain may lightly touch the groove.
- After checking, a little thread locker is dripped into the fasteners.
- Then the connecting rods are mounted, the chain is put on, and the rollers for pressing are adjusted. Please note that the grooves must be located exclusively in the center.
- The internal “pancake” is extended towards the star so that the distance between all similar elements is strictly proportional. The chain cannot touch parts.
- The bolts are secured.