Ways to solve the Grants generator problem
| If almost immediately after purchasing a LADA Granta you find problems with the generator (hum, noise or howling), then most likely the reason is in its bearing. This is a well-known disease of the Lada Grant, so AvtoVAZ is replacing the generator under warranty. Let's figure out what is the reason for the rapid failure of the generator and how to deal with it. |
According to numerous reviews from Lada Granta car owners, it turned out that the tension of the alternator belt on their cars does not correspond to the norm, that is, the alternator belt is overtightened.
By the way, according to the norm, when pressed with a force of 100N (10kgf), the belt deflection should be 8-12mm. Anyone who knows even a little about cars knows that adjusting the belt tension is an important point; the service life of both the belt and the generator will depend on this operation. Thus, the problem with the Grant generator is that Lada Granta cars with 8-valve VAZ-11183, VAZ-21116 and VAZ-11186 engines do not have alternator belt tension. But this problem can be solved, and in different ways:
Selection of components
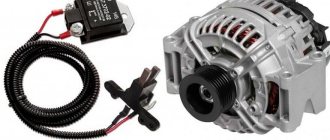
Until recently, the Grants produced by the Volzhsky Automobile Plant were equipped with KZATE 115A generators with a rated voltage of 14 V and a maximum electric current of 115 A. Car owners often complained about the low quality of the diode bridges of these units, and many other questions also arose, for example, regarding the quality of its assembly.
A much more reliable, and now the most widespread, generator is the Bosch 135 Ampere generator, which all Grants have been equipped with over the past few years. Such generators cost approximately 5,000 rubles, but do not have any serious complaints in terms of quality. A fairly powerful unit 9402.3771-06 with a maximum current of 90 A is also suitable for Granta. It is designed for installation on VAZ-1117-1119 Kalina cars, its approximate price is from 4,000 rubles. and higher.
Separately, it is worth mentioning the generator belts. Their recommended service life on Grants is similar to the warranty period of the car, but, as experience shows, the belt breaks after about 5,000 km. However, preventing belt rupture is quite possible; this is facilitated by regular checks of its condition, ideally carried out before each trip. The belt should not be over-tightened, but it should not sag too much. Normally, when you press it, the belt is slightly pressed, and when you try to turn it over, it turns over on its edge without any problems.
It is also important for the owner of the Grant not to miss the moment of replacement. It is not difficult to understand that a possible belt rupture is imminent - it begins to make whistling sounds when the engine is not warmed up and in damp weather. If a similar problem occurs to you on the road, check the degree of belt tension - quite often it only needs to be tightened a little, after which you can safely drive on. But you will still have to replace such a belt.
Replace the KATEK generator with a Bosch
From July 24, all Grant cars began to be equipped with new Bosch generators (2170-3701010-13 (F000 BL0 652)) with a capacity of 110A. This generator has an increased current output compared to the 2170-3701010-10 generator, especially at idle speed (55-60A at 800 rpm of the crankshaft). Another advantage is increased reliability.
Replacing bearings on a Bosch Grants generator
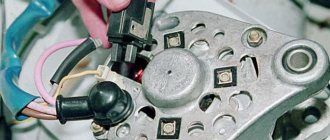
To eliminate the defect, it is necessary to dismantle the generator, carry out an inspection, and replace worn elements. Most often, the causes of failure are associated with an electrical or mechanical component.
Modification of the Lada Granta generator mounting
If you don’t care about the warranty, you can slightly upgrade the generator mounts. You will need: a grinder, a sharpener, the top bolt of the generator (2cm longer than the original one).
Thus, we have the opportunity to slightly adjust the belt tension.
Lada Granta VAZ 2190 (engine 21126)
- We hang the front part of the car, unscrew the bolts, and remove the right front wheel.
- For safety reasons, remove the terminal from the battery.
- Release the top fastening and move the converter to the side until it stops.
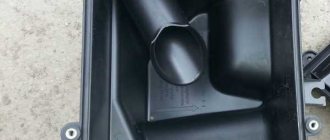
- Unscrew the six bolts and remove the engine protection.
- Through the opening of the wheel arch, remove the belt from the generator pulley and crankshaft.
- Unscrew the generator power cable from the back.
- Release the lower fastening and remove the bolt.
Next, we carry out preventive maintenance, replace worn parts, and install in the reverse order.
Replacing the Lada Granta generator bracket with the Kalina bracket
The Lada Kalina bracket includes a tension roller, which allows you to tension the generator belt, thereby affecting the service life of the belt and bearing of the Granta generator.
The grant has a bracket with number 2190 without holes for the tensioner and tensioner pulley, so you need to unscrew it and install it instead:
- Bracket 1118-1041034 Lada Kalina.
- Tensioner roller.
- Tensioner bracket
- Bushings.
- Belt from 1118.
The cost of the issue is 1700 rubles.
We remove the Granta generator, dismantle the old bracket. We install the Kalina bracket (its fastenings are similar), and then the generator itself.
We tension the alternator belt according to the norm described above.
By modifying the generator bracket in this way, we lose the warranty, but recently they say that along with replacing the generator, a tensioner is also installed under warranty.
Disassembling the generator
We disassemble the generator to check and replace the voltage regulator, rectifier unit, rotor, stator, and bearings.
Having pressed the casing latch, use a screwdriver to lift the generator casing. Similarly, press out two more housing latches...
...and remove the generator casing.
Using the “8” head, unscrew the two bolts securing the brush holder.
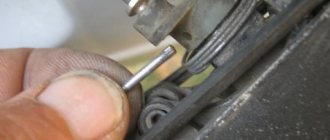
Use a 12mm wrench to unscrew the threaded bushing...
...and remove the brush holder lead from the contact bolt.
Using a screwdriver, pry up the tip of the wire... ...remove it from the terminal of the rectifier unit...
...and remove the brush holder with the voltage regulator assembly.
Using the “8” head, unscrew the three bolts securing the rectifier unit.
Using a screwdriver, press the spring clamp and disconnect the stator winding terminal from the rectifier unit. Similarly, we disconnect the remaining five terminals of the stator winding from the rectifier unit.
Use a 12mm wrench to unscrew the nut...
...and remove the rectifier block. We clamp the generator in a vice by the mounting eye.
We insert a screwdriver between the fan impeller and the generator cover jumper...
...and holding the anchor from turning, use a 24mm head to unscrew the pulley mounting nut.
Remove the generator pulley. We use a marker to mark the relative positions of the generator covers.
Using a 8mm socket, unscrew the four bolts holding the covers together.
Using a screwdriver to pry off the back cover...
...we disconnect the generator covers.
Remove the stator from the back cover.
Remove the contact bolt from the back cover.
Remove the plastic bushing from the rear bearing. We screw the pulley mounting nut onto the rotor shaft flush with the end of the shaft...
...and striking the end of the shaft with a hammer with a plastic striker, we press the rotor shaft out of the front bearing...
...and remove the rotor from the front cover. To replace the front bearing...
...press out the bearing using a suitable tool head, applying force to the outer ring of the bearing. We press the new bearing into the cover with a tool head, applying force to the outer ring of the bearing. To replace the rear bearing...
...using a two-jaw puller we press the bearing from the rotor shaft. When performing this operation, the puller screw should be pressed exactly into the center of the shaft so as not to damage the plastic insulator of the rotor slip rings. To install the rear bearing, we rest the front end of the rotor shaft on a wooden block and press the bearing onto the rear end of the shaft with a mandrel or a piece of pipe of a suitable diameter, applying force only to the inner ring of the bearing. We assemble the generator in reverse order.
Generator Lada Granta - problems and solutions
Lada Granta cars appeared on our roads relatively recently, however, unfortunately, many owners of this model of the Russian automobile industry have already noticed the presence of many chronic “sores”, among which one of the most unpleasant is the low reliability of the standard Lada Granta generator.
As always, the most correct method of solving a problem is, at the same time, the most radical. In this case, it means replacing the 9402.3701 generator with a more reliable and advanced product, for example, a 110 Amp generator from Bosch. Such modernization does not require structural changes and will help to get rid of problems associated with power supply for many years, although it must be recognized that such modifications will not be cheap.
As a preventive measure, you can slightly improve the energy generation system on the Lada Granta by replacing the clearly unsuccessful bracket on it and, in this case, we can advise installing a Lada Kalina bracket, which includes a special roller for adjusting the belt tension. Despite its outward insignificance, such a simple modification can significantly extend the service life of the generator bearings.
However, if you have the desire and some practical skills, then it is quite possible to repair the Lada Granta generator yourself.
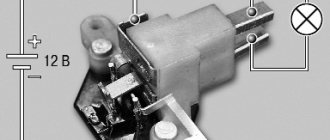
Lada Granta generator voltage regulator - check and prevention
- To check the functionality of the regulator, it is necessary to unscrew the rubber cover and connect the “positive” wire of the will, respectively, “throw the negative wire” onto the generator housing;
- We start the engine and turn on any significant load (for example, headlights);
- After about fifteen minutes of engine operation and reaching a stable average speed, measure the voltage, which should be in the range of 14.4-15.1V;
- The serviceability of the capacitor is checked with a megohmmeter or tester with a measurement scale of 110 MΩ, while the probes of the device are connected directly to its terminals. At the moment of connection, the device should demonstrate infinite resistance, then the resistance decreases and again begins to tend to infinity;
- With the removed regulator, the smooth movement of the brushes is monitored, as well as the degree of their abrasion - the brushes must protrude by at least 5 mm, otherwise the brushes are replaced together with the brush holder;
- Among other things, it is recommended to check the general functionality of the brush assembly, for which a test lamp is connected to the brushes, and a voltage of 12V is applied between the terminal and the ground of the brush holder - the test lamp should light up, and when the voltage increases to 15-16V, it should go out. If the specified operating logic is violated, the regulator must be replaced.
Common causes of generator failure:
- wiring damage;
- high load from energy-intensive consumers;
- rotor failure;
- brush wear;
- the drive belt is loose;
- poor electrical connection;
- ingress of oil and coolant.
Low generator voltage is caused by:
- slipping of the drive belt;
- faulty rectifier diode;
- voltage regulator malfunction;
- corrosion of connecting wires;
- electrical faults within the device or regulator.
High voltage is caused by:
- low battery electrolyte level;
- damage to the battery plates due to overheating.
Any deviation from the normal operation of the generator on VAZ cars leads to its wear and failure.
How to replace the Grant alternator belt
The replacement process is not simple and depends on the equipment of the car: whether there is a tensioner, air conditioning. In the latter case, you cannot do without a lift and dismantling the engine mount due to the air conditioning compressor clutch pulley.
For a Granta with air conditioning, for installation you will need to hang the wheel and remove one engine mount.
How to change a belt on a Grant 8 and 16 valve without air conditioning and tensioner
What you will need for work :
- a knife, if you just need to cut off an old part;
- crank or ratchet with head 13;
- long strong wire;
- flat screwdriver;
- partner – you can replace it yourself, but it’s easier with an assistant.
Step 1. Dismantling
The car is on a flat surface, neutral is engaged without the handbrake. The battery is disconnected .
If the old belt is not needed, we cut it in an accessible place and take it out.
If you need to save the old one, do everything up to step 3.
A replacement is needed with a length of 8223mm, six-wedge. Called 6RK 823. PHOTO: www.zr.ru
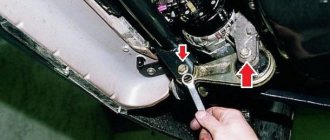
Step 2. Remove the generator mount
We approach the generator mount with head 13:
- we remove the lower bolt by 2-3 turns;
- Use it to completely unscrew the top bolt.
In this situation, we proceed to installation. PHOTO: www.zr.ru
Step 3. Raise the part
Scroll the generator up. The top mount becomes higher than the bracket to which it is screwed.
We press the part to the engine. We fix it with strong wire. For example, we hang it from the cylinder head bolt.
In this situation, we proceed to installation. PHOTO: www.zr.ru
Step 4. Install a new one
We pull the new one onto the pulleys.
The installation takes place in the position of the generator when it is pressed against the engine. PHOTO: www.zr.ru
Engage fifth gear , push the car back, pressing the belt against pulley 1 in the picture. This is where a helper will come in handy.
As soon as we put it on, we work in reverse order:
- unplug the generator;
- press it into working position;
- return the upper mounting bolt and tighten the lower one.
Replacing the alternator belt on a Grant with air conditioning
It's more difficult here. Step by step :
- we drive the car onto a lift or overpass;
- remove the tensioner;
- take off the front right wheel;
- we support the internal combustion engine and dismantle the pillow;
- change the required part.
Generator installation
To install the generator, you will need to do everything described in the “Removing the generator” section, but in reverse order. In addition, you will need to replace the alternator belt, the cost of which is approximately 800 rubles. To carry out this manipulation, you will need a mounting blade, a 13mm wrench and a knife (you will use it to cut off the old belt). A minimum of metalworking skills would also be useful in such work.
The belt is changed with the engine not running; before working with the battery, the terminal must be removed. The order of actions you perform will be as follows:
- To begin with, the front wheel and mudguard are removed, for some modifications it is necessary to remove the crankcase protection, and for an injection engine, the crankshaft position sensor is removed;
- The belt tension is weakened; for this purpose, the tensioner nut (or the generator itself) is loosened;
- Remove the old belt from the upper pulley and compare it with the one being installed, making sure they are identical;
- If necessary, find out the cause of the belt malfunction and eliminate it;
- The new belt is installed as follows: start with the crankshaft pulley, then throw the element onto the generator, and then onto the water pump, adjust its tension (the belt should not sag excessively when pressed);
- Reinstall the battery terminal, then start the engine and turn on the heater, headlights, air conditioning and other large consumers of electrical current and observe their operation (normally there should be no whistling sounds or extraneous noise, and the headlights should maintain equal illumination at any speed);
- After this, the previously removed elements must be installed in their original places.
Instructions on how to assemble a tensioner on a grant
Any Grant has space for installing a tensioner. To assemble this you will need:
- generator bracket from Kalina;
- tension roller and its bracket;
- screw tensioner;
- new belt from Kalina;
- bushings and bolts.
Assembly diagram, full list of parts with article numbers, see below:
The tensioner is not installed from the factory in order to save money. SCHEME: Lada.online
in detail here:
Replacing generator brushes with removing the converter on the Lada Grant (engine 11183, 21116, 11186)
Tools and materials are similar to previous repairs.
- The car is placed within the perimeter of the repair area, basic safety measures are taken, and the parking brake is released.
- Open the hood and remove the terminals from the battery to avoid a short circuit.
- Unscrew the six bolts around the perimeter and remove the engine protection.
- Disconnect the wire block from the converter.
- Remove the protective cap for securing the power cable.
- Unscrew the bolt of the lower mounting of the generator.
- Use the mounting tool to move the converter forward towards the radiator and remove the bolt.
- Remove the belt from the pulley.
- We remove the generator from under the car.
We carry out troubleshooting, inspect the physical condition of adjacent mechanisms and parts. We replace with new ones as necessary.
General questions about working with the Grant generator
Let's consider general questions: everything except replacement.
Tension check
There are two approaches: visual assessment and physical.
Visual assessment of condition:
- the car is on a flat surface, the gear is in neutral, the handbrake is off, the hood is open;
- We don’t start the car - we put it in 5th gear;
- We opened the hood and found a generator: we push the car back, resting against the bumper;
- We inspect the required part along its entire length: are there any breaks or cracks? It needs to be changed.
Poor quality will lead to unexpected problems on the way.
Physical assessment :
- if you have a tool that measures pressure force: press the belt with a force of 10 kg*s - the deflection should be no more than 10 mm;
- there is no special tool: we try to turn it across - it should turn no more than 90 degrees.
How to tighten the alternator belt on a Grant
This section applies only to machines with a tensioner. No - change the part or see above how to install it.
Subsequence:
- we use ring wrenches 8, 19;
- Throw key 19 onto the lead screw;
- wrench 8 for locknut;
- we touch;
- Now you can turn the lead screw: clockwise to loosen, counterclockwise to tighten;
- got the desired result - tighten the locknut.
It is better to take ring wrenches, since a head with a ratchet or a wrench will not work.
When to change: technical regulations for replacing a VAZ 2190 belt
AvtoVAZ requires checking the condition of this part every 15,000 kilometers .
every 30,000 kilometers, regardless of condition.
How to remove a generator on a Grant
It needs to be removed for repairs, replacement of bearings or rollers.
The step-by-step process involves:
- remove the negative terminal from the battery;
- working with the generator: disconnect the wiring harness from it;
- remove the cover of the power wire nut, remove the nut and remove the wire from the bolt;
- unscrew and pull out the upper and lower fastening bolts - to work with the lower one, you may need to climb into a hole, throw off the tin protection of the internal combustion engine and dismantle it from below;
- move the part to the right mudguard, remove the belt, and remove it.
You can do without a hole . Example:
How to change the generator on a 16-valve Grant
The generator mount on the 16-valve Granta variation is distinguished by the presence of a belt tensioning mechanism. Therefore, the procedure for replacing the generator on this model is slightly different. To work, you will need socket wrenches 8, 10 and 13. As when dismantling the generator from the 8-valve Granta, before starting work you need to remove the ground terminal from the battery to eliminate the possibility of a short circuit. After this, it is necessary to remove the engine protection by unscrewing the 4 front and two rear bolts securing it to the body parts. The 16-valve “Granta” generator is removed as follows:
- disconnect the block from terminal “D” on the generator;
- remove the rubber cap covering the “B+” terminal of the generator;
- Using a 10mm wrench, unscrew the nut holding the wire tip;
- loosen the tension bar nut using a 13mm wrench;
- by rotating the tensioner adjusting bolt counterclockwise, loosen the tension on the Grant generator belt (a 10mm socket wrench is required);
- move the generator towards the engine and remove the belt from the pulleys;
- Unscrew and remove the adjusting bolt of the belt tension mechanism from the generator mounting bracket;
- remove the tension bar;
- unscrew the lower nut securing the “Grant” generator;
- remove the spacer bushing and remove the lower mounting bolt;
- remove the tension bar;
- pull out the LADA Granta generator.