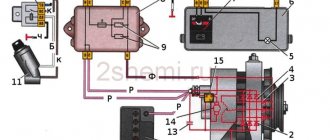
Generator voltage regulator VAZ 2110
The car has long become one of the most popular vehicles, largely due to its extremely high level of comfort. Many components require replacement from time to time, and in particular the voltage generator. In some cases, you can get by with a local method, in others it is necessary to apply a radical solution. Replacing the voltage regulator of a VAZ 2110 generator seems at first glance to be a small local problem, but it can only be solved by radically resorting to generalized repairs. Replacing the voltage regulator on a VAZ 2110 generator is a task that you can handle on your own.
Advantages of installing a three-level regulator
The three-level voltage regulator on the VAZ 2107 is capable of maintaining a constant voltage supplied by the generator to the vehicle network.
With this product it is possible to save and increase the battery life. In addition to regulating voltage, three-position regulators are capable of maintaining current within a certain range. Some of the main advantages of the device in question include:
- The main board of the device is located not in the generator itself, but away from it, which contributes to less heating of the product, as well as extending its service life.
- Possibility to regulate the voltage level manually thanks to a special switch. The device operates from a switch.
- The charge level is significantly higher, in contrast to standard products.
Problems with starting the engine, especially on frosty days when it is very difficult for the starter to start the engine, can be avoided by replacing the standard device with a three-position one. Large loads on the electrical circuit in a car, such as headlights, heater, heated glass, can contribute to battery discharge, even if the engine is running and the standard product is in good working order.
Types of regulator relays are simple, three-level and with temperature compensation. In the brush section of a standard seven generator, in most cases, a temperature-compensated option is installed. But, as practice shows, in terms of thermal regulation, these regulators are mostly ineffective. Recently, among drivers of the VAZ 2107 and other Lada models, the three-level type is gaining more and more popularity. Car owners who have installed such a regulator overwhelmingly recognize it as more effective than the standard one.
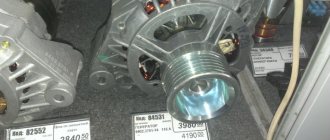
Characteristics of the Energomash device for VAZ 2107
The Energomash voltage regulator for the VAZ 2107 is equipped with three “25C” type diodes and a mode switch. With their help, a three-stage voltage change is carried out. A three-level balancer is also called a current injector, since the device is capable of maintaining it at a level of up to 6A. The main functionality of the three-level voltage regulator for the VAZ 2107 model "Energomash" is based on changing the current from the generator, thereby increasing the voltage of the on-board circuit to 13.6-14.7 V.
The first operating mode provides for maintaining the voltage at the generator output at 13.6 Volts. The switch should be installed in a position where the ambient temperature is +20 degrees and above. The switch in the neutral position should be set at temperature values from 0 to +20 degrees. And in the third position, the generator will produce a voltage of 14.7 V when the air temperature is from 0 to -20 degrees.
Changing the brush assembly
Replacing a standard product with a VAZ-2107
Connecting a three-position regulator, or rather, changing a standard product, does not present any difficulties. After purchasing the product, you must complete the following steps:
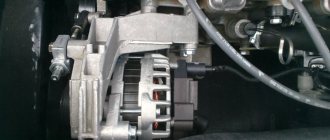
- Initially, you need to remove the protective cover of the generator. Don't forget to disconnect the negative terminal from the battery.
- The standard part is removed by unscrewing two bolts using a screwdriver or a “6” key, which depends on which VAZ generator is installed on the car. It is also necessary to remove the terminal.
- After this, we compare the standard device with the three-level one. The brushes and fasteners must be identical in design, otherwise the product will need to be replaced.
- A new product is installed in place of the standard “tablet”, after which it is fixed with fasteners (bolts).
- The body of the product should be secured to the ground of the car in any convenient place (pictured below). This is not difficult to do, since the wire is long enough.
After installing such a product, the owner of a VAZ-2107 car will be able to forever forget about constant problems with a dead battery, since the new regulator will recharge it more stably under certain temperature conditions.
How to determine the malfunction?
Signs of a breakdown in the generator:
- A light on the dashboard lights up (short-term or constantly) indicating that there is no charging - a red battery.
- The battery is under or overcharged.
- The headlights shine dimly or flicker noticeably, the wipers work unstably and constantly change speed.
- The electrolyte in the battery boils, the headlights shine brightly, and sometimes the lamps come on.
- There is noise from the generator.
This is a brief description of the problems, but you need to consider them in more detail in order to repair the generator on the VAZ 2114. The cost of a complete repair will be no more than 1,200 rubles.
How to remove a generator on a VAZ 2107 Everything is as simple as shelling pears
Diagnostics of the relay voltage regulator of the generator VAZ 2109Post navigation
- Keys 10, 17, 19;
- Set of heads;
- Ratchet;
- Mount;
- Hammer and punch.
First, remove the chips from the generator. The wire to terminal “30” is secured with a nut; unscrew it using a 10-mm open-end wrench; Using a 17 key, loosen the adjustment bar and press the “gene” to the cylinder block. Usually this can be done by hand, if it doesn’t work, use a pry bar. Remove the belt; We remove the adjusting bar; to do this, unscrew a pair of 17 nuts. In extreme cases, it is enough to dismantle only the nut that is on the generator itself; Unscrew the nut 19 from the generator mounting screw. It is most convenient to use a ratchet for this; Gently tap the end of the screw to move it out of place. Next, hit the head of the screw to knock it out. In the end, you will have to support the generator, otherwise it will warp and the screw will jam; We remove the generator. It is pulled down, between the bracket and the cross beam. Installation is carried out in reverse order
At the same time, pay attention to the installation and tension of the belt: Install the adjusting bar, the fastening screw should not be tightened; Place the belt on the pulleys; Using a pry bar, press the generator away from the engine until the belt is fully tensioned. Holding the part in this position, tighten the fastening nut.
- The wire tip is removed from the relay output;
- A pair of mounting screws are unscrewed; for this you will need a Phillips screwdriver;
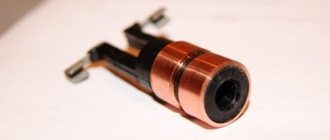
- The relay is removed along with the brush holder. At the same time, inspect the condition of the brushes. If they are shorter than 10 mm, or one is noticeably smaller, then the relay should be replaced. The brushes cannot be changed separately;
- To check, terminal “B” is supplied with power from the positive of the battery, and negative is supplied to ground. After that, we check the voltage on the brushes, it should remain within 13-13.5 V without twitching.
AutoFlit.ru
Replacing generator brushes for Lada Granta (VAZ Granta)
You will need: a flat blade screwdriver, 8”, 12” wrenches, “7”, “8”, “24” socket wrenches, hammer, soldering iron, DC voltmeter, megger.
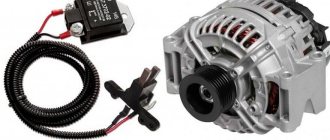
The operation of the voltage regulator is to continuously automatically change the generator excitation current so that the generator voltage is maintained within specified limits when the rotation speed and load current change. If necessary, you can check and replace the voltage regulator without removing the generator from the Lada Granta.
Replacing the voltage regulator on the generator from an old model to a new one
| Old-style voltage regulators do not see the real voltage in the vehicle's on-board network, but only try to guess it from the voltage on the additional diodes of the bridge, which does not work very well. Since April 2004, generators began to use voltage regulators of a new type, which see the real voltage in the on-board network thanks to feedback and adjust it in real time, which avoids voltage sag when consumers are turned on. |
About the compatibility of voltage regulators and VAZ generators
- — 372.3701 installation RN 1702.3702-01 — VTN.
- - 9402.3701/3202.3771 installation RN 9111.3702 - VTN, 9111.3702I2 - VTN, or 9333.3702-02 - VTN.
- — 5102.3771 installation RN 846.3702 — Orbit.
Reasons for VAZ 2110 battery discharge
— 9402.3701/3202.3771 with installation of LV 93.3702 — Astro, 941.3702 — Autoelectronics, 844.3702 — Orbit, 845.3702 — Orbit, 611.3702-05 — Energomash, 611.3702-07 — Energomash, 793 1.3702 I4 - Electric module, 7931.3702-01 - VTN, 9444.3702 - VTN, 9333.3702-04 - VTN.
Replacing the old-style voltage regulator with a new generator model
- without consumption: 13.75-13.8V.
- with consumers: 13.6V.
- without consumption: 14.4V.
- with consumers 14.3V and freezes at this figure.
xn--2111-43da1a8c.xn--p1ai
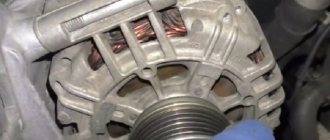
Brush mechanism failures
Faults can be divided into two types: breakdown of brushes or voltage regulator. Replacement of brushes and relay regulator is carried out without dismantling the generator. Diagnostics can also be done using improvised means - a pair of AA batteries, a battery, a light bulb or a tester. The cost of the brush assembly is quite low, so you don’t have to check it, but immediately install a new one and forget about the problems. But if you get excited about the idea, then diagnostics are performed as follows:
- Connect power to the voltage regulator.
- Connect the incandescent lamp to the brushes.
- At a voltage of 12-14 Volts, the lamp lights up.
- When increased to 15-16 Volts, it goes out.
This is normal operation of the regulator. If the lamp behaves differently during diagnostics, we can talk about a breakdown of the relay regulator. It is also worth mentioning the signs of worn brushes:
- There is a decrease in voltage in the on-board network.
- The battery is not charging.
- Voltage surges are observed.
After removing the brushes, visually assess their condition - if the length is less than half a centimeter, then you can safely throw them away. Also pay attention to how the brushes of the VAZ 2114 generator move in the grooves - if there are jams, it is better to install new ones or drop a little clean oil. Be sure to evaluate the condition of the slip rings on the rotor; sometimes they need to be ground. After installing the new brushes, it takes a few minutes for them to start working properly.
How to remove a generator on a VAZ 2114 and 2115 Available methods
Lada 2107 Arkano-mobile Samara Logbook Replacing the heater tap in a VAZ 2107 with a tap from a VAZ 2108 with its removal from the passenger compartment under the hood
- The terminal is removed from the battery; this should be done for all work on the car’s electronic systems;
- The car is jacked up, the right wheel is removed;
- The mudguard is unscrewed;
- Remove connector block D from the generator;
- After that, using a 10mm wrench, unscrew the wire from terminal B++. The wires are removed;
- The generator adjusting screw is loosened. The belt is removed. The screw should be completely unscrewed. Remove the tension bar;
- Using a 17 socket, unscrew the 3 screws securing the generator bracket to the cylinder block;
- The generator is removed;
- Remove the bracket, to do this the nut is unscrewed, this is done with a 13 key. The screw is removed.
- Unlock the cover fastening latches and remove it;
- Use a Phillips screwdriver to unscrew the 2 screws securing the voltage regulator;
- The block of wires from the regulator is disconnected, and it is finally removed from the generator;
- Using a 10mm wrench, tighten the nut securing the capacitor wire. Next, unscrew the screw securing the capacitor itself;
- We remove the diode bridge. To do this, unscrew the screw securing the block with a Phillips screwdriver. Next, unscrew several screws securing the winding terminals. There are insulating washers on the screws;
- We remove the winding leads and remove the diode block;
- While holding the head from turning with a gas wrench, use a hexagon to unscrew the pulley;
- Using a Phillips screwdriver, unscrew the 4 screws holding the covers together;
- We mark the position of the covers relative to each other. Separate both halves;
- We remove the stator;
- We clamp the cover with the rotor in a vice. We knock it out with a punch;
- All that remains is to remove the bearing using a puller.
AutoFlit.ru
Alternator Removal Tools
A bracket is attached to the engine block (approximately in the middle). The generator housing is secured to the bracket on the block using a special strip. Thanks to it, it becomes possible to adjust the belt tension. To remove the generator, you will need the following tool:
- Wrenches (preferably box and open-end) with sizes “10”, “13”, “17”, “19”.
- Some vehicles may require a "15" socket.
- A small pry bar or short piece of pipe.
This is interesting: How to choose a battery: rating of the 10 best batteries of early 2018
Generator regulator relay repair
VAZ regulator relay ; to do this, you need to remove the plastic housing cover, which is secured with latches. Next, you need to unscrew the two screws holding the transistor and unsolder the terminals from pins 67 and 15 .
Important! When removing the board, you must monitor the insulating substrate of the transistor and try not to lose it. Without it, the relay cannot be switched on .
The board and the location of the radio elements on it of the old models of the regulator relay are slightly different from the new ones, but the circuit itself has not changed.
Checking the elements must begin depending on the symptoms of the malfunction.
- If the relay somehow works, increases or decreases the voltage, then most likely the transistors are intact. They can be checked last. The first to check is the value of resistors R1-R3 and the zener diode with diode D1; D4.
Attention! The value of resistor R3 may differ from that indicated in the diagram. On the tested relay, the resistance R3 was 4.7 kOhm. It must be identified by color or other markings and the resistance checked manually
- If the relay does not turn on at all, call fuse F1, diodes D2; D3 and all transistors first. When checking transistors, you must remember to remove them from the circuit.
For clarity and convenience, all components from the diagram are indicated on the board. Often the entire board is covered with a layer of protective varnish; this must be taken into account and washed off at the places where the probes are connected.
In this case, the culprit was the zener diode D3 - 2C147A . It was replaced by its full counterpart KS147A .
For good accuracy, you can conduct a test with a multimeter after the repair of the generator regulator relay is completely completed.
- Voltage 13.05V. The indicator light shines brightly. Everything is fine.
- Voltage 14.15V. The control light is already shining very dimly. The relay begins to limit the current.
- Voltage 14.4V. The control light has completely gone out. The relay has completely limited the current.
, after repair, copes with its tasks perfectly, and the operating mode is precisely in the range of 14 - 14.4 V.
Recommendations for increasing the service life of the regulator
In order to increase the service life of the voltage regulator, it is necessary to adhere to several simple rules aimed at implementing preventive measures. Among them:
- do not allow excessive contamination of the generator, periodically inspect its condition, and, if necessary, dismantle and clean the unit;
- check the tension of the alternator belt, tighten it if necessary (either yourself or in a car service);
- monitor the condition of the generator windings, in particular, do not allow them to darken;
- check the contact on the control wire of the relay-regulator, both its quality and the presence of oxidation on it;
- Perform periodic voltage checks on the vehicle battery with the engine running.
Following these simple rules will allow you to increase the resource and service life of both the generator and the vehicle voltage regulator.
Results
Checking the voltage regulator relay is not a difficult task, and almost any car enthusiast with basic repair skills can handle it. The main thing is to have the appropriate tools for this - a multimeter, a power supply with a voltage regulator (although you can connect it to a battery with a charger), a 12 V lamp and pieces of wires for mounting the appropriate circuit.
Read also: How to ground a panel in a private house
If during the inspection you find out that the regulator is out of order, then it must be replaced (repair work is usually not carried out). The main thing is not to make a mistake when choosing it and purchase the part that is suitable specifically for your car.
Problems of “undercharging”, as well as “overcharging” of the battery in principle, can be caused by many reasons, but the very first and most common on many cars (our VAZs are no exception here), as well as on many motorcycles, is the output of the generator relay-regulator from building. This device, despite its compactness, will protect your battery and make its service life much longer. However, if they fail, it can simply kill the battery in a matter of weeks, so if you see white streaks, and also, the engine does not start after night, even the starter does not “turn” - it’s time to check the relay regulator of your car, and here’s how it works do it yourself, and today I’ll tell you in detail...
THE CONTENT OF THE ARTICLE
To begin with, the definition
A relay regulator is a device that regulates the current from the car's generator, preventing the battery from overcharging, protecting it from overcharging, which is detrimental to the battery. Thus, this device greatly extends the battery life.
Essentially, this is just a voltage stabilizer that prevents the voltage from the generator from exceeding the threshold of 14.5 Volts; it is a very accurate device and is required for all types of cars. However, it can be distinguished into two types.
Checking an Individual Regulator
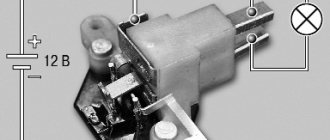
Checking the voltage regulator of the G-222 generator: 1 - battery; 2 - voltage regulator; 3 - control lamp.
As a rule, separate voltage regulators were installed on old cars, including domestic VAZs. But some manufacturers continue to do this to this day. The verification process is similar. To do this, you need to have a power supply with a voltage regulator, a 12 V light bulb, a multimeter and a directly tested regulator.
To check, you need to assemble the circuit shown in the figure. The process itself is similar to the one above. In normal condition (at a voltage of 12 V), the light bulb lights up. When the voltage value increases to 14.5 V, it goes out, and when it decreases, it lights up again. If during the process the lamp lights up or goes out at other values, it means that the regulator has failed.
Checking relay type 591.3702-01
Relay test diagram type 591.3702-01
You can also still find a voltage regulator of type 591.3702-01, which was installed on rear-wheel drive VAZs (from VAZ 2101 to VAZ 2107), GAZ and Moskvich. The device is mounted separately and installed on the body. In general, the test is similar to that described above, but the differences are in the contacts used.
In particular, it has two main contacts - “67” and “15”. The first of them is a minus, and the second is a plus. Accordingly, to check it is necessary to assemble the circuit shown in the figure. The verification principle remains the same. In normal condition, at a voltage of 12 V, the light bulb lights up, and when the corresponding value increases to 14.5 V, it goes out. When the value returns to its original value, the light comes on again.
A classic regulator of this type is a device of the PP-380 brand, installed on VAZ 2101 and VAZ 2102 cars. We provide reference data regarding this regulator.
| Adjustable voltage at regulator and ambient temperature (50±3)° C, V: | |
| at the first stage | no more than 0.7 |
| on the second stage | 14,2 ± 0,3 |
| Resistance between plug “15” and ground, Ohm | 17,7 ± 2 |
| Resistance between plug “15” and plug “67” with open contacts, Ohm | 5,65 ± 0,3 |
| Air gap between armature and core, mm | 1,4 ± 0,07 |
| Distance between second stage contacts, mm | 0,45 ± 0,1 |
Testing a three-level relay
Regulated power supply
Some car owners install on their cars, instead of standard “chocolate bars,” three-level relays, which are technologically more advanced. Their difference is the presence of three voltage levels at which the battery power is cut off (for example, 13.7 V, 14.2 V and 14.7 V). The appropriate level can be set manually using a special regulator.
Such relays are more reliable and allow flexible adjustment of the cutoff voltage level. As for checking such a regulator, it is completely similar to the procedures described above. Just do not forget about the value that is set on the relay, and accordingly, check it with a multimeter.
Generator check
There is one method by which you can check the performance of a car generator equipped with a regulator relay 591.3702-01 with diagnostic elements. It is as follows:
- disconnect the wires that went to pins 67 and 15 of the voltage regulator;
- connect a light bulb to it (excluding the regulator from the circuit);
- Remove the wire from the positive terminal of the battery.
If, as a result of these actions, the engine does not stall, then we can say that the car’s generator is in order. Otherwise, it is faulty and needs to be checked and replaced.