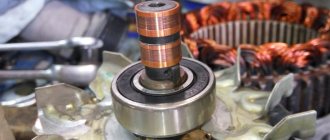
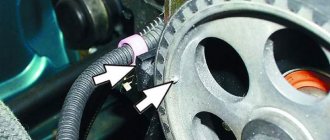
Slip ring block
ATTENTION! A completely simple way to reduce fuel consumption has been found! Don't believe me? An auto mechanic with 15 years of experience also didn’t believe it until he tried it. And now he saves 35,000 rubles a year on gasoline! Read more"
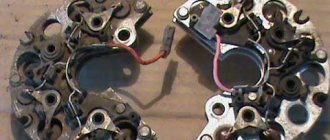
Disassembling the generator is the first thing to do. In order to see the rings, it is enough to remove the back cover of the gene from the side of the diode bridge. However, to replace it you will need to disassemble the entire device.
A block of rings is like this.
The rings, as you can see, come assembled. Factory rings have a decent thickness - 1-2 mm. Purchased analogues may be thinner. Blocks of rings “run” on generators, depending on operating conditions, for approximately 300 thousand vehicle kilometers. If the generating device did not fall into the area of primary concern of the car owner, and “lived out its life,” so to speak, in oil, the service life of the slip rings will decrease significantly.
The block is inexpensive. If you replace it along with the bearings and the tablet, you get an almost brand new generator.
However, a block with rings is not always available for sale. Here you should proceed like this: first find a new block with rings, and only after that remove the old one. In some cases, worn rings on an old block can be restored by sanding them down.
You can do this if you can’t find a block on sale: buy a new regulator and put a couple of washers under it. But this should be done so that the brushes move with the worked part of the rings. Even on some regulators, the brushes are initially offset from the standard. By doing this, you can extend the life of the rings for some time.
Disassembling the generating device
It is noteworthy that generators come in two types: old and new. The differences between them are in the diameter of the shaft. A 15 mm shaft is installed on old generators, 17 mm on new ones. This means that different bearings should be selected for replacement. The 302nd is suitable for a 15mm shaft, and the 303rd for a 17mm shaft. As for the rear bearing, it goes with all generators and is marked as 202.
So, disassembling the generator begins:
- First, remove the plastic cover;
- then the diode bridge is dismantled;
- remove the tablet (regulator with brushes);
- To unscrew the pulley nut, you will have to clamp the generator in a vice, and then use a 24mm socket.
Advice. The gene must be clamped in a vice very carefully so as not to damage its parts. To avoid damage, the pulley is clamped using rubber gaskets.
- the relative position of the covers of the generating device is marked;
- then the tightening screws are unscrewed.
Note. The fastening screws are tightened very tightly. They are made of soft metal, so the usual methods of turning out oxidized bolts will not work. Here you will need an impact screwdriver or a shaped one, but with a large tip. Fasteners must be pre-treated with WD-40 or brake fluid and wait a little.
It is also recommended to treat the joints of the covers with the device body with WD-40.
- take a mounting spatula or an ordinary, but flat screwdriver, and halve the gene.
We change bearings in Lada Kalina
The rectifier units present in the designs of generator sets of the AvtoVAZ model range have received a considerable number of negative reviews during operation. This statement is also true for the Lada Kalina we are considering. These modules can break down even after a mileage of 10 thousand km, which requires repair or replacement of the device. It has also been revealed in practice that the cause of most malfunctions is the generator set bracket. However, bearings can also fail prematurely. It is gratifying that the owners are able to cope with such a problem on their own.
To repair the generator module, it will require preliminary disassembly. For this purpose, we “grab” the tips of the stator cables with a screwdriver and slightly pull them out of the springs present in the diode bridge. Next, you need to unscrew the bolts holding the bridge itself. In addition, unscrew the connecting bolt.
Having disassembled the body of the LADA Kalina generator set, we resorted to checking the integrity of the rear bearing. Here you will need to twist its outer ring. If it rotates without noticeable difficulties or sounds, and is not inclined to emit play, then we ascertain the serviceability of the bearing. When the slightest signs of wear are evident, we change it without hesitation.
The next step is to dismantle the generator unit bracket. Using the same screwdriver, we pry up the stator and remove it from the casing. The bracket design contains a bearing, which is also subject to inspection and replacement (if necessary).
Replacing rings
Such partial disassembly of the generating device is sufficient to replace the slip rings and the bearing on the shaft (armature bearing).
Attention. Even if the armature bearing is new, it is recommended to replace it after pressing.
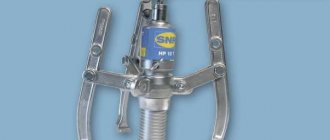
Method for replacing ring block 1
- the anchor is clamped in a vice;
- the bearing is pressed out;
- then use a knife to remove the plastic contact protection, which is located directly under the bearing;
- after this, you need to open the bracket of the contact block and tear out the soldered wires so that you can remove the old slip rings (again, you can use a knife).
Attention. If it is not possible to open the bracket due to oxidation, etc., then you can use the old-fashioned method - press out the block with the contacts using a chisel and any long tool, directing the force of the lever upward.
- a new block with rings is put on the shaft (a spacer and light blows from above on the block with a hammer - the main thing is that the tails of the block accurately hit the seats);
- the wires are tucked into the proper places and sealed.
Note. During the soldering process, it is recommended not to use soldering acid (if used incorrectly, liquid can easily get inside the winding). After this, crimp the soldered contacts with pliers.
Next comes the assembly process:
- put the contact protection back on (it should fit tightly);
- then a new bearing is installed.
Bosh generator repair. Replacement of the collector. Alternator Repair.
In this video, you will see how and in what order you can replace
collector, at home.
We break off the rest of the plastic by prying out the contact with a screwdriver.
We hook the puller to the lower ring , install the spacer and remove the contact rings of the generator.
We remove any remaining plastic from the contacts of the generator winding.
Before replacing slip rings , check the continuity between the contact and the ring. Since there have been cases of breakage.
We install the replacement slip rings and lightly tap the top of the slip rings and press them onto the generator armature. It is important to pay attention to the location of the cutout on the generator armature and the tab on the part being replaced (some generators have a cutout on both sides). Before completing the installation of the rings on the generator armature, it is necessary to insert the wires into the slots.
The contacts can be soldered together with the plate, or by carefully removing it.
Having replaced the contact rings of the generator, we fill the bearing and assemble the generator .
Download the book: “Generators of foreign cars.” This book well describes the principle of operation of a car generator, voltage regulator, and provides recommendations for repairing generators. A selection of books on car repairs can be found here.
Replacing the slip rings of the VAZ 2110 generator is necessary if there are various types of defects on their surface. Because of them, the rings cannot efficiently perform their most important function - tightly connecting the parts to each other so that contact occurs between them. Very often, individual parts of the generator break. If you change it completely, you will have to spend a considerable amount of money. Therefore, you can repair it by replacing broken parts. On a VAZ 2110, replacing the slip rings of the generator is a simple procedure and you can handle it yourself.
Replacing a generator on Kalina
There seems to be nothing complicated about removing and replacing the generator on a Lada Kalina..
To replace the generator with a 16-cell. Kalina will need a warm garage with a pit and a set of keys: 13, 19; heads: 8, 10 and 13.
Be sure to remove the terminal from the battery.
Remove: the plastic engine protection and the washer reservoir (after all, it would be better to unscrew a few extra nuts than to suffer later). So remove the connectors from the washer motor and use keys “8” and “10” to unscrew the nuts securing the barrel. The barrel is screwed in 2 places.
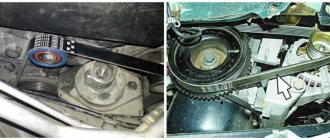
Then remove the alternator belt and reset the “gene” chip.
If there is motor protection at the bottom, then we dismantle it too. Later disconnect the generator wires.
The wires are screwed in with 2 bolts (it’s easy to reach the top one, and the 2nd one from the bottom from the hole with a head and a key set to “13”, just for this it was necessary to remove the tank).
Remove the generator from the Kalina from the bottom, and if it is an 8-valve, then pull it out from the top.
By the way, be careful not to lose the nut when unscrewing the lower bolt, which is installed on the other side.
Naturally, you can remove the generator on Kalina without a hole, crawling from above with the keys, but this will be even more difficult.
Read:
Steel rings and their advantages
Replacing slip rings on a VAZ 2110 generator
There is no point in installing copper rings, as they wear out very quickly. Therefore, it is better to opt for steel rings, which have a number of advantages:
- They hardly wear out, so the brushes remain in almost perfect condition for a long time.
- They are easy to install.
Note: by the way, for more reliable fixation, they are first lubricated with a flux solution, and then washed with soda.
- Once installed, they are securely fixed, remaining motionless in all situations.
Replacing the rotor with rings
Replacement on the VAZ 2110 generator
Sometimes it is not possible to replace the rings separately. The rotor also has to be replaced. This situation occurs when the rings reliably “stick” to the rotor. But you can try to restore the rings by placing them in a sulfuric acid solution. They cannot be kept in solution for a long time, as whole particles may disintegrate. To replace the rotor and rings, you must:
- Place markings on the covers of the generator (to make it easier to assemble them later, otherwise you can confuse their location).
- Remove the plastic casing. This is easier to do after the three latches securing it are bent away.
Note: you need to bend them very carefully, as they are quite delicate. Moving too quickly can cause them to break.
- Remove the two screws that secure the electronic voltage regulator.
- After this, you will have access to the generator relay. It must be removed, otherwise it will interfere with the work process.
- Remove all fastenings of the unit and condenser.
- Then unhook the three winding tips coming from the stator.
- Remove the block and capacitor. If you need to replace the capacitor, you need to unscrew the nut that secures it. Then remove the washer along with the bushing. Now it’s the turn of the wires that attach the capacitor to the contact bolt. After this, you can remove and replace the capacitor itself.
- Unscrew the generator coupling bolts. There are four of them in total. There are usually flat washers and spring washers underneath the screw heads. They are very small, but perform an important function. You can’t lose them, otherwise you’ll have to buy new ones, but finding them on sale is not easy.
- Remove the generator cover from the side where the slip rings are located. In this case, you can help slightly with a screwdriver, as if pulling the lid towards you.
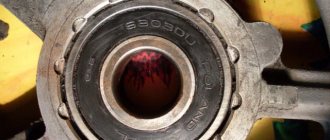
VAZ 2110 in the generator slip rings
- Remove the nut securing the generator pulley. Remove the washer and pulley.
Note: the rotor must be stationary. To prevent it from spinning, it should be clamped as much as possible, and a small piece of plywood should be placed under it.
- Disconnect the thrust washer.
- Remove the generator rotor.
- It has a spacer ring that needs to be removed.
- At this stage, you need to carefully inspect the slip rings. It is possible that they will also have to be replaced. If they are worn out or there are scratches on their surface, then replacement cannot be avoided (by the way, it is not necessary to install new rings - they can be thoroughly sanded).
- A multimeter should measure the resistance of the rotor winding.
Note: if this tool shows that there is a break in the rotor winding, then it urgently needs to be changed. You can also try to rewind it, eliminating the break. But this process is quite complicated.
- You should also check if there is a short circuit between the winding and the rotor housing. To do this, you need to use a 220 V lamp. One of its wires must be connected to the body, and the other must be connected in turn to each of the slip rings. Moreover, if there are no short circuits, the lamp will not light.
- Insert the new rotor into place.
- Assemble everything in the opposite order.
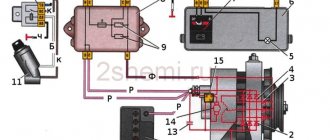
Removing and disassembling the generator
Disconnect the wire terminal from the negative terminal of the battery.
Remove the generator belt (see “Checking the condition and replacing the generator drive belt”). By pressing the lock of the generator pre-excitation wire block. . disconnect the block from the voltage regulator connector.
Using the “13” socket, unscrew the nut securing the wire lugs to terminal “B+”. . and remove them from output.
Using a 17mm socket, unscrew the bolt of the lower mounting of the generator and remove it. Remove the nut from the generator bracket.
Using a 13mm socket, unscrew the nut of the bolt for the upper mounting of the generator.
. and remove the generator. We disassemble generator 5132. 3771 to replace the voltage regulator, rectifier unit, rotor, stator and bearings.
Using the “8” socket, unscrew the three nuts securing the casing.
. and remove the casing.
Remove three metal washers from the casing mounting studs.
Using a slotted screwdriver, unscrew the two screws securing the voltage regulator terminals.
Using the “8” socket, unscrew the two nuts securing the voltage regulator.
. and remove the regulator.
We use a marker to mark the relative positions of the generator covers.
Using a 7-point socket, unscrew the four bolts holding the covers together.
Remove the back cover with the stator assembly. If the stator does not come out of the front cover, pry it off with a screwdriver from different sides relative to the front cover.
We put a high “24” head on the pulley fastening nut and through its hole insert a “8” hexagon into the hole of the rotor shaft. We unscrew the pulley fastening nut, holding the tool head with a pipe wrench or in a vice. Remove the spring washer
. and a spacer washer.
Push the rotor shaft out of the front cover.
. and remove the cover to replace the front bearing.
. Using a slotted screwdriver, unscrew the four screws securing the bearing pressure plate.
What causes rings to wear off?
Alternator rings for VAZ 2110
The following generator parts can cause slip ring failure.
Stator
- On its inside there should be no traces from the rotor that would appear during its operation. Otherwise you will have to change it.
Note: You also need to check the bearings, as this problem often appears when they are broken. Sometimes even the generator cover can also get broken. This problem urgently needs to be fixed by replacing the damaged part with a new one.
- After this, you should check whether there is a break in the stator winding. It needs to be checked in the same way as the rotor.
Generator VAZ 2110
Of course, if you are sure that the stator is completely intact, then you should not carry out such manipulation. But if there is even the slightest suspicion that it is malfunctioning, then it is better to check it. A faulty stator can lead to rotor failure again.
Bearing
- See if the generator bearing located on the rotor rotates correctly. It should rotate freely on the slip ring side without jamming.
- If it dangles too much or, on the contrary, is very tightly clamped, then it needs to be compressed.
Lid
- The generator cover on the slip ring side may have damage, cracks or other defects.
- In this case, it needs to be replaced, otherwise it will have a bad effect on the contact rings, leading to their abrasion.
Self-diagnosis
So we smoothly approached the issue of verification. If you don’t know how to check the functionality of a unit in your car, then first of all carry out a visual diagnosis of the device’s condition. If the check shows that there is no external damage, then a more thorough diagnosis is needed. Initially, you should check the winding for insulation damage; you will need a multimeter or a test lamp to check.
Before checking, one wire from the lamp must be connected to the armature shaft, and the other wires must be touched in turn to the collector plates. Please note that when checking, the wire tips must be reliably insulated. In the event that the armature winding shorts to ground, the light should blink.
To check the turn-to-turn short circuit you will need a special induction device. The core of the device in this case is made of metal, and the coil is powered using industrial alternating voltage. The armature is installed in the prism of the core, after which it must be rotated around its axis, and an iron plate must be connected to the metal. In the absence of short circuits, there will be no current in the winding (the author of the video is the Ramanych channel).
If there is a short circuit, then an electromotive force will be recorded in the closed turns. In this case, the alternating voltage will contribute to the formation of another magnetic field, so if there is one, then vibration will appear in the iron plates connected to the armature. The presence of vibration may indicate that there is a short circuit in the turns; if this is the case, then the only option to solve the problem is to rewind the armature.