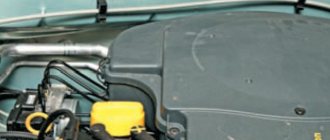
Lada Largus, replacing the belt on an engine with 8 and 16 valves is different. Today we will talk about replacing the drive of auxiliary units on both types of Lada Largus engines. The manufacturer requires replacement every 60 thousand kilometers or after 4 years of operation, if the 60 thousand mark has not been passed. In addition, the drive belt patterns with air conditioning and without air conditioning are different. Our article today is about all this.
Belt replacement Lada Largus 8 valves with air conditioning
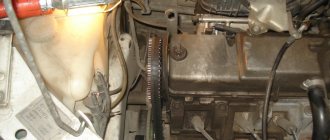
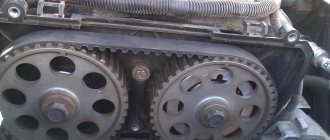
Belt diagram with power steering and air conditioning.
- 1 - auxiliary drive pulley
- 2 - tension roller
- 3 — power steering pump pulley
- 4 — generator pulley
- 5 - air conditioning compressor pulley
- 6 - support roller
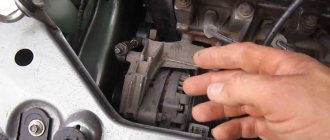
The tension of the drive belt for Lada Largus auxiliary units with power steering and air conditioning is automatically adjusted by a tensioner. To replace the belt, remove the right mudguard of the engine compartment.
To loosen the belt tension, from below the car we put a spanner or a 13-mm socket on the tension roller mounting bolt and turn the roller bracket clockwise, overcoming the force of the tensioner spring, until the hole in the roller bracket and the recess in the device body are aligned.
We fix the roller bracket by inserting a “6” hexagon or a rod with a diameter of 6 mm into its hole and the recess in the tensioner body.
Remove the accessory drive belt.
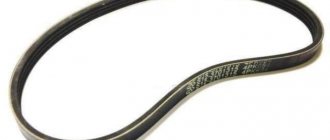
Marking of the drive belt for auxiliary units of a car with power steering and air conditioning is 5K 1747 (five-strand, length 1747 mm). When replacing the belt, the support and tension rollers must also be replaced.
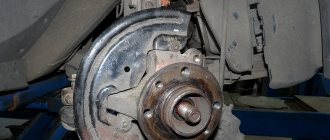
To replace the support roller with a spanner wrench or a 13-mm socket, unscrew the bolt securing it and remove the bolt with the protective cover of the roller. Remove the support roller.
Similarly, unscrew the fastening bolt and remove the tension roller. If it is necessary to replace the tensioner (for example, if a spring breaks), use a “13” head to unscrew the two bolts securing the tensioner housing and remove the tensioner assembly with the roller.
Automatic tensioner assembly in the next photo
Install the removed parts in reverse order. Before installing the belt, the tension roller bracket must be turned clockwise and locked (see above).
When installing the belt, place it on the pulleys and place it under the tension and support rollers in accordance with the drive diagram. Attention, very important point! The drive pulleys for auxiliary units, generator, air conditioning compressor and power steering pump are six-ribbed, and the drive belt is five-ribbed.
We lay the belt on the pulleys so that it is shifted to their outer edge, and the inner groove of the pulleys remains free. Let's look at the next photo.
After installing the belt, slightly turn the tension roller with a wrench and remove the lock from the hole in the roller bracket and the recess in the tensioner housing. Then, using an 18-inch head with a ratchet, we turn the crankshaft clockwise three turns by the bolt securing its pulley to check the correct position of the belt and the functioning of the tensioner.
2163-13-12-01
... we put a spanner or a 13-mm socket on the tension roller mounting bolt and turn the roller bracket clockwise, overcoming the force of the tensioner spring, until the hole in the roller bracket aligns with the recess in the device body (for clarity, shown on a removed engine).
... we put a spanner or a 13-mm socket on the tension roller mounting bolt and turn the roller bracket clockwise, overcoming the force of the tensioner spring, until the hole in the roller bracket aligns with the recess in the device body (for clarity, shown on a removed engine).
... we put a spanner or a 13-mm socket on the tension roller mounting bolt and turn the roller bracket clockwise, overcoming the force of the tensioner spring, until the hole in the roller bracket aligns with the recess in the device body (for clarity, shown on a removed engine).
Belt replacement Lada Largus 8 valves without air conditioning
Belt diagram without air conditioner.
- 1 - auxiliary drive pulley
- 2 — tension roller with bracket
- 3 - adjusting bolt
- 4 — tension roller bracket mounting bolt
- 5 — generator pulley
- 6 — power steering pump pulley
- 6 - drive belt
Checking the belt tension of auxiliary units of a car with power steering and without air conditioning must be performed using a special tool at a dealer service. Considering that if you replace it yourself, you will have to change the belt outside of the dealership service center, we will show you a way to approximately estimate the belt tension.
Remove the right mudguard from the engine compartment. From below the car, use your thumb to press the belt in the middle between the pulleys of the power steering pump and the crankshaft. With a pressing force of 10 kgf, the belt deflection should be 6–8 mm. To tension the belt, loosen the two bolts 4 securing the tension roller bracket and rotate adjusting bolt 3 clockwise. Having tensioned the belt, tighten the bolts securing the tension roller.
Attention! Excessive belt tension leads to premature failure of the belt and tension roller, as well as accessory bearings.
To replace the belt, turn adjusting bolt 3 counterclockwise several turns and loosen bolts 4 securing the tension roller bracket. Having loosened the belt tension, remove it from the pulleys. Marking of the drive belt for auxiliary units of a car with power steering and without air conditioning is 5K 1110 (five-strand, 1110 mm long). When replacing a belt, you must also replace its tension roller. Install the auxiliary drive belt in reverse order.
Attention! The drive pulleys for the auxiliary units, generator and power steering pump are six-strand, and the drive belt is five-strand.
We lay the belt on the pulleys so that it is shifted to the inner edge of the pulleys, and the outer groove of the pulleys remains free. We adjust the belt tension using the method described just above.
The belt overheats or breaks
The characteristic smoke and unpleasant odor emanating from the drive belt, or the peeling of tracks and pieces of rubber from it, is a sign of jamming of some kind of attached unit (including a generator) or idler rollers. On some models, a broken drive belt not only leads to the generator turning off, but also causes much more serious troubles (the broken pieces can get under the timing belt, which will lead to irregular valve timing or engine failure). If the belt overheats or spontaneously breaks, check the alternator pulley - it should rotate easily and not warp under load.
Belt replacement Lada Largus 16 valves
Drive belt diagram with air conditioner..
The Lada Largus belt tension is adjusted automatically by a tensioner. To replace the belt, remove the right mudguard of the engine compartment. To loosen the belt tension, from below the car we put a spanner or a “15” socket on the tension roller mounting bolt.
Turn the roller bracket clockwise, overcoming the resistance of the tensioner spring, and remove the belt from the support roller. Remove the accessory drive belt from the pulleys. The marking of the drive belt for Largus auxiliary units with air conditioning is 6РК 1822 (six-strand, 1822 mm long). When replacing the belt, the support and tension rollers must also be replaced.
To replace the support roller with a spanner or a 13 socket, unscrew the bolt securing it and remove the outer cover of the roller. Remove the support roller and its inner cover.
Similarly, remove the tension roller. If it is necessary to replace the tensioner with a “10” head, unscrew the two bolts and remove the tensioner assembly with the roller.
Install the parts in reverse order. When installing the belt, place it on the pulleys and place it under the tension and support rollers in accordance with the diagram above.
To transmit the mechanical energy of torque from the crankshaft to the generator, which generates the necessary electricity to power the car, the generator belt on the Lada Largus is used. The drive is installed on the generator and crankshaft pulleys. Depending on the design features of the engine and the availability of additional equipment, this part serves as a drive for the air conditioner and power steering. This does not change the principle of operation.
The principle of operation of a car generator
Among vehicle breakdowns, the most common failure is the failure of electrical equipment. All electrical equipment can be divided into current sources, current consumers and auxiliary devices. Current consumers include optics, ignition, climate control equipment, anti-lock wheel systems, security systems, lighting devices and other equipment. All these systems will not operate without failures without well-functioning power supplies.
A car generator is designed to convert the rotational energy of the engine into electric current, which is used to charge the battery and power the electrical equipment of the car. The device is driven from the crankshaft by a belt drive.
When the ignition switch is turned on, the current from the battery goes through the brushes to the field windings, creating a magnetic field there. The rotor begins to rotate simultaneously with the engine crankshaft, and its magnetic field penetrates the stator windings, creating an alternating voltage. The rectifier unit converts the current into direct current, which powers the battery and on-board network.
Foreign and domestic cars are equipped with generators of both our own production and third-party manufacturers. Replacing a product with a similar one from a different manufacturer is possible with compatible mounting, power, similar parameters of the generated current, dimensions and belt drive pulley. Most often, generators from the following companies are installed on cars:
- Bosch. Installed on most European car brands. It is characterized by simplicity of the device and reliability.
- Cargo. Danish company specializing in the production of starters and generators. It supplies products to many automakers, the price of the products is slightly cheaper than the original.
- Delco Remy. An American manufacturer present on the automotive components market for more than a hundred years. The products are of impeccable quality and durability, possessing all the necessary international certificates.
- Lucas. Large British manufacturer of original quality car parts.
- Magneton. Czech manufacturer specializing in the production of starters and automobile alternators. The products are characterized by an optimal price-quality ratio.
- Valeo. A French concern formed as a result of the merger of several companies producing generators and other components for cars. The product is structurally and operationally similar to Bosch.
Types of drive belts
Depending on the configuration, the Largus is equipped with power steering or air conditioning; the power plant can be 16- or 8-valve. Accordingly, different products are used:
- Renault 117200593R (6PK 837) – standard poly-V-ribbed six-ribbed belt used on an 8-valve power unit without power steering, with air conditioning;
- model 4PK715 (four-strand, length 715 mm) - used on an eight-valve engine without power steering and without an air conditioning system;
- the eight-valve K7M engine uses a five-valve 5PK 1110, length - 1110 mm, power steering and air conditioning are also not installed on this engine;
- K4M engine (16-valve) - a six-strand 6PK 1200 with a length of 1200 mm is used, an engine without air conditioning, with power steering.
- power units equipped with power steering and air conditioning (8 and 16 valves) are equipped with a six-stream 6RK 1820 with a length of 1820 mm.
Spark plugs for Lada Largus
When buying candles on Lada Largus, you do not just purchase the necessary consumables. The correct selection of an element, insignificant in size and cost, determines the behavior of the car on the road, the cost of its maintenance, and your mood. Correctly selected spark plugs directly affect the speed, dynamic, and performance characteristics of the car.
The spark plugs included in the ignition system of a gasoline internal combustion engine serve to generate an electrical discharge. Under the influence of incoming voltage, a spark is formed between their electrodes. The subsequent ignition of the fuel mixture provides the energy necessary for the vehicle to move.
Faulty spark plugs can cause a lot of problems and hassle. The most serious ones include the following:
- difficult, especially at low temperatures, starting;
- unstable engine operation in idle, low and medium speed modes;
- reduction in power, deterioration in vehicle acceleration dynamics;
- increased fuel consumption.
All this makes the choice of spark plugs for Lada Largus not just part of the next technical or seasonal maintenance.
Lada Largus engines allow the use of spark plugs from different manufacturers, models, and operating data. Only their external characteristics remain unchanged - M14 thread with a length of the corresponding part of 19 mm, installation dimensions for a spark plug or socket wrench of 16.
Let's look at the most popular models of spark plugs that are equipped with Lada Largus engines. They differ in the number of contacts, as well as the metals used for their manufacture. Based on this, it is possible to install spark plugs with one or more side electrodes. The materials used are traditional chromium-nickel alloys or platinum group metals.
Let's start with the most common single-pin spark plugs.
The manufacturer of the K7M power unit with 8 valves provides for the installation of Renault spark plugs - a simple and reliable ignition source. It is manufactured mainly in France or in other countries under the strict control of the developer. Among high-quality analogues, it is recommended to use candles from manufacturers such as Bosh, Denso, NGK.
The electrical discharge constantly arising between the central and side electrodes gradually leads to the destruction of the latter. The multi-contact design significantly extends the life of the spark plug. Therefore, installing Renault or Bosch FR7DC+ two-pin spark plugs on eight-valve K7M engines reduces the cost of periodic maintenance of Largus vehicles.
Among the three-pin spark plugs, it is worth noting Bosch 0241235752. By forming a stable spark, they ensure complete combustion of the fuel-air mixture. This helps the engine produce maximum power and optimal traction characteristics.
I would like to complete the review of spark plugs recommended for Lada Largus with iridium NGK Iridium 6418 BKR6EIX. Among the main advantages are a long service life (at least 70,000 km when consuming high-quality gasoline) and excellent starting qualities in the cold season.
The procedure for removing spark plugs for the K4M and K7M engines differs in only one way. On the 8-valve, before dismantling, it is enough to remove the high-voltage wires. In a 16-valve engine, it is necessary to unscrew the bolts securing the ignition coils. When performing work on any engine, it is recommended to clean the spark plug wells from dirt with compressed air.
The performance of your car’s engine depends on what spark plugs you install on your Lada Largus and how promptly you change them. By making the right choice, you will make life easier for yourself and your pet.
on the:
Alternator belt malfunctions and reasons for replacement
According to the maintenance regulations, consumables on 16- and 8-valve Largus engines need to be changed after 60 thousand kilometers, or after four years, depending on what comes first. The condition of the drive does not matter. Replacement is also required when wear occurs. A characteristic sign of a malfunction is the appearance of a whistling sound when the driver puts an increased load on the vehicle’s on-board network - turning on the headlights or heater fan.
If the engine is running and you hear a whistling sound when you press the gas pedal, this is a clear sign that the belt is either stretched and loose or worn out. This sound does not mean that further movement is prohibited, but indicates the need to replace the alternator belt on Largus. Otherwise it will fly off or break. Weak tension will be characterized by insufficient generation of electricity by the generator, which will not be enough to recharge the battery and power the vehicle’s on-board network. Drive belt wear can be determined by the following signs:
- a whistle is heard when starting the engine and when pressing the gas pedal;
- a warning light comes on on the dashboard, warning you that the battery is low;
- element breakage.
The following signs indicate that it is time to change the alternator belt:
- pulley displacement relative to the initial position;
- faulty tension mechanism;
- drive life development;
- use of a counterfeit product of low quality.
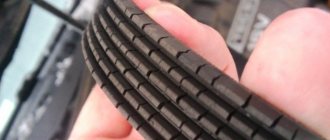
Wear can be determined by inspecting the part. The appearance of cracks, the formation of abrasions and frayed ends with protruding threads, as well as oil stains indicate the need for prompt replacement.
DIY generator repair
Most of the malfunctions that occur in the generator are solved by simply replacing one or another component. Actually, let’s take a closer look at how you can repair a car generator with your own hands and start with disassembly:
- Before starting to disassemble the generator, you will need to mark the position of the housing covers in order to subsequently facilitate reassembly.
- Next, the pulley is removed
- The brush holder is carefully dismantled to avoid damaging the current collection brushes.
- All possible wires are disconnected, and the contact bolt located, as a rule, on the back cover is unscrewed
- After this, the case bolts are unscrewed, which prevent the rear cover from being removed. It is worth noting that the case elements fit quite tightly and it will be necessary to apply some effort.
- At the end of disassembling the case, the front cover and rotor are dismantled. Quite often the cover cannot be removed by hand, so it would be wise to use the following method. The cover is installed on two wooden blocks and the rotor is knocked out not with strong blows, you need to be extremely careful in order to avoid damage.
- Finally, the windings are disconnected from the diode block and the elements are dismantled.
After the generator is finally disassembled, its components should be checked in order to find out which element needs to be replaced:
- Checking the stator winding for open circuit. The procedure is carried out using a battery and a control lamp. In fact, the finished system is a standard “dialing”. The lamp is connected in turn to the terminals of all windings, and the winding should “ring” in all three cases. If a break is detected, the winding must be replaced.
- Checking the stator for a short circuit to the frame. For this purpose, “dialing” will also be used. The lamp must be connected to the winding terminal, and the wire from the battery negative to the stator housing. Accordingly, if there is no short circuit, the lamp will not light up. If a breakdown is detected, the entire stator will need to be replaced. Additionally, it is worth inspecting the stator for overheating and after detecting it, the element must also be replaced.
- Checking the diode bridge is somewhat more difficult. It is worth noting that in normal condition the diode passes voltage in only one direction. And in the event of a break, the passage of current will be impossible. In a situation where, during testing, the diode passes current in both directions, this indicates that a short circuit has occurred in it. In any case, the diode bridge needs to be changed entirely, because It is not always possible to replace one diode separately, and it is also quite difficult to achieve factory quality.
- Checking the rotor resistance. The resistance must be checked between the two rings. Under normal conditions, it will be between 4 and 4.5 ohms. Measurements can be taken with either an analog ohmmeter or a digital multimeter.
Checking the tension of the generator belt
Tension testing can only be performed on an engine that is not equipped with air conditioning. It is recommended to check the tension level of the auxiliary equipment drive belt on Lada Largus engines equipped with a hydraulic booster without an air conditioning compressor using a special tool called a strain gauge tester.
A belt break often occurs while driving, so it is not possible to use this device. It is mainly used in specialized services. For self-checking, there is one simple method that can approximately indicate how tight the alternator and auxiliary equipment belts are. The algorithm of actions is as follows:
- Remove the boot that protects the engine compartment from dirt on the right side.
- From below the car, you need to press your hand on the belt between the crankshaft pulley and the power steering pump. When applying little force, the deflection should not exceed 8 mm.
- If the deflection is large, it is necessary to tighten the drive by unscrewing the fastening bolts of the tensioner roller bracket and turning the adjusting bolt clockwise.
- When the tension is approximately optimal, tighten the two roller bracket bolts.
- Do not tighten the belt too much, otherwise it will wear out prematurely, and the drive bearings of the auxiliary equipment will quickly fail from such a load.
The easiest way to check the tension level is on an 8-valve engine without power steering and air conditioning. To do this, you need to press your finger on the middle part of the belt in the place between the crankshaft pulley and the generator.
The deflection should not be more than 8 mm, otherwise tension should be carried out by removing the right dust shield in the engine compartment.
Next, you need to loosen the generator mounting bolt from below and the tension plate mounting bolt. Using a mounting blade, the generator is moved away from the engine, thereby tightening the belt. Hold the mounting blade and tighten the mounting bolts. To more accurately check the optimal tension, you should contact a specialized service.
General recommendations and nuances
It often happens that the generator stops functioning only when the engine is warm. This phenomenon is due to the natural expansion of the metal with increasing temperature or a change in the properties of semiconductors (diodes) for the same reason. In this case, you should first check the functionality of the generator on a warm car, and if this does not bring results, then dismantle the device and check it after heating it with a hair dryer. In conclusion, it is worth noting that independent replacement of generator components such as stator or rotor windings and bearings in domestic conditions is advisable only if you have the appropriate equipment, tools, and experience. If it is not there, then if the battery is not charging, limit yourself to trying to replace the relay-regulator combined with the brush assembly. To do this, you don’t have to buy a new device: you can install a known good one and evaluate the result.
A generator is a kind of power plant that provides energy to all engine systems: power, cooling, ignition, so its failure will inevitably lead to other malfunctions. To prevent breakdowns, it is necessary to systematically diagnose it, and if problems cannot be avoided, repair it immediately.
In this article we will talk about how to check the generator for performance without resorting to the help of specialists. But first, let's look at the symptoms of its possible malfunctions.
Reviews about replacing the alternator belt in Largus
Car owners rarely turn to the service center with such a question as replacing an alternator belt; in most cases, this operation is carried out as an accompanying operation during a scheduled technical inspection. Basically, the replacement is done with your own hands.
Pavel, Novorossiysk: “I’ve owned Largus for a little longer than a year; I used to have a ten with a regular 8-valve engine from a nine. I thought everything would be just as simple in Largus, I changed it in five minutes and moved on. With power steering and air conditioning, it’s not only comfortable to drive, but also difficult to replace the drive. It’s good that there are a lot of guides on this topic, I figured it out quickly.”
Sergey, Volgograd: “It’s better to buy an original spare part; purchasing a cheap belt will save several hundred rubles, but will create many more problems. A belt breaks on the road - what could be worse, especially if there is no spare one and the situation arose in the middle of nowhere. It’s better to play it safe and buy an original, or better yet two.”
Dmitry, Pskov: “The user manual says that a special tool is needed to check the tension, and that the strap needs to be changed at a service center. I changed it myself, tightened it myself and roughly by eye, nothing bad has happened yet. The mileage after replacement is 20 thousand kilometers, the flight is normal.”
The good condition of the alternator belt is the key to uninterrupted engine operation. Timely prevention of wear and breakage will help avoid the unpleasant situation of replacing a belt in the field. To avoid such problems, it is better to take the advice of car enthusiasts and buy a spare belt just in case.
Tools:
- Socket wrench or socket 13;
- Head 18 with ratchet;
- 6 mm hexagon or 6 mm diameter rod.
Notes:
Depending on the vehicle configuration, there are three options for drive circuits for auxiliary units:
- with power steering and air conditioning;
- with power steering, without air conditioning;
- no power steering or air conditioning.
In accordance with the maintenance regulations, we replace the auxiliary drive belt on a car equipped only with power steering every 60 thousand kilometers or after 4 years (whichever comes first), regardless of its condition, on other cars - after 120 thousand. km or after 6 years.
We carry out the work on an inspection ditch or overpass. At every maintenance we recommend checking the condition of the belt. The belt must be replaced if cracks, tears or detachments of rubber from the fabric base are detected on it.
Option 1
The belt tension of a car with power steering and air conditioning is adjusted automatically by a tensioner. To replace the belt, remove the right mudguard of the engine compartment.
1. To loosen the belt tension, from below the car we put a spanner or a 13mm socket on the tension roller mounting bolt and turn the roller bracket clockwise, overcoming the force of the tensioner spring, until the hole in the roller bracket aligns with the recess in the device body (for clarity, shown in the removed engine).
2. We fix the roller bracket by inserting a 6 mm hexagon or a rod with a diameter of 6 mm into its hole and the recess in the tensioner body.
Diagram of the drive of auxiliary units of a car with power steering and air conditioning:
1 — auxiliary drive pulley; 2 - tension roller; 3 — power steering pump pulley; 4 — generator pulley; 5 — air conditioning compressor pulley; 6 — support roller; 7 - belt.
3. Remove the accessory drive belt.
The marking of the drive belt for auxiliary units of a car with power steering and air conditioning is 5K 1747 (five-ribbed, length 1747 mm). When replacing the belt, the support and tension rollers must also be replaced.
Replacing support and tension rollers
1. To replace the support roller with a spanner wrench or a 13mm socket, unscrew the bolt securing it.
2. Remove the bolt with the roller protective cover.
3. Remove the support roller.
Similarly, remove the tension roller.
Replacing the tensioner
If it is necessary to replace the tensioner (for example, if the spring breaks), use a 13mm head to unscrew the two bolts securing the tensioner housing.
2. Remove the tensioner assembly with the roller.
Automatic tensioner assembly:
1 - tension roller; 2 — roller bracket; 3 - body.
3. Install the removed parts in reverse order. Before installing the belt, the tension roller bracket must be turned clockwise and locked (see above).
When installing the belt, place it on the pulleys and place it under the tension and support rollers in accordance with the drive diagram.
Note:
The drive pulleys for auxiliary units, generator, air conditioning compressor and power steering pump are six-ribbed, and the drive belt is five-ribbed.
4. We lay the belt on the pulleys so that it is shifted to their outer edge 1, and the inner groove of the pulleys 2 remains free.
5. After installing the belt, slightly turn the tension roller with a key and remove the lock. Then, using a 18mm socket with a ratchet, we turn the crankshaft clockwise three turns by the bolt securing its pulley to achieve the correct position of the belt.
Option 2
The manufacturer recommends checking the belt tension of auxiliary units of a car with power steering and without air conditioning using a special device (strain gauge tester). Considering that the belt may have to be changed on the road (for example, if it breaks), away from the service center, we will show a method in which you can approximately estimate the belt tension.
Why does the generator fail?
The generator itself has a simple structure; if you want, it’s a regular electric motor (only made to allow for large current generation), try to spin a regular electric motor and attach a light bulb or LED to it, it will start to light up - and there you have it, an elementary current generator.
Someday I will have an article in which I will tell you what the generator consists of. BUT today it is simple and exaggerated - this is the rotor (moving part), stator (fixed part), brush assembly, relay regulator, and of course the housing in which the whole thing is located.
And now the actual breakdowns.
- The bearings are jammed. This is a fairly common problem with already worn-out generators, the rotor in the housing spins on bearings, from time and moisture (dirt), they wear out and simply jam or wedge. If there is a wedge, then this is one thing - the rod stops rotating. But if wedging occurs, it is difficult to notice; the rod may or may not rotate. In any case, with such symptoms, the belt that turns the generator from the engine is more likely to break. THIS IS THE FIRST CALL.
- The winding on the stator or rotor has burned out. It is there in any case and most likely will be on the stator, so - also from moisture (salt on the roads), it can be corroded and it will simply short out or simply burn out, since copper wires are used there. Accordingly, current generation will stop.
- Failure of the brush assembly. This is also very common, brushes are graphite (often square) rods that run along the stator tracks. So, from time to time they simply wear out and need to be replaced.
- Failure of the regulator relay. This relay prevents the generator from recharging the battery, bringing the voltage and current within the desired range. Often it also fails and the battery does not charge at all! Need to watch.
In general, for these 4 main reasons, the generator may not work, so it must be checked before purchasing a new battery. It's likely that this is what you're dealing with.
2163-13-12-010
...so that it is shifted to the inner edge of the pulleys, and the outer groove of the pulleys remains free.
...so that it is shifted to the inner edge of the pulleys, and the outer groove of the pulleys remains free.
...so that it is shifted to the inner edge of the pulleys, and the outer groove of the pulleys remains free.
We adjust the belt tension (see above). To accurately check the belt tension, you must contact a service center.
[How to save on maintenance of Lada Largus] [Maintenance of Lada Largus at 15,000/45,000/75,000/105,000 km] [Maintenance of Lada Largus at 30 thousand km] [Maintenance of Lada Largus at 60 thousand km of run] [Maintenance of Lada Largus for 90 thousand km of run] [Maintenance of Lada Largus for 120 thousand km of run] [Independent maintenance - general recommendations] [Safety rules for self-carrying out maintenance] [Tools required for carrying out maintenance Lada Largus maintenance] [Lamps used in the Lada Largus car]
Lada Largus: replacing the drive belt for auxiliary units of an 8-valve engine
2163-13-12-03
Remove the accessory drive belt.
Remove the accessory drive belt.
Remove the accessory drive belt.
Marking of the drive belt for auxiliary units of a car with power steering and air conditioning is 5K 1747 (five-strand, length 1747 mm). When replacing the belt, the support and tension rollers must also be replaced.