How to change the air conditioning belt on a Hyundai Accent yourself?
The normal operation of the air conditioner in a car is determined by the device belt, as well as its tension on the rollers. This belt on the Hyundai Accent Tagaz assembly sometimes breaks, so owners of such car models periodically face the need to replace the element. This material will help you find out how to change the Hyundai Accent Tagaz air conditioning belt and what is needed for this.
When is it necessary to replace?
Engine belts are quite durable and rarely need to be replaced. There are no clearly defined deadlines establishing the procedure for replacing belts on a Hyundai Accent - they change in the event of excessive stretching of the belt, cracks appearing on it, delamination and loosening of the surface. It is believed that it is necessary to systematically diagnose the condition of belts after a mileage of 60 thousand km. Since replacing belts is quite simple, you can purchase replacement kits in advance and always carry them with you.
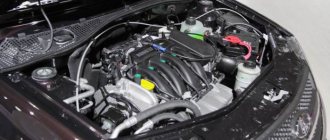
How to check and replace the air conditioning compressor drive belt on a Hyundai Accent
To carry out work on checking and replacing the belt you will need: a 12 key and a 14 key.
- To check the belt tension, press your finger midway between the crankshaft pulley and the air conditioning compressor pulley. When pressed with a force of 98N or 9.8kgf, the belt should bend by 7.5-8mm. To check, you can use a balance scale.
- In order to adjust the belt tension, the car must be placed in a viewing hole.
Loosen the nut securing the tension roller to the adjusting mechanism.- By screwing in or out the adjusting bolt, achieve the desired belt tension. After the belt is adjusted, you need to tighten the nut securing the tension roller.
- In order to replace the compressor drive belt, you need to loosen the belt tension, remove the belt from the crankshaft drive pulley
- Remove the belt from the tension roller.
- We remove the belt.
- Install the air conditioning compressor drive belt in the reverse order. After installation, adjust its tension.
Video on replacing belts:
Replacing engine belts on a Hyundai Accent is carried out in accordance with the regulations established by the manufacturer. Belts can be changed individually or as a set. Difficulties, as a rule, are caused by a small amount of space under the hood, where, during a complex replacement, it is necessary to install three drive belts. Let's look at the procedure for replacing Hyundai Accent engine belts and look at each procedure step by step.
Procedure for replacing Hyundai Accent engine belts
- The jack is installed under the right front wheel.
- Next, the engine crankcase protection is removed.
- Unscrew the bolts securing the water pump pulley (4 pcs.).
- Loosen the generator tension with the head by 12.
- Remove the alternator belt and install a new one in its place.
- Loosen and unscrew the bolts securing the power steering pump (the head must be inserted into the hole in the pump pulley to remove it).
- Replace the power steering belt.
- To replace the compressor belt, you must remove the wheel and wheel arch liner.
- Using the tension roller, release the tension, remove and replace the belt.
On a Hyundai Accent, the procedure for replacing engine belts can be determined from the manual. The job of replacing all belts usually takes 6 to 8 hours. There are no strict timing for replacing belts; usually such work is carried out after 60 thousand kilometers or when extraneous noise, whistling, or “rustling” appears in the systems. Also, a visual inspection will help determine the condition of the belts - there should be no cracks, stretch marks, or delaminations on the parts. If such defects are detected, the belt should be replaced.
If the belt tension is insufficient, extraneous noise appears and the belt wears out quickly.
Excessive belt tension will damage the water pump or alternator bearing.
You will need a 12 key.
1. Check the belt tension by pressing your finger with a force of 98 N (9.8 kgf) in the middle between the generator and water pump pulleys:
– on engines mod. G4EB the belt should bend by 7–10 mm;
– on engines mod. G4EC belt should bend by 5.1–6.0 mm.
To check the belt tension, you can use a balance scale by pulling the belt branch with a hook.
2. To adjust the belt tension, loosen the bolt securing the generator adjustment mechanism to the tension bar...
3. ...and the nut of the bolt securing the generator to the oil pump housing.
4. By screwing in or out the adjusting bolt, adjust the belt tension.
5. To replace the alternator drive belt...
6. ...loosen the belt tension (see above), remove the belt from the generator drive pulley...
7. ...and from the crankshaft pulley.
8. Install the generator and water pump drive belt in the reverse order of removal, and adjust its tension by performing the operations specified in paragraphs. 1–4.
Vehicles with SOHC and DOHC engines have alternator drive belts of different lengths, so be careful when purchasing a replacement belt.
Many motorists have encountered the fact that when they go out in the morning and start the car, a whistle is detected. But not everyone knows what causes this effect. And even more so, how to eliminate it yourself.
Video
The video will tell you why the belt whistles on a car
Instructions for step-by-step replacement
Since this problem is familiar to many owners of these vehicles, it would be useful to describe the procedure for replacing the air conditioning belt. In addition, you also need to properly tension the element on the rollers so that it does not break later. But how do you know when it’s time to replace this component? There are several main signs of this:
- The initial sign of the need for replacement is a whistling sound. This whistle usually appears during increased load on electrical devices and other equipment on the machine.
- If your car is equipped with a special sensor to detect this malfunction, then a light diode may light up on the instrument panel, notifying the driver of a breakdown in the generator.
Required Tools
- Phillips screwdriver;
- a set of head keys (you will need keys for “10” and “12”).
Before you begin replacing the air conditioner belt and its tension on the rollers, you must remove the right engine mudguard. This is done as follows:
- The vehicle should be driven into a pit. Open the hood and using a Phillips screwdriver, unscrew the piston bolt that holds the internal mudguard mount. The piston needs to be pulled out.
- Now climb under the bottom of the car and using a 10mm socket wrench, unscrew the screws securing the mudguard. Dismantle it. For greater convenience, you can also remove the wheel.
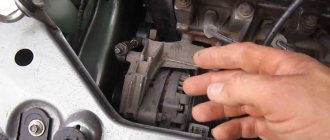
- Next, to remove the air conditioner belt, you will need to remove the alternator belt. To do this, take a 12" wrench and loosen the nut and pin that secure the alternator. Using the same wrench, unscrew the adjusting screw to loosen the strap tensioner.
- Then the device itself should be moved closer to the BC, after which you need to remove the strap from the shafts and pull it out.
- Since the roller tension nut is loose, you can easily unscrew and remove the adjusting screw. The strap can then be removed from the shafts. Take the new A/C belt and install it on the rollers.
- Now you need to tighten the element so that it sits firmly on the rollers. To do this, take a “12” key and loosen the screw securing the generator to the oil pump. After this, start turning the adjustment screw clockwise to tighten the strap. Tighten all the nuts and screws you removed before. Remember that you cannot overdo it with the stretch. Otherwise, this may cause increased loads on the bearings of the generator as well as the coolant pump. In turn, increased loads will provoke accelerated breakdown of these devices.
- Repeat all further steps in reverse order to complete the repair work. Don't forget to reinstall the splash guard.
Remember that such repair work requires at least some experience and practice, so it is better for inexperienced motorists to entrust this task to professionals.
In addition, everything must be done very carefully and thoroughly, since loosening even one bolt will lead to unpleasant consequences in the future. And on the road, the last thing the driver wants is this.
We also strongly recommend that you do not buy low-quality parts and other components of questionable manufacture to repair your vehicle. As a rule, the service life of such elements is much shorter and they wear out very quickly. Follow all the steps described in the instructions correctly, and you will be able to drive your car for a long time without looking under the hood.
Conclusion
The cause of the Hyundai Accent engine whistling when starting is a malfunction of the additional drive belt for attachments. Less commonly, a whistle can be caused by wear on the elements of the gas distribution mechanism and others. To eliminate the malfunction, it is necessary to diagnose and replace the failed belt in order to prevent more negative consequences for the power unit.
Replacing belts on Hyundai
Accent
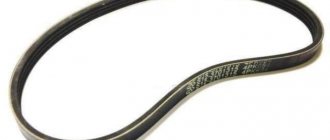
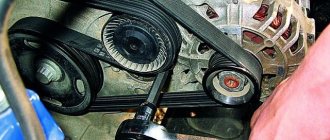
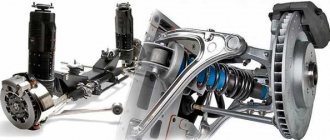
Changing belts on a Hyundai Accent usually causes difficulties due to difficulty of access. After all, there is little space for changing belts under the hood of the Hyundai Accent, and there are three drive belts. Air conditioning compressor poly-V belt (unique number 97713-1E000), belt (25212-26021) and power steering V-belt (57231-29100). To understand how the whole system works, we offer a diagram of the Accent belts.
The air conditioning compressor belt is thrown from the crankshaft pulley to the air conditioning compressor pulley. The belt tension is ensured by a special tension roller. belt rotates through the crankshaft, alternator and water pump pulleys. The tension of this belt is carried out by a tensioning mechanism that moves the generator. The power steering belt is thrown over the pump pulley and the power steering pump pulley, this belt
by moving the power steering pump housing on a special bracket attached to the engine.
Hyundai Accent
drive To change or adjust the tension of the air conditioning belt in the Hyundai Accent, you need to remove the wheel and fender liner. Since there is no other access to this area. The tension roller, which regulates the tension, allows you to loosen or tighten this belt. For clarity, we offer a photo. The arrow indicates the tension roller.
Characteristic
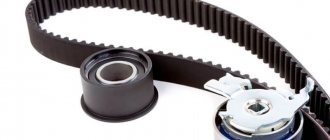
How to determine that it is time to replace the timing belt Usually, the timing belt makes itself known by making unpleasant sounds during engine operation, these are the first prerequisites for replacing it.
The driver is required to periodically conduct a visual inspection of this part. But you need to take into account the wear and tear of the engine and its components. Therefore, it will be cheaper to install a new belt every thousand.
And a break can end in disaster - the valves will bend, cracks will appear in the block head, and many other troubles. We can conclude that replacing the timing belt is required in two cases: When the maximum mileage is reached in thousand km.
In case of breakage or damage. The price of new belts for the Accent: This is what will be discussed in this article. Checking the belt and the need to replace it The manufacturer strongly recommends that all Hyundai Accent owners change the timing belt after approximately 50 - 60 thousand kilometers.
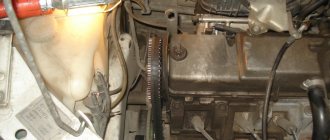
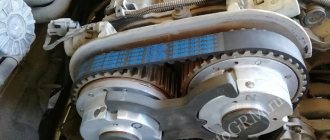
Replacing the timing belt
You should not delay this procedure too much - this element, unlike many other parts and assemblies, is unable to signal its malfunction and can break at the most inopportune moment. Place the wrench with the socket head on the bolt in the center of the crankshaft and press it against the spar.
Disconnect the low voltage connectors from the ignition coil module. Rotate the starter a few turns to loosen the crankshaft bolt. Turn the bolt clockwise until the marks on the crankshaft pulley are aligned.
Unscrew it and remove the pulleys; removing the metal plate will also be necessary. Loosen the bolts that secure the tension roller and unscrew them.
Hyundai Accent 2 - Replacing brake drums
Let's say the alternator belt has already been removed. Now we need to loosen the bolt securing the power steering pump to the bracket and unscrew another one on the other side. In the next photo, the locations of the required bolts are marked with arrows. If you can get to one bolt with almost any wrench, then the second can be unscrewed only with the head, pushing it through the hole in the power steering pump pulley.
Why does the generator belt whistle (reasons for whistling)
Many car enthusiasts believe that the whistling of the alternator belt appears only because it is worn out or sagging, but this is not entirely true. It is not always possible to eliminate whistling by replacing the old belt with a new one or “tightening” it. Often the causes of whistling may not be obvious.
In order to understand how to eliminate the whistling of the generator belt, you must first understand why it whistles (squeaks, creaks), and what are the reasons for the appearance of these sounds.
During operation, the alternator belt, like other vehicle drive belts, is subjected to prolonged high loads. With its help, torque from the engine crankshaft is transmitted to the generator and other attachments.
Most drive belts in automobiles are wedge-shaped, which provides greater frictional force where they contact the pulleys. They are called V-belts. The same belts that have several wedge-shaped tracks (so-called “rivulets”) are called poly-V-belts.
V-belts are available with and without teeth. It is believed that belts with teeth work better at breaking, do not break and slip less often.
Now we have come to the answer to the main question - why does the alternator belt whistle ? It's very simple - in 99% of cases, the whistle appears due to the friction of the belt on the pulleys and tension rollers as a result of slipping! That is, if the belt cannot turn the pulley of a generator or other equipment, then it simply slips, making an unpleasant sound similar to a whistle, squeak, squeak or squeal.
Therefore, you need to look not for the cause of the whistle, but for the reasons that cause the belt to slip. And there can be five main reasons:
- Weak or very strong alternator belt tension;
- Poor quality or worn belt;
- Getting dirt, moisture, oil and other technical fluids onto the belt and pulleys;
- Faulty generator bearing or tension roller;
- Pulley misalignment.
In addition, the appearance of a whistle can be influenced by such factors as humidity and ambient air temperature, the technical condition of the generator, air conditioner, power steering and other equipment driven by the generator belt.
What will happen if you don't change it?
If the power steering belt was not replaced on time, then various defects will be visible on their surface - cracks or abrasions. A worn belt will produce an unpleasant whistling sound during operation. This means it's time to replace it. If the drive belts break, the driver will hear a loud bang, and the equipment will simply stop performing its functions. For example, if the alternator belt breaks, then the battery will stop charging. Also, if there is a break, the hydraulic booster may stop working. As a result, the steering wheel will become very tight. Of course, you can drive with such a malfunction, but you shouldn’t put off replacing it. This is very harmful to the amplifier system. However, the main problem is the pump not working. In this case, the circulation of coolant stops and the engine may overheat. And this is already fraught with expensive repairs.
Features of clutch replacement
Replacing the clutch on a Hyundai Accent is a very labor-intensive operation that involves hanging the engine and gearbox. In Moscow and other large cities there are specialized car services ,
where there is a lift, pit and other necessary equipment.
Important features you need to know about.
- It is necessary to use a special mandrel to center the driven disk, otherwise the box will not fit into place - the usual VAZ mandrel is not suitable here.
- Removing the starter is somewhat difficult. To gain access to the starter bolts, you need to remove the cable fastenings. The cables themselves can be hooked onto the vacuum brake booster.
- The release bearing on this car is mounted on a short bell-shaped guide. If the bearing wears out due to heavy load, the Hyundai owner will face repairs at a high price. The guide itself will need to be changed.
- The clutch on the Accent is installed in the crankcase, connected to the cylinder block and gearbox. The basket is connected to the flywheel using 5 bolts. The latter is equipped with three pins, which, when installing the coupling, enter the structurally provided holes in the casing (basket). Thus, centering occurs.
- The pressure plate is fixed to the basket by three pairs of elastic steel plates. Replacement of the casing is recommended if there is significant settlement of the diaphragm spring and severe wear of the drive disk and petals to a depth of more than 0.8 mm. However, due to the complex process of removing the transmission on a Hyundai Accent, it is recommended to replace the entire clutch kit, including the discs and release bearing.
The work time depends on the type of mechanism installed on the Hyundai Accent. If this is a regular mechanism, then the repair will take about 1 hour.
Let's get to work. Removing the belt
So, first you need to jack up the front left side and remove the wheel. Next, open the hood and loosen the pump pulley bolts. A total of four bolts need to be unscrewed. Next, remove the belt from the air conditioner (if one was installed on the car). To loosen the belt, slightly unscrew the tension roller. Next we need to remove the alternator belt. For this we need 12" heads. Additionally, unscrew the power steering shaft. The amplifier itself can also be removed.
We remove the pump pulley with the belt and disconnect the fasteners of the power steering reservoir. We move the last one a little to the side. Next, you should remove the side motor mount (the one that is attached to the right wing). As the work progresses, we inspect its condition. The engine mount should not have cracks or play. Otherwise, we replace it with a new one.
Next, unscrew the plastic casing under which the timing belt is hidden. Using a ratchet and a 22mm socket, unscrew the bolt located in the middle of the crankshaft. Be careful - it is twisted with great effort.