How to set valves on a 4-stroke scooter
When adjustments need to be made.
♦ After the first 500 km, then according to the table of prof. works (see Operating Manual, will be posted on our website).
♦ The scooter does not start or starts with difficulty.
♦ Has difficulty gaining momentum.
♦ The motor makes a ringing noise.
Attention, it is not only incorrect valve adjustment that can cause these problems. Descriptions of common problems, possible causes and solutions will be published on our website.
♦ Adjustment of the gap only ON A COLD MOTOR!
♦ Remove the seat carefully, the plastic is fragile, especially at low temperatures!
♦ After adjusting the gap, the carburetor may need to be adjusted.
♦ Before removing the cylinder head cover, it is advisable to wipe the engine. After removal, make sure that no foreign objects get into the engine.
♦ The author of the article does not bear any responsibility for possible harm caused by incorrect adjustment.
♦ 9 and 8 mm keys (heads)
♦ Feeler gauge for setting the valve clearance (we need 0.05 and 0.1 mm)
Step 1. Preparatory work.
Prepare 3-4 jars or other containers for screws, nuts and other small parts. This way we won’t lose anything during the work process.
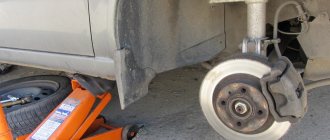
Removing the seat. Here we will need a 10mm socket wrench and a screwdriver. There are 4 nuts in the luggage compartment that need to be unscrewed (two on the sides of the seat lock and two on the bottom). Under the rubber foot mat there are 2 screws, which we also unscrew (see photo).
Next, carefully remove the seat along with the helmet box (luggage compartment). Below it is the engine. Now the motor is free and nothing bothers us.
Step 2: Fan cover.
To adjust the valves, we must find top dead center.
To do this, remove the plastic lining of the fan for the generator:
Unscrew 2 nuts (M8) and two screws and remove the lining:
Step 3: Cylinder head cover.
Remove the cylinder head cover:
To do this, unscrew 4 M10 bolts and 2 nuts (the metal tube is screwed on with nuts). Now we remove the cover and see the following picture:
The arrows indicate the valves: inlet at the top, exhaust at the bottom. Before we start setting the clearance, we need to find TDC (top dead center).
Step 4: Top Dead Center (TDC)
TDC is the point at which the piston reaches the top position in the cylinder. In this article I present a method for finding TDC using marks on the generator rotor. Of course, you can determine TDC in another way, for example, by the position of the valve rocker arms. Attention: Four-stroke scooters have 2 TDCs!
There are 3 holes on the camshaft sprocket. Their location shown in the photo corresponds to the TDC of the piston, at which both valves are closed (what we need).
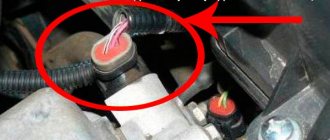
There are marks on the generator flywheel: T (TDC) and F (ignition timing):
The mark T should be opposite the protrusion marked with the number 1.
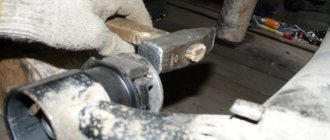
To align the protrusion and the TDC mark, use a socket wrench and rotate the fan CLOCKWISE until TDC is reached. To find out that this is really TDC, lightly move the key, while the valve rocker arms should not move. If they move, then this is not TDC, turn the fan further, CLOCKWISE, until the mark and the protrusion align.
Well, we have found the top dead center, now we can start adjusting the valves.
Step 5: Adjust/Check Valve Clearance.
To check the gap, take a 0.05 mm feeler gauge and try to insert it between the intake valve and the adjusting bolt.
If this fails (due to the absence or insignificant gap) or the gap is too large, then loosen the M9 lock nut and turn the adjustment bolt with pliers or a suitable wrench. Clockwise - the gap decreases, counterclockwise - increases. At the same time, hold the feeler gauge between the valve and the adjusting bolt.
The probe should sit tightly between them, so that the probe can be moved, but when moving, there should be no scratches on it. Tighten the locknut while holding the adjustment bolt with a wrench or pliers. After tightening, check the gap again.
So we adjusted the intake valve.
We do the same with the exhaust valve. Access to it with a probe is difficult, but possible. The gap here should be 0.1 mm.
The valve adjustment is now complete. We reassemble in reverse order, putting all the parts in place. (head cover, fan cover, seat).
Let's see if we have forgotten anything. Tighten all screws, bolts and nuts accordingly. We work with plastic carefully! May break, especially at low temperatures.
Photo report: How to grind scooter valves
Due to its initially unfavorable location, the cylinder head valve takes on the main load arising during fuel combustion. The exhaust valve is especially hard hit, since the main flow of hot gases passes directly through it.
In order to increase the resistance of valves to temperature, vibration, wear and various deformations, they try to use more expensive, and therefore high-quality materials and technologies for the manufacture of scooter valves and cylinder heads. Chinese manufacturers constantly save on something, so the “quality” of valves and cylinder heads made in China leaves much to be desired...
The valve can be removed from the cylinder head using this device, which consists of two washers of suitable size welded together through small spacers.
We place our device on the valve plate and, using a suitable clamp, compress the spring and remove the crackers.
After removing the valve from the cylinder head, we clean it and the cylinder head from carbon deposits using all available means.
What parts should look like after cleaning.
Lapping:
We take pliers, use them to clamp the valve right next to the plate, and apply a little lapping paste evenly over the entire surface of the chamfer.
All manipulations with valves should be performed with round nose pliers, this way you will protect yourself from getting abrasives on the valve stem.
After applying the paste, use pliers to insert the valve into place.
We push the valve all the way in and put a rubber tube of a suitable diameter on it on the back side.
The valves should be ground in according to this principle: lightly pull the tube, then turn the valve in one direction about one turn, then raise the valve a little, again lightly pull the tube and turn the valve in the opposite direction by half a turn, and repeat this many times until it is ground in the valve to the seat completely. Yes, it is long and tedious, but the result will be worth it.
During lapping, constantly monitor the condition of the chamfers and carefully ensure that the paste does not get on the valve stem.
This is the chamfer that was originally on the burnt out exhaust valve.
You should grind until the shells, irregularities and other damage are completely removed; as a result, you should get a uniform chamfer with a matte color on the seat and valve plate.
Here are examples of an ideal ground bevel.
After grinding in, we thoroughly wash all the parts and proceed back to installing the valves on the cylinder head: Install new valve stem seals (preferably), use a syringe to apply engine oil to the valve stem and insert it into place, then put on the valve springs and using our device We put the crackers in their places.
The direction of the inner and outer valve spring coils after installation should be in different directions.
After installing the crackers, to check their secure fit, lightly hit the valve stem from the spring side with a hammer.
After all that has been done, the valves should be checked for leaks, for this there is a special stand which, unfortunately, I do not have, so I will check them the “old-fashioned” way using kerosene.
We turn the head over so that the outlet or inlet channel is at the top and fill it with kerosene to the very edge, and after 30 minutes we see if the kerosene has leaked out, then we disassemble and grind everything again, and if everything is dry then the head can be put back in place, work on The installation of the cylinder head is described in detail in the article: Installing a piston 170 CC instead of the standard 150 CC on a scooter
How to set valves on a 4-stroke scooter
Adjusting valves on a 4T 139QMB scooter
Introduction.
From time to time on 4-stroke scooters, it is necessary to adjust the valves. Whether to do it yourself or in a service, everyone decides for themselves. I would like to note that adjusting the valves on a scooter is not such a difficult task; anyone who knows how to twist nuts can handle it. This process will take 20-30 minutes. All you need is attention and accuracy. When adjustments need to be made. — After the first 500 km, then according to the table specified in the instruction manual for your scooter.
Most often, reduced or increased valve clearance leads to:
— The scooter does not start or starts with difficulty. — The engine is slowly picking up speed. — Also, the engine constantly stalls. — The motor makes a ringing noise in the head area.
Attention:
— Adjustment of valve clearances is carried out only ON A COLD ENGINE!
— When removing the seat, be careful, the plastic on scooters is very fragile, especially at low temperatures. — After adjusting the gap, it may be necessary to adjust the carburetor
. — Before starting to remove the valve cover, it is advisable to wash the engine area (cylinder head) with water and wipe dry. After removal, make sure that no foreign objects get into the engine.
Required tools:
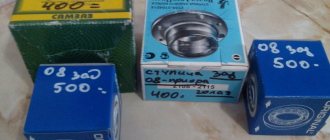
— Pliers — Phillips screwdriver — 9 and 8 mm wrenches (heads) — Feeler gauge for setting the valve clearance (we need 0.05 and 0.1 mm). The dipstick can be purchased at any auto store. It is best to have a similar set in your garage, as shown in the photo below.
This is what the valve adjustment gauge looks like.
Valve Adjustment Tools
To work with the Alpha moped you will need the following tools:
- pliers - will be useful for holding fasteners in one position while unscrewing other elements;
- a brush for working with metal – it is useful for cleaning the candle from external accumulations;
- 9mm wrench – required to loosen the locknut;
- key 17 - it is necessary to unscrew the valve covers;
- Allen key - you will need it to turn the flywheel. There is a mark on the specified element, thanks to which the “dead” point is adjusted. The mark should coincide with the arrow on the crankcase already during disassembly;
- feeler gauge - it is used to measure gaps. The standard size for the intake and exhaust valves is a 0.05mm feeler gauge, which is the correct setting.
Dipstick for adjusting scooter valves
Each of these items is in the tool box, especially for moped owners. The setup procedure will only take a few minutes with proper skill and following the instructions.
Scooter valve clearances - adjustment
Tools: Pliers, curved and/or minus screwdrivers, 9 and 8 mm (heads) and 13 keys, feeler gauge for setting valve clearance - 0.05 and 0.1 mm
Adjusting the valve clearances is a mandatory procedure for a new scooter, and this must be done as soon as possible after purchase. Then approximately every 2500 - 3000 km. But if a characteristic clicking sound, similar to a clattering sound, is heard from the cylinder head earlier, you should not wait for scheduled maintenance. If possible, adjust the gaps for the first time together with someone who has done this more than once. But this is optional. ATTENTION! Adjustment of scooter valve clearances is carried out only on a COLD engine, since these clearances are thermal ones.
First, let's clear access to the cylinder head cover. To do this, remove the seat (toilet bowl). The picture should look like the one in the picture. At low ambient temperatures, plastic must be handled carefully; it becomes brittle.
Adjusting valve clearances Now unscrew the screws (1) securing the valve cover (2). If there is a tube, dismantle it.
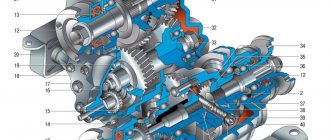
Now you have this picture in front of you - valve cams, rocker arms, camshaft, camshaft sprocket.
Now, to adjust the valve clearances, you need to adjust the top dead center (TDC) of the piston, i.e. catch the moment when the piston is in its upper limit position. It is not difficult. But be careful: four-stroke engines have two TDCs, at the beginning of the 1st and 3rd strokes. We need the 3rd measure.
To find TDC, remove the fan cover for the generator. Using a 13 key, turn the hexagon on the generator cooling impeller clockwise until the mark on the generator flywheel marked “T” coincides with the protrusion on the side of the flywheel.
Now we look at the camshaft sprocket. Its two small (1) and one large (2) holes should be located as in the figure. In this case, the valves should be closed, and they should not move when the generator flywheel oscillates slightly. The so-called position of the “3rd beat”, or more precisely, the beginning of this beat.
Now you can proceed directly to adjusting the gaps. First you need to check the gaps. Using a 0.05 mm feeler gauge, we check the inlet (upper) valve - insert the feeler gauge between the adjusting bolt and the valve. With normal settings, the probe should enter with little difficulty, and you need to move it in the gap with a little effort, but so that there are no scratches on it.
If adjustment is required, the locknut must be loosened (“outside”). Then you can change the gap by rotating the adjustment bolt (“inside”) - less clockwise, more counterclockwise. Then, without releasing the adjusting bolt, tighten the locknut. You need to be careful here - after tightening the locknut, the gap may change. Therefore, we recheck the gap.
Similar actions with the release valve. Only access to it is more difficult, and the gap is 0.1 mm.
All. Now let's put everything back together in reverse order. Fair wind!
Adjusting valves on a scooter
Scooters with simple 50 - 150 cc engines have flooded the market and are now found on every corner. Why is this happening? First of all, they captivate with their low cost, unpretentiousness and every year the better and better quality of the main components and their assembly. Regardless of the year of manufacture, the entire scooter, and especially its motor, is subject to regular maintenance; this is the main requirement for maintaining the performance of the motors. One of the important adjustments that should be done regularly is adjusting the valves on a four-stroke scooter.
Many owners of scooters and motorcycles are afraid of this procedure due to ignorance and fear of damaging the engine. We believe that adjusting the valves on a 4t 80cc, 50cc, 150cc scooter is a task that any motorcycle owner can handle with a small set of keys and desire. Below, you will find step-by-step instructions on how to adjust the valves on a scooter with a 139qmb and 157qmj motor.
When to adjust valves on a moped
Maintenance of the Alpha moped engine should be carried out if the following situations arise:
- slow increase in speed during acceleration;
- noticeable noise in the form of a clattering sound;
- the vehicle does not start the first time;
- The motor stops working while driving.
Depending on the wear and tear of the moped, the procedure may be needed more often - even after 1000 km, as metal fatigue and constant temperature changes when starting the engine and when traveling at different times of the year make themselves felt. It is recommended to carry out the procedure regularly to eliminate the following consequences leading to increased costs for correcting transport:
- with a constantly reduced gap, a rattling noise will become noticeable, reminiscent of the sound of a mechanical sewing machine. This configuration is also harmful for the reason that the engine does not provide the required level of traction, increasing gasoline costs and wearing out the mechanics;
- in the case of a reduced gap, compression disappears, preventing the vehicle from moving - the valve gradually collapses, the spark plug becomes unusable;
- the exhaust gases change color and the smell becomes more pungent.
If you follow simple instructions, you will not have to resort to major repairs of the moped, but this procedure will require much greater costs and additional help from specialists.
Why adjust valves?
Many “riders”, when purchasing equipment, have little interest in its needs, which leads to rapid engine breakdown. The role of the valves is to supply the air-fuel mixture to the combustion chamber and remove exhaust gases. They operate under constant temperature conditions, and as you know, when heated, the metal begins to expand. Thermal expansion, together with gap deviation, leads to the fact that the valve may not close completely and the pusher is pinched, or vice versa, to too large a gap between the pusher and the valve.
If the intake valve has too large a gap between the pusher, then the combustion chamber is filled less with the mixture and the pusher breaks, and if the exhaust valve, the ventilation of the cylinder deteriorates. In both cases, this is felt as a loss of power and dynamic characteristics of the engine. When we talk about excessive clearance, then in this case the consumption may increase and a characteristic clattering sound can be heard.
That is, the engine requires adjustment of the gaps if:
- hard to start;
- does not start;
- stalls while driving;
- starts and stalls;
- consumption has increased;
- the maximum speed has decreased;
- a clattering sound is heard at the gas distribution mechanism;
- 500 km have passed since replacing the piston and cylinder group.
What can happen if a reed valve breaks?
If this very important part is broken, worn out, and begins to leak air, the fuel mixture will flow back into the carburetor. And the result will be a loss of power, since the engine simply will not have enough fuel. Then, after fuel enters the carburetor, gasoline is thrown into the air filter. Also, one of the consequences of a faulty valve may be a lack of response to adjusting the throttle.
Adjusting valves on a 4t 50cc scooter step by step instructions for a 139qmb motor
Step 1. Remove the upper part of the seat, and then unscrew its base. To do this, we need to unscrew 4 nuts inside the niche, two on either side of the lock and a couple more on the bottom. On the outside, under the mat, there are 2 more screws that need to be unscrewed (photo).
Now you can remove the unscrewed part, freeing access to the engine.
Step 2. Adjusting the valves on the scooter involves setting the piston to the TDC position, which means you need to remove the fan grille.
We unscrew the nuts securing the part and gain access to the fan.
Step 3. Now we need to remove the valve cover, it looks like in the photo.
To do this, we need to unscrew 4 bolts securing the cover itself and 2 more nuts holding the tube. After removing the cover, you can see the gas distribution mechanism (photo above on the right). The arrow at the top points to the intake valve, and the bottom arrow to the exhaust valve.
Step 4: Now you need to find top dead center or the position where the piston is closest to the valves. We will be guided by the marks of the generator rotor. But first, you should make sure that the holes on the camshaft sprocket are located as in the photo below.
Now we go to the rotor and look for the mark marked with the letter T. We combine it with the protrusion, as in the picture. This corresponds to the TDC of the piston, however, 4-stroke engines have two TDC, so we make sure that the holes of the timing sprocket coincide with the picture and that both valves are closed.
To align the mark, use a wrench to rotate the flywheel clockwise until the marks and the protrusion match.
Step 5. Now begins the adjustment of the valves of the 4t 50cc scooter China. To do this, take a set of feeler gauges and try to insert a 0.05 feeler gauge into the gap as in the photo below.
If the dipstick does not fit into place or passes freely, then the lock nut should be loosened. Next, hold the dipstick with one hand and rotate the adjusting bolt with the other. Ideally, the feeler gauge should enter the gap with some force. Now we leave the feeler gauge in the gap, hold the adjusting screw motionless with one hand, and tighten the lock nut with the other. After tightening, we check the gap again; the first time you can lose the gap, so you should repeat the procedure from the beginning until after tightening the gap is exactly 0.05.
We do the same to adjust the exhaust valves, only now we take a 0.1 mm feeler gauge.
Step 6: If the valves are adjusted and tightened, they should be checked. To do this, rotate the fan again. After several revolutions, we align the mark with the top dead center so that both valves are closed and measure the gaps with a feeler gauge one last time.
Step 7. We assemble everything in the opposite order, not forgetting to tighten all the fasteners, especially the valve cover. This completes the adjustment of the valves on the scooter.
Interested in increasing the power of your scooter?? Find out how to do this in the article: tuning a Chinese scooter.
Prevention of moped engine breakdowns
To increase the service life of not only the valves, but also the entire engine of the Alpha moped as a whole, you must follow these recommendations:
- fill only with high-quality fuel - this eliminates harm to the gas distribution system, and also does not leave unnecessary traces from the inside;
- you need to monitor changes in sensors indicating changes in the condition of the moped;
- It is worth changing the oil completely from time to time;
- Do not allow the engine to overheat, especially in the summer heat. Similarly, it is unacceptable to expose the engine to sudden temperature changes. Therefore, when leaving the street in winter, you should not immediately move away - you need to let the engine warm up. This prevents accelerated wear of the metal used in the vehicle;
- It is mandatory to keep the moped clean - regular cleaning of dirt, at least on the surface, so that it does not accumulate in layers, making further repairs difficult in the future. Vehicles should only be stored indoors on a permanent basis;
- For the winter, the battery will need to be removed if the moped is not in use. This will eliminate the formation of condensation and other problems - before re-installing the element, it is worth recharging it.
You should always keep a toolbox ready specifically for your moped. This is useful not only for repairs, but also for other purposes, such as tightening fasteners, since they can unscrew over time. As a result, not only reliable retention of the engine valve will be ensured, but also overall safety when driving in any conditions.
It is worth considering that the instructions may be useful when correcting defects in other models of mopeds/scooters, where the engine size differs. In this situation, the gap on both sides will be different. Otherwise, you will need to further study the vehicle repair manual to determine the correct parameters. In the garage you will need a small table to place the engine on it when dismantling it and completely cleaning it - this will make the work much more convenient and efficient.
How to adjust valves on an Alpha moped - step-by-step instructions
4.3 (86.67%) 6 votes
Step-by-step instructions for setting the valve clearance of the 157 qmj engine
Adjusting the valves of a 4-stroke scooter begins with freeing access to the cylinder head. To do this, we remove the seat tank, which is often secured with several bolts. Next, gaining access to the cylinder head, remove the 4 bolts and remove it from the engine. Now we get to the fan housing. It can be completely dismantled, allowing free access to the necessary marks, or if you do not want to dismantle it completely, you can unscrew the cover. The plug that the arrow points to can be removed with a simple screwdriver, and it is through it that the rotor marks can be seen.
Insert a 14mm socket wrench into the generator casing and rotate the rotor clockwise, while looking into the hole on the casing. It is necessary that the T mark appears in the inspection window (opposite the ledge), which indicates that the piston is at top dead center or TDC.
We look at the gas distribution mechanism. Here both valves should be closed and the holes on the camshaft sprocket should match the picture below. Did everything coincide? - let's move on. If not, then rotate the rotor again until the mark coincides with the protrusion, and again monitor the position of the valves and holes on the sprocket.
Note. Very often, the chain stretches and therefore the holes on the sprocket may not coincide 100%; if the deviation is small, then there is nothing wrong with it, but if you notice a complete mismatch, then this can lead to motor breakdown, which means the chain needs to be changed.
- Unscrew the lock nut holding the top valve.
- Insert the 0.05 feeler gauge and manually tighten the adjusting screw.
Leaving the probe, we take the pliers and fix the adjusting screw with one hand, and tighten the lock nut with the other. Now the probe should be pulled out with a little effort and also fall into place with a little effort. If this is not the case, then repeat the procedure again.
- Having set the intake valve, we move on to the lower valve. Here you need a 0.1 mm feeler gauge. The adjustment process is similar. We loosened the bolt, inserted a feeler gauge, then tightened everything up and checked the gap.
- Everything is ready, all that remains is to reassemble the engine in reverse order and test the new settings on the road.
Advice. After setting the gaps, it would be a good idea to check the carburetor settings.