Niva Chevrolet transfer case design: 1 – driven gear; 2 – differential bearings; 3 – spring washer; 4 – retaining ring; 5 – differential lock clutch; 6 – gear ring of the differential housing; 7 – gear ring of the front axle drive shaft; 8 – front axle drive shaft bearing; 9 – oil deflector; 10 – dirt deflector; 11 – front axle drive shaft; 12 – flange; 13 – oil seal; 14 – oil drain plug; 15 – driven gear of the speedometer drive; 16 – speedometer drive drive gear; 17 – hole plug for filling and checking the oil level; 18 – front cover of the transfer case; 19 – roller bearing of the intermediate shaft; 20 – transfer case suspension bracket; 21 – drive shaft bearing cover; 22 – thrust ring of the bearing; 23 – drive shaft bearings; 24 – overdrive gear; 25 – gearshift clutch hub; 26 – gear shift clutch; 27 – transfer case housing; 28 – reduction gear; 29 – low gear bushing; 30 – drive shaft; 31 – back cover; 32 – ball bearing of the intermediate shaft; 33 – intermediate shaft; 34 – differential housing; 35 – thrust washer of the rear axle drive gear; 36 – rear axle drive shaft bearing; 37 – rear axle drive gear; 38 – satellite; 39 – satellite axis; 40 – retaining ring of the satellite axis; 41 – transfer case suspension axis; 42 – spring washer; 43 – front axle drive gear.
Niva Chevrolet transfer case drive:
1 – differential lock clutch fork; 2 – differential lock clutch; 3 – fork locking bolt; 4 – rod protective cover; 5 – lever spring; 6 – differential lock fork rod; 7 – front axle drive housing cover; 8 – lock washer; 9 – bushing of the lever axis; 10 – lever axis; 11 – differential lock lever; 12 – gear shift fork rod; 13 – control lever fork; 14 – control lever; 15 – differential lock lever rod; 16 – gear shift clutch; 17 – gear clutch fork; 18 – spacer sleeve; 19 – locking ball; 20 – retainer spring bushing; 21 – clamp spring; 22 – switch for the differential lock warning lamp; 23 – axis of the control lever fork; 24 – fork mounting bolt.
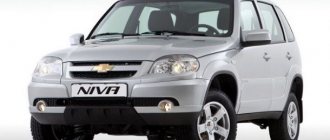
The Chevy Niva transfer case is designed to vary the torque in magnitude and distribute it between the front and rear drive axles. The car is equipped with a two-speed transfer case with a center differential lock. The transfer case is controlled (selecting a higher or lower gear, turning on/off the differential lock) with one lever through a mechanical lever drive.
https://www.youtube.com/watch?v=Vw3kZ3igAZ0
Changing the oil in Niva Chevrolet transfer case
According to the service book, the oil in the transfer case must be replaced every 45,000 km. To change or add oil to the transfer case, you will need a 12mm hexagon, a syringe for filling transmission units, and a container for used oil.
Unscrew the drain plug and drain the oil, then tighten the drain plug and turn out the filler
Using a syringe, fill in fresh oil to the level of the lower edge of the filler hole and tighten the filler plug. This completes the oil change in the Chevrolet Niva transfer case.
Gears
When inspecting gears, check the condition of the teeth and seating surfaces. Teeth chipping and excessive wear are not allowed. There should be no scoring or wear on the gear seating surfaces that would cause large clearance.
Bearings. Ball and roller bearings must not have damage to the raceways of the rings, cages, rollers or balls, as well as cracks and chips on the rings. The radial clearance of the bearings should not exceed 0.05 mm.
When turning, a clean, dry bearing should not make any knocking noise. The movement should be smooth, without jamming. Replace damaged bearings.
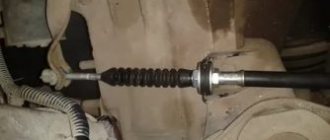
Replacing transfer case shaft seals for Niva Chevrolet
To install new shaft seals for the Chevy Niva, you will need a 24mm wrench, a 12mm hexagon, a syringe for filling transmission units, and a container for used oil.
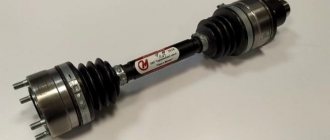
Drain the oil from the transfer case and disconnect the corresponding driveshaft from the transfer case
Unscrew the self-locking flange nut, having previously locked the transfer case differential and engaged the gear
Remove the nut and washer and the flange from the shaft
Remove the oil seal using a screwdriver. Apply sealant to the seating surface of the seat in the crankcase under the oil seal, lubricate the working edge of the oil seal with oil and press the oil seal in with a suitable mandrel. Replacement of the Niva Chevrolet transfer case drive oil seal has been completed.
VAZ-2121 Niva: from sadness to joy
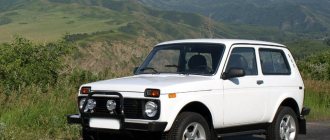
I sold my last Niva ten years ago, after an asphalt road to my summer cottage appeared. But in the year of the fortieth anniversary of the car, with which, it turned out, so much was connected in life, I decided to share my memories.
The reason was a call from Kostya, a young architect, the son of my friends, in love with Niva, asking for help finding tires for his car. It turned out that all this time in the summer he was driving on my tires, which I gave to them after selling my Niva.
I'll start with Nivov tires. Everyone knows that the standard VLI-5, which was equipped with the Niva, was poorly suited for driving on asphalt due to the terrible noise and insufficient traction properties on dry asphalt, and it wore out quickly. To make the ride comfortable, it was necessary to immediately change the tires. Have you tried to find them in the standard 16-inch size for the Niva?
Kostina Niva, or rather VAZ-21214, which he proudly drives on roads and country roads.
Kostina Niva, or rather VAZ-21214, which he proudly drives on roads and country roads.
This is still a problem, except for the Kama tires, which are difficult to balance. So I installed Bridgestone tires designed for delivery vans. Having traveled 30 thousand kilometers on my Niva, these tires drove about fifty more on two Nivas in Kostya’s family. Many tire drivers switch to 15-diameter tires to solve the tire problem, but this requires replacing the standard rims. However, such a transition, in turn, gives rise to the problem of placing a spare wheel under the hood. That is why there are options for mounting the spare tire on the rear door.
The unsuitability of VLI-5 tires for normal driving on the Niva was pointed out to me by Jean-Jacques Pocq, the French importer of Lada, when in 1989 he helped us equip three Nivas before the forced march across the Sahara. There was such an episode in the life of the magazine “Behind the Wheel” (the report was published in the last three issues of the same year). But this is a completely different story. I will only note that the tires of all Nivas sold in France were immediately changed to Michelin ones even before meeting the buyer.
Fan
In such equipment, Niva crossed the Sahara. The windows are covered with a mirror film, the solid trunk serves as a heat-reflecting screen, and the gasoline cans on the roof have not yet swelled under the scorching rays of the sun.
In such equipment, Niva crossed the Sahara. The windows are covered with a mirror film, the solid trunk serves as a heat-reflecting screen, and the gasoline cans on the roof have not yet swelled under the scorching rays of the sun.
However, that trip to the Sahara made me remember another Niv problem - the engine cooling radiator fan. Before the visit to Africa, all cars in Tolyatti were equipped with belt-driven fans; electric ones were abandoned. It’s easier to take a spare pulley with you than to drag an electric motor. Now Nivas are equipped with electric fans, even two, to prevent overheating. Niva engines do not complain about overheating, but the noise from the fans is annoying. The owners of such fields say that “the cooling fans scare away pedestrians with their monstrous howl.”
The first kilometers on Niva in Africa.
The first kilometers on Niva in Africa.
Body
Having time to sell any car before its body requires major repairs has always been a difficult task. But keeping the Niva’s body in good condition is a real art. And no matter what the designers came up with during the forty years of the machine’s life on the assembly line, the problem persists to this day. If you don't take care of the body, it blooms like a spring garden.
This is especially noticeable on white and light-colored cars. My Nivas were red - the rust on them was not so noticeable, but this did not stop the car itself from rusting. Therefore, anti-corrosion treatment was given top priority. From new, the entire car was treated, and then every two years the anti-corrosion compound was pumped into the hidden cavities.
Niva in section. Photo from an illustrated album, which was highly valued for its clarity by those who repaired cars in the garage.
Niva in section. Photo from an illustrated album, which was highly valued for its clarity by those who repaired cars in the garage.
Kostya’s two-year-old car already has corrosion around the windshield frame. After just a year and a half of operation, he noticed rust on the welds between the body and the roof. (It is noteworthy that VAZ does not give any guarantees for the body and coating of the Niva at all.) In the rain, Kostya is bothered by the windshield seal that is leaking after three warranty replacements. Moreover: as he noticed, water seeps from under it directly onto the engine fuse block.
In addition, the appearance of a large rear door, which reduced the loading height and made access to the trunk easier, led not only to the fact that when opening it, bags, things and products were at risk of falling out and getting dirty every time, but also to a significant weakening of the rigidity of the body. More than once I was faced with the fact that the trunk simply did not close on uneven surfaces - the lock moved relative to the latch. The same problem occurred when lifting the car on a jack. There were no such complaints with the previous modification with a “short” tailgate.
Transmission
| VAZ-21213 lost the rotating windows in the side windows, but retained small rear-view mirrors. To adjust them, you had to lower the window and move the mirror by hand. VAZ-21213 lost the rotating windows in the side windows, but retained small rear-view mirrors. To adjust them, you had to lower the window and move the mirror by hand. | The large rear door of the modernized Niva outside the city sometimes warped on uneven surfaces and was not easy to close. The large rear door of the modernized Niva outside the city sometimes warped on uneven surfaces and was not easy to close. |
All-wheel drive brought Niva, without exaggeration, worldwide fame, but at the same time became one of the constant headaches for its owners. I won’t hide the fact that constant repairs and overhauls of gearboxes and transfer cases, balancing of cardans forced me to part with the Niva. Moreover, it all started after I moved to a Niva with a 1.7 liter engine paired with a 5-speed gearbox.
https://www.youtube.com/watch?v=f2yWglBvgsY
On the previous car with a 1600 cc engine and 4-speed gearbox, I did not experience any inconvenience. Moreover, the new Niva turned out to be more gluttonous than its predecessor. In my “old lady”, with careful driving, I managed to achieve eight liters per 100 km on the highway, but with the new car, consumption of 10 liters per 100 km has become the norm.
But the main thing is that the transmission was constantly humming and crunching... The first overhaul of the transmission was required already at 20 thousand kilometers, then it had to be repaired every ten thousand kilometers. The situation was not saved by high-quality foreign oils and additives that were poured into the units. An exchange of views with other Niva owners in the late nineties and early 2000s confirmed the scale of the phenomenon. Anyone who bought a Niva at that time was preparing for expensive chassis repairs.
I was relatively lucky - I did not have any cases when I did not reach my destination in my Niva. But friends had them. Some were being repaired on the road. Kostya’s parents changed the gearbox assembly at a car service center, where they managed to drag the car on a “tie”.
Brakes
| The Niva's engine compartment also contained a spare wheel, which was often used to store tools. The Niva's engine compartment also contained a spare wheel, which was often used to store tools. | Tuning version of Niva. The alloy wheel spare wheel did not fit under the hood, so it was placed on the rear door. Tuning version of Niva. The alloy wheel spare wheel did not fit under the hood, so it was placed on the rear door. |
The Niva’s short wheelbase provided it with good geometric cross-country ability, but at the same time it made it “goat” on asphalt waves and reduced directional stability. Well, when the pistons in the brake mechanisms of the front wheels soured, the car seemed to go crazy and desperately rush to the side. Several times I miraculously avoided an accident. The “disease” usually appeared after a long stay. ABS would have saved the situation, but there was no trace of it on domestic cars.
Now Niva has acquired an anti-lock brake system. When Kostya switched to Niva with ABS, he felt freedom. “And then,” he complained, “before, when braking in the snow, a skid inevitably occurred, which had to be compensated by steering.
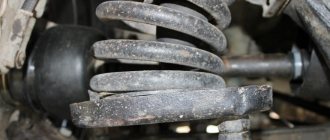
Replacing the suspension cushions of the Niva Chevrolet transfer case
To replace the transfer case cushions on a Chevy Niva, you will need a key 13 and 17. Before starting work, install a support under the transfer case.
Unscrew the nuts securing the cross member of the transfer case rear support to the body
Unscrew the nut and remove the bolt
Remove the cross member (popularly called a helicopter) assembled with the support pad
To replace the cushion, unscrew the two nuts that secure it and, if necessary, also replace the rubber bushings of the cross member
To replace the transfer case side mounting cushion, unscrew the nut of the box mounting axis and the two nuts securing the cushion to the body
Remove the pillow. The second pillow is removed in the same way. Installation of Niva Chevrolet transfer case cushions is carried out in the reverse order of removal.
Problems with the box
The Niva Chevrolet car, and in particular its gearbox element, as they say, is good, but with its own “peculiarities”. Somewhere after the first 50 thousand km, the device begins to show its teeth. There may be a hum or unusual noise. Such “features” make it clear that the bearings or gears are worn out. If you watch the gearbox for some time, you can determine what exactly needs to be replaced. What other problems can occur with the gearbox?
- Noise, grinding or knocking when the car is moving, and sometimes when warming up.
- Shocks when changing gears.
- The gearbox may refuse to disengage a particular gear.
- Deformation of the lever, which promises complications during the gear shift process.
- Also, transmissions can simply be knocked out.
For each item listed above, there are reasons and ways to solve them. But today we will look at a specific problem - the knocking of the Niva Chevrolet gearbox and we will carry out the repair ourselves.
A knocking sound when the car is moving or when warming up indicates that the bearings, gears, shaft (primary) or axial ones in the gearbox have worn out. Actually, determining what exactly was the reason is sometimes very difficult. And if you do not have the opportunity to completely replace the gearbox, then your only option is to remove the device manually, disassemble it and carry out minor repairs.
Removal and installation of transfer case Niva Chevrolet
To remove the transfer case from a Chevy Niva you will need a key for 13 and 17, disconnect all driveshafts from the transfer case
Inside the car, disconnect the transfer case lever cover from the floor tunnel casing and remove the cover together with the lever handle
Remove the rubber cover of the Niva Chevrolet drive shift lever
Unscrew the nuts securing the left side cushion of the box suspension to the body and loosen the nuts securing the remaining cushions
Disconnect the wires from the differential lock warning lamp switch
Place a support under the transfer case, unscrew the remaining nuts securing the cushions and remove the transfer case. Installing the transfer case on a Chevy Niva is performed in the reverse order of removal.
Eliminate vibration with additional fasteners
Installing the third support of the transfer case on VAZ 21213/21214 vehicles allows you to reduce the level of vibration of the transfer case; with this support it is easier to center the transfer case. The part can be purchased at auto stores or made yourself. The finished product comes with three long studs (for model 2121); to install the third support on this machine, you will need to unscrew the short studs from the transfer case housing and install new studs from the kit. We carry out repairs as follows:
Vibration is eliminated more effectively by installing a subframe under the transfer case. You can also make such a device yourself or buy a finished product at a car store.
In order to install the subframe, the transfer case must be removed. It is more convenient to carry out such work in a pit; we carry out repairs as follows:
It should be noted that installing an additional support or subframe on the steering wheel does not always lead to the desired effect; in some cases, vibration only increases.