We repair Lada Priora manual transmissions, eliminate the causes and signs of malfunction. We carry out free diagnostics, do major and current repairs of the Priora gearbox, and restore the gearbox within 1-3 days. Services include: restoration, selective replacement of parts, installation of a new gearbox, oil refilling, elimination of clutch defects. We sell spare parts for transmissions, complete manual transmissions, and consumables. We carry out maintenance. Phone in Moscow +7 (909) 624-64-64
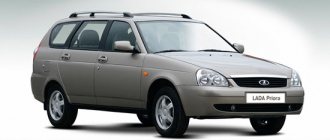
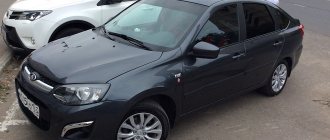
Lada Priora sedans, hatchbacks, station wagons were produced from 2007 to 2018. The Priora VAZ 2170 model is equipped with 5-speed gearboxes with mechanical and robotic shift principles. Both options are far from ideal and cause a lot of problems for car owners. Often, transmission malfunctions begin with minimal mileage, and sometimes immediately after leaving the car dealership. unit. Car service specialists consider this to be shortcomings of AvtoVAZ.
Diagnostics and repair of manual transmission Lada Priora
If there are noises in the gearbox and difficulties in shifting gears, it means that some elements of the gearbox or clutch have failed. All these breakdowns can be repaired. The main thing is to contact a specialized workshop as soon as possible. Regular car repair shops do not always undertake repairs to the Lada Priora gearbox. This is due both to the specifics of the work and to the features of the VAZ 2170 box itself. Despite the fact that the unit was updated in 2010, many shortcomings remained in it. And in most cases, to find the cause, not only good diagnostic equipment is required, but also the experience of specialists.
"Remont-MKPP.ru" is a specialized car service. We are engaged in the restoration of transmissions of domestic cars and foreign cars. We carry out manual transmission repairs for any damage. We bring components back to life even with signs of severe wear. We change boxes and provide systematic maintenance for Lada Priora of any year of manufacture.
Stages of VAZ Priora manual transmission repair
- Inspection and diagnostics.
- Consultation.
- Removing the box.
- Troubleshooting. Accurate identification of all mechanical weaknesses.
- Drawing up a repair plan. Cost calculation.
- Agreeing on the amount and terms with the car owner.
- Receiving parts from the warehouse.
- Repair of Lada Priora gearbox.
- Installing the unit in place.
- Re-check.
- Transfer of the car to the owner.
At the diagnostic and troubleshooting stage, we determine the type of repair of the Lada Priora manual transmission (selective or major). Based on what spare parts are needed, we immediately calculate the cost. Next, we will agree on all issues with the owner and begin the repairs.
The grounds for contacting a car service center are malfunctions of the Priora gearbox, difficulties in switching, lubricant leaks, and noise. High-quality repairs usually solve all problems. If the gearbox cannot be restored, then we change the entire mechanism. Upon completion of the work, the customer receives a machine with a perfectly working gearbox.
Mechanics
Mechanically, the clutch operation process is extremely simple. Let's analyze it from the moment the movement begins. After starting the engine, the car is in neutral gear (starting the engine in gear is bad manners). The clutch is depressed all the way - this means that it is turned off, the driven and pressure plates have separated, that is, a moment is created to change gear. The gearshift lever is moved to position 1, and first gear is engaged.
The pedal is smoothly released (the clutch is engaged), at this moment the most important thing happens: the distance between the pressure plate and the driven one is constantly decreasing, and the force transmitted by the engine has already set one disk in motion, which makes the moment of “collision” of the two disks become difficult. If the pedal is released abruptly, they will quickly touch, which means that the disc will stop (imagine that you are walking and tripping on a stone - much the same thing happens to the engine)
The engine may stall, or in the best case, the car will simply “bite.” At such moments, the “petals” on the driven disk suffer greatly - the more “flattened” they become, the closer the time for replacing the “hitch” is. If the discs come into contact smoothly and the driven disc is slowly set in motion, the car starts from a standstill.
Priora transmission - gearbox defects
In general, the manual transmission is the weak point of the Lada Priora. And considering that the transmission is one of the main systems of a car, it is easy to imagine the scale of the troubles. Being in second place after the engine, mechanics play an important role in the safety and comfort of movement. Therefore, any defects in the gearbox and clutch require immediate elimination.
The main disadvantages of manual transmission Lada Priora
- The need for constant adjustment and improvement. Factory defects lead to the fact that Lada Priora manual transmission repairs are performed on every second car.
- Weak synchronizers, their rapid wear. A crunching sound when shifting gears will indicate that your car has this problem.
- Release bearing noise. Half of all VAZ 2170 owners encounter this problem. The model is equipped with a reliable LUK clutch, but nevertheless this does not exclude the possibility of extraneous sound.
- Manufacturers do not consider systematic noise in the box to be a defect. But experts still advise changing the oil every 75 thousand km. This will help extend the service life of the mechanics.
- Weak Priora gearbox lever. Its breakdown does not allow the vehicle to be operated in a safe manner. The defect requires elimination.
We have listed transmission faults that most often occur in Lada Priora cars. In general there are much more of them. They differ in their causes and methods of elimination.
Installing a new element
You need to start assembly from the Priora's interior, although you can only feed the cable from the engine compartment. When it is already placed in place in the cabin, attach the cable end compensation mechanism to the pedal. Attach the casing. Then, pressing the plug, secure the clamp for the plug.
Having installed the housing mount on the gearbox in place, use a 17 key to adjust the correct tension of the device.
Attach the rubber seal to the hole in the passenger compartment and replace the air filter. That's it, replacement of the flexible clutch drive is done.
In the video, the process of dismantling the Priora clutch cable:
The clutch cable is rare, but it still happens, and the most common thing that happens to it is the metal part of the cable flailing, which is why it starts to jam and the clutch pedal simply cannot return back, but we won’t talk about the symptoms (More on that below we have already written) but let us briefly explain why this cable is needed at all, its real name is: “Clutch release cable”, you can already understand that thanks to it the clutch is disengaged (That is, the release bearing separates both disks from each other, thanks to which you can change the speed and in general, the clutch will be disabled when the engine can even work) and if this cable is not there, then switching gears will become much more difficult (Without a clutch you will have to switch them, it’s possible, but you just need experience and quick hands, if you are interested in that how you can change the speed without pressing the clutch pedal, then in this case, watch the video below, everything is explained there and shown with a clear example).
In order to carry out the work of replacing the clutch cable, you need to stock up on: All the keys that are in your set (If you have one) and a ruler or caliper (In general, something with which you can measure the distance between the fork and the leash) and we also recommend it in the store spare parts for the car, buy a clamp that attaches the clutch cable to the pin, just tell the consultant that you will still need this clamp if you suddenly lose the old one (And it’s very easy to lose it)!
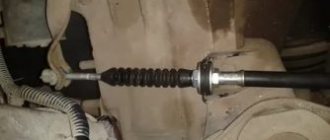
Where is the clutch cable located?
It has two ends like any other cable, one end is connected to the clutch pedal, the second clings to the clutch release fork, you can clearly see the cable only by opening the cap of the car and looking at the place where the gearbox is located, but you don’t need to look from below car, namely from above, in the photo below, by the way, the clutch cable is shown with an arrow for clarity, you will also find it in your home.
When should you change the clutch cable?
When the pedal starts to stick, in some cases it starts to make clicking noises, they can be treated either by tightening the cable or by replacing it, although you can drive with these clicking noises, you’ve probably already heard them in cars such as the Lada Kalina and Lada Granta (In them it’s just that the clutch cable is made a little differently, which is why this happens on them much more often and on almost every second car these clicking noises can be heard) they occur precisely because of the cable, but although in some cases other parts are to blame for this, but this it happens very rarely and in addition to both of the listed symptoms, there is one more, if you find it, then immediately start replacing the clutch cable with a new one, namely, if you notice that the cable has become loose in some place or is about to break, then do not delay the replacement in no case should it, because if it suddenly breaks at the most inopportune moment, and you, out of habit, while rolling, turn on the lower speed (For example, there is a sharp turn ahead, you throw the gearshift lever into neutral, the car speed is 80 km/h and before the turn you turn on 2nd gear and imagine what will happen if at such a speed the cable breaks, and imagine that if it happens in winter, firstly, the clutch will come back together with the flywheel, due to the high speeds the wheels will lock and, being confused, it will spin you out at best, let’s not even talk about the worst We won’t, such cases have already happened in real life, so always take care of your car and at the right time, it will save you).
Signs of malfunction, repair of the Priora gearbox
Transmission system failures occur for a number of reasons. For VAZ, this is primarily due to factory defects. Other sources of breakdowns include wear and tear of parts, mechanical damage, participation in an accident, untimely maintenance and systemic driving errors.
The Priora gearbox does not like sudden acceleration, extreme braking, or incorrect shifting. It is not so reliable that errors go unnoticed. The aggressive nature of driving will very quickly respond with noise and knocking out of gears. And this is a direct route to the workshop for repair of the Lada Priora manual transmission with associated costs. Forgetfulness of drivers in terms of maintenance also leads to unpleasant consequences. Thickened grease loses its effectiveness. Overheating and increased friction cause manual transmission mechanisms to fail even faster. After which a major restoration may be required, and possibly a replacement of the box.
Symptoms of a manual transmission malfunction
- Noise, hum, or grinding noise in the gearbox may indicate wear on the gear teeth, bearings, or lack of fluid.
- Difficulties in shifting may arise due to incomplete disengagement of the clutch, loosening of the hinge or lever. Deformation of the drive rod and jet thrust also leads to difficult transition to other gears. In addition, incorrect adjustment of the drive and deformation of the plastic elements of the gearbox control drive can lead to failures.
- Knockout of gears occurs due to the wear of synchronizer teeth and increased engine vibrations on the supports. Due to incomplete gear engagement, incorrect drive adjustment.
- Noise when shifting gears can occur as a result of incomplete engagement of the clutch and wear of the synchronizer locking ring.
- An oil leak may occur due to the destruction of oil seals or the gear selector rod, loosening of the crankcase, damage to the gearbox cover, sealant, or drain plug.
To eliminate symptoms, the first step is to determine the root causes of the breakdown. It is impossible to do this in a garage. That is why self-repair is based on the assumptions and intuition of the “masters”. Such repairs of the Lada Priora gearbox always end in the same way. One repair is followed by the next, until the indirect or main cause is determined at random. At the same time, a complete solution to the problems of manual transmission may not be expected. This is due to the fact that one malfunction gives rise to another. And they can be eliminated comprehensively only in a professional car service. And the more you do self-repair, the more likely it is that you will have to look for a new gearbox on your Lada Priora. And this will be more expensive than high-quality repairs.
Step-by-step instruction
Disassembled clutch pedal
To change the clutch cable, you will need a set of screwdrivers and wrenches. Initially, the air filter, which is located in the engine compartment, is removed. The clutch cable is pulled forward. Then it is removed with a leash from the groove of the lever.
Using a “17” wrench, unscrew the nut securing the tip of the shell of this unit to the bracket several turns. You will need to hold it with a hex wrench. The tip is removed from the bracket. The last element is located in the Priora's interior.
The nut that secures the bracket is unscrewed with an “8” key. Since replacing the cable on a Priora is carried out in difficult conditions, to facilitate the work, it is recommended to firmly pull the clutch pedal. Using a screwdriver, pry up the rear edge of the last element. Then the pedal is dismantled.
The next step involves pulling the cable sealing boot out of the hole. After dismantling it, turn away and remove the leash from the tip. If the Lada Priora clutch sensor fails, it is replaced with a new device. As for installing the clutch cable, this procedure is carried out after checking the condition of the plastic bushing on the corresponding pin. If it is worn out, a new unit is installed. The pin and bushing will need to be lubricated with a special substance.
Installation of the clutch cable on the Priora begins with passing this element through the hole in the shield from the car interior into the engine compartment. Then the sealing cover is mounted, and the housing of the corresponding cable mechanism is put on the finger. After fixing it, the cable sheath is secured.
It is screwed onto the tip of the wires so that its end is flush with the similar element of the leash. The last element is installed in place. Next, adjust the clutch drive on the Priora. This procedure involves pulling the cable forward by its tip until it stops completely. In this position, the distance from the lever to the end is measured. This figure should be 27 mm.
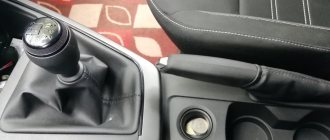
On the first models of Russian VAZ passenger cars, with rear-wheel drive, the clutch was engaged using a hydraulic system. That is, as with the brake drive, when the pressure from the master cylinder is transmitted to the working, actuating mechanism. When developing a new series of VAZs with driving front wheels, this scheme was abandoned. A simple and reliable system for engaging the clutch mechanism using a special cable was developed. The principle of the rocker arm works here. When you press the lower part of the pedal, the upper working area, through the base (rod), goes in the opposite direction and pulls the cable along with it.
The other end of the flexible connector is attached directly to the clutch drive fork. When you press the pedal, the clutch disengages, making it possible to engage or change gear in the box.
Lada Priora gearbox failures in Moscow
VAZ 2170 Priora cars arrive at our workshop with different types of damage. As an example, let’s look at the most common problems with our clients’ cars.
- Lada Priora has a mileage of 70 thousand km - there were problems with shifting 2nd gear. At first it turned on with a crunch, then it began to knock out. When I tried to shift, the car started to jerk and eventually stopped.
- VAZ 2170 2010 – the Lada Priora gear knob has failed.
- The owner contacted the auto repair shop because the gearbox on his Lada Priora was damaged and needed replacement.
- The essence of the appeal is faulty elements of the Lada Priora: gearbox seal, bearings, cracked crankcase.
- Lada Priora 6 – required fluid refilling and clutch adjustment.
In these and other cases, we carried out professional diagnostics. The manual transmission was repaired and the transmission system was brought back to normal.
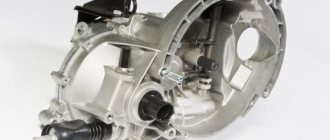
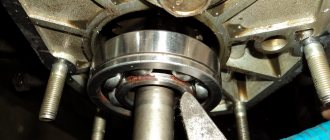
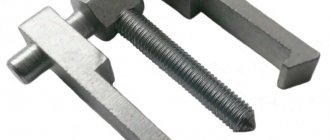
Disassembling the input shaft
We clamp the input shaft in a vice with soft metal jaw linings.
We pry up the rear ball bearing with two mounting blades and press it together.
Through the barb we strike the end of the inner ring of the front roller bearing...
...and press the ring.
Replacing the Lada Priora gearbox is a last resort
It is necessary to change the manual transmission only in extreme cases. For example, if the unit is no longer repairable. Or, when the Priora box is very worn out and its restoration will cost more than a new unit. There are cases when the manual transmission has to be changed after an accident if the damage is too severe. The cheapest options are used. They are often ordered precisely because of their favorable price. The disadvantage of such gearboxes is their shorter service life. New original and non-original boxes are more expensive and more durable. The class of the unit is chosen by the customer.
Repair of Lada Priora gearbox - price, terms of work
The price of repair work is calculated after inspection and troubleshooting. It depends on the type of damage, cost of spare parts, complexity and number of operations. After selective repairs, you can pick up your car the next day. If the damage is serious, it may take longer to fix it.
Lada Priora manual transmission repair at Remont-MKPP.ru – your benefits
- Inexpensive car parts and manual transmission assembly.
- Affordable prices for the company's services.
- 4 month warranty.
- Carrying out free diagnostics.
- Company discounts – from 10%.
- Carrying out work in 1 day.
- High quality result.
We have been working for more than 20 years. We have extensive experience in the restoration of manual transmissions and related components. We guarantee complete restoration of all transmission functions, comfort and safety of vehicle operation. We work from 9 to 21 hours. We accept cars throughout the working day.
Phone in Moscow: +7 (909) 624-64-64.
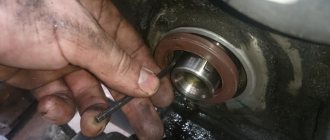
Disassembling the secondary shaft
We clamp the secondary shaft in a vice with soft metal jaw linings. We insert two mounting blades into the gap between the ends of the inner ring of the front shaft bearing and the main gear drive gear (to avoid damaging the gear teeth, you can place soft metal spacers under the mounting blades).
Leaning the mounting blades on the gear...
...press the inner race of the front bearing.
Use pliers to remove the locking rings...
...and remove the retaining ring from the front end of the shaft.
Having engaged the driven gear of the 1st gear with a three-jaw puller...
...we compress the drive gear of the main gear. If there is no puller, we place stops under the driven gear of the first gear and compress the drive gear of the main gear, striking the end of the shaft with a hammer with a soft metal tip.
Use pliers to remove the locking rings...
...and remove the retaining ring of the 1st-2nd gear synchronizer clutch hub.
By prying the driven gear of the 2nd gear with two mounting blades, we press the hub of the synchronizer clutch of the 1st–2nd gears from the shaft.
Remove the 1st–2nd gear synchronizer assembly with the 2nd gear driven gear. We disconnect the driven gear of the 2nd gear and the synchronizer of the 1st–2nd gears. Turn the shaft over in a vice.
Having placed a stop under the screw of a two-jaw puller on the end of the shaft, we press the rear shaft bearing with the puller...
...and remove the bearing.
Remove the thrust washer.
Remove the 4th gear driven gear.
Using pliers, we open the retaining ring of the synchronizer clutch hub for 3rd–4th gears...