HELPFUL ADVICE As the pistons are pressed into the cylinders, the brake fluid level in the master cylinder reservoir rises. If the brake fluid level in the reservoir is at or close to the “MAX” mark, pump out some of the fluid from the reservoir to avoid overflow.
13. Install new brake pads on the VAZ 2106 car in the reverse order of removal. 14. Press the brake pedal several times to set the pistons to the working position.
NOTE After replacing the brake pads, check the brake fluid level in the master cylinder reservoir and, if necessary, bring it to normal.
15. Reinstall the wheel. Replace the brake pads of the other front wheel brake.
How to find out whether the brake pads on a VAZ 2106 car need to be changed. To do this, turn the front wheels to the right and left and inspect their condition. The new brake pad is 11mm thick and can function as long as the thickness is greater than 1.5mm. If your pads are thinner, they need to be replaced immediately. Replacement occurs in the following order: remove the VAZ 2106 wheel and clean the caliper from the dirt accumulated on it. Next, take pliers and remove the cotter pins from the pin with the spring.
We take out the fingers with springs and the flat spring of the block. Then we take the mounting blade and remove the brake pads from the disc. Then the spread brake pads will press on the brake cylinders and squeeze out the brake fluid from them. Be careful, at this moment the liquid may splash out of the tank, so it is recommended to drain a small amount of liquid from it in advance. Use pliers to remove the used brake pads from the caliper. New pads are installed in reverse order.
Replacing the pads is not very difficult; removing the brake drum is much more difficult. This is done in this way: remove the VAZ 2106 wheel, unscrew the two fixing bolts, then start the engine, turn on first speed and press the brake pedal. Attention! During this operation, no one should be near the drum being removed. After removing the drum, replacing the pads is very simple. First of all, remove the end of the cable from the lever and remove the lever itself. Next, remove the upper and lower tension springs. As a result, we take out the old brake pads, put new ones in their place and assemble them in the reverse order.
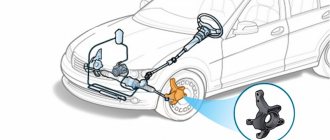
This material will tell you how to properly remove and replace the front brake pads of a VAZ 2106. They will have to be removed not only if they are worn out, but also when removing the brake caliper and replacing the front brake cylinders.
How to remove the front brake pads of a VAZ
- We lift the car on a jack and install a safety log under the lever (a safety measure to prevent the car from falling off the jack).
- Lubricate the contact points between the caliper and the guide pins with WD-40 or its equivalent.
Dirt often accumulates in these places and corrosion occurs. To simplify the work process and remove the guides without problems, it is necessary to lubricate these places with a special lubricant.
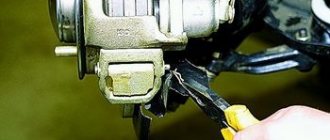
- Pull out the cotter pins that secure the guide pins
The cotter pin (retainer) may “resist.” To remove it, lightly press on the guide rod to relieve tension on it. Use a screwdriver or pliers to remove it from its seat. At this point, the fasteners may become damaged. Therefore, it is recommended to buy a repair kit in advance, which will contain new ones. This will save you from inconvenience when installing them in place.
- Use a punch to knock out the guides, holding the pressure springs from flying out
They serve to press the pads to the caliper, to the guide pins, so that when the car moves, the brake pads do not rattle in the pits. Over time, these springs lose their properties, stop pressing tightly, and on bumps, drumming occurs in the area of the front brakes. If you press the brake at this moment and the noise disappears, it is the springs (“chains”) that have weakened and must be replaced.
- Using pliers we open (retract) the pistons of the brake cylinders
We grasp the bottom of the cylinder with one edge of the pliers or a mechanic's wrench, and with the other we grasp the protruding side of the block. Smoothly squeeze the pliers, pushing the cylinder piston inside. We do it without “fanaticism” so as not to crush the cylinder.
You don't have to do this, maybe you can pull out the pads this way. But it is worth remembering that when replacing them, you will install new ones with thicker friction linings. There is a possibility that they will not fit into the old sizes of worn parts. In this case, you will still have to recess the cylinders to fit new ones.
Installation is carried out in reverse order.
Procedure for removing and installing front wheel pads
I suggest you first watch my video instructions, which I specially prepared for this article. Below is a video in which everything is clearly shown and the entire operating procedure is explained:
Then you can see my photo report on the work done, if suddenly the video does not load (and this can happen).
First, lift the front of the car with a jack and remove the wheel:
After which we see the brake mechanism of the front wheels, which it is advisable to spray with penetrating lubricant so that there are fewer problems with dismantling. Then we first need to pry with a screwdriver and remove the cotter pins of the upper and lower rods, as shown in the photo below:
And take them out, putting them aside so as not to lose them:
Now we take a Phillips screwdriver and squeeze out the rods from the outside, since they have become quite rusty over time:
If the rods cannot be removed due to the force of the screwdriver, you can tap the screwdriver with a hammer, or use some kind of punch to avoid splitting the screwdriver:
And now you can easily remove the spring clips (brackets) that hold the pads:
After which you can remove the brake pads outwards, first the outer ones, as shown in the photo below:
And then we extract the inner one in the same way:
If problems arise when replacing the pads, that is, they cannot be removed normally by hand, then you can insert a screwdriver into the holes in the housing and pry them up with it to remove them:
Now we buy new pads for our VAZ 2106 and install them in the reverse order.
And we try again to put new brake pads in place. After sinking the pistons everything should work out easily.
How to properly install pressure springs
This question has divided all professional car mechanics into two camps. Some argue that it is correct to install from the brake disc side, as shown on the left side of the screenshot below, others - from the brake cylinder side, as shown on the right.
The first ones say - there is no difference, the main thing is that they press the pads and do not let them “rumble”. The latter explain it this way: if you install “gulls” on the disc side, then with their edges they will press the brake element against the disc, increasing wear on the friction clutch. If you install it with the side facing the cylinders, they seem to move them apart; they do not come into contact with the disk, so there is no wear during movement.
If you think logically, then the second part of the people is right. The springs have a design in which they, with their rounded edges, attract the pads in the direction of their installation. Therefore, if you place the springs on the inside, their edges will slightly press them against the disk - they will wear out faster. If from the inside, then there will be no such effect.
Video on how to shoot a classic in a garage:
Replacing brake pads on drum brakes
You can independently replace the rear brake pads on a disc-type and drum-type system. You need to know the technological process, since the nuances of assembling and disassembling rear brakes depend on the type of VAZ car.
Before replacing the rear brake pads, you need to diagnose them without removing the drum. For this purpose there is an inspection window in the brake mechanism. It is necessary to remove the plugs and evaluate the condition of the lining and its thickness. If you need to replace the pads, then it's worth doing it.
- You need to start by weakening the handbrake drive;
- the guide pins are unscrewed, the brake drum is rotated and removed. This won’t work the first time, so you first need to tap the drum from the end;
- after the drum is removed, you need to remove the guide spring from engagement with the block;
- Next you need to disconnect the lower tension spring, remove the front block and the expansion bar;
- the guide spring is disconnected from the rear brake shoe, the manual drive lever is removed from the cable tip;
- the guide spring is removed from the brake mechanism, the axis of the handbrake lever must be unlined, the axis, lever and washer are removed;
- Then the lever is moved to a new brake pad, and the axle needs to be pinned. The brake pads are then installed in the reverse order.
Recommendations
If for some reason you do not want to install new ones, then you can swap the inner pad with the outer one. Thanks to this, their wear will be uniform, and they will brake with uniform force.
Front brake pads are replaced when the friction lining thickness is 1.5 cm or less. With such wear, you will be bothered by squeaks and squeaks when you press the brake, and the quality of braking will be worse.
Remember, a properly functioning braking system is the key to safe driving.
Before you start removing it, it is recommended to buy a repair kit for the front calipers. It includes: “gulls”, guide fingers, and their springs. This is necessary so that during the replacement process the pressure springs may “fly out” in an unknown direction, the fingers will not want to lick out of their seats, they will have to be cut off, the guide springs and “gulls” may lose their elasticity.
We remove the old ones
We jack up the rear wheel of the VAZ 2107 and remove it. You need to take the necessary safety measures first: place boots under the wheels, place a safety stand under the body. This problem is usually not difficult. Further it will be slightly more difficult. It happens that the brake drum gets stuck to the axle shaft, and it is impossible to remove it using standard means.
In this case, the drum is “torn off” - the guides are turned out, the car is started, the gear is engaged and the speed is increased, after which the brake is sharply pressed.
Be very careful when performing this operation - ensure that the VAZ 2107 is securely secured so that it does not fall off the jack.
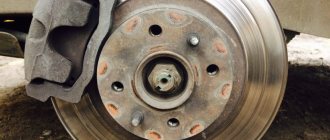
- We remove the brake drum and check the condition of the brake pad linings. In addition to wear, partial breakage of the linings may occur, because, unlike the front ones, the rear ones are not solid. We determine whether one or both pads need to be replaced.
- Using a flat-head screwdriver, remove the lower tension spring;
- Using pliers, remove the spring clamps from the guides, turning them until the slots match;
- Using a screwdriver, press on one end of the upper spring and remove it.
READ Replacing rear crankshaft oil seal Ford Focus 3
This is the last action, after which nothing holds the pads anymore, and they fall.
Brake pads VAZ 2106
The frequency of replacing the front brake pads on a VAZ 2106 depends primarily on the mileage of the car, as well as on the quality of the linings themselves. It happens that on good quality pads alone you can drive more than 50,000 km with a moderate driving style. And there are also some vehicles that you can’t drive even five thousand: they start creaking and buzzing terribly, and the quality of braking becomes simply disgusting.
Replacement
The work is carried out on a car with the front wheels hanging (on a lift or a car raised on a jack and installed on supports).
To replace the front brake pads on a VAZ 2106, you will need: calipers, a hammer, firmware (a bit or an old brake pad mounting pin), a file, a mounting blade, pliers, a wrench for wheel bolts, a jack, and supports.
1. Remove the front wheel from the car. Visually check the thickness of the brake pads. If the lining thickness is less than 2 mm, remove the brake pads for inspection.
2. Clean the brake mechanism from dirt, especially the brake pad mounting pins.
3. To facilitate disassembly, apply WD-40 type liquid to the joints of the pins and cylinders.
4. Remove the two pin pins.
5. Knock the fingers out of the brake cylinders.
NOTE To replace the brake pads, it is allowed not to completely knock out the pins from the inner wheel cylinder, however, for a detailed inspection of the brake mechanisms or if difficulties arise when knocking out the pins, it is advisable to remove them.
6. Remove the two brake pad pressure springs.
7. Remove the outer and inner brake pads.
WARNING Do not press the brake pedal with the brake pads removed to avoid pushing out the pistons from the working cylinders.
NOTES Oiling of the lining, disruption of the connection between the lining and the base, chipping and other damage to the surface of the lining are not allowed. If the indicated defects are present, as well as if the lining thickness is 1.5 mm or less, replace the brake pad. If there is uneven lining wear or uneven wear on the linings of one brake mechanism, replace the entire brake caliper assembly or the working cylinders (see “Removing and installing the front brake caliper” and “Replacing the front brake working cylinders”).
8. Wipe the inside of the wheel cylinders with a clean cloth.
9. Inspect the brake cylinder boots. Damage or signs of aging are not allowed.
10. Check the thickness of the brake disc by using a file to remove the shoulder on the disc on both sides. On each side, remove the bead in at least three places.
11. Measure the thickness of the brake disc in at least three places. In any place it should be more than 9 mm. Otherwise, replace the brake disc (see “Replacing the brake disc”).
12. Using a spacer (or a worn brake pad) and a mounting blade, press the pistons into the brake cylinders one by one, resting the blade on the brake disc.
Instructions for replacing rear brake pads on a VAZ 2107
- Release the lower spring.
- Turn the cotter pins securing the pads so that they align with the slots.
- Straighten and pull out the cotter pin of the handbrake lever.
- Use a screwdriver to press down and release the upper spring.
- After releasing the pads, remove the handbrake lever.
- Install in reverse order.
So, before starting work, you need to jack up the rear of the car, remove the wheel and brake drum. After which this picture opens up to us.
The first step is to release the lower spring. This is quite simple to do, just pry it up and pull it down with a screwdriver, as shown in the photo below
Next, you can use pliers to grab the “cotter pins” that secure the block and turn them so that they coincide with the slots in the washer.
We carry out the same procedure with the second side. Then we straighten and use pliers to pull out the cotter pin that holds the handbrake lever
Now you can press with a certain force on the upper spring with a flat screwdriver so that it comes off
After which the pads fall off on their own. Now all you have to do is remove the handbrake lever and you're done. Then we buy new rear pads and replace them.
Replace brake pads with new ones if the thickness of the linings is equal to or less than 1.5 mm. In addition, oiling of the lining, disruption of the connection of the lining to the base, chipping and other damage to the surface of the lining are not allowed. If the indicated defects are present, replace the block.
The work is carried out on a car with the rear wheels hanging (on a lift or a car raised on a jack and installed on supports). The manual brake lever must be lowered all the way down (the car is released).
Replace pads only as a set (on both sides of the car).
You will need: calipers, hammer, wrench “8”, “17”, firmware (bit) or screwdriver, file, two mounting blades, pliers, wrench for wheel nuts, jack, supports.
1. Remove the brake drum (see “Removing and installing the brake drum”).
2. Clean the brake mechanism with a brush and rag from dirt and wear products of the brake pads.
It is prohibited to use gasoline, diesel fuel or any other mineral solvents to clean brakes.
3. Disconnect the end of the upper tension spring from the front brake shoe (see “Replacing the wheel cylinder protective caps”).
4. Disconnect the end of the upper tension spring from the rear brake shoe and remove the spring.
5. Press the upper cup of the front brake pad pressure spring, rotate the cup 90° and remove it.
Hold the pressure spring rod on the back of the brake shield.
6. Remove the pressure spring.
7. Remove the lower pressure spring cup.
8. Remove the pressure spring rod.
9. Remove the front brake pad while holding the lower tension spring.
10. Remove the lower tension spring.
11. Remove the spacer bar.
12. Remove the rear pad pressure spring in the same way as you did for the front one, and remove the pad from the brake shield.
13. Disconnect the end of the parking brake cable from the drive lever.
14. Measure the thickness of each pad in several places. In any place it should be at least 1.5 mm.
15. To replace the rear brake pad, unpin the parking brake lever pin.
Car maintenance involves inspecting, dismantling worn parts and installing new parts. In the process of performing this operation on the VAZ 2107, the condition of the discs is monitored and the brake pads are checked. For objectivity, parts are measured with a regular caliper. If the thickness of the disc or pads turns out to be less than acceptable, they must be replaced.
It is recommended to check the condition of the brake pads and brake disc on a VAZ 2107 during the next maintenance every 10 thousand km. The operation is performed as follows:
- Use a wheel wrench to loosen the wheel bolts.
- Stops are installed under the rear wheels, and the body is raised with a jack.
- The wheel is removed and the steering wheel is turned in the desired direction.
Replacement of worn components is carried out in the same position.
Pads for VAZ 2106
Despite the fact that the model has long been discontinued, there are plenty of original spare parts on the car market. In addition to factory parts, a number of components manufactured by foreign companies are available for sale. Obviously, the price of domestic brake system elements will be cheaper than their foreign counterpart.
Brake pads must be replaced if the limiting friction lining thickness of 2.0 mm is reached. Below this norm, there is a high probability of deformation and splitting of the lining into pieces. Elements of the brake system must be immediately replaced if engine, transmission oil or antifreeze gets on the surface.
The process of replacing pads is not complicated; every driver can do it, even without experience in servicing equipment.
If something went wrong
Difficulties often arise in the process of replacing front and rear pads. The most common problems and ways to solve them are below.
Brake drum won't come off
- It is necessary to loosen the handbrake cable;
- WD-40 is used;
- If both of the above methods do not help, you need to carefully hit the wooden lining with a hammer several times.
The fluid level in the brake reservoir has dropped
- The required amount is added;
- The brakes are being pumped;
- Brake fluid is added again.
Substitutes
| vendor code | Price, rub.) | vendor code | Price, rub.) |
| 0026400 TRW | 570 | 41062 | TRW |
| GDB140M ABS | 650 | ADB0281 | ABS |
| 98271307 Allied Nippon | 750 | Delphi 65139 | 780 |
| LP92/S | 800 | Delphi 0065139 | 780 |
| 98271307 Allied Nippon | 750 | Delphi 65139 | 780 |
| 98271307 Allied Nippon | 750 | Delphi 65139 | 780 |
| Allied Nippon | 65139 |
What rear brake pads can be installed on a VAZ 2106
The original rear brake pads are 3.5mm thick. With use, the friction lining wears out and is erased. When the thickness reaches 1.5 mm, the part must be replaced. Further operation of the machine is unsafe.
The process of replacing rear pads is as simple as replacing the front ones. Unless a handbrake cable is added, which should be removed. It is not necessary to have any special experience or skills. Please resort to the help of service station workers if you identify a large-scale breakdown that requires prompt intervention from professionals.
What does a driver need to replace?
It is worth noting that to change brake pads on a VAZ-2107 car, you must have special tools or devices. These include:
- Wrench for end-type nuts (balloon).
- Jack.
- Wrenches of various sizes.
- Metal brush.
- Large screwdriver (flat head).
- Pliers.
- Aerosol preparation for corrosion prevention (WD-40).
- Clean rags.
- A set of new pads.
Hammer.
Experts draw the attention of readers to the fact that the dismantling and replacement of new brake components on the VAZ-2107 is carried out immediately in a comprehensive manner.
It is noteworthy that the rear brakes are drum type, and the front brakes are disc. It follows from this that their dismantling and installation are different.
Substitutes
| vendor code | Price, rub.) | vendor code | Price, rub.) |
| Delphi 65140 | 850 | Finwhale 23593 | 800 |
| LS1219/S | 850 | VR311 | 800 |
| Bosch 17888 | 950 | TRW 26401 | 800 |
| 986487217 | 850 | GS8164 | 850 |
| HZTS 79927 | 800 | 2101-3502090 | 800 |
| Start 63275 | 800 | 21010-3502092 | 850 |
| MASTER SPORT 2103-3502093 | 850 | 030137-02332 | 800 |
The lists are presented for informational purposes. Before purchasing, be sure to consult with a specialist from a service center or auto store to determine the compatibility of the catalog article with the make/model of your car.
Replacing brake pads on disc brakes
Installing and replacing rear brake pads is significantly different from replacing drum brakes. Here you need not only standard screwdrivers and wrenches, but also special pullers that are designed for the car system.
Replacing front brake pads on VAZ 2101, 2107, 2106, 2105, 2103 and 2104
- First you need to loosen the hand (parking) brake cable;
- the handbrake lever is released;
- the adjustable pins must be knocked out and the locking spring removed;
- brake pads and pads are removed;
- the caliper surfaces need to be cleaned because the caliper surface is in contact with the brake pads;
- You must simultaneously check the condition of the dirt cover for mechanical damage. If there is such damage, then you will need to completely rebuild the caliper;
- Next, check the friction surfaces of the brake discs for mechanical damage and measure the thickness of the brake discs. The manual pre-specifies the minimum permissible thickness of the brake discs, so that after a few days you do not have to change the brake discs;
- Next you need to push the pistons of the brake cylinder into the cylinder;
- then install the brake pads. Both sides of the gasket should be lubricated with a thin layer of silicone grease. The gasket is installed on the rear plate of the block. Next, install the brake pads;
It is important that if during disassembly the brake pad was removed from the caliper, then brake fluid will need to be added to the reservoir, and the brakes will also need to be pumped. Make sure that brake fluid does not leak. Then you will need to adjust the brakes.
How to independently replace the front and rear pads on a VAZ 2106
Preparatory stage: a set of automotive tools, rags, new pads, liquid to remove layers of rust and corrosion.
- Place the machine on a level platform. The option with an inspection hole or road overpass is excluded due to inefficiency;
- We jack up the front wheel with a hydraulic jack, remove it, having previously installed the wheel chocks;
- Use pliers to remove the guide pins. Please pay attention to the pressure springs; they may fly out during the work;
- Using a flat-tip screwdriver, press the slave cylinder into its original position. We widen the gaps to remove the brake pads;
- We remove worn pads, carry out preventive maintenance on the brake caliper, and clean it from rust and deposits. If necessary, use a liquid like WD-40;
- Replace with new pads, assemble the structure in reverse order.
Subject to the above recommendations and the purchase of original spare parts, the service life of the brake system elements is 20 - 25 thousand km. mileage A moderate driving style and average ambient temperatures will increase the service life by 5 - 7 thousand km.
Replacing front pads
The need to replace brake pads on a VAZ 2106 arises when they are worn out or damaged due to the use of low-quality parts. If you don’t drive the car, you can drive about 50 thousand km on high-quality pads. However, there are situations when a part must be replaced after 5 thousand km. To replace the front pads on the “six” you need to prepare the following list of tools:
- "balloon" key;
- mounting blade;
- calipers;
- beard;
- pliers;
- new pads;
- hammer;
- file.
For repairs, the front wheels of the car are hung on a lift or raised with a jack.
Removal
The procedure for removing old pads is as follows:
- Unscrew the bolts and remove the wheel.
Installation
The assembly procedure consists of the following steps:
- We wipe the cylinders with a rag where they contact the pads.
- We inspect the anthers for rupture. If there is damage, replace the protective element.
Video: replacing front brake pads on a “classic”
Sequence of actions when replacing rear pads
Preparatory stage: a set of automotive tools, rags, liquid for removing deposits, a new parking brake cable, graphite-based lubricant.
- We install the car on the inspection hole, fix the front wheels with wheel chocks, remove the rear wheel;
- Underneath the bottom, we unscrew (loosen) the handbrake cable for the convenience of carrying out maintenance work;
- Gently tap the drum guide bolts with a hammer. During operation and installation/disassembly, the bolts stick and are difficult to unscrew. If tapping does not help, spray with liquid to remove deposits, wait 10 minutes, then start unscrewing;
- After removing the drum cover, pay attention to the position of the parking brake lever. If it is not located near the lever, it means it is jammed and must be replaced. If you ignore this signal, it will be problematic to install the drum in its normal position;
- Remove the upper pressure spring, press the strut support, and turn it until it completely coincides with the slot. Remove the two cups and the spring from the stand;
- Disconnect the cable shank from the handbrake lever. We clean the disc from dirt, deposits, and rust;
- We carry out troubleshooting of the brake cylinder and seals. If there are signs of wear, leakage, or deformation, replace it with a new repair kit;
- We remove the parking brake lever from the old pads, take out the cotter pin and washer;
- Please note that the left and right levers are different and not interchangeable. Next, you need to install a spacer bar and move the pads apart. When installed correctly, the lugs are vertical;
- We start a new cable, fix it in the eye;
- We install new pads and assemble the structure in reverse order. If you have any difficulties with installation, it is better to watch the video presented in this manual.
The final stage: adjusting and tensioning the handbrake lever. In accordance with the requirements of the instruction manual, the handbrake should clamp the pads already at 5–6 clicks. Exceeding the norm indicates weakening, and decreasing indicates excessive tension.
Checking the hand brake
To check the condition, or rather the functionality, of the handbrake, you should set the car on a slight slope and, if the handbrake is tightened 3-4 clicks with the lever and holds the car on the slope, we can assume that everything is in perfect order.
If the travel of the hand brake is large, it must be adjusted using a tensioner, for which the following operations should be performed:
- move the handbrake control lever to the lowest position
- Pull the lever up two clicks (two teeth of the sector)
- from an inspection ditch or from under an overpass using a 13 mm wrench. and use pliers to loosen locknut 3, rotate adjusting nut 2 to tighten cable 1, then tighten the locknut again.
Adjusting the hand brake
After completing the operation, check in action whether the adjustment was carried out correctly.