Installation location of the diagnostic block for VAZ 2109
Communication with the electronic control unit (ECU) of the main components of the car is carried out by the diagnostic block. On a VAZ 2109 car, the diagnostic block is located on the right side under the dashboard next to the ECU. A special diagnostic tool or counting the number of flashes of the built-in “CHECK ENGINE” lamp can read the vehicle fault codes that are stored in the ECU memory. The article suggests getting acquainted with the procedure for reading fault codes in a VAZ 2109 car and how to perform all operations yourself.
Why do you need an on-board computer?
In previous articles we have already talked about what an on-board computer is, what it is needed for and what types they come in. But let me repeat myself so that you clearly understand all the advantages of having an on-board computer, and there are probably no disadvantages, except perhaps spending money on the purchase and that’s all.
Let's take, for example, the on-board computer STATE 115×24. With this model in your possession, you can:
- set the radiator fan start temperature; this function is very useful, for example, in winter, when you can control the temperature of the coolant, thereby monitoring the temperature of the heater radiator.
- The function of drying and warming up the spark plugs before starting the engine is very useful.
- The function of resetting settings and ECU adjustments is needed to switch to gasoline with a higher or lower octane number (from 92 to 95 and vice versa), and this function is also needed to reset settings after a long trip with increased load on the engine.
- The ability to read errors allows you to monitor the condition of the car and change non-working sensors and elements in a timely manner.
Installation instructions for on-board computer
In this article we will look at the process of installing the Prestige on-board computer with diagnostic and error reading functions.
For work we will need:
- Screwdrivers,
- on-board computer,
- wire 1m long.
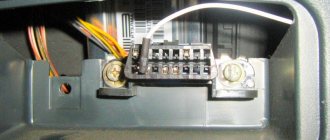
We remove the plug on the central dashboard and look for a 9-pin wiring block in it. This block must be present on all cars of our model. All that remains is to connect the block to the computer and that’s it, but we need to draw a K-line.
How to draw a K-line?
- We take our wire and install it in the second contact of our block.
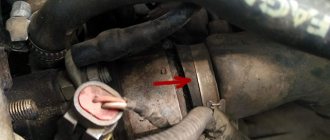
- We throw the opposite end of the wire under the instrument panel down to the diagnostic block (for convenience, you can unscrew the right side panel).
- Having stretched the wire to the diagnostic block, we connect it to the “M” socket if you have a EURO-2 block or to the 7th socket if you have a EURO-3 block (it is very common that the diagnostic block for Euro-3 is installed upwards on the car feet, keep this in mind)
- Now we connect the on-board computer, insert it into its normal place and check it.
VAZ 2109 diagnostic block - ease of car maintenance
Installation location of the diagnostic block for VAZ 2109
Communication with the electronic control unit (ECU) of the main components of the car is carried out by the diagnostic block. On a VAZ 2109 car, the diagnostic block is located on the right side under the dashboard next to the ECU. A special diagnostic tool or counting the number of flashes of the built-in “CHECK ENGINE” lamp can read the vehicle fault codes that are stored in the ECU memory. The article suggests getting acquainted with the procedure for reading fault codes in a VAZ 2109 car and how to perform all operations yourself.
How to read fault codes in a VAZ 2109 car
When reading fault codes with a lamp, contact B, in the diagnostic block, is connected to the “ground” to which contact A is connected.
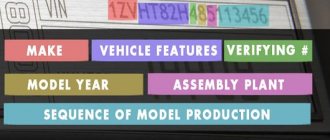
Marking of contacts in the diagnostic block of a VAZ 2109 car
The photo shows the markings of the contacts of the VAZ 2109 block, the same markings and the VAZ 21093 blocks. A - connects to ground; B – serves to supply a signal to the ECU; controls the electric fuel pump contact – G; information is provided by contact M. When connecting contacts A and B, the key in the ignition switch of the car must be turned to the ignition position - I, the engine should not be running. Under these conditions, the “CHECK ENGINE” lamp should flash code 12 three times in a row. The procedure is as follows:
- Flash.
- One to two second pause.
- Flash.
- Flash.
- A pause of two to three seconds.
- This still needs to be done twice.
Code “12” indicates the operation of the system, which indicates that there is a breakdown in the diagnostic system itself. After code “12” is displayed, the “CHECK ENGINE” lamp lights up the fault codes three times; if there are any, if there are no faults, code “12” is displayed. When several fault codes are stored in the computer's memory, each one should be displayed three times.
Tip: Upon completion of the diagnostics, contacts A and B on the device can be opened 10 seconds after turning off the ignition on the VAZ 2109 car.
The table shows the ECU error codes for the VAZ 2109 car
| Code | Fault name |
| 12 | Malfunction in the diagnostic circuit of the control lamp |
| 14 | Increased signal level of the sensor indicating the coolant temperature |
| 15 | Reduced signal level of the sensor indicating the coolant temperature |
| 16 | Increasing voltage in the on-board network |
| 17 | Reduced voltage in the on-board network |
| 19 | Incorrect signal in the crankshaft position sensor |
| 21 | Increased voltage in the throttle position sensor signal |
| 22 | Reduced voltage in the throttle position sensor signal |
| 24 | No signal from the vehicle speed sensor |
| 27 | Increased level in the CO potentiometer signal |
| 28 | Reduced level in the CO potentiometer signal |
| 33 | Incorrect signal in the mass air flow sensor (a high signal frequency appears at the sensor output) |
| 34 | Reduced signal frequency generated at the output of the sensor indicating mass air flow |
| 35 | Idle speed fluctuations |
| 43 | Faulty knock sensor signal |
| 51 | Error in the programmable read-only memory (PROM) |
| 52 | Error in the electronic control unit (ECU) |
| 53 | Error occurring in an electronic programmable memory device (EPROM) |
| 61 | Immobilizer error |
Unexpected codes may be found when reading codes. In this case, they are assumed to be caused by an intermittent failure and can help diagnose the system.
Installing an on-board computer on a VAZ 2109 car
Despite the fact that the price of an on-board computer is quite high, having it in a car is very useful. The device reads the data located in the electronic engine control unit and then displays it on the BC display. This way you can configure the display of coolant temperature, instantaneous fuel consumption, speed, remaining fuel in the tank, on-board voltage and other indicators. A big advantage of the on-board computer is the presence of a trip computer function. With its help, you can calculate the car's mileage on the remaining fuel, calculate the average fuel consumption and other parameters. In addition, the on-board computer can read error codes from the controller’s memory. This makes it easier to find breakdowns and replaces diagnostics at a service center.
Work order:
- Power cables are connected to the device:
- constant +12V;
- initiating the launch of the BC;
- appearing after turning on the dimensions. In this case, in the dark, the display on the BC is dimmed when the car’s dimensions are turned on;
- masses.
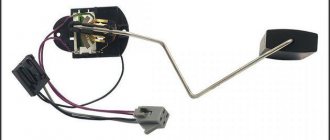
- A signal is sent from the fuel level sensor (fuel level sensor).
- The controller diagnostic line “K-line” is connected.
For the first four points, the VAZ 2109 diagnostic block is used to connect the on-board computer. In this case, the adapters included in the BC kit are used. In its absence, you can use the cigarette lighter for power (see Replacing the cigarette lighter yourself), to start the BC - the ignition switch, the cigarette lighter backlight lamp, which lights up when the side lights are turned on and is located close to the standard place for the BC, the mass is also taken from the cigarette lighter.
Advice: When carrying out any manipulations with the electrical wiring of a VAZ 2109 car, you need to disconnect the battery mass, which will prevent short circuits and fire.
Diagnostic block VAZ 21093
If the BC kit includes an external temperature sensor with a long wire, the sensor is located on the left in the corner of the front bumper. Here, temperature has less influence on the sensor readings. The wire with the sensor is routed out of the passenger compartment through a hole for the speedometer cable located in the engine shield. Further configuration of the BC can be shown in the operating instructions for the device.
How to correctly connect the diagnostic block on a VAZ 2109 can be clearly seen in the video.
MasteraVaza.ru
Errors when connecting/operating the on-board computer
Error: “No connection with the controller” or “break in the K-line.”
This error indicates that the K-line is not connected or a contact break has occurred. Check the wire according to the diagram described above. Most likely the contact has come off the diagnostic block.
Error: Incorrect readings of the sea temperature sensor.
If your temperature outside is -40, then this indicates that the wire to the temperature sensor has broken, or there is no such sensor at all. If the temperature is, for example, -25, but it’s only -10 outside, then you need to replace the sensor with a working one.
Description
VAZ-2109 that rolled off the assembly line never had a standard on-board trip computer. Fortunately, there are BC models designed specifically for this popular brand. These are, for example, BK-10 and BK-36.
on-board computer VAZ 2109 carburetor, on-board computer VAZ 21093 carburetor, on-board computer on a VAZ 2109, on-board computer on a VAZ 2109 injector, on-board computer staff on a VAZ 2109, installation of an on-board computer on a VAZ 2109
The first VAZ 2109 cars appeared in 1987 and lived on the assembly line until 2011. Already in 1990, a modification of the VAZ 21093 appeared, which was primarily distinguished by greater power and improved design.
In the same 1990, a full-fledged VAZ 21099 model appeared, with a sedan body that was 20 centimeters longer. The cars also have their own radiator trim, the hood and front fenders have been slightly changed, and the interior has a new panel with a tachometer. Over time, these changes migrated to the entire Samara family.
In a practical interior, everything is like this: a low dashboard, front seats with headrests, and they contain height adjustment for the seat belts. The newer model features a “higher” dashboard, improved interior seats and doors, with an emphasis on prestige. The rear seats of the Nine fold down, transforming the car into a cargo-passenger version.
The “Lux” package has a tachometer and a trip computer, an anti-theft system, electric door locks and electric windows. Interestingly, the control system reminds you of an unfastened seat belt, an open door, the ignition key being left, and even the functionality of some individual components of the VAZ 2109. In 1995, restyling was carried out, which, overall, did not bring major changes in appearance and design.
On-board computer for VAZ 21099 injector
Many owners of VAZ 21099 cars with an injector want to install an on-board computer (BC) on their cars. This desire is understandable, because such a device not only provides information on fuel consumption, ground speed, mileage and crankshaft speed, but also carries out real-time diagnostics of important vehicle systems.
This, in turn, makes it possible to identify engine, electronics and attachment faults as soon as they occur. This greatly simplifies the life of car enthusiasts, as it becomes possible to predict serious car breakdowns and virtually eliminate unplanned car repairs. You can install an on-board computer on a VAZ 2108-99 without the help of specialists. To do this, you need to have a little knowledge of electrical engineering and some free time.
Return to contents
Selecting an on-board computer
There are a lot of electronic devices on the market that supposedly can be installed on cars of the Lada Samara family. They are produced in different countries, are in different price segments and differ in many respects. Don't pay attention to sellers' advice.
First of all, the on-board computer of the VAZ 21099 must be compatible with the protocols of the electronic control unit (ECU) installed on your car. Therefore, find out in advance which ECU you have, and then go get the computer. When choosing an on-board computer for the VAZ Sputnik - Samara, pay attention to the following parameters.
- Supply voltage - it is important that the device operates at a voltage below 10 and above 14 volts.
- Processor size - The computer must have a 32-bit processor. A 16-bit processor may not be able to keep up with the situation.
- Average current consumption - in order not to increase the load on the generator, it is necessary that the device consume no more than 0.5 A in operating mode. And in order not to discharge the battery, it is necessary that in standby mode the device consumes no more than 0.04 A.
- Operating ambient temperature - for moderate latitudes, the minimum temperature should be -20...-25 °C, and the maximum up to +45 °C.
- Discreteness of information provision - determines the tolerances in the display of information. If the discreteness in the display of fuel consumption is equal to 0.1 liters, then the indicators on the display will be rounded to this value (when 0.16 liters of fuel are consumed, the display will show a consumption of 0.2 liters).
- The presence or absence of a voice synthesizer. The voice synthesizer is good because it pronounces detected faults out loud. This allows you to notice any damage while driving, because during intensive driving it is difficult to look at the BC screen.
Among the brands of on-board computers on the market, experts recommend devices from the “Stat” and “Multitronics” brands. They are guaranteed to fit Lada cars. The choice of device model depends on the car model and the budget of the car owner.
Prices range from 1,500 rubles for a device without a voice synthesizer and with a small black and white display to 4,000 rubles for a BC with a full range of options. At the same time, it is better to buy these devices in online stores, since their prices are 2 times lower than the market ones.
Return to contents
Device installation and configuration
After the purchase, you need to install the computer on the VAZ 21099. This is easy to do if your car has a high or Europanel. These front panels have specially designated seats for the BC on the center console, closed with plugs. We will look at installing an on-board computer using the example of installing a Multitronics C340 device on a VAZ 21099 car with a high front panel. Procedure.
- First, disconnect the “-” terminal from the battery.
- Then remove the plug on the front panel.
- After that, we look for a diagnostic block - in cars with a high panel it is located under the dashboard, on the front passenger side.
- We insert the pin of a long single white wire into the “M” connector of the diagnostic block. We insert the opposite end of this wire into connector “2” of the adapter block included with the device.
- If the car has an immobilizer block, but the device itself is missing, you need to install a jumper between 9 and 18 contacts of the immobilizer.
- We connect the blue wire from connector “6” of the adapter block to the wiring of the cigarette lighter lamp.
- We connect the end of the green wire to connector “8” of the adapter block, and the other end to pin 11 of the white 13-pin block of the instrument cluster.
- We connect the 4-terminal block from the BC kit with the mating part located in the center console, near the audio system socket.
- Next, we connect the adapter block to the 4-terminal block as shown in the diagram.
- We insert the device body into its proper place. That's it, the computer is installed on the VAZ 21099, all that remains is to check if it works.
The computer should start working within a few seconds after installation. This will be shown by turning on the display. The device should then go into standby mode. Don't forget to put the negative terminal on the battery before testing the device!
After starting the engine, the VAZ 21099 injector computer should automatically detect the ECU protocol. If this does not happen, you need to turn off the ignition and select it manually. After this, you need to start the engine again and check that the following parameters are correct:
- engine temperature;
- crankshaft revolutions;
- throttle position;
- instant fuel consumption.
These parameters should change upward when you press the accelerator pedal.
expertVAZ.ru