Priora has several panels, depending on the year of manufacture, plus non-standard ones made specifically for it. Everyone knows how important it is to know the instantaneous status of instruments and machine parameters.
The panel, also known as the control panel, on a Lada Priora car is, in fact, brief information about the condition of the car at the moment. It contains all the basic information, from movement speed to indicator readings on malfunctions of the main units and components of the machine. When something in it doesn’t work, it’s immediately alarming, because it’s current information. A description of all the icons and their meaning can be found below in the article. Technology is gradually developing, so the dashboard is becoming more and more technologically advanced. But since the Lada Priora is a low budget car, the panel on it is of the same quality. On the first devices, the backlight often does not light up, or is only half lit. Of course, this doesn’t look good on Priora.
The instrument panel on the Priora car changed with the restyling of the 2nd Lada car. And Lux cars come with navigation. In fact, its basic functionality remains the same - all basic information is visible. Here you can monitor the operation of the engine, monitoring the speed, and understand that it is time to take the car for maintenance when one of the lights comes on. The price of a first (1) and second (2) generation part starts from 6,000 rubles and above. Tidying saves you from speeding, helps you refuel on time and prevent the Priora from boiling.
Standard instrument panel - article number and price
The original car tidy exists in three types.
- the first is an option for a pre-restyling car;
- the second panel is for a restyled car;
- and the third is the “Lux” option for the restyled one, which has become faintly similar to all previous torpedoes.
Each of them contains standard elements such as a tachometer, so their functionality does not decrease. . Who wants to do tuning of the instrument panel, this option is for them.
Priora first generation
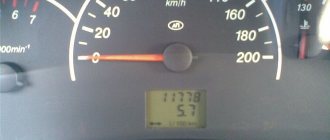
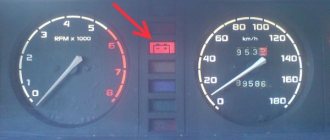
The instrument cluster for the first generation Lada Priora received catalog number 2170-3801010. Cost – about 6,000 rubles. Everything is standard with it - from left to right there are four arc scales with red arrows: odometer, speedometer, coolant temperature, fuel level. Below the speedometer there is a small on-board computer display, and above the arches are all the indicators, including the direction indicators.
Priora 2
For the Priora “Lux” variation there are two more “subtypes” - with or without a CAN bus. Different subtypes were made so that the panel could be connected to any car. Catalog number – 2170-3801010-50 without tire, 2170-3801010-60 with tire. It is distinctive in that it contains an elongated display with a screen that can highlight the navigator.
The catalog number of the combination for the “Norma” assembly is 21720-03801010-20. Cost – 6,500 rubles. Like the “Lux” version, it received a brighter speedometer and odometer, and the coolant temperature along with the fuel level indicator is hidden at the bottom of the speedometer and odometer. The base will not create a route on the display, but will show all the information in color.
Appearance
Currently, tuning for VAZ cars has a wide range of choices. Since Russian-made cars are quite inexpensive, this attracts their buyers. Tuning for Lada cars is also available and can be found in almost any city.
Tinted glass
To give your car a beautiful appearance, the first step is to tint it. Car tinting is relatively inexpensive, ranging from 2,000 to 3,000 rubles. But after tinting, your car will shine with new colors. It is legally possible to tint car windows only from the rear. Since the light transmittance of the film is not so high, viewing in the evening will be difficult.
Lip installation
To give the car a stylish look, you can install a lip on the front instead of the standard fangs under the bumper. There are several types of lips. The rubber lip “Samurai” and the plastic lip from the Chevrolet Cruze fit perfectly on the Priora bumper. The lip should be secured under the bumper with self-tapping screws. The price of the lip is from 500 to 1000 rubles.
Guba Cruz Guba Samurai
Lipspoiler
In the days of the nines, when our fathers raised the rear of the car by installing spacers under the rear shock absorbers and installing huge spoilers like in Need For Speed. Nowadays, it is stylish to lower a car; by the way, you can read how to properly lower a car on our website, and install a small spoiler that is glued to double-sided tape. The price of such a spoiler varies within 1000 rubles.
Alloy wheels
Everyone knows that the wheels of a car are the floor of the car, so the wheels of your car should be beautiful and you like them. On the Lada Priora you can install wheels with a radius ranging from R14 to R17. When installing R16 and R17 wheels, you will have to buy low-profile tires, which is very expensive and not practical, but at least beautiful. When installing disks with a large radius, comfort is lost and the chassis begins to work rougher since the rubber does not “eat up” minor road irregularities.
It is best to install R14 and R15 wheels. Such wheels are relatively inexpensive and the tires for such a radius are high profile. It follows that the comfort of driving a car will not be lost.
SE caps and mirror repeaters
In order to give your car a little luxury, you can install turn signal indicators in the prior mirrors and turn signal plugs in the wings on the SE. This modification is relatively expensive, but it significantly changes the appearance of the car and gives it a certain “richness”.
Sabers and bars
This is an amateur modification and is most often suitable for cars with a dark body color. The rear chrome-plated trunk saber and the front chrome-plated hood saber are painted matte black. This modification is very cheap and simple, but it has its own zest and is relevant when the chrome on sabers begins to swell, which is very common on Priors.
Antishildik
This modification consists of removing all nameplates from the car, but it also falls under the category of amateurs. Some car enthusiasts like their cars to look like they came from the factory. The nameplates must be removed using a hairdryer; they are glued with double-sided tape. After removing the nameplate, the remaining tape must be removed with gasoline or solvent.
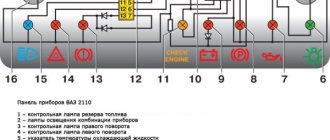
Icons on the factory dashboard
All indicators should light up like a Christmas tree for three seconds when the engine starts. If some icon remains, it means the system is signaling a breakdown. To make it easier to understand all the indicators, here is a schematic picture:
1,5,9,10 are already known scales that display the main parameters that can change. 19 – on-board computer display. Further:
- 2 – Icon indicating the operation of the braking system.
- 3 – Battery condition. If the light remains on, the battery is discharged or the charge level is too low.
- 4.7 – Doublers for direction indicators (“turn signals”).
- 6 – Oil level (indicates low level).
- 8 – Handbrake. Lights yellow when the lever is tightened.
- 11 – “Gasoline light bulb.” Lights up when there are only 10 liters left.
- 12 – Button for switching on-board computer modes.
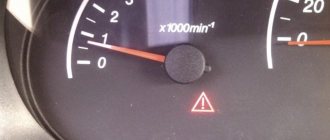
- 13 – “Emergency”.
- 14 – Electric power steering (indicates a breakdown).
- 15 – High beam on.
- 16 – Side lights/low beam.
- 17 – Airbag condition (malfunction).
- 18 – Immobilizer (if you hear a beep and the icon itself blinks, the immobilizer is faulty).
- 20 – Seat belts not fastened.
- 21 – Unsatisfactory condition of the service brake system.
- 22 – Disabling the airbag.
- 23 – ABS malfunction.
- 24 – “Check”, “Check Engine” - engine failure.
Possible faults
The instrument cluster does not always tell the truth, and sometimes its readings can mislead the driver - they may seem absurd. For each common malfunction, a brief commentary will be given on the possibility of eliminating them:
- The fault lamp does not light up (check the lamp);
- the lamp is on - check the sensor, reset the error via the diagnostic connector.
If none of the above measures help resolve the problem, carefully inspect the wiring - damage to it may cause the light bulb to activate or deactivate.
The large and clear navigator screen in Solaris is convenient and pleasing to the eye.
The large and clear navigator screen in Solaris is convenient and pleasing to the eye.
The large and clear navigator screen in Solaris is convenient and pleasing to the eye.
To my surprise, despite the manufacturer's claims, the navigation is not at all! It is installed by dealers, regardless of the configuration of a particular car. The option turned out to be expensive - 29,000 rubles. for the head unit plus 5000 rub. for installation. And if you also need to replace the frame (this depends on the design of the center console), please pay another 6,000 rubles. Quite a lot!
In addition, by installing navigation, you will lose the ability to listen to music from CDs - only USB devices will remain as external audio media. But there are also advantages. The main thing is that you get a full-fledged multimedia complex with a large 7-inch touch screen, the ability to connect external hard drives and a rearview camera. All this is neatly integrated into the center console - there is no trace of a feeling of foreignness here.
And it’s very convenient to use: the virtual buttons are large, and the monitor is responsive even to weak touches. The Koreans chose the iGO primo package from Hungarian developers as the software. And you were right - this is one of the most user-friendly navigation programs.
Pinout of the instrument panel of a Priora car
The panel pinout looks quite complicated, but there is a more simplified diagram that will help you figure out the wires connected inside:
- EUR
- "emergency light"
- Engine oil
- Handbrake
- Immobilizer
- Airbags
- Headlights and dimensions
- Right turn signal
- Left turn signal
- Electronic control unit
- Pad wear sensor
- Seat belts (closing sensor)
- ABS
- Reset button
- Brake system, brake fluid
- ABS
- High beam headlights
- Torpedo shield lighting
- "Weight"
- Thirtieth terminal
- Fifteenth terminal
- Fuel consumption
- Forward key
- Back key
- Ambient temperature sensor (minus)
- Ambient temperature sensor (plus)
- Fuel level
- Speed sensors
- Coolant temperature
- Odometer
- Diagnostics of the shield (service)
- Generator regulator
Choice of modifications
The only thing the Priora's instrument panel really lacks is brightness.
While the structure itself looks pretty decent, a few details and some additional lighting will greatly improve its visual appeal. The backlighting of the sensors can be changed so that only the main devices are highlighted, making them much easier to find. While the car is moving, the driver should be minimally distracted by looking at the sensors; the backlight will help with this.
A personal example of do-it-yourself tuning is highlighting the indicator arrows of instruments. If the sensor arrows look more expressive, it will be much easier to navigate the operation of the machine’s systems. At night, proper lighting will tire your eyes less. A set of good lamps, plastic or polyethylene multi-colored inserts, a little time and the ability to solder will allow you to transform your instrument panel. Where should I start?
How to enable self-diagnosis of the instrument panel
Using the panel you can “dig into the brains” of the Priora:
- Hold the button under the fuel gauge and turn on the ignition. The display should indicate the start of the test.
- Press the button again. The display should show the operating system version.
- Click again. The system should show error codes:
- (2) – High voltage level;
- (3) – DT malfunction;
- (4) – DTOZH malfunction;
- (5) – DTV malfunction;
- (6) – Motor overheating;
- (7) – Low oil level;
- (8) – Malfunction of the brake system;
- (9) – Battery discharge;
- E – Brain error, EEPROM.
- If necessary, reset the error: hold the button for three seconds.
- Release the button. Click again. All indicators should light up.
- Leave all the buttons. After 30 seconds, the self-test will automatically complete.
What devices does the Priora panel show?
The instrument cluster on the Lada Priora looks like this, and it is somewhat different from the configuration of the Lada Kalina:
scale of the device displaying the value of the fuel remaining in the tank;
Priora engine temperature meter scale;
indicators for connecting and switching off various machine systems;
LCD display of trip computer;
When a driver drives a Lada Priora (it doesn’t matter whether it’s a luxury class or an economy class), he has to look at the instrument panel under the glass from time to time to understand whether the car is working properly, when to stop to refuel, whether the turn signal is on, whether it needs repairs . In the event of a malfunction, an experienced car enthusiast will immediately notice the error on the unit, determine what exactly is not working and draw the appropriate conclusions.
"LADA PRIORA"
(surcharge for built-in navigator RUB 13,000)
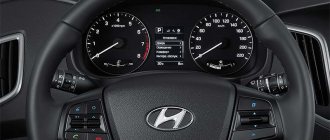
What car navigator can you buy today for 13,000 rubles? Yes, almost anything - from the usual box on a rod to a not-so-sophisticated smartphone. But, whatever one may say, standard devices are much more convenient in everyday life. Let's see what the built-in guidebook of the Priora (or Kalina) can attract...
At first glance, everything here is not like in humans: the screen is small (4.3 inches diagonal) and is located very unusually - right between the devices. However, you quickly get used to its size and layout and soon you even begin to praise AVTOVAZ for such a creative approach.
In addition, the Lada navigator finds the satellite very quickly and the positioning accuracy is excellent. After all, it works with signals not only from American GPS satellites, but also from Russian GLONASS (here the score is not in our favor - for every domestic satellite there are two or three non-our ones).
How to remove the instrument console in Lada Priora
If the old unit has become unusable, it becomes necessary to install a new console in the Priora. Follow the step by step instructions:
Remove 4 screws. If there is a radio, carefully dismantle it, remembering to remove the wires.
Pull out the cover and turn off the battery.
Unscrew the steering wheel with the switches.
The cover should be removed from the floor corridor by unscrewing the screws and dismantling the panel with instruments.
All that remains is to remove the nozzles and nuts, the safety console cover, the amplifier and disconnect the pads.
Dashboard indicator symbols
When starting up, almost all the icons on the dashboard light up - this way the operation of the light bulbs is checked. Some drivers believe that these are messages about malfunctions of some Lada Priora systems.
| No. on the diagram | Indicator designations |
| 1 | Tachometer. The device measures the engine crankshaft frequency (revolutions per minute). If the arrow goes beyond the red value, it means that the Lada Priora engine is operating in a dangerous mode; |
| 2 | Brake force distributor indicator. Reports defects in the operation of this node; |
| 3 | Battery charge. If the lamp lights up while the engine is running, the battery is discharged; |
| 4 | Left turn signal. The sign flashes when there is an alarm or the left indicator is on; |
| 5 | Speedometer. The device reports the speed at which your Lada Priora is currently moving; |
| 6 | Emergency lubricant pressure in the engine. If the sign lights up during operation of the power plant, it means the pressure in the system is low; it is highly not recommended to operate the engine in this condition; |
| 7 | Right turn signal (see No. 4); |
| 8 | Handbrake indicator. Lights up yellow if the Lada Priora is in the handbrake; |
| 9 | Antifreeze temperature in the cooling system. The operating temperature of the motor starts from 90° and above to the red mark. If overheating occurs, turn off the engine; |
| 10 | Gasoline level in the tank. If the fuel level approaches the minimum, the fuel pump may break; |
| 11 | Reserve gasoline level. The indicator lights up when there are less than 10 liters left; |
| 12 | Key for resetting the daily mileage and switching between display modes; |
| 13 | Alarm. If you have triggered the emergency lights, the lamp will flash along with the turn signal arrows; |
| 14 | Malfunctions in the electric amplifier. If defects appear in the EUR, the lamp will light up while the engine is running; |
| 15 | High beam designation. An active indicator indicates that you have switched to distant; |
| 16 | Outdoor Lighting. The system notifies the driver about the operation of the headlights or low beams; |
| 17 | Airbag malfunctions. If the lamp lights up after starting, then there is a high probability that the airbags will not deploy in a collision; |
| 18 | Immobilizer. An audible signal and flashing indicate that the immobilizer system is faulty; |
| 19 | Computer screen. Here you can view information from the bookmaker, as well as find out the total and daily mileage; |
| 20 | Indication of unfastened seat belts. The buzzer will signal a violation for 90 seconds; |
| 21 | The brake system is in disrepair. Most often these are worn pads or insufficient fluid in the system; |
| 22 | Disabling a specific airbag; |
| 23 | Indicator of defects in ASB operation, the braking system is operating normally; |
| 24 | Check Engine – there is a breakdown in the engines; diagnostics and subsequent repairs are urgently required. |
What are the devices on the dashboard for?
Each device on the pinout block with instruments displays certain values of the functional components of Priora with navigation:
- Tachometer - determines the speed of rotation of the rotating shaft. One division of the scale is equal to 0.5, the entire scale is calculated into 7 divisions. To determine the frequency, it is enough to multiply the value displayed on the screen by 1000. The maximum possible value is 6000 rotations. The red line is a boundary that should not be crossed.
- The next indicator is for a left turn. When the left turn signal is turned on, a green flashing light appears, accompanied by an audible signal.
- The speedometer determines the speed at which the Priora is moving along the highway.
- Another necessary device on the panel is a sensor equipped with an arrow showing the antifreeze temperature. If the temperature reaches more than 115 degrees, the arrow enters the red sector. The sound signal must sound - it draws the driver’s attention to high values.
- Fuel lock arrow. If there is too little gasoline, the indicator turns red, which means it’s time to refuel; there is up to 5 liters of fuel left in the tank. Experts are against refueling the Priora only when all the gas runs out - it’s better to do it in advance.
- The fuel indicator shows when the car needs to be refueled.
- If you want to reset all the values displayed on the instrument panel for the last 24 hours, press the button located next to the gasoline indicator.
- If the car breaks down, then press the hazard warning button; the lights will turn on and notify other road users of the forced stop.
- The Priora also has a built-in power steering, which is controlled via a special button on the instrument panel. When the engine starts, the button turns on and lights up orange.
- High beam headlights are necessary when driving the Lada Priora at night, for better visibility. A blue indicator will appear on the device block.
- As soon as the brake is applied, the parking brake light comes on.
- If the car's exterior lighting devices are turned on, the corresponding lock in the car's interior in front of the driver begins to work.
- If the airbag is deployed, the button is activated for a short period of time - 4 seconds.
- If an accident or major breakdown occurs, the oil pressure gauge turns red as a warning. When the engine starts, the signal will disappear. If the engine is started, but the latch still does not appear, it means that there is a breakdown of the sensor, wires or the entire device. If the signal appears while the motor is running, turn it off and think about what the problem is. If there is not enough oil, the Priora cannot be used; the consequence of driver negligence may be engine combustion.
- A device that fixes the immobilization of the system.
- Also nearby are displayed the kilometers that were covered while driving the car per day, including the total mileage for the entire period of use.
- Following traffic rules, the driver and passengers are required to fasten their seat belts. If the driver forgot to do this, an indicator will appear on the panel reminding the need for manipulation.
- Another signal notifies you that the ABS system has broken down and that a specific component needs to be replaced.
- If the battery is low, the instrument cluster on the Priora will definitely show this.
- If the car is involved in an accident, the car has a built-in brake sensor.
The exclamation mark is on - what to do?
We have noticed that new topics often appear on car forums where drivers ask about the exclamation marks that are displayed on the Lada Priora panel. They rarely specify where it is lit and what is depicted on the icon. In this section we have collected a small FAQ Below are all the exclamation marks that can light up on the instrument panel of a VAZ 2170 car. The designations of these icons are as follows:
- The red exclamation mark in the circle (bottom) is lit. The indicator indicates that there is a problem with the vehicle's brake system. This is usually a low brake fluid level. Add it to the tank and, most likely, the sign will stop lighting. If this does not happen, then it is worth checking the system for damaged components. When igniting, the indicator lights up for 4 seconds and then goes off.
- The red exclamation mark in the triangle/circle (above) is lit. Modern versions use a triangle instead of a circle. The indicator tells us about defects in the operation of the brake force distributor. Use extreme caution if the light comes on while driving.
- Exclamation mark next to the steering wheel icon. When illuminated for a long time, it indicates a malfunction in the electric power steering (EPS). Like other icons, it lights up when ignited and goes out after a few seconds if the system is working properly.
Sometimes the indication is caused by faults in the electronics. Terminals are coming off, contacts are oxidized, defects in the on-board computer are a few reasons for the random appearance of icons. To avoid damaging one of the systems, check the electronics first. To do this, it is enough to dismantle the device on the Lada Priora and see if the terminals are securely seated in the sockets. If the brake system indicator lights up, first check the fluid level in the reservoir, and only then fill in new antifreeze.
Instrument cluster
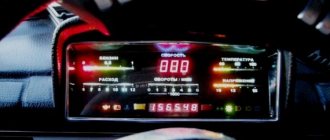
Tuned control panel of a Priora car
First, let's look at the description and pinout designation of the icons of the new instrument panel on the Lada Priora car.
So, the shield includes the following elements:
- A tachometer device designed to demonstrate engine speed. Red arrows on the combination indicate speeds that are not recommended to be exceeded. Lada Priora allows you to accelerate the engine to six thousand revolutions.
- Pinout icons for light alarms or turn signals. A green arrow pointing to the left lights up on the dashboard when the left turn is engaged. It not only lights up, but also blinks, the same applies to the right turn signal. In addition to the fact that the icon turns on, at this moment the sound signal also works; its shield turns on along with the turn signal.
- The speedometer shows the speed level at which you are traveling.
- Refrigerant temperature level sensor in the system. If, as a result of any malfunctions, the coolant temperature increases to 115 degrees, an audible signal will tell the car owner about this. This will happen for five seconds until the temperature drops to 110 degrees. To prevent the engine from overheating, you should turn it off and get rid of the problem of antifreeze boiling.
- The designation of the arrow for the level of gasoline in the tank is known to everyone. If the arrow on the Lada Priora instrument cluster has approached the red zone, this indicates that the tank needs to be refilled as quickly as possible, since there are about five liters left in it. Please note that sediments present in the fuel collect at the bottom of the gas tank, so it is not recommended to use gasoline completely.
- A pinout icon indicating that the gasoline reserve is turned on; this symbol is made in the form of a gas station. When it lights up orange and stays on continuously, it means refueling is needed.
- There is a button on the speedometer designed to reset the daily mileage; when you press it, the daily mileage will be reset to zero.
- Alarm. When this function works, red icons are activated on the Lada Priora instrument cluster. The vehicle's parking lights begin to flash, indicating a breakdown.
- An icon indicating the operation of the electric power steering. When the ignition is turned on, this icon works and passes the test, but after the engine starts, the backlight disappears.
- Icon with blue highlight. On the Lada Priora combination diagram, when you turn on the high beam headlights, you will be able to see the corresponding icon with a blue backlight, but it will be practically invisible during the day.
- Handbrake icon that illuminates when the lever is activated. The backlight of this element lights up in red; it also disappears when the engine starts, after the test.
- Symbol for turning on external lighting, that is, side lights or low beam. The icon turns on with a green backlight.
- The symbol of working airbags on the Lada Priora combination diagram turns on for 3-4 seconds after turning on the ignition, during the test, it lights up in orange.
- Engine fluid pressure emergency icon. There is also this icon on the navigation diagram for the driver; it always lights up in red when the ignition is on and goes out after the engine starts, that is, the test. The driver must always use the navigation panel of the Lada Priora and monitor the operation of this indicator. If it does not light up when igniting, this may indicate a sensor malfunction. If the fluid pressure level is below the required level, an audible signal will tell the driver about this within five seconds. It is not recommended to operate the car when the fluid level is low, as this will harm the engine.
- Immobilizer icon. On the navigation diagram you can see a symbol with orange backlight - the immobilizer icon. The element demonstrates to the driver whether the Lada Priora vehicle protection system is turned on or not.
- The computer is another symbol that shows the full mileage of the Lada Priora per day, with indicators of the main functions located in the middle.
- The seat belts disconnected symbol lights up red during the test; if the seat belts are not fastened, the system will sound a corresponding buzzer.
- Battery symbol. Another indicator that is tested when the ignition is turned on is the battery symbol. When you turn the key, it passes the test and lights up, the indicator goes out after the engine starts. It should be noted that the operation of this component of the Lada Priora instrument cluster must always be monitored. If it does not turn on, then there is a possibility that the battery is not ready for use or the sensor has failed. If the indicator functions while the engine is running, this may indicate a low battery charge. There is also a possibility that the timing belt is loose or broken, or the generator is not working correctly (the brushes are worn out).
- The brake system status regulator is also located on the Priora dashboard. This symbol on the combination lights up in red when the ignition is on, like other sensors, it stops working after the engine starts. If the brake system does not pass the test, then using the Lada Priora is not recommended.
- The Check Engine regulator on the Lada Priora combination indicates the condition of the engine. When the ignition is turned on, it passes the test and turns off when the engine starts. If the symbol continues to light while the engine is running, this indicates a malfunction of the unit; it is recommended to carry out computer diagnostics of the engine. This is the only way to obtain the most accurate data about possible breakdowns that need to be eliminated in the near future.
- The ABS system icon lights up continuously when it fails.
- Airbag disabled icon. The driver's navigation control panel also has this icon, in particular those located on the front passenger seat.
- Symbol of failure of the electronic brake force distribution system (video author - Automotive Diagnostics).