Lada Priora comes off the assembly line in various configurations, but even the “norm” version is offered with primary audio preparation, which involves running wiring for the radio and speakers in the front doors and on the rear parcel shelf. When purchasing such a variation, the question of installing acoustics immediately arises, and even in the luxury version, not everyone is happy with the original acoustics supplied with the car. Let's analyze in detail the choice of acoustics and, as a result, figure out how to install podiums on the Priora.
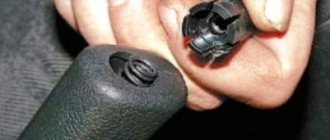
How to make podiums on Priora
In order to make podiums for the front doors of the Priora with our own hands, we will need:
- sheet of plywood (can be MDF);
- a mixture of epoxy and fiberglass;
- polyurethane foam;
- fiberglass putty;
- finishing putty;
- sandpaper (coarse and fine).
Attention, very important point! Before you start making podiums, you need to carefully measure and calculate everything. The new decor should not interfere with the opening and closing of doors, lowering and raising windows, and, of course, the passenger himself. You should start by making a drawing of the part, which will serve as a template for cutting out of plywood.
Plywood thickness – no more than 8 mm. You should cut out two parts at once with a jigsaw. Spacer rings can be made from the same plywood. Don't forget to measure the diameter of the speakers themselves and the mesh. Cut out the mounting hole to size. Coat the cut template with glue and install it on the base.
To securely fasten the ring, carefully nail it with furniture nails after drying. In order to give rounded shapes, use polyurethane foam. Pre-cover the hole with polyethylene. To distribute the foam evenly and economically, apply it in a circular motion. After complete hardening, you can begin cutting out rounded shapes and cutting off excess foam. Then you will need sandpaper to sand the workpiece. After sanding, apply a thin layer of fiberglass putty to level the surface.
After drying, apply a second layer, wait again. And then the third. After drying, sand it with sandpaper. To protect the surface from damage, it must be treated with a mixture of epoxy and fiberglass. Gently apply a thin layer using a spatula. At the final stage - reupholstery with eco-leather.
Priora door panel trim
To cover door cards with leatherette you will need:
- 4 meters of furniture leatherette;
- glue “Moment” or equivalent (0.5 liters per door);
- brush;
- "Super glue";
- stationery knife;
- construction hair dryer;
- fabric gloves;
- White Spirit;
- antenna cable with a diameter of 5 mm.
The covering of Priora door cards is done one by one, one by one. Produced as follows:
- remove door cards;
- clean and wash the surface of the casing;
- cut a piece of leatherette in accordance with the size of the casing (so that they overlap 15 cm over the edges of the casing);
- degrease the sheathing surface with white spirit;
- Using a brush, coat the surface of the door card with glue;
- wait until the glue begins to dry;
- Using a brush, lubricate the underside of the leatherette blank with glue;
Important: the glue on the upholstery and leatherette must be applied in a thick layer!
- wait 10 minutes;
- place the workpiece on the casing in the area of concave areas;
- press the leatherette onto the trim;
- using a hair dryer turned on at low power, warm up the leatherette in the area of the concave areas;
- With a hand wearing a fabric glove, carefully press down and smooth the heated areas of the leatherette;
- move to the convex places of the covering, also heating and smoothing the leatherette;
- last of all, glue the leatherette to the inside of the door card;
- cut pieces of the antenna cable so that it fits in size to the junction of the plastic sheathing elements with leatherette;
- Glue the cable with “Superglue”, hiding the joints.
Modern podiums
Acoustic podiums yourself
Sound organization is a set of measures that includes not only sound insulation or installation of a subwoofer, but also installation in the front doors of the podiums. You don’t have to buy them, although you can find almost any option in stores today. You can make podiums with your own hands if you know the basic nuances of the operation presented in our instructions below. Modern acoustic podiums are not too different from those that came before. Although, this is at first glance, but if you take a closer look, you will see the following:
- Modern podiums are made of high-quality material, which significantly increases their service life. If earlier they were made of plastic, which soon became covered with cracks and delaminated, today podiums are made of more durable material;
Modern acoustic podium
- Acoustically, modern podiums have an excellent and comfortable matte surface that does not leave dirty marks. High-quality plastic or plywood, from which modern podiums are made, is quite difficult to accidentally damage;
- The current podiums are made in such a way that they provide the opportunity to conveniently lay hidden electrical wiring to the speakers;
- Modern podiums are distinguished by a slightly modified configuration, which allows the installation of not one, but several speakers that reproduce different frequencies.
Acoustic podiums for yourself
Painting the door trim of “Priora”
To complete the work you will need:
- White Spirit;
- primer for plastic surfaces;
- auto enamel;
- car varnish
If you don't have a spray bottle, primer, enamel and varnish must be taken in an aerosol container.
Painting the Priora door trim is done as follows:
- clean and wash the surface of the casing;
- degrease the front surface of the cards with white spirit;
- apply 1-2 layers of primer;
- apply 2-3 layers of paint;
- cover the surface with matte varnish.
After the varnish has completely dried, the door trim can be installed on the car.
Making your own podiums
Buying acoustic podiums, as mentioned above, is not necessary. You can make them yourself using our instructions.
Preparation
- Plywood or MDF;
- Polyurethane foam;
- Epoxy mixed with fiberglass;
- Fiberglass based putty;
- Finishing putty;
- Fine-grained and coarse-grained skins.
Making acoustic podiums yourself
Operation algorithm
Note. An important point: in designing a homemade podium, preparation of the base plays an indispensable role. It needs to be done wisely, trying to calculate everything very carefully and competently. The point is that innovations should not spoil the appearance of the interior, nor should they interfere with the convenient operation of door handles and window regulators. Also, nothing should interfere with closing the door.
- We draw on paper or, better yet, on thick cardboard the shape of the podium, calculated according to all the rules, and then cut it out with scissors;
- We draw the part according to the cut-out template on plywood, the thickness of which should not be more than 8 mm. We work with a jigsaw and cut out two parts at once;
- We make spacer rings for pre-purchased speakers. We use plywood as the material for this. We measure the dimensions of the speaker and its protective grid. We make a mounting hole in the plywood, the internal diameter of which should correspond to the diameter of the speaker ring.
Note. As for the outer size of the circle, it should be the same as the diameter of the protective mesh. At the end, it is advisable to add 5-6 extra millimeters for a decorative ring.
- Cut out a template for a decorative ring from plywood. We coat it with glue and place it on the base of our structure.
Making acoustic podiums yourself
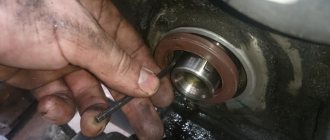
Note. To achieve greater reliability, after it has dried, it is advisable to nail the ring to the base with small nails.
- The rings are attached to the base with special slats made of wood or iron. They should be cut in advance to sizes depending on the degree of inclination of the ring relative to the base, individual preferences of the owner, etc. As a rule, four rails should be attached to one speaker to the base. The slats are attached to the ring with self-tapping screws to ensure reliable fixation;
- Give the shape of the base a curve. This is why you need polyurethane foam. After applying it, you need to wait until it hardens, and then cut out rounded shapes, always without sharp corners.
Polyurethane foam is an important component of the podium manufacturing procedure
Note. To avoid large foam consumption, it is recommended to close the hole for the speaker on the podium with a plastic pipe, and cover it with cellophane on top. Once the foam has hardened, the pipe can be easily removed.
- It is necessary to apply the foam in an even layer, starting from the ring in a circular motion and ending with the edges of the podium.
Note. Until the first layer of foam has completely dried, it is recommended to apply a second layer around the decorative ring. This is done to save time. It is better and more convenient to cut off the excess after the first hardening of the foam than to wait for the first layer to dry, apply the second and wait for it to harden again.
- After the foam has completely dried, you need to start forming the blank for future speaker mounting (see How to choose speakers for a car radio on your own). Excess foam is cut off with a sharp knife, and then the product is given the desired shape;
- The sandpaper is taken and the sanding process begins;
- After this, you need to level the surface by applying a thin layer of fiberglass putty. We wait until it dries, then we apply the second layer, then the third;
- After the last layer of putty has dried, we finally process the surface to the desired state, again using sandpaper.
Note. To protect the podium from mechanical stress, it must be covered with epoxy mixed with fiberglass. This composition must be applied according to the instructions, first in an even layer on the surface of the podium, and only then fiberglass putty is applied. At the end, you need to smooth everything out carefully. A rubber spatula is perfect for this job. Thus, the formation of folds is prevented and the fabric completely follows the contours of the podium.
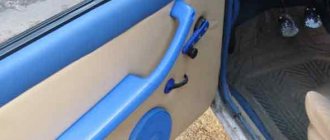
- At the final stage, the podium must be covered with artificial leather. A technical hair dryer will help soften the material so that it lays down in an even layer. You need to fix the leather on the podium using a stapler, and cut off the excess material with a knife;
Faux leather in different colors
- Next, you need to secure the podium to the Priora doors using self-tapping screws. They must be screwed in from the back side of the casing, and not from the outside. Everything, including the trim itself, door handles and decorative elements, is put in place.
Note. In order to more securely fix the homemade podium to the door, the use of special protrusions on the door is provided.
As a result, quickly, and without spending extra money on buying a podium, you can assemble it yourself and install it on the Priora. The cost of the operation is minimal, the costs are only for consumables, including plywood, glue, putty, and so on. Watching thematic videos and photo materials will only be beneficial; the instructions should be studied thoroughly.
High-quality sound in a car is ensured by installing and connecting several speakers to the media system. The larger the tweeter, the louder the sound will be.
And the more speakers, the more voluminous the sound from the radio in the cabin. This is why many owners decide to install podiums on the front doors of the Priora to increase the playback volume. The speakers can be placed either at the top or at the bottom of the door.
Standard speakers - article number and price
At the front of the Priora (sedan, hatchback, station wagon), speakers with a diameter of 13 cm (5.25 inches) were installed, forming a bipolar coaxial speaker system. Maximum power – 80 watts, resistance – 4 Ohms, sensitivity – 4 dB. The AvtoVAZ spare parts catalog provides for audio speakers the designation 2170-791020. Audio components were supplied to the factory conveyor. This manufacturer sells its products under the URAL brand. Now speakers 2170-791020 are sold at prices starting from 600 rubles.
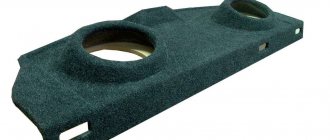
The Lada Priora sedan was also equipped with radio speakers 2170-7901030 with a diameter of 16.5 cm (6.5 inches), mounted on the trunk shelf. Components 1117-1901030 were installed in the rear pillar of the Priora station wagon. Hatchbacks in the “Norma” configuration were produced with the same audio components located on the support of the trunk shelf. In the Priora “Lux” hatchbacks, speakers 2172-7901030 were installed instead, characterized by an expanded frequency range (64-18000) and a diffuser with fabric filling. The price for a pair of these parts is from 700 rubles.
The acoustics of the standard Lada Priora speakers satisfy only unassuming car owners. Fans of high-quality car audio assemble and upgrade the car's acoustic system.
New podiums on the Priora in the front doors: differences and features of the products
Before choosing a podium for Priora tweeters, the buyer needs to determine their appropriate size. This applies not only to the purchased speakers, but also to the free space left for a comfortable stay in the cabin. It is unacceptable to install an element that is too bulky, since it will not allow either the driver or the passenger to sit properly in the cabin.
In addition, the podiums should be conveniently attached to the side pads. The newly acquired elements must lie exactly on the surface of the door, without blocking the pocket. And special podiums for Priora, installed in the upper part of the sidewall near the pillar, will allow you to add new notes to the sound. And also achieve surround sound transmission.
The external design of the podiums also plays an important role. For example, in a car with a classic black and gray finish, you can buy podiums on a Priora in regular black or dark gray. But silver linings will look no less attractive, giving the interior a more modern look.
A car with a brown or beige finish should be complemented with podiums in a coffee or pleasant brown shade.
Small additions should not only be of high quality and convenient. The elements must look stylish in the car where they are installed. That is why only stylish podiums on Priora with tweeters can complement the interior and create really good sound from the media system. And during operation they will not cause any discomfort or noise.
Product delivery options
Note! Below are the shipping methods available specifically for this product. Payment options may vary depending on the shipping method. Detailed information can be found on the “Delivery and Payment” page.
Parcel by Russian Post
Available payment methods:
- Cash on delivery (payment upon receipt)
- Using cards Sberbank, VTB, Post Bank, Tinkoff
- Yandex money
- QIWI
- ROBOKASSA
Shipping throughout Russia. Delivery time is from 5 to 12 days.
Parcel by Russian Post 1st class
Available payment methods:
- Cash on delivery (payment upon receipt)
- Using cards Sberbank, VTB, Post Bank, Tinkoff
- Yandex money
- QIWI
- ROBOKASSA
Shipping throughout Russia. Delivery time – from 2 to 5 days. More expensive than regular delivery by Russian Post, approximately 50%. Parcel weight up to 2.5 kg
Express Parcel EMS
Available payment methods:
- Cash on delivery (payment upon receipt)
- Using cards Sberbank, VTB, Post Bank, Tinkoff
- Yandex money
- QIWI
- ROBOKASSA
Shipping throughout Russia. Delivery time – from 3 to 7 days. More expensive than regular delivery by Russian Post, approximately 100%.
Transport companies
Available payment methods:
- Using cards Sberbank, VTB, Post Bank, Tinkoff
- Yandex money
- QIWI
- ROBOKASSA
Delivery is possible to any locality where there is a representative office of the transport company. Delivery time – from 2 to 10 days. Sending large parcels is approximately 50% more profitable than by Russian Post.
Installing speakers in the rear shelf of Lada Granta liftback
The installation process is somewhat complicated by the need to pre-prepare the shelf, cut holes, and install podiums.
- Open the back door of the Lada Granta Liftback, remove the shelf;
- We apply the speakers one by one, projecting their oval silhouette onto the shelf from the back side;
- We cut out holes with a jigsaw and clean them around the perimeter with sandpaper;
- We buy in advance and cut out the podiums for the speakers ourselves. We apply and assemble the structure.
The most crucial moment comes - laying the cable. Some masters practice feeding from side doors, which is fundamentally wrong. As the load on the circuit increases, the speakers will begin to sag. It is best to connect to the ISO connector on the back of the tape recorder.
- We dismantle the plastic linings - thresholds between the front and rear rows of seats.
- We lay the wires from the rear speakers and bring them out to the inside of the dashboard.
- We route the ISO connector and connect it to the free sockets.
- We reassemble the pads.
Provided you follow the recommendations and follow the algorithm, the performance of the speakers is guaranteed. During the warranty period, the buyer has the right to present to the seller any demands provided for by law.