The brake light switch, or “frog” as it is also called, is located on the driver’s side just at the beginning of the brake pedal in close proximity to the steering shaft. It is this detail that sometimes causes stop packs to fail. The photo below clearly shows its location:
To begin replacing it, you must first disconnect all the wires from this switch:
Now take a 19mm wrench and slightly loosen the nut that secures the frog in one position:
Now we press the brake pedal with one hand, and with the other at this time we unscrew the fastening nut, which is located at the very edge:
And after this, you can finally unscrew the brake light switch of the VAZ 2106, and this can be done by hand, since you don’t have to make any special efforts.
The final result of the removal is shown in the photo below:
Its price in the store is about 80 rubles. Replacement is carried out in the reverse order and be sure to adjust the timing of the brake lights after installation.
The purpose of the brake light is to warn drivers behind you about braking. It should turn on as soon as the brake pedal is pressed. If the stop is faulty, it can cause an accident. The article discusses the brake light, the principle of operation, typical malfunctions, methods for eliminating them, and provides instructions for replacing them yourself.
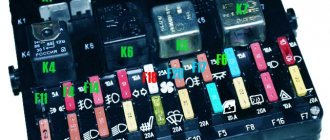
Which fuse is responsible for the brake light on the VAZ 2110?
Diagram and location of fuses VAZ 2110, 2111, 2112
| Fuse No.: | Amps | What he is responsible for: |
| F17 | 7,5 | Brake light, ignition switch illumination, interior lighting |
| F18 | 25 | Cigarette lighter, glove compartment light, interior heater |
| F19 | 10 | Reversing lamp, brake light monitoring |
| F20 | 7,5 | Rear fog lights |
Video “Replacing a foot on a Mercedes”
This video demonstrates how to replace a brake light with your own hands using the example of a Mercedes (the author of the video is Ivan Poknya).
In January-February, when braking, the error “Check the brake system” began to appear periodically (once a day) . Check VSC. Check ABS"
. The indicators for parking brake, ABS and an exclamation mark were on the display. The brakes worked well, but it was impossible to use assistance when going uphill. After turning off the ignition and turning it back on, the error disappeared.
Scanning the ECU did not reveal any error codes. I thought that the ABS sensors were clogged with dirt, or that the stuck snow/ice began to melt while driving and “flooded” the ABS sensors. Before, when overcoming water obstacles, a similar error popped up a couple of times - but that was in the summer and clearly after deep puddles.
After a few days, the error began to appear more and more often, and then several times a day. There was no dependence - you braked sharply or smoothly. I looked at the brake fluid level - according to the MAX risk. I checked the error codes again - everything is clear. I started searching on the Internet.
As it turned out, a similar error very often appears on RAV4 2007-2009, you can call it a “sore”. And the reason lies in the so-called brake frog (or, as it is correctly called, “brake light switch”). Oxidation forms on the contacts during operation, which leads to resistance surges and asynchronous switching on of the right/left brake lights. The computer accepts this circumstance as an error and warns about it.
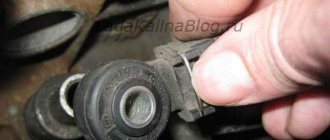
It is located above the brake pedal. Before removing it, it is better to unscrew the protective plastic cover (otherwise access will be limited) - it is held on by 2 screws with a Phillips screwdriver. Then you need to disconnect the wires.
Then we turn the frog itself clockwise and it freely leaves the landing site. Next, disconnect the gray case (here, be careful not to break the 2 latches). On the forums, people wrote that they had terrible carbon deposits on the metal contacts. I didn’t see anything terrible in myself. Yes, there were black traces of oxidation, but there was no soot or dirt.
I removed traces of oxidation from metal contacts and plastic parts simply with a rag.
I did not use any aggressive solutions during the cleansing process, because... There is some kind of transparent viscous substance applied to the contacts - I was afraid to remove it. 5 days have already passed since cleaning and no errors have appeared. PS. You can order a new one on Aliexpress for 600-800 rubles.
The brake light switch, or “frog” as it is also called, is located on the driver’s side just at the beginning of the brake pedal in close proximity to the steering shaft. It is this detail that sometimes causes stop packs to fail. The photo below clearly shows its location:
To begin replacing it, you must first disconnect all the wires from this switch:
Now take a 19mm wrench and slightly loosen the nut that secures the frog in one position:
Now we press the brake pedal with one hand, and with the other at this time we unscrew the fastening nut, which is located at the very edge:
And after this, you can finally unscrew the brake light switch of the VAZ 2106, and this can be done by hand, since you don’t have to make any special efforts.
The final result of the removal is shown in the photo below:
Its price in the store is about 80 rubles. Replacement is carried out in the reverse order and be sure to adjust the timing of the brake lights after installation.
Useful for car enthusiasts - everything about cars
Methods for troubleshooting
Troubleshooting is not a complicated process and even novice car enthusiasts can do it (the author of the video is Avtoelektika VC).
First of all, you should check the integrity and condition of the wiring.
Using a multimeter, you need to test the wiring. Damaged or torn sections should be replaced intact or soldered. If there are traces of oxidation processes on the contacts, they need to be cleaned.
If the LEDs burn out, they need to be replaced in pairs. If the breaker fails, it must be replaced with a new one, as it cannot be repaired. Before replacing, turn off the vehicle's power by removing the negative terminal from the battery. Then disconnect the power wires from the breaker. Next, you need to loosen the lock nut and unscrew the main nut securing the switch to the bracket.
Replacing the brake light switch
Before installation, the new frog should be checked for functionality. This can be done using an ohmmeter. We connect the device to the device and measure the resistance. When the contact is closed, the resistance should be zero. If you press the rod, the contacts should open; the resistance in this case tends to infinity.
Operating principle of the electronic engine control system (ECM)
In a modern car, all process control, except for the rotation of the steering wheel, and even then, is entrusted to the computer, or Electronic Control Unit (ECU). It contains a program with many different tables. In general, the ECU receives data about the state of the car, speed, revolutions, and activated mechanisms from a large number of sensors. Based on the results of these observations, the ECU, using these tables, includes certain ignition modes, fuel supply and other executive functions.
The role of the clutch sensor
It would seem, what does the clutch have to do with it? And here's what it has to do with it. When the clutch engages, the most sensible thing to do is to reduce the engine speed. But not to idle, but according to the speed of the car. This is not always available to the driver, especially a beginner. And here the computer will come to the rescue. Reacting to the signal from the clutch sensor, it can independently adjust the engine speed.
Important! In addition, in accordance with the Priora speed sensor, the ECU can obtain information about the serviceability of the clutch. Summarizing the above, we can say that the presence of a sensor on the clutch allows:
Summarizing the above, we can say that the presence of a sensor on the clutch allows:
- saves fuel;
- make driving easier;
- monitor the serviceability of the coupling;
- increase its service life.
Therefore, its serviceability is an important factor in the Priora control system.
Design and location of the Priora clutch sensor
In principle, this is the simplest switch. In the position when the clutch is disengaged and the pedal is not pressed, the sensor circuit is open. If you press the clutch drive, the limit switch of the sensor closes and the signal “clutch is on” is sent to the ECU.
It is located on the clutch pedal mounting assembly, where the very tip of this pedal is located opposite the sensor end switch.
Possible malfunctions: signs and causes
If the feet do not burn, the reason may be the following:
- bad contacts;
- damage to the wiring located in the corrugation between the door and the body;
- burnt out lighting elements.
There is a situation when the brake lights are constantly on if the side lights are on. In this case, the headlights may not light up. If they are turned off, additional lighting fixtures operate normally.
In this situation it is possible:
- the contacts of the parking lights and stop lights have been short-circuited;
- there is no weight on the dimensions;
- the two-pin lamp is faulty;
- the circuit closed, but did not open.
If the parking lights and brake lights are on and the ignition is turned off, then you need to check whether the lampshades are shorted to the housing. The reason may be poor contact of the negative wire with ground.
Main reasons
Almost all problems related to automotive electrical systems can be solved in approximately the same way. You need to look for a potential or probable cause of malfunctions in the problematic object itself, or understand the system responsible for supplying power.
The situation is exactly the same with devices called brake lights. If they stop working, then you should look for the reason in one of the following points:
- There were problems with the fuse. It has oxidized or completely failed;
- There are faults in the lamps themselves or in one lamp, depending on how many stops are not working;
- The reason lies in the mechanism responsible for turning on the warning signal when the brake is applied;
- In the socket where the stop light is installed, the contacts have oxidized;
- More serious problems appeared related to damage to the wiring.
Based on the stated reasons why the feet may stop working, we can draw a completely objective conclusion. A truly serious malfunction concerns only wear or damage to the electrical wiring. Solving such a problem with your own hands is not always correct.
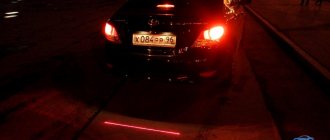
When the rear brake lights (left and right) or the additional central brake light repeater fail, do not rush to look for an auto electrician and offer him money to fix the problem.
There is a high probability that you will be able to do everything on your own. You will only need a standard set of tools for a motorist, as well as an understanding of how the lighting equipment in general works in your vehicle. Start with the most likely and fairly simple to solve possible malfunctions. Only if it turns out that the problem is bad or damaged electrical wiring, then it makes sense to visit a good car service center. It is better to entrust such tasks to experienced craftsmen. The main components for restoring the operation of brake lights on your own, you will need a spare working lamp, a control unit or a multimeter, as well as suitable tools.
It would be a good idea to study the owner's manual and understand how to get to the stops on your car.
Fuse
The first place to start is by searching for the mounting block in which the fuse responsible for the brake light is located.
Moreover, each machine has its own electrical circuit and specific location of fuses.
These can vary significantly depending on the vehicle, such as:
- VAZ 2110;
- VAZ 2107;
- Toyota Rav 4;
- Ford Fusion;
- VAZ 2114;
- VAZ 2115;
- Ford Focus;
- Chevrolet Lacetti;
- Lada Granta;
- Hyundai Accent;
- Renault Logan;
- Hyundai Solaris, etc.
A blown fuse quite often causes the failure of a number of equipment, including lighting devices. Check fuses visually and using a multimeter.
But there is a simple and effective way to check that takes a minimum of time. To do this, start the engine and hold down the horn button. This is not suitable for all car models, but on many vehicles the same fuse is often responsible for the sound signal and brake lights.
If this is not the case, we continue our search further.
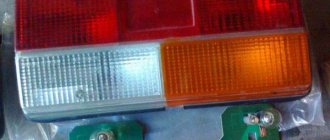
Brake lamps and their sockets
Next, you should switch to the brake lights themselves. In most cars, to gain access to the feet, the luggage compartment is opened, the rear light bulb is removed, after which you can get to the feet themselves.
But the dismantling process may differ on different brands and models. Here, start from your car specifically; if necessary, look for hints in the operating manual. There are examples of cars where you can get to the brake light without removing the rear optics at all. You still have one main task ahead of you. It consists of gaining physical access to the faulty device, the lamp and the socket in which it is located. Not everyone can try to determine the problem by eye. Here it is better to take a different route.
The optimal solution would be to use new, similar lamps instead of potentially faulty ones. Therefore, you will have to buy a light bulb in advance and screw it in. If you can't find a lamp of a similar size, use a marker or turn signal repeater. Make sure these conditional controls work first.
When everything worked after installing the new lamps, you found the reason. You can confidently buy new matching stop lamps, replace old ones and reassemble the unit in reverse order.
It is extremely important to take into account one feature. Some modern cars have such a principle of operation of brake lights, in which when one car brake light fails for one reason or another, the second one automatically stops functioning. That is, sometimes checking one lamp does not give a result, since in fact the chances are 50/50 of replacing the burnt lamp, and not the one that simply turned off in tandem.
If replacing the light bulbs did not give anything, check the sockets themselves. It happens that they oxidize, this breaks contact, and the device does not turn on, although power is supplied to it. Also make sure that the socket is connected to the vehicle wiring. If necessary, the contacts are disconnected, cleaned with fine-grained sandpaper, and then returned to their place. Even during this procedure, it is recommended to apply a special lubricant to the contacts after cleaning.
One more thing. When checking the sockets, it is also worth taking new light bulbs. It happens that due to oxidation of the cartridge, the lighting device itself fails. That is, in fact, 2 malfunctions occur simultaneously.
Problems with the switch
The brake light on a car lights up the moment the driver presses the brake pedal with his foot while sitting behind the wheel. When pressed in this way, the force is transferred to a special mechanism. It is popularly called a frog. It is also a limit switch and it is also a classic brake light switch.
There are 3 main reasons why a frog or limit switch may not work:
- contacts have oxidized;
- carbon deposits appeared;
- corrosion has formed.
Despite the slightly different processes, the essence of the problem is the same. It can be eliminated by stripping the frog, or by replacing the stop switch.
If none of the options are suitable, there is a high probability that the problem lies in damage to the vehicle's electrical wiring. Here it’s up to you to decide whether to try to resolve the issue on your own, or seek help from qualified specialists.
Considering the complexity of the electrical circuits of modern cars, a better solution would be to visit a trusted auto electrician. But the final choice is yours.
Thanks everyone for your attention! Be sure to subscribe, leave comments, ask questions and invite your friends to join us!
Where is the reverse sensor located on KamAZ?
For safe movement, all types of vehicles are equipped with signs indicating the direction of travel. On trucks, in particular on KamAZ, the reverse sensor turns on and off the white-moonlight lights when moving backwards. If the lights do not light up when you engage reverse gear, then this is either a blown fuse, or a faulty reverse sensor, or a broken electrical circuit.
The reverse sensor on KamAZ is located in the gearbox. It is a button that is pressed and released by the gear shift lever.
The sensor may not work for the following reasons:
- electrical wiring contacts have oxidized;
- the sensor turned away;
- the reverse sensor identifier (RDS) is broken;
- DZH fuse has blown;
- The reversing light bulbs are burnt out.
Fuse numbering designation for KAMAZ vehicle
| Fuse markings | Rated current in Amperes | What is he responsible for? | Main power switch/ignition switch status |
| FU1.1 | 5A | EFU control unit | On / ON |
| FU1.2 | 5A | Air suspension control unit | On / ON |
| FU1.3 | 5A | Electrical Control Unit (CBCU) | On / ON |
| FU1.4 | 5A | EBS control unit | On / ON |
| FU1.5 | 5A | Engine control unit ADM3 | On / ON |
| FU1.6 | 10A | Neutralization system control unit | On / ON |
| FU1.7 | 10A | Engine control unit MR2 | On / ON |
| FU1.8 | |||
| FU1.9 | 10A | Retarder control unit | On / ON |
| FU1.10 | 5A | OBD diagnostic connector | On / ON |
| FU1.11 | 5A | Tachograph/instrument cluster | On / ON |
| FU1.12 | 5A | Connector for special add-ons | On / ON |
| FU2.1 | |||
| FU2.2 | 10A | Driver side control panel | On / ON |
| FU2.3 | |||
| FU2.4 | 5A | Generator field winding | On / ON |
| FU2.5 | 5A | Central locking control unit | On / ON |
| FU2.6 | |||
| FU2.7 | 5A | Sunroof control drive | On/ACC |
| FU2.8 | 20A | Air conditioner | On/ACC |
| FU2.9 | 15A | Driver side control panel | On/ACC |
| FU2.10 | 15A | Passenger side door control panel | On/ACC |
| FU2.11 | 5A | system | On/ACC |
| FU2.12 | 10A | Cigarette lighter | On/ACC |
| FU3.1 | 15A | EBS control unit | On / 0 |
| FU3.2 | 15A | EBS trailer | On / 0 |
| FU3.3 | 15A | Air suspension control unit | On / 0 |
| FU3.4 | 15A | Dehumidifier | On / 0 |
| FU3.5 | |||
| FU3.6 | 10A | Retarder control unit | On / 0 |
| FU3.7 | 10A | Instrument cluster | On / 0 |
| FU3.8 | 20A | EFU control unit | On / 0 |
| FU3.9 | 10A | OBD diagnostic connector | On / 0 |
| FU3.10 | 10A | Electrical control unit | On / 0 |
| FU3.11 | 20A | Electrical control unit CBCU gr.4 | On / 0 |
| FU3.12 | 15A | EBS control unit | On / 0 |
| FU4.1 | 20A | Electric pump for raising/lowering the cab | On / 0 |
| FU4.2 | 10A | Interior lighting | On / 0 |
| FU4.3 | 10A | Connector for special add-ons | On / 0 |
| FU4.4 | 5A | Power supply for keys and sensors | On / 0 |
| FU4.5 | 10A | system | On / 0 |
| FU4.6 | 10A | Heated glass | On / 0 |
| FU4.7 | 10A | Hitch light | On / 0 |
| FU4.8 | 10A | 24V socket | On / 0 |
| FU4.9 | 10A | Sound signal | On / 0 |
| FU4.10 | 5A | Battery remote switch relay | On / 0 |
| FU4.11 | |||
| FU4.12 | |||
| FU5.1 | 15A | Heating fuel in the fuel intake | Doesn't depend / 0 |
| FU5.2 | 15A | Fuel heating in FGOT | Doesn't depend / 0 |
| FU5.3 | |||
| FU5.4 | 5A | Tachograph | Doesn't depend / 0 |
| FU5.5 | 10A | Engine control unit ADM3 | Doesn't depend / 0 |
| FU5.6 | 15A | Neutralization system control unit | Doesn't depend / 0 |
| FU5.7 | 20A | Electrical control unit CBCU gr.1 | Doesn't depend / 0 |
| FU5.8 | 20A | Electrical control unit CBCU gr.2 | Doesn't depend / 0 |
| FU5.9 | 20A | Electrical control unit CBCU gr.5 | Doesn't depend / 0 |
| FU5.10 | 20A | Electrical control unit CBCU gr.6 | Doesn't depend / 0 |
| FU5.11 | 25A | PZD | Doesn't depend / 0 |
| FU5.12 | |||
| FU6.1 | 15A | Electrical control unit MUX4-P | Doesn't depend / 0 |
| FU6.2 | 15A | Electrical control unit MUX4-P | Doesn't depend / 0 |
| FU6.3 | 15A | Electrical control unit MUX4-P | Doesn't depend / 0 |
| FU6.4 | 15A | Electrical control unit MUX4-P | Doesn't depend / 0 |
| FU6.5 | 15A | Electrical control unit MUX4-P | Doesn't depend / 0 |
| FU6.6 | 15A | Electrical control unit MUX4-P | Doesn't depend / 0 |
| FU6.7 | 15A | Heated seat | |
| FU6.8 | |||
| FU6.9 | 15A | Central locking control unit | On / 0 |
| K1 | Wiper mode relay | ||
| K2 | Windshield wiper brake relay | ||
| K3 | Hitch light relay | ||
| K4 | Horn relay | ||
| K5 | Fuel heating relay | ||
| K6 | Cab tilt lock relay | ||
| K7 | Battery cut-off relay | ||
| K8 | Air conditioner relay |
Brake pedal sensor Lada Kalina
Lada Priora Sedan constructor, assemble it yourself Logbook Mileage and clutch replacement
The Kalina brake pedal sensor is a technical device that is used to monitor the degree of impact on the brake pedal. Quite often, car owners of the VAZ line complain about breakdowns or incorrect adjustment settings of the product.
Fortunately, the process of adjusting or replacing a part is not very difficult if certain nuances are observed.
Performance diagnostics
Checking the functionality consists of: 1. Testing the product with a multimeter. 2. Disassembly and visual inspection of the internal components of the part.
3. Replacement sensor is not known to be good.
The first method involves alternately measuring the contacts of the dismantled sensor. The point is to check each contact individually and in pairs (second and third contact). This is quite convenient to do, since at the place where the contact chip is connected, all connectors are numbered.
The second method is used to identify faulty or deformed internal elements of the product (in most cases, damaged springs).
There should be no traces of oxidation or contamination. If there are any, clean them out.
The third method is quite simple and trivial. Install a new part to replace the one whose serviceability you doubt.
When the system is restored to normal operation, the malfunction indicator (check engine) should go out (if it does not disappear within 15 minutes, the error should be reset manually).
Signs of a faulty brake pedal sensor Lada Kalina
In order to understand that the Kalina brake pedal position sensor is the cause of the vehicle’s incorrect operation, pay attention to the following signs:
- presence of error “P-0504” on the dashboard;
- a significant decrease in power and engine responsiveness when pressing the gas pedal;
- increase in engine speed (short-term) when changing gears.
Main causes of sensor failure
In order to identify the reasons that interfere with the normal operation of the device, it is necessary to disassemble it and carry out a thorough inspection to identify deformations and damage. The following defects are most common:
- the internal (small) spring, which is located on the rod, shows signs of deformation or distortion;
- the contact terminals of the product have physical oxidation;
- backlash of the moving contact;
- Quite low quality of factory production (defective, flimsy internal elements of the device).
Adjusting the brake pedal sensor Kalina
If the sensor is in good condition, and incorrect operation of the internal combustion engine continues to bother you, try adjusting the product yourself
Please pay attention to the following features:
- The sensor must be screwed in clockwise until the brake pedal begins to move down. Then you will need to slightly unscrew the product and secure its position using the fastening nut.
- The result should be such that when there is no action on the pedal, the sensor rod is recessed into the housing, and when the pedal is applied, on the contrary, it is completely released from the housing.
- As for the working gap, it is adjusted using two nuts (one at the top, the other at the bottom). The adjustment is carried out using the upper nut, which is tightened, and the lower one, on the contrary, is unscrewed. The entire process is carried out until the button is completely recessed into the body when the brake pedal is applied. However, you should not overdo the adjustment; in other words, you should leave a small gap or travel margin (approximately 2 to 5 millimeters).
Removal and installation
Replacing the brake pedal sensor on Kalina is carried out using an adjustable wrench set to “19”. The sensor itself is located above the brake pedal under the steering column. Conventionally, the removal stages can be divided into 5 steps:
- Before starting electrical work, it is recommended to disconnect the negative wire (terminal) from the battery.
- Then you need to move into the car interior on the driver’s side. For ease of operation, it is advisable to move the driver's seat in the opposite direction from the dashboard.
- Find the location of the sensor. Find a contact chip with wires. Press and hold the 2 plastic fasteners located on both sides of the chip. Pull the connector out of the sensor connector.
- Take the wrench in your hands and loosen the fastening nut. After which the sensor can be unscrewed freely.
- The installation process is similar to the removal procedure, except that you will need to make adjustments (tuning), the process of which is described in detail in the previous section.
Photo report Replacing the frog, brake light switch for VW Golf 4, Bora
LuxLP
Master Advisor
I want to share my experience of replacing brake light switches. symptoms - the feet either burn all the time or do not turn on at all. According to the wise decision of VAG, the normal position of this limit switch is in the position of the brake pedal pressed, i.e. More often than not, if the foot breaks, they will be on all the time.
Of course, before repairing the limit switch, it makes sense to check the light bulbs and their previous ones. suddenly they all burned out in unison
The limit switch itself (F) (VAG 1C0945 511A) is also called “frog”, because it (in its new version) is green. the new version came out in 06gv when VAG realized that the old version was breaking too often. I had a breakdown at 90k.
both versions are four-pin, but only (at least in my configuration) the 1st and 4th legs are used. The scheme is simple: on one leg the + comes from the 13th leg, on the other this plus goes to the hind feet.
The limit switches look like this (new one below):
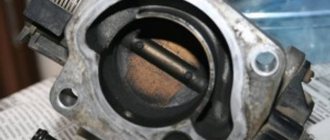
if you disassemble the old one, we will see the following picture: when you press the brake pedal, the rod presses contact plates 1-4 and 2-3 in pairs, depending on the depth of pressing. it could have been repaired, but since even VAG recognized it as a defect, there is no point (similar to the situation with the plastic glass holder in the ESP).
1. unscrew 3 screws (Torx) that secure 2 plastic casings under the steering column from below. They are on clips on top.
2. take out the horizontal casing with sound insulation, it is held on by latches (arrows):
3. The end switch is immediately visible; a chip with two wires fits into it. remove the chip, remove the limit switch by turning counterclockwise by 45-90 degrees. and pull it towards ourselves. put it in reverse order:
the whole operation takes about five minutes. The only tools you need are a 15 or 20 Torx (I don’t remember).
in the meantime, the limit switch is broken, we drive with emergency lights and fashionable vinyls something like this))
PS: according to the stories of automatic transmission owners, breaking the limit switch is great entertainment, because... The automatic transmission ECU does not understand that the brake is pressed and blocks the shift-lock. Therefore, I would advise you to carry a new limit switch with you or change it preventively (a la rivets in DUU boxes). I bought a limit switch for 400 rubles in the second store I came across (it was not in stock in the first one).
Volken
I don't break what works
Thanks for the report
Torx for 15 is needed.
In existential terms, the limit switch costs 350 rubles.