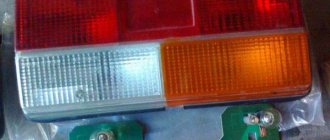
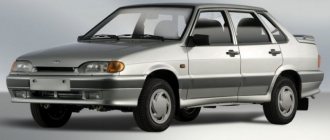
Every car owner wants his personal equipment to be the most noticeable and vibrant. Updating the design, replacing classic factory spare parts with modern ones is a long-standing occupation of men. The fourteenth is recognized as one of the popular models of the domestic automobile industry. This technique is similar to foreign models. The most common action is tuning the headlights on a VAZ 2115. It is worth noting that the light fixtures of the 14th and 15th models are identical.
Advantages of tuning lighting elements
When producing equipment, many companies want to make their products as affordable as possible; they try to save on expensive spare parts by equipping models with cheap components. This also applies to lighting structures installed at the Volzhsky enterprise. Independent modification of the optics of the iron horse gives it an attractive appearance. If there is a desire to distinguish equipment from the same type, then a simple modernization of the lights on the VAZ 2114 and tuning the headlights of the VAZ 2115 are allowed. By upgrading these devices and other parts of the car, you will transform the car, getting a unique, interesting car.
Lighting devices are an important part of any car; when modernizing, you need to preserve the functions assigned to them. This will ensure the safety of road users.
Possible malfunctions of brake lights and their elimination
Regarding malfunctions related to optics, we can say that the most common problem is the contacts on the board coming off. To avoid such problems, many car enthusiasts replace circuit boards with cartridges. The circuit board in the flashlights burns out at regular intervals, but upgrading may be a solution.
Replacement occurs without any special complications: remove the board, and in their place make a suitable hole for the cartridges. Then make contacts from the total mass. When working, be careful not to blow fuses. After this there should be no problems with the headlights.
Photo gallery “Replacing the board with cartridges”
For more successful modification of the rear lights of the VAZ 2115, you can take a look at the photographs provided below.
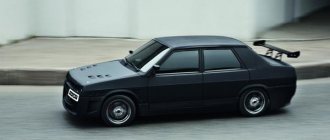
Types of tuning
There are a certain number of ways to change the appearance of lighting structures that look quite attractive. This is both internal and external tuning. The most commonly used option is angel eyes on the VAZ 2114. Tuning significantly improves the appearance and attracts the attention of others. Carrying out the production process yourself will provide valuable experience.
Tuning VAZ 2114 headlights and tuning VAZ 2115 optics involves replacing classic factory-installed parts with more powerful ones, or tinting with film. Many people install xenon. This improves lighting performance at night, but is contrary to traffic regulations, so installation of such bulbs is possible only on rear lighting devices. Installation of bixeon lighting structures is allowed.
Taillight tuning ideas
You have to tune the headlights not only to somehow make the car stand out from the crowd, but also for the safety of the optics. Often, at first glance, “gadgets” are an elegant decoration, for example, the same eyelashes for headlights, however, in fact, they protect the optics from an unfavorable environment.
Manufacturing of overlays
Headlight covers are the most favorite and popular way for car enthusiasts to tune taillights.
They can be made manually using:
- LED light bulbs;
- fiberglass;
- sticky tape and epoxy glue.
Covers for rear lights
The scheme of actions proceeds as follows:
- cover the entire surface of the rear light with adhesive tape, on top with fiberglass on which the covers will be installed;
- cover the fiberglass fabric in several layers with epoxy liquid, and do it so that there are no defects on top;
- wait for the liquid to dry, then remove the blank for the overlay and mark the outline of the future decoration on it;
- cut the profile on the template using a cutting tool;
- sand with fine-grained sandpaper;
- cover with a primer layer to protect against corrosion, then apply paint and cover with a special protective varnish;
- install LED blanks.
Installing LEDs in taillights
Installing LEDs is quite a creative solution, because there are a lot of options.
To realize the idea, you need to spend some time on drawing, and also prepare the following tools:
- a set of LED lamps and resistors;
- fasteners;
- adhesive tape and glue;
- a device similar to a sealer.
LEDs in the rear lights
For installation you need to do the following:
- Pull out the headlight, reflectors and reflectors, and then separate the glass.
- Using a marker, mark the places where the LEDs will be installed.
- On the inside, stick pre-prepared small round fragments cut from adhesive tape.
- Paint the lights and remove the tape after the paint dries.
- Install the reflectors using epoxy-based glue, and then treat each of the joints with sealant.
- Attach the LED boards to the machine wiring, marking them inside the lamp.
- Assemble the turn signal control units and restore the contacts.
- After this, install the modules with glue (video author - Alex Aitov).
Causes of failure of the rear parts of the lighting system and driver actions
You can find out what the breakdown may be and how to solve the problem below. We will talk about modified nines.
- Due to a voltage drop, a short circuit may occur and the paws will burn out.
- If it's time to strip the wires because the contacts have oxidized and the terminals do not conduct current well enough.
- Often, in the event of a voltage drop, it may be necessary to remove and replace fuses.
- If the reverse sensor contacts are broken or damaged.
Removing the brake light switch sensor
In the case of the problems listed above, the easiest way, of course, is to install a new lamp. This happens without any difficulty: you just need to turn off the lights, open the trunk and remove the wiring block. After this, holding the fixing elements that are installed on the sides, remove the panel and unscrew the lamp. In its place, install a new lighting device and assemble the assembly in the reverse order. If we talk about the stops, both lamps and one of them may not work, that is, only in one headlight.
If such a problem occurs, it is necessary to immediately diagnose:
- Check the fuse and, if necessary, replace it with a new one. Fixing a breakdown is not enough, because, as in the case of human diseases, a burnout may be a fault in the system that needs to be corrected. If this is not done, you can change the device until the end of the life of the VAZ 21099. One of the reasons may be a short circuit.
- If the wiring in the signal lamp sockets has oxidized, the lamp needs to be twisted a little in the socket to scrape off the damaged layer. To make the work done more effective, you can clean the contacts with sandpaper.
- If the lamps in the stops burn out, you need to replace it with a new one and check whether the system will work. And if the contacts are bad, they need to be cleaned both on the board and on the wire block.
- If the tracks in the headlight circuit board are burnt out, then you can remove the board and visually diagnose its integrity. If there are burnt tracks, they can be modified by replacing the wiring.
- The sensor is faulty or the electrical circuit is broken. First, you need to remove the red and white wires from the sensor and connect them with a piece of wire. If the brake lights come on, then the sensor needs to be replaced; if not, you need to check the electrical circuit. It needs to be checked for broken contacts.
Search principle
To find a fault in any vehicle on-board network system, you should use the method of sequential elimination of elements. The point is to consistently check electrical appliances and sections of the circuit, excluding elements from the list of reasons that could cause a breakdown. To do this, you need to clearly understand the design and operating principle of the system. When troubleshooting, you need to move from the components that require the least effort to check, to the most difficult to diagnose elements.
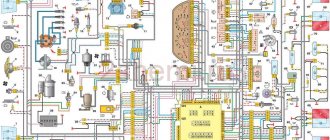
Electrical diagram
We immediately emphasize that the pinout of connectors and color markings of wires may differ not only between different models of the same automaker, but also among one model of different years of manufacture. Before you start searching for the cause of the breakdown, you need to find an electrical diagram specifically for your car model.
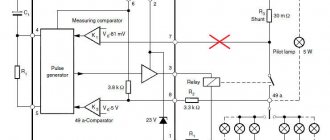
We will consider the principle of operation of brake lights and the troubleshooting algorithm using the example of the VAZ 2101-2102 circuit. The photo shows the general diagram of the vehicle's lighting and light signaling. We need to isolate the components involved in the operation of brake lights.
- 6 – mounting fuse block;
- 13 – brake light switch. It is a non-locking button (returns to its original position after removing the force). Located directly next to the brake pedal. When the brake pedal is released, the contacts of the limit switch are open, no current passes through it. Accordingly, when pressed, the contacts close, allowing flow through the lamps;
- 19 – lamps that light up when you press the brake pedal.
We do not have a diagram of the mounting block, but we know in advance that the brake lights only work when the ignition is on. There is a wire from the mounting block to the brake light limit switch, on which there is a constant + after the ignition is turned on. As soon as the limit switch contacts close, + goes to the brake light bulbs, which are connected in parallel. The “ground” of the rear lights is common and consists of a wire screwed to the car body.
modification of the rear panels of VAZ 2113-2115 models - Community "Kulibin Club" on DRIVE2
Hi all. I want to tell you about the modification of the rear light boards of the 14th family. In general, I was tired of them, they often glitched, and at one time I gave up on them. But the control lamp on the dashboard was constantly on and I got sick of it. Having gone to the fuchika, I took new standard boards, but they didn’t inspire confidence in me. I installed them and didn’t throw away the old ones.
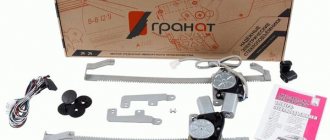
I figured out how to improve them. I bought several more sockets for 2-pin lamps, terminals, a 4-pin connector
What do we need for one board: 1) Old board 1 pcs 2) Support for the turn signal 1 pcs (classic or Samara) 3) Support for a 2-pin lamp 2 pcs 4) 4-pin connector 1 pcs 5) Terminals 8 pcs 6) Screw or self-tapping screw 4 pcs 7) a little wires
8) Soldering iron
and of course, straight hands and a quick thinker :) the total amount of money came out to about 800-900 rubles
Let's gut the old board. We remove the cartridges and the circuit. We put our cartridges and cut out a place for the connector. We glue and solder the whole thing. We connect the wires according to the correct diagram.
As a result, we get a normal board with good contacts on the sockets. Of course, you can do it differently. For example, put the cartridge on the turn signal with glue from a hot-melt gun. Well, in general, whoever is good at what, but I did it this way.
Thank you all for your attention, I hope my advice is useful
How to replace the rear light on a VAZ 2113-VAZ 2115?
Removal: 1) To a greater extent, on many cars the rear lights are mounted on nuts, and this happened with cars of the Samara 2 family, so removing the rear light will be very easy for you; at the beginning of the operation you will have to open the trunk and bend the original (Factory) carpet to the side (A place will be cut right into the carpet where it can be bent back, so where exactly do you need to change the taillight and look for the place where the carpet can be bent back), as soon as it is bent back you immediately have access to your headlight, starting from headlights, you need to disconnect the wire block, which is indicated by a red arrow in the photo below, but keep in mind the fact that the block fits tightly and therefore be more careful with it, in addition, we recommend that before disconnecting the wire block, remove the minus terminal from the battery, after all, you are working with electronics and if water gets on it and the battery still supplies voltage, then a short circuit will occur, due to which the wiring you have going to the flashlight will become unusable (If you don’t know how to remove the terminal from the battery, then in this case read article entitled: “Replacing the battery on a VAZ”, everything is written in paragraph 1).
2) We go further, as soon as the block is disconnected, take a wrench in your hands and use it to unscrew the four nuts that hold the taillight in place, in the photo below you see how two of the nuts are indicated by red arrows, the other two are on the other side and therefore you will immediately find them when you remove the headlight; by the way, after unscrewing all four nuts, remove the headlight from the car.
Car diagram - Lada Samara 2
This article provides electrical circuit diagrams of equipment for the VAZ 2115 1997+. The interior of the VAZ-2115 has become more comfortable, a new, more convenient and advanced instrument panel has appeared, which has a more streamlined and ergonomic shape, backlit push-button switches and indicator lamps (the so-called “European panel”), an adjustable steering column, a steering wheel from the “tenth” "family, "console" between the front seats. The new heater design provides efficient heating of the interior. The standard equipment includes an on-board driver warning system for closing the door locks, unfastened seat belts, leaving the ignition key in the lock, the level of oil and coolant in the engine, and extreme wear of the brake pads. The luggage compartment has become more spacious and convenient due to the increase in the trunk lid. The power units are similar to the VAZ-21099.
Electrical connection diagram of the wiring harness of the non-contact ignition system
1 – spark plugs; 2 – ignition distributor sensor; 3 – ignition coil; 4 – switch; 5 – carburetor solenoid valve control unit; 6 – carburetor solenoid valve; 7 – carburetor limit switch; 8 – ignition switch; 9 – mounting block; 10 – speed sensor; 11 – electric motor of the engine cooling system fan; 12 – fan motor activation sensor; A — blocks for connection to the front wiring harness; B - scheme of conditional numbering of plugs in the blocks of the ignition sensor-distributor and speed sensor; B - to power supplies; G - to the instrument cluster (signal for tachometer); E - to the instrument cluster (signal for the speedometer)
Electrical diagram of VAZ-2115-20 equipment
1 – headlights; 2 – fog lights; 3 – air temperature sensor; 4 – electric motor of the engine cooling system fan; 5 – blocks connected to the wiring harness of the ignition system; 6 – engine compartment lamp switch; 7 – block for connection to a single-wire type audio signal; 8 – sound signal; 9 – washer fluid level sensor; 10 – front brake pad wear sensors; 11 – oil level sensor; 12 – generator; 13 – engine compartment lamp; 14 – coolant temperature indicator sensor; 15 – starter; 16 – battery; 17 – relay for turning on fog lights; 18 – coolant level sensor; 19 – brake fluid level sensor; 20 – reverse light switch; 21 – windshield wiper gearmotor; 22 – oil pressure warning lamp sensor; 23 – block for connecting to the rear window washer electric motor; 24 – windshield washer electric motor; 25 – instrument cluster; 26 – mounting block. Conventional numbering of plugs in blocks: A - block headlights; B — electric fuel pump block; C — blocks of the mounting block, ignition switch, windshield wiper gearmotor; D — interior lamp
Connection diagram for starter 29.3708 on VAZ-2115
1 – starter; 2 – battery; 3 – generator; 4 – mounting block; 5 – ignition switch; P1 – pull-in winding of the traction relay; P2 – holding winding of the traction relay
Wiring diagram for turning on the rear window wiper and washer
1 – mounting block; 2 – ignition switch; 3 – ignition switch unloading relay; 4 – rear window wiper electric motor; 5 – rear window washer electric motor; 6 – rear window cleaner and washer switch; A - to power supplies
Diagram of the rear lights of VAZ-2115 and 2114 cars in comparison
1 – direction indicator lamps; 2 – side light lamps; 3 – brake light lamps; 4 – fog lamps; 5 – reversing lamps
Connection diagram of the mounting block on the VAZ 2115
The outer number in the designation of the wire tip is the number of the block, and the inner number is the conventional number of the plug: K1 – relay for turning on the headlight cleaners; K2 – relay-interrupter for direction indicators and hazard warning lights; K3 – windshield wiper relay; K4 – lamp health monitoring relay; K5 – power window relay; K6 – relay for turning on sound signals; K7 – relay for turning on the heated rear window; K8 – headlight high beam relay; K9 – relay for low beam headlights; F1-F20 – fuses
Electrical diagram of the ignition switch connections (with the key inserted)
Generator connection diagram
1 – battery; 2 – generator; 3 – mounting block; 4 – battery charge indicator lamp, located in the instrument cluster; 5 – ignition switch
Reversing lights
Lamps, which are a light-signal element that notifies you when you are reversing, can significantly increase the level of safety on the road.
The turning on of the rear lights indicates that the car is moving backwards, so you should be careful. Non-working lights can easily lead to accidents and collisions, for which you will ultimately be the culprit.
What is this?
3X headlights are white lighting fixtures. They turn on when shifting into reverse gear.