Some technical characteristics and general description
In order not to buy a pig in a poke, having decided to stylishly tune your car, it is advisable to familiarize yourself with the proposed description of the technical characteristics of the product. What material is the additional lighting made of, how long will it last, and how justified is such a purchase? Let's figure it out together. A meager description on the packaging is one thing, and an objective view from the outside is another.
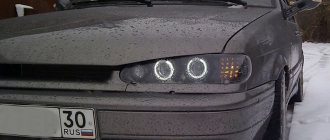
Let’s say right away that such lights shine really well on Largus. It is also noteworthy that this illumination is practically indistinguishable from the illumination of the main lights and is, in fact, its logical continuation. This will definitely emphasize the individuality of your car and will be a simple, but at the same time effective visual tuning.
When it comes to light source technology, LED lighting is currently the most technologically advanced. It is capable of providing high-quality light for tens of thousands of hours and for at least ten years. Such lamps are also not afraid of low temperatures, are economical and shock-resistant. They do not heat up the lamp body like outdated halogen samples. In general, it’s a pleasure.
The red impact-resistant ABS plastic of the lampshade also looks very presentable and reliable, which adds overall points in favor of purchasing the product. After installation, the lights will hardly stand out in any way. The product looks natural and harmonious, as if the lamps were installed there from the very beginning.
Flashlights are made of impact-resistant ABS plastic
The price of such “pleasure” is approximately 3 thousand rubles. It largely depends on the region of the country and the dealer offer of a particular store. You can hardly find a simpler and cheaper tuning of your car. Therefore, from this point of view, this acquisition also seems very attractive. The only thing that upsets us is the cost of installing the lamps at service centers.
Why is it profitable to install additional rear tuning lights on the Lada Largus yourself?
Official service centers estimate the cost of what we are about to tell you at about 3 thousand rubles (the price of the work is commensurate with the cost of the product). The most generous offer from a service center that we saw on the Internet was only 1,500 rubles. It’s unlikely that anyone will want to tinker with your car for less money except you. You can install additional taillights on your Lada Largus yourself, spending about an hour on everything and saving a decent amount of money.
The manufacturer even kindly includes instructions, once again explaining how these lamps are installed correctly. You will hardly need the above-mentioned manual, because you will get all the necessary information from our article. By understanding the algorithm of actions in advance, you can avoid a lot of unpleasant moments of inept and blind tuning.
Features of additional optics
With such lights, the LADA Largus becomes much more visible to other traffic participants. It is especially important to turn on these devices in the dark or in poor visibility conditions. The use of optics improves safety on the road.
The material used for this product is ABS plastic and PMMA glass. The light source is diodes. Devices applicable to Lada Largus are capable of functioning in two modes:
- like brake lights;
- as dimensional lighting equipment.
The weight of the entire set reaches 2 kg. It includes:
- a pair of lighting devices (for both sides of the car);
- cable harness;
- diagram according to which installation and switching with the on-board network is carried out.
After the rear additional lights are installed, the exterior of the car is transformed; the rear looks especially impressive in the dark when the lighting devices are turned on.
Today, there are companies on the market that perform tuning of cars of domestic origin. Among such companies one can single out TuneAuto. This company sells additional rear lighting equipment made using LED technology and made of ABS plastic. These lighting devices have three functional modes:
- side light;
- brake signals;
- these two functions at the same time.
The devices are provided with a warranty for a period of six months. The weight of the set does not exceed 1.8 kg. The devices combine perfectly with standard optics and are not subject to fading under the influence of the sun.
How to install rear lights on Lada Largus. Detailed instructions.
Let's start work by dismantling the main lights of the Lada Largus. To do this, you will need to unscrew the two screws holding them from the interior side, after which the LED lighting should simply fall out of its seat. We disconnect the electrical plug and put the VAZ lighting aside; we won’t need it until the end of the work. Now you need to partially disassemble the plastic interior trim on the side of the lining for the additional lights in order to remove them. For these purposes, unscrew the gill loop, the upper loop of the rear straps and a couple of screws in the lower part of the pad. After which the inner lining element can be folded to the side and dismantling of the linings can continue.
Now you can unscrew the screw holding the trim for the lights on the inside of the cabin. To avoid losing it, it is best to use a screwdriver with a magnetic handle, because it is recessed very deeply. You can also use double-sided tape glued to the end of a screwdriver.
From the outside of the car, the plug is held in place by three self-tapping screws for a Phillips screwdriver. They are very clearly visible and you won’t have to search for the necessary screws for a long time. Finally, the boring and ugly trim can be thrown to the side by first unscrewing the central screw from it and screwing it into a similar hole in the newly installed lights.
We install the purchased Lada Largus LED lights in place of the plugs in the reverse order. The product comes with a plug with leads for electrical wiring, which we carefully connect under the main taillights of the car. All that remains for you to do is to perform the so-called electrical switching, i.e. connect the wires.
Methods for connecting to the main electrical wiring of Lada Largus
Regarding the issue of electrical commutation, the more relevant discussion will be not how to connect the wires, but with what. Almost everyone has enough skills to connect a couple of conductors. Now you need to be able to connect them efficiently or reliably. We will also discuss with you the best way to insert into the existing electrical wiring and how to do it.
Connecting wires to standard wiring
The easiest way, of course, is to make the connection using regular twisting. But this kind of method “is not comme il faut.” Contact will be lost sooner or later. In general, it cannot be called reliable. But this is really the simplest and enough to first test the switching made.
If you have soldering skills, tinning and soldering conductors will be a simple and reliable way. This kind of connection will never oxidize over time, and its strength will be comparable to the strength of the conductor itself. That's why soldering is good.
But it’s not soldering alone that can help you out in the matter of connecting rear lights to the Lada Largus. A cheap and practical way would be to use the most common screw terminal blocks. They cost pennies and are sold in almost any electrical goods store. To avoid cutting the main wiring, bend it at the connection point and thus clamp it with a screw contact.
Well, the most optimal would be to use special terminal blocks, known as clamp couplers. They are specifically designed to connect to live electrical wiring without twisting, soldering or cutting. Perhaps this method can be considered a priority. We will finally move on to the connection process itself.
Electrical connection diagram, how to connect the wires correctly
Let's take in our hands a working electrical plug that is connected to the main lights of the Lada Largus. It comes with wires of five different colors, including:
- common wire, also known as “plus”;
- power supply for direction indicators;
- for fog lights;
- in reverse;
- on the brake, as well as the clearance.
Among all this not very tricky interweaving of multi-colored conductors, we are interested in the following colors:
- black - common wire;
- orange - responsible for the brake light;
- blue - responsible for dimensions.
This is exactly the connection scheme that is allowed on the Lada Largus. Rear lights installed instead of trims, of course, can be connected to any other wires in the plug, but this will contradict the technical regulations of AvtoVAZ, therefore we will not invent anything of our own and will not teach you anything bad. Additional lighting conductors have the following insulation colors:
- black - common “positive” conductor;
- red - to be connected to the orange on the plug, it is responsible for the brake light;
- yellow - to be connected to the blue one on the plug, it is responsible for the dimensions.
The electrical connection has no other nuances. Before final assembly of the casing, it is recommended, however, to test the correct functioning of the additional lights. This will help you avoid a “bad job” if you make a mistake. In general, there should be no problems, everything is extremely simple, and soon you will be able to independently drive along the roads in an updated and tuned Lada Largus, to the envy of everyone.
Peculiarities
When installing wheel rim lighting, it is necessary to follow the general installation rules that apply to all types of lighting tuning. First of all, it should be remembered that many parts are quite fragile and require careful and careful handling. Otherwise, damage may occur that could affect the further operation of the lighting system.
Another major problem is the location of the wires, which must be determined in advance. In addition, it is necessary to think through and determine the lighting style in advance. Some car enthusiasts prefer to contact designers on this issue. When using LEDs, you can always replace them with brighter ones.
I would like to dwell separately on the latest technical achievement - the new Smart Wheels, which is a completely new technology for multi-color illumination of light-alloy wheel rims. In essence, this is an intelligent remote-controlled system that allows you to adjust color, brightness and other modes depending on the operating conditions of the car.
Thus, light tuning of a car allows you to decorate it and stand out from the bulk of similar models. After all the tuning activities, the car acquires unique, inimitable and beautiful features. Unlike conventional tuning, lighting design allows you to create truly exclusive options. Illuminating wheel rims is one of the cheapest and most effective ways to prove your uniqueness and originality. Currently, this type of tuning is still gaining momentum, therefore, you can often find cars with poor-quality and incorrect lighting.
However, if the wheel rim lighting is installed according to all the rules, it can clearly highlight not only the wheels, but also the overall style of the entire car. In different cases, lighting will also highlight the appearance of the wheels differently. This became possible thanks to a wide range of lighting fixtures suitable for all occasions, and their high-quality installation will allow you to please yourself and others with a successful design for a long time.
Video: instructions for installing disk backlight