Lada Largus is a domestic car with a spacious trunk and convenient operation. The car also has disadvantages, for example, failure of the wiring in the door area, deterioration of sound insulation, and jammed handles. In most cases, diagnostics or repairs require removing the factory trim first. The work is simple, it doesn’t take much time, and you don’t need a complex tool to do it. However, inexperienced drivers still wonder how to remove the front door trim on a Largus car, so we have created detailed instructions on this topic.
Why is cladding needed?
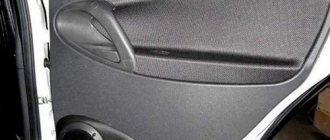
One of the main purposes of Largus door trim is door sound insulation. It also improves the performance of the vehicle's acoustic system. If you cannot drive without music, and the speakers are installed specifically in the door, then the trim must be done.
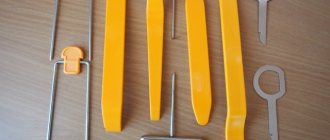
To remove the upholstery in a Largus car, a simple set of tools is enough. It includes a flat-head screwdriver (spade puller), a T30 Torx bit and a T20 sprocket.
The reasons for dismantling and replacing the old casing in the Lada Largus Cross and other models:
- failure of the electric window;
- broken wiring;
- speaker malfunction;
- damage to rear and front door handles;
- the need to improve the quality of sound insulation.
Removal of old casing should be done carefully. For an experienced master, the procedure takes only 15 minutes.
How to remove the trim on the rear and front doors of the Lada Largus
Lada Largus is a domestic car with a spacious trunk and convenient operation. The car also has disadvantages, for example, failure of the wiring in the door area, deterioration of sound insulation, and jammed handles. In most cases, diagnostics or repairs require removing the factory trim first. The work is simple, it doesn’t take much time, and you don’t need a complex tool to do it. However, inexperienced drivers still wonder how to remove the front door trim on a Largus car, so we have created detailed instructions on this topic.
Procedure for dismantling
Let's look at how to remove the Largus door trim step by step:
- Use a 10 key to separate the terminal mass from the battery cylinder.
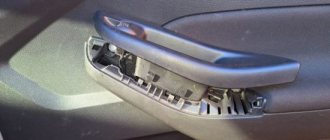
- Using a T20 screwdriver, unscrew the screw that secures the internal handles, and use it to remove the right and left door trim, carefully breaking all the fasteners.
- Unscrew the protective cap of the nut that secures the windshield wiper at the rear. It is convenient to use key 13 for these purposes.
- Remove the trim, dismantle the cable deck from the windshield wiper, drill out the required rivets using a drill, and remove the wiper.
- Remove the latches and door stops from the outside, separate the cables from the lock drive at the bottom, it is convenient to use T30 Torx for this.
- Using a 10mm replaceable head or a wrench, remove the linings, tighten the bolts and nuts, after first separating the rod from the lock toggle switch.
- Disassemble the additional brake signal by separating the block with cable from the rear window heating element. Now there is no wiring harness on the Largus door or a washer tube on the rear window.
- Unscrew the set of 4 bolts that attach to the body.
- Remove the seal, the handle of the lock limiter, tighten a couple of nuts on the bolts, and remove the limiter through a special opening inside.
Review of spare parts prices
| Name/article | Price, rub.) |
| 00001003833121 Bolt M5x10 with serrated shoulder | From 100 |
| 00001003831801 M5 nut with serrated shoulder | From 100 |
| 00001002624101 Washer 5 mm | From 50 |
| 00001003275901 Screw M6x10 | From 50 |
| 00001002605371 Lock washer 6 mm | From 50 |
| 21230610542000 Lock cylinder | From 550 |
| 11180610515000 External front right handle | From 650 |
| 11180610515100 External front left handle | From 650 |
| 21900610518000 Inner front right handle assembly | From 950 |
| 21900610518100 Inner front left handle assembly | From 950 |
*prices are current as of November 27, 2018.
Recommendations for choosing and replacing door handles
When choosing spare parts, always give preference to original ones. Good, high-quality parts are always 10 - 15% more expensive than analogues. At the same time, by purchasing a factory part, you can count on a long service life of the mechanism.
A cheap counterfeit does not provide even a third of the required resource. The final choice is up to the owner of the technical device. The deciding factor is the budget.
Attaching new skin
Installation of all working parts and components is carried out in the reverse order of removal. Rubbing parts are lubricated, sliding surfaces in the door lock, stops, hinges, and rod hinges too. Before installing the upholstery, be sure to connect the ground wire terminal to the battery, check the operation of the door lock, and if necessary, adjust it. To check the operation of the window regulator, raise the lowered window. You can also restore or replace the seal-sealant at the end of the upholstery, if necessary.
Reviews
| № | Positive |
| 1. | Vitaly: for two years of operation of the car, there are no comments on the body or locks. From time to time I lubricate the components myself; for this I bought a special grease gun. To prevent the core from freezing in winter, I spray it with an aerosol. |
| 2. | Gennady: I used the aerosol several times to lubricate the core in winter. The door slams easily, the plastic does not rattle, the sound insulation is standard. |
| 3. | Vasily: after using the car for a year and a half, I only replaced the factory vibration and noise insulation and re-lubricated the door mechanism. Everything works as usual, there are no complaints. |
| 4. | Kirill: I’m happy with the car, the build quality is good, I fix minor breakdowns on my own. |
| 5. | Gennady: During the year, I made one unscheduled visit to the workshop to lubricate the door components. The central locking works properly and stably. Poor sound insulation, but this is easily fixable. |
| 6. | Alexander: my positive review of the Lada Granta, the car is good, it fully meets the “price-quality” criterion. Minor flaws are present, as the model is in the budget segment. |
| 7. | Ivan: I drove 75,000 km on Grant, I didn’t make any capital investments, I just bought consumables for maintenance. I treat my equipment with care, fill it with high-quality fuel, and periodically lubricate it. |
| Negative | |
| 1. | Victor: The standard locks are very weak, they wear out quickly, after which the door rattles and knocks. A year and a half has passed since the purchase, and the mechanisms already need to be changed. |
| 2. | Dmitry: after another winter, the castle on the left side flew away. There is no point in repairing it, since repairs will cost more than buying a new one. |
| 3. | Vyacheslav: the factory hinge on the left side lasted only 80,000 km, after which it was replaced with a new one. The service life is short, the quality is very poor. |
Conclusion If the need arises, you can replace the door handle on the Lada Grant yourself. The process is not complicated, and the principle of operation is intuitive.
When selecting and purchasing consumables, give preference to parts with factory catalog numbers. When contacting a service station, request a quality guarantee for the work performed.
Replacement or repair
To check the condition of the parts, the door lock of the Lada Largus car must be removed and disassembled. To get to the plastic box that hides the core of the device, the handle is removed, the decorative panel is removed, and the wiring is disconnected. To work you need to prepare:
- screwdrivers;
- pliers;
- socket wrench 8;
- lubricant;
- anti-corrosion;
- knife.
Removing the trim
To work with the wiring, you will need to disconnect the contacts on the car box, otherwise a short circuit may occur. It is more convenient to carry out the procedure from inside the car. To dismantle the casing element, the following algorithm of actions is provided:
- Remove the plugs on the handle. Unscrew the three bolts under them.
- Remove the plastic cover.
- Remove the top of the trim panel by unfastening the clips.
- Remove the front shutter glass position switch.
- Dismantle the wiring harness block.
- Disconnect electrical wiring: speakers (if equipped), power windows.
- Unfasten the bottom row of clips to remove the panel.
- Unscrew the handle. Gained access to the castle.
- Unfasten the rods, remove the spring and washer.
- Unscrew the fasteners holding the box.
Now you can unscrew the box fasteners, remove the cylinder and conduct a visual inspection. If the driver comes to the conclusion that there is damage to the mechanism, then it is worth installing a new core. Having the skills, you can try to repair it, but this measure will extend the life of the device for a short time.
Replacing the cylinder or the entire device
Regardless of what decision was made, after removing the larva and before the installation process, it is necessary to treat the internal niche with an anti-corrosion substance. If a new core is installed, it is treated with a lubricant; if a solid device is installed, these actions are not required, then it is inserted into the old box. Next steps:
The bolts are tightened
It is important to make sure that the box is secure. The rods are attached to hinges. The spring and washer are returned to their place. Wiring is being installed
The operation of the lock is checked.
Installation of the sheathing fabric is carried out in the same way as removal.
Repair options: modification, adjustment, adjustment
You can repair the pins, spring, washer and rods. The process is painstaking and requires skill. Possible actions:
- Removing the pins from the rod end. Stitch.
- Cleaning spare parts from corrosive deposits.
- Installation of spacers between the cylinder and the lock body.
- Tightening the spring and other fasteners.
- Replacement of the washer or spring is done using a flat-head screwdriver.
Individual parts for the Lada are easy to find. Sometimes tuning or adjusting the lock will help. After the device has been inspected, the grooves and pins are thoroughly cleaned. Contamination is a common cause of blockage. If the check shows that the key does not fit into the well, additional lubrication of the elements or adjustment of the internal teeth will be required. The Largus lock of the front left or right door is adjusted using a hexagon. This work is carried out before the complete assembly of the structure is completed. Required:
- Open the door, disassemble the stand.
- Loosen the screws, then fix them at a right angle.
- Change the position of the adjusting bolts by tightening or further loosening.
After each action, it is important to check whether the operation of the mechanism has improved, nothing has changed, or, on the contrary, it has become worse. Based on these indicators, you should continue to adjust
When the result is achieved, the screws are tightened and the casing is assembled.
Show me the cubic capacity!
Having released the latches, we open the rear doors 180 degrees. Now we pull two plastic flags in turn - and the back of the rear sofa falls forward. Now we put the remaining parts in our hands in place and pull the sling - the sofa moves forward. All that remains is to unlock two more latches, grunt a little and pull the bench out of the cabin.
Then it’s even simpler: the middle sofa easily folds into the front seats - and here they are, the promised “two and a half cubes”! The permitted load capacity of 555 kg allows you to fill this volume with something not too heavy. For example, TVs, gas stoves and bicycles can easily be placed on a flat floor - and possibly at the same time.
Yes, you don’t have to throw the third row of seats in the parking lot, but take it with you - all you need to do is fold down a smaller part of the middle sofa. After loading the bench, there will still be quite a lot of space left inside for luggage.
Bracket selection and installation
Brackets for fixing a spare wheel on Largus appeared on the car accessories market not so long ago. There are two types of such fastenings:
- spare tire holder on the rear door: fixed and rotating versions available;
- reinforced spare wheel mount - fixed in the trunk opening and to the bottom of the car, replacing the tow bar.
To install the fastener, you do not need to drill new holes for bolted connections; existing standard places are used. The spare wheel on the back door can become a decoration if you purchase an additional cover. It can be ordered in any color and with any inscription.
Installing the bracket takes no more than 20 minutes:
- unscrew the upper nuts of the lower and upper hinge of the rear door on the right;
- the bracket is placed on the vacant seats;
- screw the hinge nuts and two fastening bolts into the standard places near the door lock.
The Lada Largus is available in a front-wheel drive version, so it is better to purchase two sets of tires: a summer and a winter version. Preference can be given to both domestic and foreign rubber manufacturers. It’s not worth saving on purchasing as an all-season product: multiple experiments have proven its dubious effectiveness.
"largus" ordinary
"What's this? "Logan"? Lada? What is the price? How in general?" The test of this car turned out to be a high point for me: never before have my neighbors along the road tried to stay closer in order to get a better look at the car and, on occasion, ask a couple of questions.
"Largus"! How does it, besides the boat on the steering wheel hub, differ from its Romanian relative? The Togliatti team didn’t limit themselves to badge engineering alone: in the process of “naturalizing” the universal Logan, the car was given an increased ground clearance of 20 mm, the front suspension arms were made of steel 3 mm thick (not 2.5) and they worked on the dirt protection: under the wings there were mudguards, and the wheel bearings of the front wheels were covered with casings.
In general, the study of the “vasomotor” space makes you respectfully stick out your lower lip: the Largus is ready to meet road troubles with powerful protection for the engine compartment, and the anti-gravel film fearlessly climbed onto the outer part of the threshold. And in general, there’s basically nothing to tear off under the bottom. At least go fishing now!