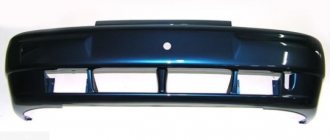
Front and rear bumper Lada Largus
In 2008, the Russian AvtoVAZ acquired from the French Renault the entire list of rights to produce and sell models built using the common R90, F90 and B0 platforms.
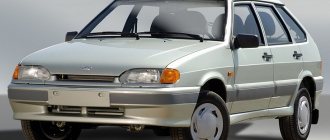
An addition was the fact of a deal to equip cars with engines with 1.4 and 1.6-liter volumes. This approach allowed the universal version of the Lada Largus to appear in the automotive world. This car is a joint project of several corporations, although the Dacia Logan MCV model was used as a prototype. The exterior of the universal “Russian” Lada Largus is made in a simple style, where the components do not have intricate design delights. Manufacturers have used traditional rectilinear forms of body panels, small overhangs that help quickly overcome potholes, and wide moldings located on the side elements. Also, the sides of the car have an impressive glass area, which contributes to good visibility. The stern doors are hinged and have useful latches that allow you to hold the doors in any position, from perpendicular to the body to fully open. Sometimes the owners of the model install a cover on the rear bumper.
Removing and replacing the rear bumper on Lada Largus
Hello, today we will show you the process of removing the rear bumper on a Lada Largus. The rear bumper is usually removed only in two cases: for cosmetic repairs, or to completely replace the bumper if the old one was broken.
So let's get started. Unscrew the four fender liner mounting bolts
Unscrew the fastenings of the fender liners
Unscrew the fastenings of the fender liners
Next, unscrew the bolt securing the bumper to the arches on both sides
We unscrew the fastenings of the rear bumper to the arches. Now we remove the lights and unscrew the two bolts that secure the bumper to the pillars.
Unscrew the rear bumper mounts to the struts
Then we unscrew the four bolts that secure the bumper to the amplifier from below
Unscrew the rear bumper fasteners from below
After this, unscrew the 4 bolts securing the bumper from above
Unscrew the rear bumper mounts from above
We lower the corners of the bumper down and towards ourselves to unclip the latches
Lower the corners of the rear bumper
We also unclip the bumper stop clamps from the bottom on both sides and remove it
Unclip the rear bumper clips from below
Installation of the rear bumper occurs in the reverse order of removal.
Why do you remove the bumper?
This action is prompted by a not so wide range of reasons. If there is a need for dismantling, then for this purpose it is not at all necessary to go to a service center. An ordinary Lada Largus driver is quite capable of handling this procedure on his own and, in addition, saving a considerable financial resource.
So, let's take a closer look at cases when it is necessary to dismantle an element.
- Breaking. This can happen in an accident or during careless parking. The latter case in most cases assumes the integrity of the body element itself, and its paintwork is damaged.
- Needs painting. This event involves removal, which will ensure better quality of painting work compared to a similar procedure without dismantling the element.
- Body modernization. Some owners seek to update the exterior of their “horse” and are inclined to replace the standard product with a tuning element. Plus there is a cover on the rear bumper.
- The need to install additional tools. Such accessories may include parking sensors, a camera, etc.
- When installing overlays.
How to remove and install bumpers on a Lada Largus: step-by-step replacement instructions
If your car needs a body kit replacement, it will be useful to know how to remove the front or rear bumper on a Lada Largus. Dismantling will also have to be carried out to repair or replace the kenguryatnik.
To remove the front or rear bumper on a Lada Largus, you will need the following tool:
Make room and time for dismantling and enlist the support of a friend. Prepare the above tools, make sure that there is free access to the bottom of the machine (you can do work in the pit) and proceed to action. Replacing a car bumper may be necessary in such situations when you need:
- remove, install new or repair parts damaged during road travel,
- straighten the deformed back panel,
- install the bumper cover,
- repaint the body or renew a worn-out paint layer,
- make improvements or modernization (tuning) of the car,
- install parking sensors.
How to remove the front buffer
To remove the front bumper on a Lada Largus, you need:
1. open the hood, 2. use a T30 key to unscrew the four fastening screws,
3. using a T20 wrench, unscrew two screws each at the right and left fender liner, 4. unscrew 3 more fastening screws located on the lower left side of the car bumper, 5. repeat the previous step on the other side of the car, 6. remove 3 more in the same way screws located in the middle, 7. after bending the right fender liner (locker) and gaining access to the next fastening (the screw connecting the bumper to the car fender), unscrew that too, 8. repeat on the left side, bending the corresponding fender liner, 9. unscrew with the tenth key bolts located under the wheel arch using a special extension, 10. pull the unscrewed bumper towards you.
If you have fog lights, you will also need to disconnect the right front headlight power harness and then the left front power harness. If desired, you can tune the standard Lada Largus by installing a mesh to protect the radiator.
Step-by-step instructions for removing the rear bumper
Replacing the rear bumper with your own hands after dismantling the front guard (cross dismantling) begins with its removal, for which you need to go through the following algorithm of actions:
How to remove the stern bumper?
Many will find useful information on how to remove the bumper. To perform the indicated procedure, that is, remove the rear bumper, you will need a certain set of tools. Their composition is as follows:
- a head having a size of “10”;
- nozzles “T20” and “T30”;
- a screwdriver with a flat profile for removing clips.
Regarding the time costs, we note that the entire list of actions when you need to remove the rear bumper will take no more than one hour. Some craftsmen manage to carry out dismantling in less time, which is facilitated by accumulated experience.
After preparing the tools, you will need to provide access to the bottom of the car. We install our Lada Largus over a pit or hang it using jacks. Some experienced owners are able to complete the dismantling procedure without lifting the car, but this is guaranteed to entail additional time costs.
How to remove the rear bumper.
- We disconnect the fender liners from the base.
- Now, using a socket set to “10”, we unscrew a pair of fixing screws on each side of the car.
- We move inside the fender liner and find the screws that secure the part itself to the body panel. We also unscrew them.
- Next you will need to remove the lights. Alternatively, the bumper can be dismantled together with these devices.
- We proceed to unscrewing the fasteners that connect the bumper to the amplifier.
- On the top of the bumper, near the luggage compartment seal, there are 4 screws that will also need to be unscrewed.
- We take a screwdriver and carefully remove the side sections of the bumper from the brackets (we work from both sides).
- Now you can remove the Lada Largus Cross bumper itself by applying a pulling force first downwards and then towards yourself (backwards).
Largus rear bumper removal video – AutoTop
Place the car on a two-post lift and brake it with the parking brake (electro-hydraulic lift type P-3.2 G).
Open the hood and disconnect the earth wire terminal from the battery.
Raise the car to a height convenient for doing the work.
Unscrew two self-tapping screws 2, Figure 3-1, from the right and left sides of the car, securing the casing to the bumper.
Move the wheel arch protective casing aside and unscrew bolts 1 of the side bumper fastening on the right and left sides of the car (replaceable Torx T30 head, extension, wrench).
1 – bolt of the side fastening of the bumper; 2 – self-tapping screw securing the casing to the bumper; 3 – protective casing of the rear wheel arch
Unscrew five screws 1, Figure 3-2, of the lower bumper mounting (replaceable Torx T30 head, wrench).
1 – screw for lower bumper mounting
1- side bracket for rear bumper
Remove the sidewalls of the bumper from engagement with the side brackets 1, Figure 3-3.
Unscrew the eight bolts 1 securing the bumper, Figure 3-4 (replaceable Torx T30 head, wrench).
Remove the rear bumper.
1 – bolt of the upper bumper fastening
Installation is carried out in the reverse order of removal.
As in all cases, to remove a car part you will need tools. To remove the rear bumper from a Lada Largus, you need a minimum kit, which many owners probably have. So, let's look at what is needed: the 10th head, T20 and T30 nozzles, and, as in the case of the front bumper, a flat-head screwdriver or a special tool for removing clips.
Rear bumper removal process
The process of dismantling the rear bumper is not complicated and will take from 30 minutes to 1 hour, depending on the abilities of the person who will carry out this operation.
But before you start work, you need to prepare your workplace. To remove the buffer, access from below is required. Of course, you can do without lifting the car, but it is better to perform operations on a pit or a lift.
So, let's look at the step-by-step process of removing the part:
- First of all, you need to disconnect the fender liners from the bumper. To do this, using a 10mm socket, unscrew the screws securing the rear part of the fender liner on the right side and on the left (2 pieces each, 4 in total).
The bolts in the diagram are indicated by a red arrow
There are screws under the fender liner that secure the bumper to the body. They need to be removed.
Screws under the flap
- The next difficult step is dismantling the lights. Without this, it becomes impossible to remove the bumper.
- We unscrew the screws that secure the bumper to the amplifier.
- Between the sealing rubber of the trunk and the bumper there are 4 screws that need to be removed; they secure the buffer to the rear panel.
- Carefully, using a plastic screwdriver, remove the side parts of the bumper from the clamps.
- Press the edges of the front part of the rear bumper away from the fender.
- With a slight downward and backward movement, we dismantle the buffer.
- Assembly, as always, is carried out in reverse order.
Now the bumper is removed, and you can carry out the remaining manipulations.
Removing the rear bumper LADA LARGUS – HOW TO REMOVE THE REAR BUMPER
Removing the bumper on LADA Largus detailed instructions
Repair of Largus – Installation of rear bumper protection on LADA Largus.
LADA LARGUS repair
Replacing the rear bumper on a Renault Logan - eliminating sagging.
How to remove the front bumper on Renault Logan and Lada Largus
LADA LARGUS Bumper repair
Lift. Sagging rear bumper on Renault Logan/Renault Logan.
Repair of Largus - Part 2 Conversion of PTF into a reversing light on LADA Largus +18, be careful
DIY rear brake drum puller Logan
Removing the front bumper
Let us remind you that the usual cases requiring the removal of this element, or rather the front bumper, are:
- need for repairs;
- the need to provide access to assemblies and components hidden under the bumper;
- for painting (renewing the coating) or replacing with an analogue;
- if you need to remove the radiator grille.
To remove the front bumper we use the following set of tools:
- mounting blade;
- flat head screwdriver;
- a “10” head or a wrench with a similar dimension;
- nozzle "T30".
Remove the front bumper.
- The first step is to unscrew the 3 screws that secure the plastic protective panel of the engine compartment to the bumper.
- On the rear sections of the element, pull out the clip cores, then remove the clips themselves from the mounting sockets.
- We remove one piston from the mudguard attachment points.
- After disconnecting the upper part of the mudguard from its lower segment, remove it.
- We dismantle the fender liner, and then the lower part of the mudguard.
- The work on the left side of the car is different from the right in that here you will need to disconnect the cable harness connecting the front fog lights with the on-board electrical network.
- We proceed to unscrewing the lower edge of the component to the subframe.
- We disconnect the side sections of the Lada Largus Cross bumper, located in both arches near the wheels, from the wings by unscrewing one screw at a time.
- We move under the hood and unscrew the 4 bolts that hold the edge of the bumper to the radiator frame.
- We first pull the back corners of the product down, holding the stops in the form of holes.
- Now we move the side sections of the element forward and the bumper moves from its seat. If the specified cable harness interferes with the process, it can be safely removed.
- We unscrew the 4 screws holding the headlight units and dismantle both devices.
- 13. Finally, pull out the plastic clips located on the inside of the body and remove the front grille along with the air ducts. Now the Lada Largus Cross bumper has been completely dismantled.
The installation procedure is the reverse of removal.
Front bumper
Required : Torx T20 and Torx T30 wrench.
Procedure:
- Unscrew screws No. 2 of the upper bumper mounting;
- Unscrew bolts No. 1 of the lower fastening of the bumper to the subframe.
- Remove the mudguard from the bottom of the bumper (piston No. 3 and 4, three fastening screws No. 1);
- Unscrew the screws securing the plastic fender liner (locker) No. 1. And then, under the protective cover of the wheel arch, unscrew bolts No. 2 of the side fastening of the bumper.
Remove the front bumper of Largus by pulling it towards you, disengaging it. If there are fog lights, disconnect the block with wires. Installing the bumper is done in reverse order.
The process is also shown in the video:
How to remove and install the front and rear bumpers on a Lada Largus
AvtoVAZ bought in 2008 from the automobile manufacturer Renault the right to assemble and distribute cars built on the basis of the R90, F90 and B0. A deal was also made on the possibility of using engines (1.4 and 1.6 liters). This is how the Lada Largus car was born. This is a joint project of several companies at once. In fact, the model is an exact copy of the Renault Logan, except for some changes in appearance and a different logo.
In general, the appearance of the Lada can be said in a few words - simply and without unnecessary details. Rectangular shapes, clean lines, small overhangs and wide side moldings. From the side the body is straight with a large glass part. The rear doors are hinged. They are equipped with comfortable position locks when opening (from fully open to perpendicular to the car).
How to Remove the Rear Bumper on a Lada Largus ~ AUTOINTERLINE.RU
Quite often, after a minor accident, the Lada Largus bumper needs to be replaced. To make repair work easier, it is better to raise the car to a small height. The rear bumper changes as follows. To remove it, you must first release the liner, which is supported by four bolts. Then the Lada Largus bumper is detached from the arches. It is necessary to unscrew one bolt on each side of the arch. The rear lighting is then removed.
Then you need to release the amplifier. Loosen the four screws at the bottom and bottom. In the wheel arches the bumper is also removed from the body. To remove the bumper on a Largus car, you need to open the clamps and release the fangs. To do this, lower it and pull it towards you. If the disassembled part has minor damage, such as a small crack, then virtually any driver can repair the Largus car bumper.
This requires the following tools and materials:
- sandpaper;
- mounting knife;
- soft spatula;
- sanding block;
- auto putty;
- primer;
- car color paint.
The surface around the crack is cleaned of dirt and grease. In addition, the edges of the divided part are melted by a gas burner. Then all bulges are smoothed out with sanding cloth. The treated surface is thoroughly cleaned and leveled. After this, a small groove is cut between the edges with a construction knife, where the putty is applied in the required amount. The putty is applied to the Largus car bumper using soft putty. The layer should be smooth and even.
Replacement of the rear bumper for Renault Logan. eliminating sagging.
Once the protective layer has hardened one hundred percent, all existing tubers are completely smoothed with a sanding washer and the additional putty pad is removed. When grinding the Largus rear or front bumper, the treated surface is better moistened with water. This will significantly reduce the amount of dust emitted containing harmful components.
When the soil is well dried, the back buffer can be painted.
To do this, carefully glue the areas around the paint area. Then a thin layer of primer is applied. When the primer is completely dry, the stain is painted with a specially selected paint. You can choose the right paint tone that matches the color of your car at a specialized service center. There they do it from a computer using the appropriate program.
The Largus front bumper is now mostly made of plastic. The part is a solid three-dimensional structure mounted on load-bearing supports. Thanks to the good elasticity of plastic, the bumper on Largus serves as a shock absorber when the car collides with an obstacle. This property of plastic has saved many lives during road accidents.
The buffer height is usually in accordance with international standards. These standards are designed to minimize damage to a vehicle's body from minor impacts. In addition, the height of the frontal buffer is influenced by the calculation of causing light damage to a pedestrian who might be hit by a moving car. That is why most of the technical innovations in this part of the body were initially aimed at increasing safety standards.
To protect the rear of the car from damage during parking, a special reinforcement made of stainless steel pipe is installed. Typically, such a pipe is mounted on supports located on both sides of the car. If there is one at the rear, then a separate side reinforcement fits each side of the bumper.
Removing the Largus bumper protects the radiator
To ensure that the front or rear bumper of a Largus car always has a clean appearance, in most cases a special decorative trim is installed. In addition to improving the visual perception of the car, as well as improving its appearance, this mat perfectly protects the paintwork material from various cracks or chips.
Often the front bumper on a Largus car is dismantled for body repairs or relocation. lattice. To remove it, you will need a multi-purpose screwdriver and a 10mm open end wrench.
Post Views: 22
You may also like
Why dismantle
There may not be many reasons for a driver to remove the bumper on his car. It is not at all necessary to contact a service center for this, where you will have to pay a considerable amount for repairs. Everything can be done with your own hands. Why the driver may need to remove the bumper:
- Breakdown – this happens as a result of a traffic accident or improper parking. It happens that the part itself is intact, but the back panel requires repair.
- Painting – requires dismantling for better painting of the body.
- Body improvements - installation of a new bumper, etc.
- Installation of additional accessories, for example, parking sensors, etc.
- Installation of overlays, etc.
Front bumper - removal and installation of Lada Largus Lada Largus
There may not be many reasons for a driver to remove the bumper on his car. It is not at all necessary to contact a service center for this, where you will have to pay a considerable amount for repairs. Everything can be done with your own hands. Why the driver may need to remove the bumper:
- Breakdown – this happens as a result of a traffic accident or improper parking. It happens that the part itself is intact, but the back panel requires repair.
- Painting – requires dismantling for better painting of the body.
- Body improvements - installation of a new bumper, etc.
- Installation of additional accessories, for example, parking sensors, etc.
- Installation of overlays, etc.
Replacement
Lada Largus Logbook DRL from standard Largus lamps
The car received a proven and recognizable body. The Largus bumper is a high-tech solution, but it can also get damaged and break. Dismantling is necessary to carry out repair work on the body element itself or the parts that are hidden behind it. Removing the part is not as difficult as it might seem.
Removing the rear bumper
To work on a car you always need some tools. It is not difficult to remove the bumper, but for this you need at least a minimum set (usually every car enthusiast has one in the garage). We will need:
- Head 10;
- Nozzles type T20 and T30;
- For rear bumper: flat head screwdriver (clip removal tool).
It is not at all difficult to remove the rear bumper of the Lada Largus.
Attention! The whole process will take no more than an hour (you can complete it in half an hour, everything will depend on the skills of the master).
First you need to prepare a workplace and all the tools. Next, provide free access to the bottom of the car. Drive the vehicle into the pit or lift the body with a jack (you can do without lifting, but in this case it will take more time and effort to dismantle).
The process of removing the Largus rear bumper:
The first step is to detach the fender liners from the base. Take a 10mm socket and unscrew the fixing screws on the back (2 pieces on the right and left of the fender liner). Under the fender liner there are screws connecting the part and the rest of the body. Unscrew them. The next step is more difficult. You have to remove the lights. The part cannot be dismantled together with them. Unscrew the screws that connect the bumper and amplifier. There are 4 screws between the seal on the trunk and the part; they need to be removed (they secure the buffer on the rear panel)
Carefully, using a flathead screwdriver, remove the fasteners from the side. We disconnect the edges of the front side from the wings
With a smooth movement down and back, remove the buffer.
You can install the part in reverse order.
Removing the front bumper
Usually the front bumper of the Lada Largus is removed if it is necessary to carry out body repairs, replace an element, or gain access to parts. Also, the part is dismantled when removing the radiator grille, which is built into it. Its cladding is designed as one piece with the bumper.
Tools:
- Mounting blade;
- Flat screwdriver;
- Key with 10mm head;
- T30 nozzles.
The process of removing the Largus front bumper:
- Unscrew the three screws securing the front lower part of the side motor splash guard (they need to be pulled out).
- Take the tool, pull out the core from the retainer of the rear securing part of the mudguard and remove the retainer itself.
- Remove the piston by removing it from the mudguard mounts with a tool.
- Disconnect the two parts of the mudguard (upper and lower) and remove the upper one.
- Remove the fender liner.
- In the same way, release and remove the lower mudguard and the right fender liner of the car.
- On the left side there are wires stretched to the fog lights; disconnect the block.
- Remove the screws securing the bottom of the lip to the subframe at the front of the car.
- Near the wheels (on both sides in the arches), unscrew one fastening of the side parts of the bumper, which are connected to the wings (they need to be separated).
- Release the top by unscrewing the 4 screws along the edge connected to the radiator frame.
- The rear corners need to be pulled downwards to take the stops from the holes that secure the bumper along the lower edge.
- Point the sides forward and dismantle the part.
- The wire feeding the fog lights can be removed if it is in the way.
- Unscrew all the screws securing the headlights (4 pieces each) and remove them.
- By pulling out certain plastic fasteners (located on the inside of the body), you can remove the radiator grille, headlight trim, air guide shields, and lower grille.
After the work has been completed, the bumper is installed on the car in the reverse order.
Removing the bumper is not difficult; any driver can do all the work independently, without the help of a service center. However, for this you must have at least basic knowledge of working with a car.
- How to change wheels on Largus
- Fuel filter Chevrolet Lanos
- Peugeot Boxer fuel filter
- How to change filters in Mitsubishi ASX: cabin, air, fuel
Body repair Lada Largus Lada Largus in St. Petersburg
Lada Largus Sound box Logbook Fuel consumption
Replacement
The car received a proven and recognizable body. The Largus bumper is a high-tech solution, but it can also get damaged and break. Dismantling is necessary to carry out repair work on the body element itself or the parts that are hidden behind it. Removing the part is not as difficult as it might seem.
Removing the rear bumper
To work on a car you always need some tools. It is not difficult to remove the bumper, but for this you need at least a minimum set (usually every car enthusiast has one in the garage). We will need:
- Head 10;
- Nozzles type T20 and T30;
- For rear bumper: flat head screwdriver (clip removal tool).
It is not at all difficult to remove the rear bumper of the Lada Largus.
First you need to prepare a workplace and all the tools. Next, provide free access to the bottom of the car. Drive the vehicle into the pit or lift the body with a jack (you can do without lifting, but in this case it will take more time and effort to dismantle).
The process of removing the Largus rear bumper:
- The first step is to detach the fender liner from the base. Take a 10mm socket and unscrew the fixing screws on the back (2 pieces on the right and left of the fender liner).
- Under the fender liner there are screws connecting the part and the rest of the body. Unscrew them.
- The next step is more difficult. You have to remove the lights. The part cannot be dismantled together with them.
- Unscrew the screws that connect the bumper and amplifier.
- There are 4 screws between the seal on the trunk and the part; they need to be removed (they secure the buffer on the rear panel).
- Carefully, using a flathead screwdriver, remove the fasteners from the side.
- We disconnect the edges of the front side from the wings.
- With a smooth movement down and back, remove the buffer.
You can install the part in reverse order.
Removing the front bumper
Usually the front bumper of the Lada Largus is removed if it is necessary to carry out body repairs, replace an element, or gain access to parts. Also, the part is dismantled when removing the radiator grille, which is built into it. Its cladding is designed as one piece with the bumper.
- Mounting blade;
- Flat screwdriver;
- Key with 10mm head;
- T30 nozzles.
The process of removing the Largus front bumper:
- Unscrew the three screws securing the front lower part of the side motor splash guard (they need to be pulled out).
- Take the tool, pull out the core from the retainer of the rear securing part of the mudguard and remove the retainer itself.
- Remove the piston by removing it from the mudguard mounts with a tool.
- Disconnect the two parts of the mudguard (upper and lower) and remove the upper one.
- Remove the fender liner.
- In the same way, release and remove the lower mudguard and the right fender liner of the car.
- On the left side there are wires stretched to the fog lights; disconnect the block.
- Remove the screws securing the bottom of the lip to the subframe at the front of the car.
- Near the wheels (on both sides in the arches), unscrew one fastening of the side parts of the bumper, which are connected to the wings (they need to be separated).
- Release the top by unscrewing the 4 screws along the edge connected to the radiator frame.
- The rear corners need to be pulled downwards to take the stops from the holes that secure the bumper along the lower edge.
- Point the sides forward and dismantle the part.
- The wire feeding the fog lights can be removed if it is in the way.
- Unscrew all the screws securing the headlights (4 pieces each) and remove them.
- By pulling out certain plastic fasteners (located on the inside of the body), you can remove the radiator grille, headlight trim, air guide shields, and lower grille.
After the work has been completed, the bumper is installed on the car in the reverse order.
Removing the bumper is not difficult; any driver can do all the work independently, without the help of a service center. However, for this you must have at least basic knowledge of working with a car.
Required tool for replacement
As in all cases, to remove a car part you will need tools. To remove the rear bumper from a Lada Largus, you need a minimum kit, which many owners probably have. So, let's look at what is needed: the 10th head, T20 and T30 nozzles, and, as in the case of the front bumper, a flat-head screwdriver or a special tool for removing clips.
Rear bumper removal process
The process of dismantling the rear bumper is not complicated and will take from 30 minutes to 1 hour, depending on the abilities of the person who will carry out this operation.
But before you start work, you need to prepare your workplace. To remove the buffer, access from below is required. Of course, you can do without lifting the car, but it is better to perform operations on a pit or a lift.
So, let's look at the step-by-step process of removing the part:
- First of all, you need to disconnect the fender liners from the bumper. To do this, using a 10mm socket, unscrew the screws securing the rear part of the fender liner on the right side and on the left (2 pieces each, 4 in total).
The bolts in the diagram are indicated by a red arrow
- There are screws under the fender liner that secure the bumper to the body. They need to be removed.
Screws under the flap
- The next difficult step is dismantling the lights. Without this, it becomes impossible to remove the bumper.
- We unscrew the screws that secure the bumper to the amplifier.
- Between the sealing rubber of the trunk and the bumper there are 4 screws that need to be removed; they secure the buffer to the rear panel.
- Carefully, using a plastic screwdriver, remove the side parts of the bumper from the clamps.
- Press the edges of the front part of the rear bumper away from the fender.
- With a slight downward and backward movement, we dismantle the buffer.
- Assembly, as always, is carried out in reverse order.
Now the bumper is removed, and you can carry out the remaining manipulations.
Removing the front bumper on Lada Largus
The process of removing the bumper is simple and does not require special knowledge. If you follow the instructions, this operation will take about half an hour.
Necessary tool
Of course, no repair work is complete without tools. To remove the front bumper, you will need a minimum set: a flat-edge screwdriver, a 10-mm wrench and a T30 socket . All this can be found in tool kits, which are recommended to have in your car, just in case, or borrow from your neighbor in the garage.
Dismantling process
So, let's look at the step-by-step process of dismantling the front bumper:
- Before you start this simple task, you need to prepare. It is best to place the car on a lift, but at worst, you can use a pit.
- Now let's move on to the dismantling process itself. Remove the lower plastic protective mudguard. To do this, unscrew the fasteners that are located in front. The back and middle parts are attached to plugs that can be removed using a special tool or screwdriver.
- Now, you need to unscrew the front fender liners from the bumper.
- Next, you should find the wire connector that is responsible for the fog lights and disconnect it. It is located in the left arch of the body mudguard.
- We unscrew the screws that secure the bumper to the subframe from below.
How to remove and install bumpers on a Lada Largus: step-by-step replacement instructions
If your car needs a body kit replacement, it will be useful to know how to remove the front or rear bumper on a Lada Largus. Dismantling will also have to be carried out to repair or replace the kenguryatnik.
What is needed to replace the bumper
To remove the front or rear bumper on a Lada Largus, you will need the following tool:
- wrench head 10;
- extension for key;
- Torx keys T20 and T30;
- a flat-head screwdriver or a special tool for removing the clamps.
Make room and time for dismantling and enlist the support of a friend. Prepare the above tools, make sure that there is free access to the bottom of the machine (you can do work in the pit) and proceed to action. Replacing a car bumper may be necessary in such situations when you need:
- remove, install new or repair parts damaged during road travel;
- straighten the deformed back panel;
- install the bumper cover;
- repaint the body or renew a worn-out layer of paintwork;
- make improvements or modernization (tuning) of the car;
- install parking sensors.
How to remove the front buffer
To remove the front bumper on a Lada Largus, you need:
1. open the hood; 2. use a T30 wrench to unscrew the four fastening screws;
3. Using a T20 wrench, unscrew two screws each at the right and left fender liners; 4. Unscrew 3 more fastening screws located on the lower left side of the car bumper; 5. repeat the previous action on the other side of the car; 6. remove 3 more screws located in the middle in the same way; 7. after bending the right fender liner (locker) and gaining access to the next fastening (the screw connecting the bumper to the car fender), unscrew that too; 8. repeat on the left side, bending the corresponding fender liner; 9. Use a tenth key to unscrew the bolts located under the wheel arch using a special extension; 10. pull the unscrewed bumper towards you.
If you have fog lights, you will also need to disconnect the right front headlight power harness and then the left front power harness. If desired, you can tune the standard Lada Largus by installing a mesh to protect the radiator.
Step-by-step instructions for removing the rear bumper
Replacing the rear bumper with your own hands after dismantling the front guard (cross dismantling) begins with its removal, for which you need to go through the following algorithm of actions:
1. Disconnect the rear wheel arch liners using a 10 mm socket wrench. In total, at the first stage you will have to unscrew five screws.
2. Open the luggage compartment doors on the right and left sides of the vehicle one by one. Look under the removed fender liners for a few more screws securing the bumper to the car body. They should also be carefully unscrewed and pulled out. 3. The third step is to remove the headlights. 4. Next, unscrew the screws that attach the rear bumper to the amplifier. 5. Inspect the space between the rubber seal located on the trunk and the bumper itself, you will find 4 screws and unscrew them. 6. Using a flat (preferably plastic) screwdriver, carefully separate the left and right parts of the car bumper from the clips and press the edges that attach the part to be removed to the car fender. 7. After disconnecting the bumper from all holders, separate it from the Largus body by performing a “down and back” movement.
Bumper installation features
To install a repaired or new bumper on a Lada Largus, you will need to perform all the above steps in reverse order. Here are some rules and notes that will help you do the job efficiently and not miss a single detail:
- Do not forget that bumpers are an important part of the car, as they ensure trouble-free operation, being a kind of safe buffer. It is very important to firmly and securely fasten all mounting brackets and screws so that passengers, the driver of the Lada and other road users are safe.
- If this is possible, do not neglect the installation of additional protection, which is made in the form of linings made of synthetic materials that are not harmful to humans and animals.
- Installing a bumper with curved sides (spoilers) not only improves the aesthetics of the car's appearance, but also increases turbulence when driving fast.
- When performing work on installing a car bumper, you need to raise the car to the height required for the work. This rule especially applies to the manual installation/dismantling of Lada Largus safety buffers by their owners.
- Additional protective pads will protect the car from possible minor scratches and other damage to the body.
- Before lowering the repaired machine from a certain height, you must first install the shields that protect against dirt and tighten the fasteners well.
To install and dismantle the bumper and other (adjacent) parts of the Lada Largus car, you should prepare several tools necessary for the work and do not forget to follow the instructions exactly.
When working with the bumper yourself, it’s a good idea to check the strength of the screws and be careful when removing the bumper from the holders. For road safety, it is recommended (but not required) to install protective elements. If necessary, you can reinforce the bumper with metal or chemical-resistant overlays.