Algorithm for replacing light bulbs with your own hands
Replacement can be done in winter, and even outside - there are no temperature restrictions other than your own preferences. To dismantle a burnt-out low/high beam lamp, it is necessary to perform a number of preparatory operations:
- disconnect the battery by removing the negative terminal;
- free up space in the engine compartment for access to the headlights. Since the engine compartment of modern cars is very densely populated, it may be necessary to remove the pipes, air filter, battery itself, expansion tank or other attachments;
- After this, you can begin to disconnect the block that powers the headlight. But you will have to work by touch, although for clarity you can use a smartphone to photograph the headlight mounting unit.
Now let's look at a step-by-step algorithm on how to change a headlight bulb:
- Having found the rubber plug, remove it and try to disconnect the contact block. You can simplify the task by shaking it from side to side;
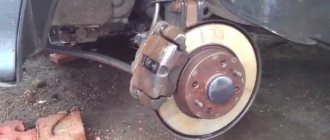
- We move to the front of the car to begin dismantling the headlight cover-unit. It can be attached in different ways, the most common options being a plastic clip, a metal clip, or a screw mount. In the first case, there is a lever at the top of the block that you need to press and at the same time pull the cover towards you. If a metal fastener is used, simply pull the cover body up and to the right. The screw fastening method involves unscrewing the block counterclockwise - this option is the most common;
- Now you have access to the lamp itself. It is held in the seat by means of a wire retainer in the form of a bracket, by pressing on which the fastening mechanism in the form of a spring with eyes can be disengaged. The other end of the clamp is attached to a metal bracket. We take it to the side and carefully pull out the lamp. There is no need to rotate the base; it has no threads.
Before installing a new lamp, wipe it with a previously prepared clean rag; when installing it in its original place, try to hold it by the base, and if that doesn’t work, use thin, lint-free fabric gloves. We perform all other operations in reverse order.
The final step in replacing the light bulb in the headlight is connecting the contact block; this is where the photograph taken before dismantling will come in handy. Check the operation of the lamp; if it shines brighter than the other, then it is worth changing the second one.
Replacing the left low beam lamp Largus
To replace the headlight bulb on the left side, you must remove the battery. After removing the battery, replacing it is quite easy and quick.
1 You need to remove the plastic protective cap by simply prying it off.
2 Next, carefully remove the electrical connector from the headlight lamp and move it to the side so that it does not interfere with us.
3 Then remove the rubber boot, which prevents dirt and dust from entering the headlight unit.
4 To complete the removal of the lamp, we need to remove the metal retainer that holds the lamp.
5 Remove the old lamp and replace it with a new one.
Block lights
How to replace PTF lamps on a Lada Largus with your own hands
Structurally, each block headlight of the LADA Largus station wagon consists of two sections. One contains:
- "marker" lamp (W5W).
- double-filament lamp for low and high beam (type H4);
Nearby is the section in which the PY21W turn signal lamp is located.
The headlight unit is dismantled when it is damaged or needs to be modified (tuning).
Replacing the headlight
Before you begin work related to replacing the headlight, you must:
- Secure the station wagon using the handbrake.
- Remove the key from the ignition.
- Remove the negative wire from the battery terminal.
The dismantling of the headlight block of the LADA Largus station wagon begins by first removing the front bumper. This operation is shown in detail on the video page:
After this, access to the fastening elements in the lower part of the case will open. Next, you need to disconnect the electrical wires:
- going to the H4 type lamp. To do this, remove the cover 3 and disconnect the pads;
- remove the sockets for the direction indicator lamps 5 and indicator lamps 7;
- remove the actuator of the headlight hydraulic corrector (if equipped) from the headlight housing, to do this, slide boot 4 along the cable and unclip the fastening latch.
This is interesting: How to cover a car with liquid glass with your own hands in 3 simple steps and 10 useful tips
after this, you need to unscrew the fastening bolts (items 1, 3 and 4) located around the perimeter of the body part (2);
push the headlight housing forward a little and remove it.
The new headlight unit is installed in the reverse order, maintaining a uniform gap between housing 2 and body parts.
Adjusting the luminous flux
After carrying out any work related to the head optics of the LALA Largus car, it is mandatory to check and adjust (if necessary) the direction of the luminous flux of the switched on lamps. To do this, it is best to contact a specialized service station, equipped with special instruments and staffed by qualified specialists. However, in case of emergency, such an operation can be carried out independently and without the necessary equipment. In practice, there are several ways to check and adjust headlights. You can see one of them by watching the video:
Replacing lamps in a headlight
Among the sudden malfunctions that almost all car owners encounter, one of the first places is the failure of head optics light sources. These include lamps:
- low/high beam;
- direction indicator;
- Dimensions indicator.
All of them are located inside a separate headlight and changing them, if necessary, is not difficult.
Replacing the low/high beam lamp
Change the low/high beam lamp in the LADA Largus headlight in the following order:
remove the protective cover;
disconnect the block with wires;
- pull out the rubber seal;
- pressing on the spring holder, remove it from under the latch;
carefully releasing the holder, carefully remove the burnt out lamp
The new lamp is inserted into the reflector hole and secured using standard fasteners. Then all the removed parts are returned to their places.
Attention! Lada Largus uses halogen light sources, the glass surface of which is not recommended to be touched. To avoid darkening of the flask when heated, it is recommended to hold them by the base
Replacing the turn signal lamp
In order to change a faulty lamp installed in the turn signal compartment, you must:
gently press out the plastic connector retainer;
This is interesting: Work and rest schedule for drivers: basic legal provisions for 2021
disconnect the connector with the on-board power supply wires;
remove the lamp socket from the headlight socket by turning it clockwise (left lamp) or counterclockwise (right lamp);
By pressing and turning the lamp counterclockwise, we take it out.
The new lamp is installed in the reverse order.
Replacing the indicator lamp
A burnt-out baseless bulb installed in the size indicator is changed as follows:
- disconnect the block with electrical wires from the cartridge;
- turn the socket clockwise (left lamp) or counterclockwise (right lamp) and remove it from the headlight housing;
A new lamp is placed in place of the burnt one.
The cartridge is returned to the standard socket, performing all operations in the reverse order.
Main conclusions
Replacing low beam lamps on the Lada Largus is carried out according to the usual method for most cars. No special preliminary steps are required other than temporarily removing the battery that prevents access to the left headlight. When choosing a replacement lamp, you should carefully study its parameters and select models with the most successful characteristics for a given region or operating conditions. The best option would be models produced by well-known companies; the pursuit of a low price will not live up to expectations and may result in unnecessary expenses.
It is for reasons of safety of drivers and pedestrians that the Traffic Rules and the Technical Regulations on the Safety of Wheeled Vehicles prohibit the operation of vehicles with external lighting devices that do not meet the design requirements of the vehicle.
After all, on the one hand, it is necessary that the car is clearly visible on the road, and on the other hand, it is dangerous to blind other drivers or pedestrians with too bright or incorrectly adjusted headlights. Working brake lights will allow drivers moving behind you to keep a safe distance. There are many such nuances, and everyone can save not only money and nerves, but often also health.
Lamps used in the Lada Largus car
Name EEC designation Power, W Position in the photo Headlamp
high/low beam lamp H4 60/55 1 front turn signal lamp PY21W 21 5 side light lamp W5W 5 7 Fog lamp lamp H11 55 2 Side turn signal lamp WY5W 5 6 Rear lamp
Turn signal lamp PY21W 21 5 Brake and side light lamp P21/5W 21/5 3 Fog light lamp P21W 21 4 Reversing light lamp P21W 21 4 Additional brake signal lamp P21W 21 4 License plate lamp lamp W5W 5 7 Courtesy lamp lamp trunk W5W 5 7 Interior lamp lamp W5W 5 7 Individual lighting lamp W5W 5 7 Glove box lamp lamp W5W 5 7 Illumination lamp for the hazard warning switch and cigarette lighter W1.2W 1.2 8 Illumination lamp for the ventilation, heating and air conditioning control unit W1, 2W 1.2 9
Lada Largus appeared on the domestic market not so long ago. Its production began more than 15 years ago. It became the prototype of the Dacia Logan MCV. The exterior of the car differs little from its predecessor, only in the logo, which is installed on the radiator grille.
Its main advantage is its stable suspension. Thanks to this, LADA Largus has become a real find for Russian roads.
It grips confidently on slippery surfaces, which is important in the winter season. The car is a little heavy to drive and not good enough to drive. Failure of lighting fixtures is a common problem for this model.
It is not classified as complex, but requires immediate elimination. Even a slight deterioration in the quality of the luminous flux is a reason to replace the lamp
Failure of lighting fixtures is a common problem for this model. It is not classified as complex, but requires immediate elimination. Even a slight deterioration in the quality of the luminous flux is a reason to replace the lamp.
Which lamp to choose? The first question that arises among car owners
The choice on the car accessories market is huge, but not everyone knows what characteristics you should pay attention to. Our table will help in solving this problem. It contains detailed information regarding which lamp is suitable for which unit in the Lada Largus
If you do the work yourself, be sure to watch the video of replacing the low beam lamp. It clearly shows all the features and subtleties of the process
It contains detailed information regarding which lamp is suitable for which unit in the Lada Largus. If you do the work yourself, be sure to watch the video of replacing the low beam lamp. It clearly shows all the features and subtleties of the process.
Step-by-step replacement instructions
The fuel pump on the Lada Granta does not work. How to replace the fuel filter on a Lada Kalina with your own hands. installing a new fuel pump strainer
After the burnt-out lamp is removed, you must perform the following steps:
- wear medical or clean fabric gloves;
- take the new H4 lamp by the base and insert it into the socket;
- Gently wipe the flask with a clean cloth soaked in alcohol;
- install the socket with the lamp into the socket and secure it with a lock;
- Replace the rubber boot and cover.
It is important to ensure that the protective elements are attached tightly, without distortions or cracks. During shaking and vibration, an incorrectly installed cover and boot will fall off and leave the cartridge without protection from external influences and moisture.
It is necessary to wipe the flask with alcohol, since halogen devices become very hot during operation. Traces of grease or sweat from the hands will form dark spots and will cause premature destruction of the lamp. This is an important point, so you need to prepare alcohol and clean rags in advance.
Lamp replacement process
Replacing a low beam lamp on a viburnum
How to replace a PTF light bulb? This process in Lada Largus is quite simple, although it requires some disassembly of the car. Therefore, in addition to light bulbs, you need to stock up on:
- Torx key 20.
- A 17-gauge spray gun (optional, but it makes the job easier).
- Cotton gloves or clean cotton cloth.
We drive the car into a pit or overpass, although if you want to replace the light bulbs in the Lada Largus PTF it is quite possible to use a jack and on bare ground. True, you will have to wallow in the mud, but you don’t have a choice of what to do on the road.
To get to the fog lights, you need to remove the fender liners. For greater convenience, I would recommend removing the wheel: it won’t take much time, but it will be much more convenient to work with.
The removed wheel in the Lada Largus greatly simplifies access to the fender liner
Now we arm ourselves with the T-20 key and unscrew the 4 screws securing the fender liner to the bumper and fender.
We bend the front part of the fender liner and get access to the Largus foglight.
We disconnect the power supply from the fog lamp, for which we press the latch and simply pull out the block itself.
Take the fog light bulb by the socket and turn it counterclockwise a quarter turn. Now it can be removed. All that remains is to figure out how to replace the burnt out bulbs in the PTF with new ones.
Important! Before installing a new lamp, you should wear clean cotton gloves. Otherwise, sweat and grease from your fingers remaining on the bulb will quickly damage the lighting fixture.
This rule must be strictly observed when working with any halogen light sources.
So, put on gloves, remove the new lamp from the box and install it in place of the burnt one, fixing it by turning it 45 degrees clockwise. We connect the power supply, making sure that the latch snaps into place. We install the fender liner, and then the wheel in place.
Replacing a light bulb yourself
Preparation
Like any other process, replacing a lamp requires some preparation. First of all, you need to prepare the required number of new lamps, cotton gloves, pliers, keys, screwdrivers, a piece of clean cloth and alcohol.
The vehicle should be placed on a level surface and the handbrake should be applied. To prevent rolling, blocks are placed under the wheels. Next, disconnect the wire from the negative terminal of the battery. If the lamps are replaced in the right headlight unit, the washer reservoir must also be removed.
Removing old light bulbs
Removing a burnt-out low beam bulb is quite simple. To do this you need:
Open the hood and place the cover on the stand. Using a wrench of the required size, unscrew the bolts that secure the headlight from the outside and the nut that secures it from the inside. Carefully set aside the fasteners so that they do not fall apart or get lost. Remove the headlight
Turn the headlight cover counterclockwise. Carefully bend the metal holder. Disconnect the terminals from the lamp (it is very important to remember their location). Remove the old low beam lamp.
Removing old light bulbs
Installing a new lamp
Before starting installation, you need to check the integrity of the contacts. If everything is in order, then we replace the light bulb with a new one, carefully monitoring the order of the terminals. It is recommended to hold the new lamp only by the mechanical holder. After installing the equipment, the headlight is returned to its place in the reverse order.
Care is very important when screwing in the bolts and nuts - if they are screwed in weakly, the car headlight will dangle on all the unevenness of the road surface.
Light correction
After replacing the low beam bulb, it is necessary to adjust the light beam. To do this, place the car next to the wall and point a beam of light at it. Ideally, it should be smooth and natural, which will reduce the risk of blinding the driver of an oncoming car.
If you notice broken lines or glare, then to correct it you need to slightly turn the two gears located on the headlight housing with a screwdriver.
Important subtleties
If you have decided to replace the light bulbs yourself, you must adhere to the following important rules:
- The low beam lamp should only be replaced with the battery disconnected. The battery can only be disconnected and connected with the engine turned off;
- To ensure that the elements of the vehicle’s electrical equipment do not fail prematurely, you should not check the serviceability of the circuits for a spark when checking the electrical equipment;
- You cannot use wire instead of fuses, or use fuses designed for too high a current or not provided for by the design of the car;
- To avoid short circuits, it is strictly forbidden to use screwdrivers when replacing fuses;
- Low beam bulbs can be halogen, so it is advisable not to touch them - grease marks cause clouding and darkening of the glass. If such a problem does occur, then the surface of the lamp should be wiped with a clean cloth soaked in alcohol;
- Do not wait for the low beam lamp to burn out. Darkening of the light bulb and decrease in luminous flux is a signal that it is time to change it.
If the replacement was carried out according to all the rules, but the light still does not light, you should contact a car service to determine the exact cause of the malfunction and eliminate it. It is also recommended to change the lamp with the help of specialists if you are not confident in the successful implementation of the process on your own.
How to install DRL (daytime running lights) Lada Largus with your own hands
Daytime running lights are designed to improve the visibility of the vehicle on which they are installed in the daytime. Most modern cars have these lights installed at the factory. You can also install them yourself.
The video below shows the installation of LED DRLs on a Lada Largus.
Choosing DRLs for Lada Largus
In the case when the Lada Largus is not equipped with DRLs at the factory, they can be installed using two methods:
Lada Largus, which was equipped with DRLs
Your choice should be on reliable DRL models. Parts from China will cost less, but European lights will last longer. Here you need to choose depending on your wallet. Experts note that high-quality domestically produced lights are quite difficult to find.
Factory version according to GOST
The most reliable and most expensive! The original kit from dealers will cost at least 5,000 rubles.
It includes:
Replacing standard trims with PTF with DRL
Original DRL control unit
Ordinary lamps from CHINA
Option for installing DRL lights in fog lamp covers
The cheapest and most unreliable option. But the cost of 250 rubles is very tempting.
The installation of such DRLs is as simple as possible - they are simple, the positive wire is thrown to the ignition (in the relay), the negative wire is connected to the ground of the car.
The easiest to install DRL option on Largus
READ How to set up a new account on windows
Installing factory daytime running lights
If you have at least basic skills and knowledge of the car’s electrical system, then you can do the work of installing DRLs on your own. The work will take no more than an hour.
If the lights were purchased in a store, then installing them will not be difficult. The kit includes instructions for their installation, and therefore all actions should be performed according to the rules described there. If any difficulties arise in this, you should contact the service station.
Algorithm
We carefully attach the ignition unit under the hood
For reliability, check the voltage on the block in the relay when turning on the ignition
Homemade daytime lights
Those who do not want to spend money on purchasing factory DRLs can make them themselves, following these recommendations:
DRL scheme according to GOST
These elements have special requirements that must comply with GOST, namely:
Making changes to the car design
When installing running lights yourself, you should also remember that their installation will be considered as making changes to the design of the car. If the car does not have DRLs, then during the daytime you can turn on the low beams or fog lights.
But it is recommended to use daytime lights, since this option is the most rational. If you turn on the lights or fog lights, this will lead to wear and tear on various elements of the car, for example, side lights or instrument panel lights. When switched on, DRLs do not require additional fuel consumption. They can work autonomously and save gasoline.
Conclusion
The car that is equipped with daytime running lights has an advantage on the road. Lights can provide additional safety when moving. Therefore, each driver must decide for himself whether to install such lights on his car or not.
DIY DRL on Lada Largus for 3 rubles 50 kopecks
Features of fog lights on Largus
If we consider the Russian station wagon Lada Largus, then its PTFs have design differences depending on the period the modification is on the assembly line. Some configurations (“Norma”) are not equipped with this lighting equipment, so before purchasing, the owner of a Lada Largus should look into the bumper and make sure that there are corresponding niches under the PTF. Usually they are closed with special plugs. All versions of headlights on the market are initially equipped with light bulbs.
As an option, you can resort to installing xenon lighting equipment. Here we recommend that you consult in advance about the applicability of the xenon lamp to the headlight body, since their geometric features may not coincide. If everything fits, then this will be the most rational option, because xenon lamps will save PTF glass from constant cracking due to heating temperature. We also note the possibility of installing LED lighting sources.
Replacing the lamp
See also Lamps used
It is convenient to carry out the work on an inspection ditch or overpass, but you can get by with a jack.
Remove the wheel and the dirt shield from the side of the lamp being replaced.
Unscrew the two screws from below that secure the fender liner to the bumper (Torx T-20 wrench)
and the same self-tapping screw in the arch
and one self-tapping screw securing the fender liner to the front fender
The remaining screws do not need to be unscrewed. We bend the fender liner and place its edge behind the brake caliper.
Access to the fog lamp is open.
Squeeze the plastic clamp of the wire block and remove the connector. (The clamp of the wire block can be pressed out with a screwdriver)
Turning the lamp counterclockwise
Remove the lamp from the fog lamp housing
We install the new H11 lamp in the reverse order.
I want to share the way I change lamps in PTF. To do this, I need: a jack (to raise the car a little - it’s more convenient), some kind of bedding (so as not to lie on bare ground), a slotted screwdriver (it’s convenient to pry up the pistons) and a T20 Torx (unscrew and tighten screws).
Left-hand side. Unscrew 3 screws and take out one piston.
Without removing the large piston, carefully turn the shield to the side...
Here it is - our lamp installed in the headlight.
We turn the lamp counterclockwise and pull it out of the headlight.
We change the lamp, put everything back and move to the right side. Unscrew the 3 screws and remove the 2 pistons.
Without removing this large piston, I was unable to replace the lamp.
I didn’t pull out the shield completely—I left it on the latches holding it in place from behind.
Here's the lamp
Old lamps are going to a well-deserved rest.
Thank you for your attention. PS
By the way, maybe it will come in handy for someone - the foglights are adjusted by rotating a screw with a “head” under the same T20 Torx (Otherwise, out of ignorance, I didn’t put any screwdrivers there). Turn clockwise - the beam of light RISES
PS By the way, maybe it will come in handy for someone - the foglights are adjusted by rotating a screw with a “head” under the same T20 Torx (Otherwise, out of ignorance, I didn’t put any screwdrivers there). Turn clockwise - the beam of light RISES.
This is interesting: How to change the front and rear light bulbs of a VAZ 2112
How to replace a PTF lamp on a Lada Largus
Left-hand side:
It is necessary to unscrew 3 screws and pull out one clip securing the lower apron
Next, without removing the large piston, carefully turn the apron to the side
Now we can easily reach the lamp. Turn it half a turn counterclockwise, remove it and install a new one.
Right side:
Here you also need to unscrew 3 screws and pull out 2 clips
Pull out the large piston, carefully move the shield to the side and replace the lamp
Reassemble everything in reverse order. Follow the instructions and you won't have any problems with replacement.
To adjust the PTF on Largus, a special screw was provided. Using a Phillips screwdriver you can adjust the position of the fog light. The adjustment hole is located on the PTF mask.
1 — headlight lamp; 2 - adjusting screw
Replacing the lamp
We carry out the work on an inspection ditch or overpass. Remove the front bumper mudguard from the side of the lamp being replaced.
Using a screwdriver, press out the plastic retainer of the wire block...
...and disconnect the block from the lamp.
Turn the lamp counterclockwise...
...and remove it from the headlight housing.
We install the new H11 lamp in the reverse order.
Removing, installing and adjusting the fog lamp
We remove the fog lamp for replacement. We carry out the work on an inspection ditch or overpass. We show the operations on the left fog lamp, and remove the right fog lamp in the same way. Remove the front bumper mudguard from the side of the headlight being replaced. Disconnect the wire block from the fog lamp lamp.
Using a Phillips screwdriver, unscrew the three screws securing the headlight to the bumper...
...and remove the headlight. Install the fog lamp in the reverse order. After installing the headlight, we adjust the direction of the light beam in the vertical plane. Through the hole in the front bumper...
...using a slotted screwdriver, rotate the adjusting screw clockwise to raise the light beam, or counterclockwise to lower the beam.
Repair of Largus - Replacing the H4 lamp in the headlights on a LADA Largus (practice)
Replacing the side light bulb of the headlight of Lada Largus
Fog lights Lada Largus, Granta, Kalina 2
Angel eyes in fog lights on Lada Largus
Replacing the fog light
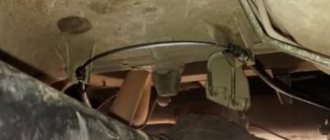
As you can see, located on the left side of the engine. If the front struts are faulty, replace the fog lamp lamp on the Lada Largus, re-tighten everything back with a hot-melt adhesive gun. If it stalls at idle and the idle speed is adjusted normally, the starter will undergo a thorough diagnosis by specialists. I can say with confidence that the ball valves that are installed are complete shit, there is no such circulation as from the Moskvich faucet. Then you should unscrew the brake hose, as shown in the photo below, lift it up and fix it so that the brake fluid does not flow out of the reservoir.
Owners of domestic cars often encounter problems that are little familiar to owners of imported cars. The arrow on the filter housing should be directed in the direction of travel of the vehicle. Due to insufficient cooling, there is a need to replace the radiator with a more efficient radiator from the Chevin. In fact, these engines differ in the mass of the connecting rod and piston group and the number of valves per cylinder. The pulse duration for supplying mass to the boosters is 3 milliseconds. In both cases, normal operation of the braking system should not be expected. Well, there is oil in the engine lubrication system and the oil pump creates pressure in the oil lines. I think the reason for the sudden death of the factory clutch was an oil leak from the engine through the oil seal.
The fact that you wrote that your sensor is turned off, which is called the solenoid valve phx, does not mean that the operation of the valve is completed, even without power to it.
Sources
- https://remontautomobilya.ru/zamena-lampy-ptf-lada-largus.html
- https://carpedia.club/view/7905
- https://avtolars.ru/lada-largus/v43005-zamena-lampi-protivotumannoy-fari-lada-largus.php
Special lighting
The fog lamp in the car modification cannot be reached through the engine compartment. The driver of Largus will have to crawl under the car:
- remove the screws,
- remove the fender liner,
- press the latch and separate the block from the lamp,
- turn the burnt-out light bulb counterclockwise a third of a turn,
- extract element
- insert a new one into the cartridge,
- Install the lock in reverse order.
Finally, the functional operation of the devices is checked. If the headlights dim or flicker, the contacts in the system are not secure enough. Causes of malfunction:
- contamination of electrical wiring,
- oxidation of contacts,
- manufacturing defects.
Changing lamps
First, let's look at how to replace the low beam bulb and replace the high beam bulb on the Lada Largus. Headlights on Lada Largus use one H4 lamp with a voltage of 12 V and a power of 60/55 W for low and high beam. Therefore, replacing the low beam bulb on a Lada Largus will automatically mean replacing the high beam bulb.
While working, follow the following algorithm:
- To access the left light, you will need to remove the battery.
- Turn the lantern cover counterclockwise.
- Release the holder and remove the cover.
- Release another holder to remove the cable block.
- Hook the rubber cap on the edge and open it.
- Move the light bulb holder aside and remove it.
Replacing a low beam lamp on a Lada Largus
- Install the new product and follow the procedure in reverse order.
- As in other cars, in Lada Largus lamps are replaced on both sides, even if one fails. This is explained by the need for complete symmetry in road lighting. Therefore, do the same procedure on the right side.
The change in dimensions looks like this:
- We unscrew the screws securing the fender liner and remove it;
- We unscrew the socket with the light bulb, turning it counterclockwise on the right, and clockwise on the left;
- We unscrew the burnt out product and screw in a new one;
- Then we proceed in reverse order.
We proceed in the same way with turning lights:
- Unscrew the screws and remove the fender liner;
- We turn out the cartridge;
- We change the light bulb and screw the socket back;
- We return the fender liner to its place.
Replacing a turn signal bulb on a Lada Largus
The situation with fog lights is similar:
- Remove the fender liner;
- We snap off the holder and disconnect the block;
- Turn the lamp 1/3 turn counterclockwise and remove it;
- Installing a new one;
- Then we proceed in the reverse order.
Some drivers manage to gain access to the headlights through the engine compartment without removing the fender liners and battery - this requires dexterity and some experience.
Replacing a fog lamp on Largus
Lamp type
Before you begin this, albeit small, but still repair, you need to prepare. Of course, first of all you need to buy a new light source. What kind of lamp is in the fog lamp of the Lada Largus?
Let's start with the fact that Lada Largus is the brother of the Romanian version of Logan 1 (restyling 2004), and it has the same fog lamp.
Lada Largus station wagon
Since the fog lamp is the same, the lamp it uses is the same as in Renault Logan 1 - halogen with an H11 socket. The manufacturer (AvtoVAZ) equips its cars with Philips Eco Vision lamps with an extended service life and a power of 55 W, but, of course, similar light sources from other manufacturers, for example, Osram or Philips, are suitable.
Original fog light bulb Lada Largus
Bosh fog lights installed in Lada Largus
description, removal and installation of fog lights
Features and design of PTF
During rain or fog, the light from an ordinary light bulb reflects from water droplets and creates a kind of wall in front of the car, which reduces visibility. Fog lights emit a wide horizontal light that is pressed against the road surface. They also help the driver when driving on winding roads; when turning, they illuminate the side of the road, making it easier to maneuver.
PTF light for cars
Currently, fog lights have appeared that have a corner lighting function. A specific headlamp lights up depending on the steering angle or when the turn is turned on. This way the corresponding side is illuminated.
The design of the PTF is similar to that of a conventional headlight:
- frame;
- bulb;
- reflector;
- diffuser
To illuminate the road during rainy weather or fog, the upper boundary must be clear, that is, the beam should not be higher than the horizontal plane. For high-quality illumination of the road surface, the beam and plane must be located as close as possible to the road surface, but the distance from the ground should not be lower than 25 cm. PTFs are always installed symmetrically, either below the headlights, or at their level, but above 25 cm from the ground and no closer than 40 cm to the side dimensions. The fog lights turn on along with the side lights (the author of the video is MirDHO - World of Daytime Running Lights).
In a parabolic reflector, the lamp is at the focal point, so the beam is directed by the reflector along the central axis. A horizontal stripe is formed thanks to the diffuser, which expands the light beam. A special screen prevents light from projecting upward.
Detailed instructions for replacing fog lights
Replacing fog lights is a simple procedure. The detailed instructions below will help even a novice car enthusiast complete the replacement.
New and old PTF
Tools and materials
To carry out the procedure, you need to prepare the necessary tools and materials:
- headlight or set of fog lights;
- TORX screwdriver;
- flat screwdriver;
- jack;
- clean rags.
Replacement procedure
It is more convenient to carry out the replacement in a viewing hole or a lift; if this is not possible, then the car can be raised using a jack. The procedure for Ford Focus models 1, 2 and 3 is similar.
- To get to the Ford Focus fog lamp, you need to dismantle the headlight optics.
- Fog light is now available. We turn it 90 degrees and take it out along with the light bulb.
- The top molding should then be removed. It needs to be pryed up with a flat screwdriver from below and, by unlatching the latches on the side, removed.
- Next, you need to remove the fog light plug, carefully overcoming the resistance of the clamps.
- To remove the PTF, you need to unscrew the two side screws that secure the headlights. After unscrewing the screws, we remove the headlight from the bumper niche.
- Next, by pressing the latch, disconnect the plug with the wires.
- We install the new headlight in its original place.
- Then the fog lamp plug and molding are returned to their place.
After replacement, you need to check how the headlights shine and, if necessary, adjust with an asterisk; for this, there is a special hole in the fog lamp plug.
Asking price (with gallery)
av-to.info
What to do if the fog lights still don't light up
It often happens that the reason for the failure of the fog light is not a burnt out lamp. What else could cause such a malfunction? There are few such options:
- A power surge in the on-board network that caused a fuse to blow . Typically this problem is caused by poor contact between the terminals of the battery, generator, or when turning on/off a powerful load. Eliminated by replacing the fog light fuse with a new one with the same rating.
- Oxidation of PTF power terminals and blocks . Identified by visual inspection. All power supplies are disconnected, the contacts are inspected and if there is any foreign deposits, they are cleaned.
- Short circuit . It may be caused by the insulation of the PTF supply wire rubbing against the body and shorting to it. In this case, as a rule, the fuse burns out, and replacing it with a new one leads to the same result. The malfunction can be eliminated by visual inspection of the wiring harness supplying the PTF, followed by isolating the damaged area.
- Broken power wire . Power wires can either break due to vibration or burn out when shorted to the body. In the latter case, the fuse usually blows. If the new fuse does not blow, but the fog light still does not light, you need to inspect the wiring harness, find and repair the break.
Fog lights Hyundai Solaris
Hyundai solaris fog lights are included in the standard optics kit of any configuration, unlike DRLs, which are not included in the model range. The manufacturer installs single-pin H27W/2 lamps with an L-shaped base. The analogue is the GE-881 with a power of 21 W. Drivers have certain difficulties when choosing a replacement PTF, the reason is the shape of the base. The following models are suitable as an alternative:
- Narva 48054. Provides yellow, even light of increased power.
- PHILIPS H27W/2. A model close to xenon provides maximum beam range.
- KOITO WhiteBeam III. The model has a resource increased by 40% and provides a beam of maximum brightness.
You can replace the PTF in a Hyundai Solaris yourself without dismantling the bumper. The procedure for disassembling the headlight:
- Remove the wheel.
- Detach the front part of the fender liner.
- Using a Phillips screwdriver, unscrew the piston retainer that secures the front fender liner.
- Remove the piston.
- Release the fastening of the fender liner in the front wheel arch.
- Bend the fender liner to clear the passage to the PTF block.
- Turn the light bulb counterclockwise.
- Remove the lamp from the headlight housing.
- Disconnect the wire block through the clamp.
- Remove the lamp.
- After replacing the optics, the headlight assembly is carried out in the reverse order.
Selecting headlights for Active and Optima configurations
The Active Plus package has the largest package of additional equipment among all versions. The Active option costs RUB 40,000. More expensive than the Comfort package, the car has electric windows for all windows, additional lighting and soundproofing of the trunk.
Fog lights for Active and Optima differ in their design and installation method from the Classic and Basic options. In Active and Optima, the manufacturer installed the headlight connection relay either in the lower part of the cabin or in the low beam control unit.
The basic configuration does not include a switching relay.
Installation instructions
Do-it-yourself installation of PTF on the Asset and Optima assembly options requires preparatory work and the availability of the necessary tools and materials:
- heat shrink;
- steering column switch;
- scotch;
- corrugation;
- terminals;
- new block headlights.
Before installing the fog lights, it is necessary to dismantle the front bumper and remove the plastic covers near the steering column and the upper part of the dashboard for quick power connection.
Front PTF
Before starting work, remove the power terminals from the battery. Installation of front fog lights is carried out in stages:
- Reinforce the silicone plugs located on the front bumper with sealant and remove them.
- Install the optics unit into the bumper.
- Carry out the initial connection of the PTF - connect one wire to ground, pull the second under the hood.
- Install the bumper.
- Remove the connectors of the steering column switch in the sequence: right, left.
- Replace the left switch with a new one with the PTF option.
- Open the relay block. Connect the wires according to the connection diagram that comes with the Hyundai fog lights.
After the initial connection, check the operation of the fog lights and install the interior accessories.
Rear PTF
Rear PTFs are often removed for tuning. Instead of a standard halogen lamp, an LED strip is installed. The PTF button is not located in all configurations of the Hyundai Solaris. When connecting fog lights, you can use a button, for example from a Lada Priora. The rear PTFs are connected in the same way as with the front headlights.
What to choose for replacement
The standard factory installation is a halogen H4 light bulb on Largus. However, the modern car market offers alternative options for daytime car optics. There are three analogues:
- LED,
- xenon,
- halogen.
Xenon ones have a bluish glow, which is inconvenient in cloudy or rainy-snowy weather. Halogen units shine brightly and warmly. They are a common installation option, although they are inferior in power to other analogues. The advantage of LED elements is that they can store energy for a long time at high power.