Lada Kalina Station wagon "Kalinka" › Logbook › Replacing rear wheel bearings
Bearing SAMARA SPZ-4.
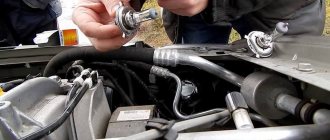
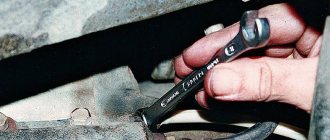
Let's start replacing the bearings. I want to say right away that no pullers or vices were used during the replacement. Everything was done the old fashioned way on “knees” and birch wood. 1). I took off the wheel;
The bearings have not been changed from the factory, this is indicated by the factory paint. The nuts were not touched and that's a fact.
2). Unscrewed the hub nut;
I had to increase the leverage.
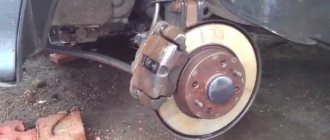
3). Removed the pads; 4). I removed the hub by hand (I didn’t believe it myself), the tension was small.
There is factory marking paint.
I removed the hub assembly.
5). Removed the retaining ring. I knocked out the old bearing with a 32 head.
I disassembled the bearing for analysis. According to the Vologda labeling.
I disassembled the bearing and found it with lubricant without cavities, damage or dirt. It means it has simply exhausted its resource.
No shells, cracks, etc.
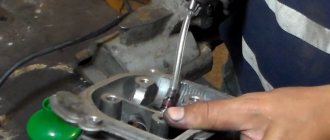
6). I washed the hub and pressed in a new bearing, having previously lubricated the seats with a thin layer of grease. Just in case, I checked whether there was grease in the new bearing.
There is grease in the new SAMARA bearing.
I pressed in the new bearing using a birch block and a race of the old bearing.
At first he pressed it against the chick like that, with gentle blows.
This is how I pressed it further using the old bearing race.
7). I installed the retaining ring by hand without tools and this is possible. 8). I installed the hub in place using a 32 socket and then pressed it in with the hub nut. The tension was small. Perhaps because he lubricated the seats.
Gently tap slowly on the inner race of the bearing.
Everything is in place. I tightened the nut just like at the factory. According to old marks.
9). We put everything back together in reverse order and check if there is any play. In my case it is not on both wheels.
A pile of used bearings.
P S. Now find, as they say, “three differences.” Today I went to the garage to clean up after repairing my car. I cleaned the bearings of grease and found the following differences, see below.
What does a bearing consist of?
The markings are printed in different fonts. Not visible in the photo.
The separators are plastic and come in different colors and different barely noticeable shapes.
One has a collar, the other does not. There are also different collars on the inside.
Rear wheel bearing on Kalina: design features and typical faults. Algorithm for replacing the rear wheel bearing on Kalina with photos and videos.
The Lada Kalina rear wheel bearing is a resource-intensive part (the bearing remains functional at levels up to 200,000 km and above), however, Russian operational realities reduce the resource potential and the bearing often fails even on relatively new cars. The breakdown is that the bearing cage falls apart and the rollers get knocked to one side.
Read more: The expansion tank allows air to pass through
How to remove a bearing
The most interesting thing is yet to come - you need to remove the bearing from the hub. To do this, follow these steps:
- Use pliers to remove the retaining rings. If you don’t have such a tool, you can use a thin screwdriver or an awl.
- It is advisable to use a special puller to remove the bearing. It is installed on the element over its entire area; when the nut is tightened, the bearing is evenly squeezed out. But if you don’t have such a tool, you can use the outer race from an old bearing. Applying blows evenly, remove the element from the seat.
The dimensions of the rear wheel bearing of the VAZ-2108 are slightly smaller than those of classic series cars. But this does not mean that they are very weak. If the bearing is installed correctly, it will last a long time.
Front wheel bearing size VAZ 2108
Any spare part of a modern car must be perfectly matched to fit and technological dimensions. Unfortunately, the manufacturer does not always take into account the specifics of using materials in spare parts, which affects their service life, reliability, and, ultimately, traffic safety
The chassis of a car is subject to enormous loads, so it is simply impossible not to pay attention to the correspondence of the factory dimensions with the ones being replaced.
VAZ 2108 front wheel bearing size
If we take this issue more specifically, the chassis of cars of popular models and brands most often suffers from low-quality spare parts. First, let's look at this problem using the example of a VAZ 2108 front wheel bearing.
It would seem that there is nothing complicated - the hub has its own standard dimensions, which the roller bearing must correspond to:
internal diameter - 34 mm; outer diameter - 64 mm; Bearing width - 37 mm.
Only by these parameters can you select a bearing, of which domestic factories produce thousands. Manufacturers from China actively help in this, providing products that are not of the best quality and do not stand up to any criticism. Neither the steel grade, nor the number of balls, nor the dynamic performance of such bearings meet the standards. There are bearings without any markings at all, and there are particularly zealous owners who buy them. Such bearings burn out within 1000 km and simply fall apart while driving.
Features of choosing a wheel bearing for a VAZ 2108
Naturally, we will not be able to check the dynamic load on the bearing races and on each of its balls. But you need to remember, like the Our Father, that:
- The VAZ 2108 wheel bearing is marked 25 69 07;
- according to the international marking system it is designated 53 20 66 DA;
- the bearing has a mass of 0.445 kg;
- ball diameter - 9.525 mm;
- number of balls - 28.
The difficulty in choosing bearings is that they are not consumable parts, and they are not changed as often as piston rings or silent blocks. That's why some manufacturers don't even bother making human packaging. In addition, the bearing used in the front wheel hub of the VAZ 2108 is maintenance-free, which means:
- the bearing does not require lubrication;
- does not require preload;
- does not require adjustments during installation and operation;
- must have a very high resource.
Design of wheel bearings for VAZ 2108
All VAZ cars are equipped with only three types of wheel bearings - wheel bearings for front-wheel drive VAZ cars, wheel hub bearings for rear wheels, and wheel bearings for Kalina and Grant cars, which are smaller in size.
All VAZ bearings are of the HUB-1 type, and this type is characterized by the design and installation features. The bearing has a double-row design, is a type of angular contact ball bearings with closed working surfaces and does not have flanges for attachment to the hub.
Manufacturers and prices of VAZ wheel bearings
These bearings belong to the middle price segment, so the demand for them is very high. Because of this, you can often find the fakes we mentioned. However, the transition of the VAZ plant to bearings of this type, instead of roller ones of the old type, made it possible to choose bearings not only of domestic production, but also of many other foreign factories.
The main percentage share of bearings used on VAZ cars lies with domestic manufacturers, among which several factories can be distinguished:
- Saratov Bearing Plant (SPZ) - 28%.
- "Volzhsky Standard" - 2%.
- Samara plant SPZ9 - 8%.
- "Lada Image" - 7%.
- Vologda Bearing Plant VBF - 4%.
Let us only note that Lada Image supplies products directly to the plant’s conveyor belt, and SPZ has the largest share in the spare parts market. It is impossible to say anything specific about the quality of workmanship, because there may be failures at every plant, but even if the bearing turns out to be of poor quality, the enterprise must replace it. Prices for VAZ 2108 front wheel bearings rarely exceed 250 rubles apiece, and imported models may cost a little more, but their quality is appropriate.
So, bearings from Kraft, SCT, Trialli, LGR can cost about 300-350 rubles, but these are world-famous manufacturers, and you can definitely count on the quality of the bearing. Choose the right bearings and let your figure eight roll forward with confidence!
Bearing Specifications
The product catalog number is 256706, it has the following characteristics:
- The diameter of the inner race is 30 mm.
- The diameter of the outer ring is 60 mm.
- Weight – 400 gr.
- Bearing width – 37 mm.
- Inside there are 28 balls with a diameter of 9.525 mm.
- Dynamic load capacity of at least 30.1 kN.
- Static load capacity 25.9 kN.
- The bearing operates normally at 6500 rpm.
There are only four manufacturers of these products in Russia:
- JSC SPZ (Saratov). Produces the highest quality and durable bearings. The cost is quite low.
- GPZ-23 (Vologda). It produces very good elements, which are slightly inferior to those from Saratov (denoted by the abbreviation VBF).
- Samara SPZ-4. The quality of the products does not differ, but the cost is very low.
- GPZ-20 in Kursk. The plant was engaged in the production of high-quality products; currently only copies of previous years of production can be found on the shelves.
What drives can be installed
When planning to replace old steel wheels with alloy wheels, you should choose either original products or products from well-known manufacturers who care about the quality and safety of their products.
Alloy wheels combine the following useful properties: they are lightweight, practical to use, endowed with sufficient strength and have an attractive appearance, which is aimed at transforming the entire appearance of the car.
The most common among alloy wheels are aluminum products. This is due to the fact that they are resistant to corrosion, meet strength requirements and, in comparison with other alloy wheels, remain relatively inexpensive.
The latest models from AvtoVAZ use wheels with a 4x100 mounting pattern. When installing them on a 4x98 hub, you should use studs with an eccentric to compensate for the difference of 2 mm. To install disks with other mounting patterns, you will have to use the appropriate adapters (spacers).
You must understand that installing wheels larger than 15 inches is impossible without interfering with the car’s design.
Final assembly
To assemble, follow these steps:
- Install the hub onto the axle.
- Place the washer and tighten the nut by hand.
- Install the brake drum and tighten the studs.
- Place the wheel and lower the car.
- Tighten all threaded connections.
- Place the nut on the hub.
Reassembling the entire assembly occurs in the reverse order. The hub nut must be tightened to a torque of about 200 N*m.
Volgaavtoprom rear wheel hub assembled with axle, bearing, washer and nut 2108-21099, 2113-2115
Composition: 3D model
Software: STEP / IGES 13 SP2
Date of: 2018-09-28
Views: 603
2 Add to favorites
Description of design
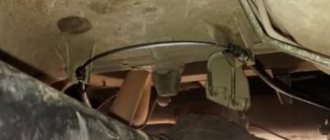
The rear suspension is with 12 coil springs and 10 double-acting hydraulic telescopic shock absorbers.
The main load-bearing element of the suspension is a beam consisting of trailing arms 14 and a connector 13, welded together through reinforcements. At the rear, brackets 15 with eyes for attaching shock absorbers 10 and flanges for attaching the rear wheel axles and brake shields are welded to the suspension arms. At the front, the levers 14 are equipped with welded bushings with silent blocks 3 pressed into them. A bolt passes through the central bushing of the silent block, connecting the lever to the bracket 2. Three welded bolts are provided to secure the bracket to the body spar.
The suspension spring 12 rests with its lower end on a cup welded to the shock absorber reservoir, and with its upper end, through a rubber gasket 11, on a support welded from the inside to the body arch.
The lower eye of the shock absorber is bolted to bracket 15 of the suspension arm, and its rod is secured to the upper support of the suspension spring through two rubber pads 8 (one at the bottom of the support, the other at the top) and a support washer 7 (under the nut).
The rear suspension springs are divided into two stiffness classes according to their length in the free state and under load: A (more rigid, “high”) and B (less rigid, “low”). Springs of the same class must be installed on the front and rear suspensions. But in exceptional cases, if class A springs are installed in the front suspension, class B springs can be installed in the rear suspension (but not vice versa!). The quality of the springs can be fully assessed by the performance of the suspension on the car. If the suspension often “breaks through” to the bump stops on uneven roads or sags under load, stiffer springs should be installed. When replacing springs, do not forget to check the serviceability of the shock absorbers - after all, it is the shock absorber-spring pair that largely determines the characteristics of the suspension.
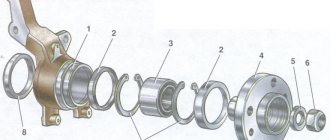
The hub has a double-row angular contact ball bearing, similar to the front wheel hub bearing, but smaller in size. The bearing fit on the axle is transitional (with slight interference or clearance). During operation, the bearing does not require adjustment or replenishment of lubricant. It is not allowed to eliminate the resulting play by tightening the nut; the bearing should be replaced. When dismantling the hub, the bearing is destroyed, so it is not recommended to disassemble the hub if the bearing is in good condition.
What is a hub and why is it needed?
In mechanics, a hub is the central part of a part with a hole (usually it looks like a keyway) for fitting onto a shaft, in particular onto a trunnion. Also, spokes are attached to the hub.
This is what the hub looks like. The part is made of cast iron or steel, turning and milling.
This important spare part ensures the movement and controllability of the car. Its main functions:
- wheel mount;
- its rotation;
- transmission of torque from the transmission to the wheel, that is, the connection between the shaft and the disk.
Hubs are divided into two types - front wheel hubs and rear wheel hubs. They differ in location: the former can be found in the front wheels, and the latter in the rear.
Rear wheel hub
Changing the rear wheel bearing with your own hands
Replacement of the VAZ-2108 rear wheel bearing is carried out in the following order:
- We install the car on a flat surface, fix the front wheels by placing wheel chocks under them.
- Remove the cap covering the hub nut.
- Using a chisel (core), we bend the bent edge of the hub nut so that it does not interfere with its unscrewing.
- Using a 30mm socket with an extended handle, unscrew the nut. If it does not give in, treat the threaded connection with anti-rust liquid.
- After unscrewing the nuts, unscrew (not completely) the wheel mounting bolts.
- We lift the body with a jack, fix its position with stumps (bricks), and unscrew the wheel bolts. We dismantle the wheel.
- Using a key set to “7”, unscrew the guide bolts on the drum (2 pcs.).
- We remove the drum. If it is not removable, we treat the place where it fits onto the hub protrusion with a rust-fighting liquid, and then knock it down using a hammer and a wooden spacer.
- Now completely unscrew the hub nut.
- Using a special puller, we dismantle the hub, grasping it with “paws” and rotating the nut. If you do not have such a device, take the removed wheel and screw it to the hub with the back side. Use the wheel as a lever.
- Remove the hub from the axle.
- Using long-nose pliers or special pliers, remove the bearing retaining ring.
- We place the hub in a vice and, using a hammer and a piece of pipe, carefully knock out the bearing.
- When the bearing is knocked out, lubricate the inner surface of the hub with grease.
- We install the new bearing without removing the hub from the vice.
- We place a wooden spacer on top of the bearing and, hitting it with a hammer, hammer the part into the hub until it stops.
- We put the locking ring in place.
- We put the hub with the new bearing on the axle. If she sits down tightly, we help her sit down using a hammer and a spacer.
- Screw on the new hub nut. We tighten it until it stops. The hub should still move inward.
- Install the brake drum and secure it with guide bolts.
- We mount the wheel.
- Remove the jack and tighten the hub nut completely. If you have a torque wrench, observe the tightening torque (186.3-225.6 Nm).
- We bend the edge of the nut, fixing its position.
- We put a cap on the nut.
- We jack up the body, check how the wheel rotates and whether there is any play. It is also recommended to check the operation of the parking brake.
What tools will you need?
Before replacing the rear wheel bearing of a VAZ-2108, you will need the following tool:
- A 30" head and a knob, as well as a piece of pipe. You can even use a spanner wrench, but it must be strongly curved to make it easier to install into the hub hole on the nut.
- Punch or thin chisel. It is advisable to sharpen the chisel in advance. This tool is needed to straighten a jammed edge on a nut.
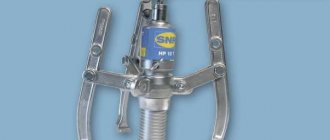
- It is advisable to have three-legged and two-legged pullers. The first is necessary to dismantle the wheel hub, and the second to remove the inner race of the bearing.
- Pliers for removing and installing retaining rings.
- It is advisable to have a puller on hand to remove and install the bearing into the hub.
- You will also need any type of keys for “12”, “13”, “14”.
- You can't do without a hammer and wooden spacers.
Be sure to buy a good bearing, it is advisable to also buy a nut. It is not recommended to use the old one. You can purchase an assembled VAZ-2108 rear hub, this will greatly facilitate repairs, but will hit your wallet hard.
Replacing the rear wheel bearing of a VAZ 2108 without a puller
When the assembly itself is removed, it is necessary to remove, press out and install a new bearing. The first method is relevant if you do not have a special tool at your disposal.
- We take out the locking ring;
- We fix the VAZ hub in such a way that the lower part is free and nothing prevents the clip from falling out;
- We take a pipe of suitable size (slightly smaller than the bore diameter) and, with sharp but gentle blows, knock out the holder with balls (instead of a pipe, you can take a nozzle on “30”);
- After dismantling, you should measure the rear wheel bearing of the VAZ 2108 so as not to make a mistake in choosing a spare part. Also, immediately before replacement, you should treat the inside, removing rust and dirt from there using fine sandpaper and thoroughly lubricate the seats.
Now you can install the new part
- Align the hub in a horizontal plane.
- We treat the new ball bearing with lithol or grease.
- We install the part absolutely exactly in relation to the seat.
- We carefully attach the spare part. The basic rule is to avoid distortion. If the element does not fit, it means there is a curvature and the procedure must be started again.
- After the part goes in halfway, you can apply more force - it will no longer be possible to warp it. (the photo below shows the process of pressing through an old bearing - it is convenient to use it as a spacer);
- We mount the retaining ring;
Replacement using a puller and press
The repair process can be significantly simplified by using a special press. It allows you to carefully press out the part and install it back as efficiently as possible.
- We fix the part in a press vice;
- Using a rod, press out the ball bearing;
- Pressing is carried out in the reverse order. For convenience and safety, it is advisable to press press through the removed part.
An alternative for a press is to have a special tool in the form of a puller. The tool will help save time when working. With its help, you can quickly replace the rear wheel bearing of a VAZ 2108, and its price remains reasonable. So, the cost fluctuates between 1500-700 rubles, depending on the country of manufacture and brand.
- Install the hub in a vice;
- We rest the puller ring against the ball bearing;
- We screw a bolt onto the stem from the reverse side;
- We perform smooth pressing;
The advantages of this approach are obvious - you can install the part yourself or dismantle it, eliminating the possibility of misalignment.
Assembly and installation of the unit
After pressing in the new element, you can begin assembling the entire assembly. The whole process is carried out in reverse order:
- Reinstall the retaining ring;
- We mount the hub assembly directly onto the axle;
- Tighten the lock nut;
- We put the brake drum on the guide pins and tighten them;
- We mount the wheel on its seat;
Preparation for repair
All work must be carried out on an inspection pit or overpass. But if you do not have such amenities, you will have to hang the rear of the car so that it is above the ground. The procedure for carrying out preparatory work:
- Place the car on a level surface.
- Place blocks under the front wheels.
- Turn on first speed.
- Loosen the nut that tightens the handbrake actuator (optional).
After this, it is necessary to loosen the bolts securing the rear wheel on which the repair is being carried out. It is also advisable to unscrew the nut on the hub, and then rip it off using a “30” wrench. You can then hang up the side of the car to make further repairs.
Lada 2106 Akkerman71 › Logbook › Front suspension 2. Fixed hubs
Hi all. Today there will be a little more letters) there is a little free time, you can press buttons). For the upcoming complete overhaul of the front suspension, I am collecting the necessary parts. One of the upgrades that the “patient” will undergo is non-adjustable hubs with one double-row bearing,
instead of two classic bearings, which from time to time need adjustment, without which wheel play appears and, as a result, control suffers, the wheels “walk” a little to the sides because of this, you have to steer the steering wheel, and they also absorb all these unnecessary beats ball joints and steering rods; excess loads damage them faster. There is a lot of information on the Internet about this and about installing non-adjustable bearings from a front-wheel drive family using adapter bushings on classic knuckles. The most common option is to install a 2108 rear hub with bearing dimensions of 60x30. Many people install and drive, but personally I don’t like this option. The bearing is not designed for heavy loads, since the main load comes from the engine and from the turning front wheels, so on the back of the 08 they made them smaller in size, so I didn’t consider this option at all. This whole thing is serious and I want to be completely calm and confident in the durability and, most importantly, the safety of all components and assemblies)). In second place is the installation of IZH Oda front hubs; a large front bearing 2108 with dimensions 64x37 is already installed in them. This option is already acceptable, in my opinion. The bearing is designed for installation “under the motor” and will run for a long time, which you won’t have to worry about. IzhOda hubs are installed either through adapter bushings, which is much simpler, or on modified classic knuckles, which is much more difficult to perform, since you still need to find a very good turner who will take on this and will not spoil anything the first time)) and with this they are just big problems)) I also refused this option, firstly, IzhOda is already a big rarity in our area, it takes a long time to look for hubs from them and used ones are used, this is not a new part, production will be present in any case. Therefore, I chose for myself the most reinforced third option with the largest possible size bearing and custom-made metal hubs. Bearing dimensions 72x37
installed on Moskvich 2141 and Renault Logan, compared to the front 2108 it is larger and looks preferable. The matter remained with the manufacture of hubs. From all the large factories with good machines, in our city (as elsewhere) only memories remain), everything was closed a long time ago, the equipment was cut into scrap metal, so I spent a long time looking for who and where to make it. As they say, “he who searches for a long time will always find”) I found someone who makes such hubs, even with adapter bushings,
source
wwss75 › Blog › Front wheel spacers for maintenance-free bearing 2108
I rewrote it, corrected it, added it. part 1. HURRAY! It’s done, I’m holding the spacers in my hands. I've been wanting to make one for myself for a long time. It’s extremely difficult with a budget and purchasing via the Internet is no longer necessary. I couldn’t find it on sale in St. Petersburg and heard a price tag of 2,000 rubles. I contacted turners a couple of times and was shocked by their price of about 6,000 rubles. for work. Andryukha's old friend came to the rescue. I found the time and, according to the drawing, turned it out of 45 steel, accurate to the hundredth. I didn’t take the money :)) FRIEND! :)) I took the drawing from timur911, here is the link at www.drive2.ru/l/4438002/ In my drawing, 2 dimensions have been changed for a tighter fit of the spacer on the axle. Plus, the manufacturing accuracy of the two seating surfaces is 0.01-0.03 mm. (When making the inner surface, the turner makes dissatisfied faces and says that it is lazy and difficult to do) So, my version is a trial one! The final dimensions will become clear after installation on the car. I'll definitely write back. (A year and a half later, everything is EXCELLENT! Everything works! The drawing was corrected and correct 09/07/16.)
How to install a 4x100 disk on a VAZ-2114
Most older foreign cars have a 4x100 drill. This makes it possible to diversify the choice of disks almost indefinitely. However, we must take into account that simply installing, without modifications, 4x100 wheels on a 4x98 seat will not lead to anything good. The fact is that the tolerance in the manufacture of the disk does not exceed 0.7-1 mm. That is, it is theoretically possible to put on a disk with a 4x100 fit, but this will lead to the fact that only one bolt out of four will fit exactly on the cone. The remaining fasteners simply will not tighten all the way and, as a result, the disk will sit with a distortion that is almost impossible to check by eye.
Disc with bolt pattern 4*100.
Disc runout leads to rapid wear of the wheel bearing.
A less reliable option is to install bolts with an offset head. A not entirely correct option is to install studs, for example, from the cylinder head and nuts from Niva, but the studs are not designed for torsional force, so the most reliable option would be to install spacers. You can carve them yourself or buy them ready-made.
But here you need to take into account several nuances:
- The width of the spacer must be at least 20 mm, since only in this case we will ensure proper thread strength.
- In this case, the offset of the disk will increase by the same 20 mm, which must be taken into account when selecting a disk.
- In this case, the disc must be selected with a minimum offset in order to remove the load from the hub and somehow compensate for the difference in offset.
Using off-center eccentric bolts Installing wheel spacers Installing studs with an eccentric nut
Wheels of the country of the Soviets: factory wheels of VAZ cars
Unlike many other parts, FIAT-124 wheels “took root” on the VAZ-2101 practically unchanged. The disk, 4.5 inches wide and with an offset of 37 mm, had eight ventilation holes of a characteristic oval shape. Since in the first months the plant experienced difficulties with components, on the “kopecks” of the period 1970-1974. one could also find other disks - with sixteen round holes, around which peculiar stampings were made.
To protect the mounting bolts and wheel bearing, the central part of the rim was covered with a beautiful chrome cap - exactly the same as on a Fiat, only without the inscription with the name of the car in the center. In order for it to stay on the disk, special “ears” were provided, and such a cap could be removed thanks to its spring properties.
In the early years, the wheels were painted silver, but later on all cars of the 2101 family only wheels with oval holes, painted in a gray-white shade, were installed.
Already in 1991, wheels of type 2101 became half an inch wider and received humps - special protrusions on the shelves for a tight fit of tubeless tires. At the same time, the “penny” wheels got rid of the “lugs” for the hubcaps.
Those who are currently engaged in restoration should take into account that, according to the offset parameters, it is permissible to mount only 2101 or 2108 wheels.
2103/2106
“Treshka” received new wheels. In appearance, they were very similar to the “Fiat” ones already found on the early VAZ-2101: the same sixteen round holes, but the rim width increased to five inches, and the offset, on the contrary, decreased to 29 mm. Such a disc was installed on “three-ruble” and “six” cars, and on cars of the third model a cap of type 2101 was used, and on the “six” there was an original one. You can distinguish it by the black round overlay in the center.
True, other wheels were planned for the “six,” the angular design of which echoed the appearance of the then newfangled light-alloy (aluminum, as they were called) wheels. However, for technological reasons, such a disc did not go into production.
Standard disk sizes
The main technical characteristics of the rims of any car, including the VAZ-2109, are expressed by the following parameters:
- Diameter. This refers to the size of the rim in inches, excluding the tire.
- Rim width is the size of the tire seat in inches.
- The size of the central hole for the hub.
- Bolt pattern is a parameter indicating the number of holes and the diameter of the circle connecting their central points.
- Overhang is the distance between the hub mounting surface and an imaginary plane passing vertically through the middle circumference of the disk.
- The central hole is 58.5 mm.
- Bolt pattern - 4x98.
The wheels are manufactured in three versions: R13, R14 and R15. Other factory parameters, taking into account the corresponding tires, are shown in the table.
| Disc diameter, inches | Rim width, inches | Departure amount, | Tire parameters, mm |
| in mm | |||
| 13 | 5 | 35-38 | 165/70 155/75 |
| 5.5 | 35-38 | 185/65 175/70 | |
| 14 | 4 | 45 | 135/80 |
| 5.5 | 35-43 | 175/65 165/65 | |
| 6 | 35-40 | 185/60 175/65 | |
| 15 | 6 | 30 | 185/55 |
| 6.5 | 30 | 195/55 195/50 | |
| 6.5 | 35 | 205/50 195/50 | |
| 7 | 35 | 205/50 195/50 |
How to recognize malfunctions
There are many signs that help identify a breakdown:
- uneven wear of tires;
- increased vibration;
- the appearance of extraneous noise;
- overheating of the disk (this means that the bearing is not working properly);
- the car deviates to the side from a straight path and the body sways (these signs are explained by the fact that a working wheel ensures smooth movement, and when a breakdown occurs, imbalance occurs).
The easiest way
If all of the above is not picked up by the hearing and vestibular apparatus, then there is an optimal method. You need to push the tire with your foot to identify any play.
Rear wheel hub: drawings and replacement instructions
The place in the ranking is determined by the votes of car owners. The best producers are selected by the ratio of votes, and the Popular ones by the difference. More details
Hello! Tell! I want to buy regular stamped wheels for a VAZ 2107! I have a question: if the disk should be centered, the diameter of the central hole is 58.1, for example, standard, but the disk is sold at 60, is this difference large and you need to buy a centering ring or can you install it and drive?! Strangely, the wheels are standard, but the center diameter is different!
While the turner was working, I decided to fix the problem with the number. its fastening was welded to a 2*2cm beam, it always clung to it, it bent and bent the number. The number is transferred to the body of the trailer, and instead of 2*2 we use 4*4
Diagnostics, signs of malfunction, causes of failure
With proper operation, the ball bearing itself can last a really long time - about 100,000 kilometers. However, there are a number of reasons why a part may become unusable much earlier. Among them:
- frequent driving at high speed on bad roads;
- improper installation without lubrication (resulting in overheating and increased wear);
- prolonged exposure to an aggressive environment (water, dirt, other abrasives or liquids that get inside);
It is easy to understand that the ball bearing has failed - a distinct noise or buzz appears in the area of the rear wheels. If you ignore the problem, vibrations will appear on the body, and in critical cases, a grinding noise in the rear, indicating that the assembly has simply fallen apart. It is simply unacceptable to wait any longer - the wheel may simply become blocked while driving, so it is necessary to immediately replace it.
Checking wheel bearings:
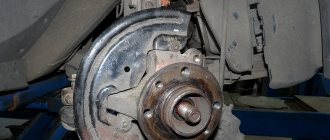
Rear wheel bearing VAZ 2108 - unit design
The main details of the unit can be seen in the photo below:
- guide;
- rear hub;
- sealing element;
- retaining ring;
- wheel bearing;
- thrust ring;
- hub nut;
- moisture-proof element;
- external protective washer;
Replacing the rear suspension wheel bearing
Each car wheel rotates on a bearing. If you hear extraneous noise while driving from any direction on a flat road, the rear wheel bearing is probably failing. At first the noise is heard at high speeds - from 80 km/h, over time it becomes audible at lower speeds - from 50 km/h. When turning in one direction, the noise may decrease, while turning in the other direction, it may increase. During diagnostics, by hanging the wheels and rotating them manually, a hum is heard, and by shaking the wheel, you can feel play. All this indicates that it is necessary to replace the rear wheel bearing on the VAZ. Read on and you will learn how to change the rear wheel bearing on Kalina (VAZ 1118).
In order to make replacing the rear wheel bearing on Kalina as simple as possible, we jack up the side we will be working on (or lift the car on a lift). We remove the wheel from the Lada Kalina.
Remove the brake drum. Removing and replacing the brake drum is described in detail in the video “Replacing the rear brake pads and brake drum.”
Unscrew the central nut of the wheel bearing with socket No. 30 (counterclockwise). And remove the thrust washer of the hub nut.
Using a reverse hammer (but it is more convenient to do this with a special puller), we press the hub together with the bearing from the axle. If the puller screw is not long enough, it should be lengthened.
Attention! The inner half of the bearing race may remain on the journal. In this case, use a hammer and chisel to knock it down separately.
If this does not work, you should make a cut across with a cutting machine, then the clip will easily get knocked off.
Next, remove the bearing retaining ring from the inside of the hub. Tap the ring first to make it easier to remove. Then use round pliers to remove the ring.
We install the hub on the press and press out the bearing, pressing the moving part of the press on the inner race. The bearing can also be knocked out with a hammer using the old bearing race as a guide, but this may not be an easy task.
We install a new bearing by pressing it in with a press. We press the moving part of the press onto the outer race. You can press the bearing in with a hammer, but you cannot hit the bearing itself, as this will damage it.
Reinstall the retaining ring.
Thanks for subscribing!
Now we install the hub back on the axle. You may have to hammer it through the tube along the inner ring. Before putting the hub back on the axle, clean it with a brush with metal bristles. All pressing must take place without jamming, jamming or scuffing.
Then install the thrust washer and tighten the hub nut.
We assemble the remaining elements in reverse order:
- put the brake drum in place - install it so that the holes for the guide bolts coincide;
- twist the guides and clamp them with a key;
- put the wheel on and tighten the nuts.
Replacing a wheel bearing is not an easy task, and you should be well prepared for it. Your safety on the road depends on the results of your actions. You can learn how to extend the life of a wheel bearing from the article “Prevention of the rear suspension wheel bearing.”
Removing the hub
To remove the rear wheel hub of a VAZ-2108, you will need to perform a few simple manipulations:
- Completely unscrew the wheel bolts.
- Remove the wheel.
- Unscrew the nut that is located on the hub.
- Using a 12mm wrench, unscrew the studs that secure the brake drum to the wheel hub.
- Place these pins in adjacent holes and tighten them evenly. This way you will be able to move the brake drum from its place. If this does not help, you need to carefully knock the drum out of its place using a hammer and a wooden spacer.
- Use long bolts; they need to be screwed into two opposite holes on the hub. It is necessary to tighten them until the hub begins to move out of its place. You can also use a three-jaw puller for this purpose. The last resort is to install the back of the wheel and pull it with your hands.
- Sometimes the inner race of the bearing remains on the axle. It needs to be removed. To do this, first, using a chisel, you need to slightly move this ring on the axis, and then install a puller with two legs. After dismantling, be sure to check that there is no damage to the axle. Otherwise, clean the metal with a fine file.
At this point, dismantling the hub is completed, it is in your hands, and you can replace the bearing. The dimensions of the rear hub of the VAZ-2108 are the same as those of similar models that were produced under the names “Samara” and “Samara-2”.
Downloading a book
After successfully completing the payment (by any method) and returning to the KrutilVertel store from the payment system website, you will be taken to the successful payment page:
The book you purchased will be in your personal account, from where you can always download it.
Please note that after making the payment, you need to return back from the payment system website to the KrutilVertel website. If for some reason you did not return back to the site and closed the payment system tab with a message about the successful completion of the payment, please let us know - we will send you a letter indicating access to download the book
If for some reason you did not return back to the site and closed the payment system tab with a message about the successful completion of the payment, please let us know - we will send you a letter indicating access to download the book.
Features of choice
When buying a rear wheel bearing for a VAZ-2108, pay attention to the manufacturer. Currently, more or less high-quality domestic parts are produced by the following enterprises:
- SPZ (Saratov Bearing Plant);
- SPZ-4 (Samara);
- VBF (GPZ-23, Vologda);
- GPZ-20 (Kursk).
It is believed that the best domestic manufacturer of bearings is the Saratov plant. His products are very reliable, but not very expensive. Thus, a rear wheel bearing for a VAZ-2108 manufactured by SPZ costs between 400-450 rubles.
VBF products are also highly reliable and are slightly cheaper. Bearings SPZ-4 and GPZ-20 are designed for those who are used to saving on spare parts. Their cost is even less, but the quality leaves much to be desired.