In our article we will talk about how to replace the oil pump on a VAZ-2106, and also talk about its design, operation and repair features. “Sixes” have been produced at AvtoVAZ since 1976. And the design of the car has undergone significant changes over the years of production. But as for the engine, suspension and body, these parts remained unchanged; they initially proved themselves to be quite good, so modernization was not required for them.
The lubrication system in an internal combustion engine plays a huge role. The design is driven by a chain; today AvtoVAZ does not practice the use of such circuits. Therefore, we will talk about the features in more detail.
Replacing the oil pump on a VAZ 2101-VAZ 2107
Welcome! Oil pump - popularly it is also simply called “Oil pump”, it performs a very important function when the engine is running, namely, it supplies the oil that is in the oil pan, the crankshaft bearings, and further along the channel the oil goes under pressure to the cams and camshaft bearings. lubricating them.
Therefore, the oil pump plays a very huge and important role in the car’s engine, and if it is damaged, the pressure in the lubrication system, which must certainly be there, will be lost. (For more details about what will happen if the pressure in the lubrication system disappears, see the article entitled: “Useful information about oil pressure on a VAZ”)
Note! To replace the oil pump with a new one, you will need to stock up on: A main set of wrenches into which the “10” and “13” wrench will fit, and you also need to take socket heads and an extension to put the same heads on it, according to abilities also take card joints with you!
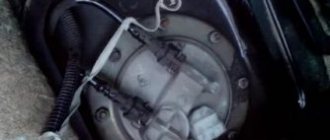
Where is the oil pump located? It is located inside the engine, so just looking at the engine you won’t see it, and in order to look at it, you will first have to remove the crankcase protection, then you will need to remove the pan and only then you will see the oil pump with your own eyes.
When is it necessary to change the oil pump? It is subject to replacement if:
1. A drop in pressure in the car’s lubrication system, at the operating temperature of the engine at idle, about which the oil pressure lamp will inform you.
2. And also if the pump itself fails, or if its gears fail, which by the way can be changed separately, without completely changing the oil pump, for information on how to do this, see the article: “Repairing the oil pump "
Note! If you saw a drop in oil pressure after a strong collision with a bump due to which the oil pan was deformed, then most likely the oil pump and specifically its intake pipe are to blame for the drop in oil pressure!
3. And in this case, if the oil pressure on your car is very high and is outside the norm, then a clogged pressure reducing valve is most likely to blame, which can also be removed and replaced with a new one. (For information on how to remove it, see the same article on pump repair)
Note! You can find out what pressure is in the lubrication system using a special indicator that indicates the oil pressure in the system!
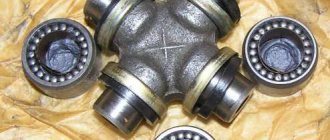
VAZ 2106 | Removal, repair and installation of the intermediate shaft
You will need a 12 key.
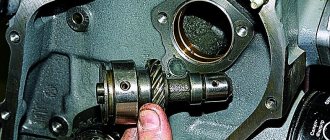
The intermediate shaft drives the oil pump. In addition, the camshafts are driven through it. The intermediate shaft rotates in two plain bearings, which are bushings.
1. Remove the upper and lower camshaft drive chains (see “Replacing timing chains and gears”).
2. Remove the intermediate shaft sprocket.
7. After removal, wash all parts in gasoline. 8. Inspect the intermediate shaft. If cracks are found on the shaft, replace it. If there are marks or other defects on the shaft journals, grind the shaft journals to the repair size. If grinding to the repair size does not completely remove the defects, replace the shaft. Measure the journals of the intermediate shaft. If the diameter of the front journal is less than 48.95 mm, and the rear journal is less than 21.95 mm, they need to be ground to the repair size. 9. The intermediate shaft bushings cannot be repaired. If they have burrs or other defects, the bushings must be replaced. Spare parts are supplied with bushings with a reduced internal diameter. After pressing into the cylinder block, new bushings must be bored to the nominal or repair size. Bore the bushings in one pass to ensure alignment of the holes. When pressing, install the bushings so that the holes in them coincide with the oil channels in the cylinder block. The dimensions of the journals and bushings of the intermediate shaft are given in table. 5.2. 10. Install the shaft in the reverse order of removal. Before installation, lubricate the shaft journals and gears with clean engine oil.
Table 5.2 Table Nominal and maximum permissible dimensions and fit of mating parts of the intermediate shaft of the engine mod. ZMZ–409.10 automn.ru |
How to replace the oil pump, also known as the oil pump, on a VAZ 2101-VAZ 2107?
Note! This work is labor-intensive, but still feasible if you have special tools, and this work must certainly be performed on an inspection ditch or on lifts, otherwise it will not be possible to change the oil pump normally!
Removal: 1) First you need to remove all the parts that do not allow access to the pump, so first remove the crankcase protection from the car, and only later move on to removing the oil pan. (For information on how to remove the protection and pan, see the article: “Replacing the crankcase pan on a VAZ”)
2) Next, unscrew the two bolts that secure the oil pump to the car engine.
Note! Be sure to look at which bolt you will pull out from where, since the whole point is that these two bolts are of different lengths (One is shorter and the other is longer) and therefore look later when installing a new pump, screw the same bolts specifically to those places where they were installed earlier!
3) Next, when the bolts are unscrewed, remove the pump and pay attention to it, since there will be a gasket on it, which will also need to be removed, and if it is deformed, then replace it with a new one.
Note! In this case, if you are going to install a new pump on a car, then this gasket must be replaced with a new one, since over time the old gasket is compressed and takes on its shape, and when buying a new pump, usually its shape may be slightly different and due to This can cause oil to leak through this place where the gasket does not match its shape!
Installation: Install a new oil pump on the car, in the reverse order of removal.
How to replace the pump drive
Replacing the drive gear is a complicated procedure, but after painstaking preparation you can remove the drive and repair it:
- Remove the car's ignition distributor.
- To remove the intermediate gear, you will need a special puller. But it is possible to get by with an ordinary wood stick with a diameter of about 9–10 mm. The stick must be hammered into the gear and then rotated clockwise. The gear will then simply come out.
- In place of the worn gear, install a new one using an ordinary stick.
- Replace the ignition distributor.
READ How to Remove Lancer 9 Front Bumper
Bypass (reducing) valve
The drive and driven gears rarely break because they have a simple design. In addition to oil seals and gaskets, there is another component in the pump design that can fail, which will have disastrous consequences for the motor.
The pressure reduction (bypass) valve on the VAZ two thousand one hundred six is responsible for controlling the oil pressure in the system. As needed, this particular valve can reduce or increase the pressure so that it corresponds to the norm.
Increasing or reducing the existing pressure is done by ordinary actions: either the valve closes or opens. Closing or opening of the valve can be due to a bolt that presses on a spring, which, in turn, closes the valve or opens it (if there is no pressure from the bolt).
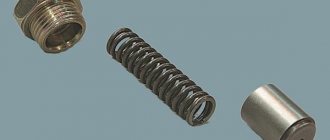
The bypass valve mechanism consists of four parts:
- small body;
- a valve in the form of a ball (this ball closes the passage for oil supply, if necessary);
- spring;
- stop bolt.
On a VAZ two thousand one hundred six, the bypass valve is installed specifically on the oil pump housing.
installation of an oil pump on a VAZ 2106. Photo: main stages of adjustment. : how to measure gaps correctly
After replacing all worn parts, the oil pump must be reassembled in reverse order.
replacing the oil pump drive mechanism
VAZ 2106 engine lubrication system
The lubrication system of any engine is a complex of different parts and components that allow for excellent maintenance of the unit. As is clear, the key to successful engine operation is proper lubrication, so that the moving parts do not wear out for a very long time.
On VAZ two thousand one hundred six cars, the lubrication system is considered combined, because the lubrication of the rubbing parts of the engine is carried out by 2 methods:
- through splashing;
- under pressure.
The total capacity of the entire system is 3.75 liters. The lubrication system on the “six” consists of the following components, each of which consumes or conducts its share of oil:
- water sump;
- level indicator;
- pumping unit;
- oil supply pipe to the engine;
- oil filter element;
- valve;
- oil pressure sensors;
- highways.
The oil pump plays the most important role in the operation of the entire lubrication system. This device is designed to ensure continuous circulation of oil throughout all components of the system.
Oil pressure adjustment
The oil pressure should always be normal. Excessive or underestimated pressure properties always have a bad effect on the operation of the internal combustion engine. So, for example, a lack of pressure may indicate severe wear or contamination of the oil pump, and excessive oil pressure may indicate a stuck pressure relief valve spring.
In any case, you will need to check several main devices of the VAZ 2106 in order to find the cause of high/low pressure and adjust the operation of the lubrication system:
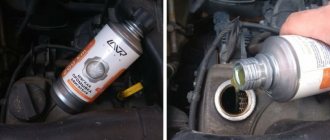
- Make sure that the engine is filled with high-quality oil, the level of which does not exceed the norm.
- Check the condition of the oil drain plug on the pan. The plug should be completely tightened and not allow a drop of oil to pass through.
- Check the operation of the oil pump (in most cases, the gasket fails, which can simply be replaced).
- Check the tightness of the 2 oil pump bolts.
- Look how dirty the oil filter is. If the contamination is strong, you will have to change it.
- Adjust the oil pump pressure reducing valve.
- Inspect the oil supply hoses and their connections.
Purpose and types of automobile oil pumps
The purpose of the oil pump is to create the necessary pressure in the engine lubrication system. Under high pressure, oil flows through special channels to all rubbing parts of the engine, intensively reducing their friction against each other, thereby preventing premature wear.
Oil pump for VAZ car, adjustable, with pressure reducing valve
Types of Oil Pumps
Various types of pumps were used on VAZ cars at different times. Let's list them:
- pumps are unregulated. There is no pressure reducing valve in their design, so the pressure in the lubrication system always remains constant;
- adjustable pumps. They are equipped with a pressure reducing valve, so that the pressure in the car’s lubrication system can vary depending on engine speed;
- rotary pumps. The main element of this design is a rotor with small metal blades, which pumps oil. In variable pumps of this type, in addition to the rotor, there is always a stator with a spring. This device ensures constant pressure in the lubrication system regardless of the crankshaft speed;
- gear pumps. Pumps of this type do not have a rotor with blades. Its function is performed by a pair of gears with long teeth. These teeth act as blades when pumping oil.
Advantages of adjustable rotary oil pumps
Almost all modern VAZ cars (starting from VAZ 2114 and higher) are equipped with adjustable rotary-type oil pumps.
Main design elements of the VAZ adjustable rotary oil pump
Here are the main advantages of these devices:
- When using an adjustable oil pump, engine power increases by 30%. This occurs due to a decrease in the power factor taken from the motor by third-party devices;
- with an adjustable oil pump, the oil has to be changed less frequently, since the crankshaft speed decreases, which means the number of revolutions decreases;
- The adjustable oil pump practically does not foam the oil. The problem that is relevant for unregulated gear pumps has been successfully solved in rotary pumps.
Oil pump for VAZ 2106: principle of operation, adjustment, repair
VAZ two thousand one hundred six cars have been produced since one thousand nine hundred seventy six. During this period of time, almost everything has changed in the design of the machine, but at first, well-chosen mechanisms are used for the “six” and to this day. The unit, body, suspension - all this remained without configurations. An extraordinary role in the operation of the internal combustion engine is played by the lubrication system, which has remained chain-based since one thousand nine hundred seventy six. There are actually no such devices on modern cars, so owners of “sixes” should know exactly how the lubrication system works and what needs to be done in case of breakdowns.
Repair of the oil pump on VAZ 2101-VAZ 2107
Welcome! Oil pump - thanks to this part, the most important units in engines are lubricated with oil, these include: Crankshaft, camshaft and other parts. If you remove this part from the car, then these parts listed above will not be lubricated with oil at all, which will lead to a very rapid failure of the engine, therefore the oil pump must always be kept in good condition and, if it malfunctions, be repaired or replaced with a new one.
Note! To repair this part, you will need to stock up on: A main set of wrenches, as well as a set of flat probes with a width from “0.15 mm” to “0.25 mm”, and also stock up on a straight iron ruler and for ease of work it is better have a vice!
And also to wash the parts you will need to stock up on: Kerosene, a container in which kerosene will be poured and in which you will wash all the removed parts from the oil pump, and also, if possible, stock up on a special cylinder or a compressor with compressed air to blow through the parts !
A short :
Where is the oil pump located? In a car, it is located in the inner part of the engine and therefore it will be virtually impossible to see it without removing the oil pan, because in order to properly examine it you will first need to remove the crankcase protection and only after that the oil pan, and after the operations performed you will see it.
When is it necessary to repair an oil pump? It is subject to repair in case of any breakdowns that will adversely affect the operation of the car engine, namely:
READ Nissan Almera H16 Timing Chain Replacement
If, for example, the pressure reducing valve that is installed in the pump is worn out or clogged, the oil in the system will rise very much and we will notify you of this by the oil pressure light, which at idle speed at the operating temperature of the engine will constantly glow, because, most importantly, if the oil is faulty pump, you will be immediately notified by an oil pressure lamp. (You can find out more about the oil pressure in the system from the article entitled: “Useful information about pressure in the system”)
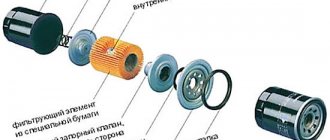
Oil filter
The filter is full-flow, non-separable, screwed onto the fitting of the cylinder block and connected by channels to the oil pump and the main oil line. To remove the filter, use device A.60312. When installing the filter, it is recommended to wrap it manually without a tool. A filter element made of special cardboard is installed in the steel filter housing. The filter has anti-drainage and bypass valves. The anti-drainage valve does not allow oil to drain from the system when the engine is stopped, the bypass valve allows oil to pass through when the filter element is clogged from the pump into the main oil line.
How to repair the oil pump, also known as the oil pump on a VAZ 2101-VAZ 2107?
Disassembly: 1) First of all, you will first need to remove the pump from the machine for its upcoming repair. (For information on how to remove the pump, see the article: “Replacing the oil pump on a VAZ”)
2) Next, install the pump in a vice and then simply use a wrench, or better yet, a socket wrench (Which is shown in the photo), unscrew the three bolts that secure the inlet pipe to the body of this pump.
Note! When unscrewing the screws, be sure to pay attention to the bolts that secure the inlet pipe to the oil pump housing. So, one of these fastening bolts will be shorter than the others, so when reassembling, screw this bolt into the same place from which it was unscrewed!
3) Now that the bolts are unscrewed, slowly disconnect the intake pipe from the body, but when disconnecting, make sure that the pressure reducing valve washer (the washer is installed in the place shown by the arrow) is not lost, otherwise you will have to find the same one, only the newest one.
Note! Carefully inspect the removed pipe; it should not be deformed; there should be no cracks or other defects. Then pay attention to the mesh of this pipe, it is almost always dirty, so remove it or directly clean it of dirt without removing it, rinsing it thoroughly with white spirit!
And in this case, if your mesh cannot be cleaned or it is damaged, then change it (When replacing the mesh, be sure to change it to one in which the holes will coincide in diameter with the holes of the old mesh). If you haven’t found the exact same mesh, then change the oil pump inlet pipe!
4) Now that everything is disconnected, carefully remove the pressure reducing valve spring without deforming it.
Note! There should be no damage or various types of deformation on the pressure reducing valve spring. If possible, check this spring for its elasticity, for this: First, using a ruler, measure the length of the spring, which should be “20 mm” with its vertical load of “6.15 - 6.65 kg”. And in a 100% free state, the length of the spring should be within “38 mm”!
5) And then remove the pressure reducing valve itself.
Note! Carefully inspect the pressure relief valve as well as the place where it comes into contact with the oil pump cover. In this place where it comes into contact, there should be no damage of various kinds of burrs, etc. There should also be no dirt or deposits, since due to all these defects the pressure in the lubrication system will drop!
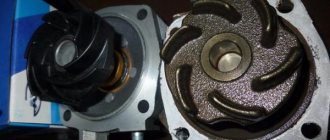
6) Then remove the cover from the oil pump housing.
Note! When the cover is removed, inspect it, pay special attention to the surface of the cover where it comes into contact with the pressure reducing valve and the inlet pipe, and also check the contact surface of this cover with the edges of the oil pump housing. In all of the above places, there should be no various types of damage such as nicks, burrs, etc. And there shouldn’t be any contamination or deposits, otherwise the pressure in the lubrication system will drop evenly with the above-mentioned dilemmas with the lid!
7) Next, remove one of the two gears from the oil pump housing by pulling it up and then put it aside.
Note! You may first remove not the driving gear as shown in the photo above, but the driven one and it will come off a little differently, so if you pulled out the gear and it came out without a roller as shown in the photo above, do not be alarmed as this will mean that you pulled out the driven gear and it usually comes without a roller but separately!
 After the drive gear is removed, remove the driven gear by also pulling it up and it will come off.
9) Next, wash all the previously removed parts well in a container into which kerosene will be poured and after that, be sure to blow all the parts with compressed air so that they dry quickly and so that all the dirt that is in inaccessible places is removed.
Note! When the parts are dry, check their condition, replace the deformed parts with new ones!
Assembly: 1) First, install the driven gear on the axis indicated by the arrow, and during installation, use a ruler or eye to determine the gap between this axis and the inside of the driven gear.
Note! The usual gap should be within the range of “0.017-0.057 mm”, and the very last limit of this gap can be “0.1 mm” but less than that!
2) Next, install both gears in the same way as they were installed earlier, and after installation, take the feeler gauge in your hands and insert it between the gear teeth as shown in the figure below:
Note! This gap can start from “0.15 mm” and ending with “0.25 mm”, but less than that!
3) Now, again, using the same probe or probes, check the gap between the outer diameter of the gear and between the wall of the oil pump housing - this diameter, like the previous one, should be within the limits of “0.15-0.25 mm”, but less than that.
READ How much did the VAZ 2107 cost in 2011
4) Then apply a thin feeler gauge first to the end of the driven gear, and then to the end of the drive gear, and in both cases place a ruler on top so that it touches the edges of the housing.
Note! This gap should be within the limits of “0.161 - 0.166 mm”, and the maximum permissible value is “0.2 mm”!
5) Next, try to rotate the driven gear and make sure that both gears rotate smoothly and without jamming.
6) Next, measure the gap between the hole in the oil pump housing (indicated by a reddish arrow), and between the supporting surface of the drive gear, which is indicated by a blue arrow.
Note! This gap should also be small and fluctuate between “0.016 – 0.055 mm”, in the latter cases this gap can be “0.1 mm” but less!
7) And finally, install all the parts in the reverse order of removal, at the same time, replace all the parts that are very worn out with new ones and always remember that the oil pump plays a very important role in the car and if it fails, the engine can in a very short time (2 -5 min) grab the wedge due to which its main parts such as pistons, etc. will fall into disrepair.
Additional video: The video located just below shows a short check of the oil pump for serviceability, therefore, in addition to the main article, we also recommend that you watch this video.
Necessary tools and equipment
To replace the oil pump you will need:
- set of socket wrenches;
- knife;
- jack;
- strong wood block;
- wood spacer;
- container for draining oil;
- new oil pump gasket;
- new pan gasket;
- new oil pump.
replacing the oil pump on classic VAZ models. Required Tools
To repair the VAZ 2106/07 oil pump you will need:
- keys at 10;
- ruler;
- a set of flat probes;
- vice.
Repairing and replacing the oil pump on a VAZ 2106/2107: how to do the operation yourself
In the reliability rating of components and parts of the VAZ 2106/07, the oil pump occupies one of the first places. But from time to time he also asks for repairs or replacement. When it fails, the oil circulation in the engine is disrupted. The consequences can be very nasty and expensive.
Oil pump removal procedure
The oil pump is replaced as follows:
- Clean the bottom of the motor from any dirt. After unscrewing the protection fastening, remove it.
When replacing the oil pump, you need to remove the crankcase protection
The oil drain plug is turned out with a hex wrench
To disconnect the engine from the body, you need to unscrew the nuts securing the lower supports
The engine is lifted using a jack and a wood spacer
To dismantle the pallet you will need to unscrew the mounting bolts
The oil pump is removed together with the gasket
Automatic transmission oil pump - causes of malfunction
Poor quality oil
The main reason for pump failure in a gearbox is the use of low-quality oil. During operation, wear particles and coking oil settle on the moving elements of the pump itself. All this leads to problems in the operation of the pump, which ultimately contributes to its failure.
Use only original automatic transmission oil
Improper use of the vehicle
We also note that the cause of breakdowns may be improper operation of the car in the winter season. Quite often, car owners do not warm up the transmission oil, but start driving in a cold car. As a result, the oil does not have the proper viscosity, which leads to excessive load on the automatic transmission oil pump . Under the influence of such a load, it quickly fails.
Location, structure and purpose of the oil pump VAZ 2106/07
The oil pump of any car creates pressure in the engine lubrication system. As a result, the friction between the moving elements of the engine (crankshaft and camshaft, piston group, etc.) is reduced and their service life increases. When the pump fails, oil pressure drops sharply, friction increases, and the engine may seize. It will require an expensive and labor-intensive complete overhaul. Therefore, it is so important to detect and eliminate any oil pump malfunctions in a timely manner.
The VAZ 2106/07 oil pump is located inside the engine in the lower part.
The VAZ 2106/07 oil pump is located in the lower part of the engine under the crankshaft. To provide access to it, you will need to remove the protection and oil pan and install the machine on an inspection hole, overpass or lift.
Design features of rotary oil pumps
As a rule, a rotary-type oil pump consists of a small number of parts, including:
- suction and discharge cavities;
- external and internal rotors;
- drive shaft.
Oil pump operation
with rotors is based on the interaction of two rotors. In unregulated designs, the oil that is drawn in is transferred into the system by rotor blades. If the pressure becomes excessive, the pressure relief valve opens and excess oil is released.
Replacing the oil pump
To replace the VAZ 2106/07 oil pump, the car should be placed on a lift, inspection hole or overpass. In the latter case, you can use a jack.
Repair and replacement of oil pump elements
After disassembly, cleaning and inspection, the pump elements are checked for wear. To do this, a series of measurements are made and associated with acceptable values:
- the very permissible gap between the driven gear and the axle should not exceed 0.1 mm;
- the gap between the teeth of the gears after they are installed in the housing should not exceed 0.25 mm;
- the gap between the housing and the outer diameter of each gear should not exceed 0.25 mm;
- the gap between the plane of the cover and the upper surface of the gears should not exceed 0.2 mm;
- The height of the pressure reducing valve spring without load should be 3.8 cm, and under a load of 60–65 N - two cm.
One of the steps in diagnosing an oil pump is checking the gaps between the gear teeth
When turning the pump by hand, you should not feel even the slightest jamming. If any of the listed gaps exceed the indicator, replace either individual parts or the pump completely. It is very important that there are no flaws on the surface of the pressure reducing valve and its spring. Otherwise, the valve will not be able to work normally.
Disassembling the oil pump
Disassembling the pump is carried out in the following order:
- After unscrewing the three bolts, remove the receiving tube. To do this, it is more convenient to clamp the pump in a vice.
The oil receiver is secured with 3 bolts
When disassembling the pump, remove the tube, spring and pressure reducing valve washer
Both gears are removed from the pump
All parts of the disassembled pump are washed in kerosene and wiped with a clean rag. Then they inspect all components and replace worn elements. Assembling the pump is done in reverse order.
Sources:
https://bumper.guru/klassicheskie-modeli-vaz/dvigatel/maslyanyiy-nasos-vaz-2106.html https://vaz-russia.com/remont/remont-maslyanogo-nasosa-na-vaz-2101-vaz -2107.html https://vazweb.ru/desyatka/dvigatel/zamena-maslyanogo-nasosa-vaz-2107.html
Pump check
If there are any problems with the oil pump, a lamp will light up on the dashboard. You need to immediately check the oil level in the system with a dipstick - if it is insufficient, then top it up. If after this the lamp still does not go out, you need to look for a fault in the oil pump.
To carry out a complete diagnosis, drive the car onto an overpass or pit and perform the following manipulations:
- Disconnect the battery.
- Drain all oil from the system. If it is new, it can then be poured into the engine.
- Unscrew the nuts that secure the suspension to the cross member.
- Remove the engine sump.
- Remove the oil pump.
- Disassemble the pump - separate the valve, gears, and pipes from it.
- Wash all metal parts thoroughly in solvent or gasoline. You can blow everything with air after washing.
- Inspect all elements and try to find damage. Chips, cracks, and signs of wear are not allowed.
- Now you need to arm yourself with feeler gauges and check the gaps. Firstly, it is necessary that there be no more than 0.25 mm between the walls of the housing and the gear teeth. If more, then the gear must be replaced. Secondly, the gap between the housing and the end side of the gears should also be no more than 0.25 mm. Thirdly, between the axes of the driven and main gears there should be a gap of no more than 0.25 mm.
Installation of the VAZ-2106 oil pump is performed strictly in the reverse order. If desired, you can install a new pump without changing its parts individually.