Antifreeze performs the function of cooling the engine, passing through tubes and lines located both inside the engine and pipes in the power compartment of the vehicle. But antifreeze must be pumped and circulated under the influence of a special device, which is a water pump. The “six” engine is cooled according to a similar principle, which is why the VAZ 2106 pump forces the cooler to move. If it fails while the engine is running, its temperature begins to rise, which can lead to overheating of the engine and destruction of the cooling lines.
Replacement
To carry out such a technological operation as removing and replacing the VAZ 2106 water pump, it is necessary to prepare the following plumbing tools:
a set of socket heads with ratchets and a wrench;
metal extension cord of small cross-section;
a set of locksmith keys for working on a vehicle.
At the preliminary stage, it is necessary to dismantle the belt drive from the generator unit, and drain the antifreeze or other coolant from the system in full into a clean container.
How to flush the engine cooling system at the link.
Repair
Attach the water pump to a piece of metal pipe, pointing the impeller upward; then, using a soft metal drift, press the shaft through the impeller and the shaft and bearings through the pump housing. Remove the impeller.
Press out the seal ring using a drift from the outer end of the pump.
Remove the center ring and spacer ring from the impeller.
Clean the pump housing and impeller with kerosene and wipe dry. Keep in mind that the shaft and bearings, along with the fan hub and sealing parts, must be replaced with new ones.
Secure the pump housing with the impeller pointing down, then place a mandrel (a piece of metal pipe) on the outer bearing raceway and press in the new shaft and bearing so that the raceway is flush with the end of the housing.
Position the pump housing with the impeller pointing upward and apply sealing paste to the O-ring seat in the housing.
Using a mandrel (metal tube), press the O-ring at a right angle into the housing.
Place a new spacer ring onto the thrust ring. Then coat the spacer ring with brake cylinder paste and press the ring into the impeller, beveled side first.
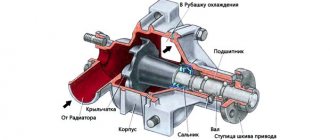
Clean the shaft, impeller seat and sealing surfaces, then place the shaft on a support and press the impeller flush with the end of the shaft. Check dimension “a” (see illustration Cross section of a water pump).
Heat the new fan hub until it turns blue (approximately 300°C). Clean the shaft and install the hub using a two-millimeter metal spacer. Place the hub on the mandrel (metal tube), insert the shaft and press it in until it reaches the adjusting shim. Wait until the hub fits tightly around the shaft, then dip it into the hearth and remove the spacer.
How to change
When replacing the pump, it is recommended to change the coolant in the system.
Necessary tools for pump replacement
A set of keys for “8”, “10”, “13”, “17” “27-30” (open-end and cap).
Coolant drain container
Place an empty container under the engine and drain the coolant by unscrewing the plug on the engine block. If you decide to replace the coolant, then you will also have to unscrew the drain plug on the cooling radiator.
Disconnect and remove the battery from the engine compartment
We disconnect the contact block from the electric fan and remove it, after first tightening the three bolts with a “17” key.
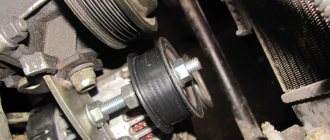
Using a “17” wrench, loosen the nut of the generator belt tensioner and remove it.
Unscrew the nut 17 on the pump bracket and move the bracket to the side.
Now you need to remove the pump drive pulley. To do this, you need to unscrew three bolts and first fix the pulley with a screwdriver.
The next step is to remove the pump from the engine. To do this, unscrew the four fastening nuts and remove it.
After removal, remove the old gasket and thoroughly clean the seats on the pump and engine block.
Install a new gasket and a new pump. Carry out the rest of the assembly in reverse order.
Fill the system with coolant, keeping the heater radiator tap open. Also, to remove the air lock from the system, you need to disconnect the hose from the intake manifold and wait until coolant begins to flow out of it, then put it back in place.
How to remove
The VAZ-2106 water pump cover is fixed to the body with four nuts (the generator drive belt and pulley have been removed for clarity).
1. Remove the battery from the car (for operating comfort).
2. Drain the coolant from the cooling system (see “replacing the coolant on a VAZ 2106”).
3. Loosen the three bolts securing the pulley, securing it from turning with a screwdriver.
4. Remove the generator drive belt.
5. Unscrew the three bolts securing the VAZ -2106 pump pulley and remove the pulley.
6. Unscrew the nut securing the generator tension bar to the pump cover and remove the washer.
7. Remove the tension bar from the stud, moving the generator away from the engine.
8. Unscrew the four nuts securing the pump cover, remove the spring washers, use a screwdriver to carefully disconnect the cover from the base and remove it.
9. Remove the pump cover gasket.
How to check
If it does not drip, remove the belt, shake it, twist it. It's wobbly/noisy, replace it.
How to identify a pump malfunction?
There are several main symptoms of a malfunction:
- The most common is gasket damage and coolant getting into the pump bearing. The coolant very quickly washes the lubricant out of the bearing and the pump jams. To avoid this, you need to look at the seal every now and then and replace it if necessary. The more mileage on the pump, the more often you need to do this. The service life of the pump on a VAZ 2107 is on average 80-100 thousand kilometers.
- Coolant leakage through the oil seal. You can determine this by looking at the pump flange (at the place where the oil seal is), everything should be dry.
- Extraneous noise when the pump is running. Typically, noise when the pump operates indicates a worn bearing or a malfunction of the impeller.
- Increased vibration of the pump during operation. Vibration indicates that you need to check the pump housing in the bearing area for cracks. You also need to check whether the alternator belt, pump pulley and fan are installed correctly.
- Dirty cooling system. If the fluid has not been changed for a long time and it is brown, then there is a high probability of pump failure.
If one or more of the symptoms listed above are detected, the pump should be replaced. We do not recommend repairing the pump on a VAZ 2107 due to the low cost of a new spare part.
For those who still want to try their hand at repairs, watch the procedure in this video:
Is it possible to eliminate a pump leak on the way?
The loss of some antifreeze on the road is indicated by an increase in the temperature of the coolant and a decrease in the level in the expansion tank. If you have located the leak and are convinced that the pump is to blame, you can try to fix the problem. Failures that cause antifreeze leakage are as follows:
- The joint between the flanges of the pump and the cylinder block has lost its tightness, antifreeze is leaking from under the gasket;
- a crack has formed in the pump body;
- the housing was destroyed by the impact of the impeller.
You can insert a wedge into the hole in the housing from the front side and coat it with cold welding
As a rule, problems with a leaking water pump are critical and quite difficult to fix on the road. Try to tighten the leaking gasket by tightening the 4 pump mounting nuts, which will require removing the generator drive belt and pulley. Don't overdo it - it's easy to strip the threads on Ø8mm studs.
Try to seal a small crack with a chemical composition - cold welding. If possible, tape the patch to the body with something so that it does not fall off, add water and get to the garage. It will not be possible to seal a large hole from the impeller; you need to look for an option to tow the car or call a tow truck.
Video: repairing a hull crack
From a financial point of view, pump restoration is more profitable than a complete replacement; the savings are about 50% of the cost of a new part. Considering how often minor breakdowns occur on Zhiguli cars, such a difference in price plays a role. The technology for replacing the bearing and oil seal on the VAZ 2101 water pump is also suitable for other cars equipped with a classic engine: VAZ 2121 Niva and its modifications, Niva-Chevrolet.
https://youtu.be/https://youtu.be/bkH3pt1g5-U
_
Pump repair
In some cases, the water pump can be repaired. It is recommended in situations where either wear of the bearings or the oil seal located inside the device occurs.
Repairing the pump will save you about 600–700 rubles, which in principle is not so little. The maintainability of the pump is determined by the condition of the impeller and shaft. If they are relatively new, then they can be restored.
A complete replacement of the pump on VAZ cars is only for the better. The new unit is inexpensive, and after replacement the car’s engine will begin to function fully.
Selection and installation of new spare parts
Since the VAZ 2106 car and its parts have long been discontinued, original spare parts cannot be found. Therefore, when choosing a new pump, it is worth considering a number of recommendations.
- Check the part markings corresponding to catalog number 2107–1307011–75. A pump from Niva 2123–1307011–75 with a more powerful impeller is suitable for the “classic”.
- Buy a pump from trusted brands - Luzar, TZA, Phenox.
Sometimes a fake can be identified by a discrepancy in size. Place the purchased product on the mounting pins and turn the shaft by hand. If the impeller blades begin to cling to the housing, you have been given a low-quality product.
Install the water pump in reverse order.
- Apply high temperature sealant to the gasket and slide it onto the studs. Apply the mixture to the pump flange.
- Insert the element into the hole correctly - the generator bracket mounting pin should be on the left.
The cooling system is filled through the radiator neck. When pouring antifreeze, keep an eye on the tube disconnected from the manifold (on the injector - throttle). When antifreeze flows out of this tube, put it on the fitting, clamp it with a clamp and add fluid to the expansion tank to the nominal level.
Purpose of the VAZ 2107 pump
A water pump is a device whose main mechanisms are a shaft and an impeller. The pump shaft is driven by transmitting torque from the engine crankshaft. Torque is transmitted through a pulley and a belt drive, which connects components such as the crankshaft and the generator.
On VAZ 2107 cars of the carburetor type in the first years of production, the pump pulley is also used to attach the forced cooling fan. Modern VAZ 2107 models of injection and carburetor types are equipped with electric cooling fans, so there is no need to drive the fan.
The pump ensures the circulation of coolant in constant mode after starting the car engine. If the pump does not function, the cooling cycle will be disrupted, which will lead to excessive overheating of the motor and failure. It is very important to replace the pump in a timely manner, otherwise the consequences will be fatal.
Water pump problems
The pump has a fairly simple design, so identifying faults is not difficult. Malfunctions may be associated with failure of the bearings, and there may also be a leak of coolant due to wear of the sealing seals. Such problems have various types of consequences:
- If there is a coolant leak, the antifreeze level will decrease and the engine will overheat. If coolant is leaking, you can compensate for its deficiency by adding antifreeze or water. If a fluid leak occurs, it is important to promptly identify this type of failure.
- When the bearings jam, the consequences of this phenomenon cause the belt to break. In this case, continuing to move is strictly contraindicated.
Replacing the pump on a VAZ 2107 car, injector or carburetor, if the above reasons occur, is mandatory. At home, you can repair the VAZ 2107 pump yourself. How to do this is shown in the video below.
However, experts do not recommend resorting to repairing the product, since it is much easier and more efficient to replace the pump than to buy a repair kit and carry out repair work. It is especially important to pay attention to the integrity of the main pump components.
What is needed for replacement
To replace the pump, you will need to use the necessary tools. These tools include:
- Keys for 8,10,13 and 17.
- A container to drain antifreeze from the system.
- Screwdriver.
The first step is to drain the coolant from the system, and only after that can you begin to replace the device. The process of replacing a water pump does not present any difficulties, but when performing work it is important to follow a clear sequence. We will look further at how the fluid is drained and the pump is replaced on a VAZ-2107.
How to remove a pump from a car: step-by-step instructions
To replace the water pump on a VAZ 2107, you need to drain the coolant. This is done by removing the cap from the radiator, as well as sequentially unscrewing the plug on the radiator and cylinder block. After draining the antifreeze, you can begin work on replacing the water pump. Step-by-step instructions for replacing the pump on a VAZ 2107 car:
- When loosening the nut securing the generator housing, remove the belt.
- Using a key set to “13”, you need to unscrew the bolted connections that secure the pump pulley. After unscrewing the bolts, it should be dismantled.
- Unscrew the fastenings of the coolant supply pipes and then remove them.
- Carry out the process of unscrewing the bolted connections by which the pump is fixed, and then dismantle it.
- After the pump is dismantled, it is necessary to replace the sealing gasket. The old gasket must be changed.
- Unscrew the 4 fastening nuts of the pump, and then disassemble it.
- Install the new pump along with the O-rings. O-rings and gaskets cannot be reused.
- Now you can assemble all the parts in the reverse order of removal.
From the instructions described above, it is clear that the process of replacing the pump is not particularly difficult. Before resorting to such actions, you should find out how to check the water pump. Checking the serviceability of the water pump involves performing the following procedures:
- Antifreeze leak detection. If the water pump fails, a coolant leak will inevitably occur. The location of the water pump housing should be inspected.
- The occurrence of extraneous noise. If the device makes strange noises, then this is the reason that it will soon need to be replaced.
- Formation of excessive vibration. Excessive vibration indicates bearing failure.
- System contamination. If you do not replace the antifreeze for a long time, this will certainly cause the pump to fail.
Preparation of tools and workplace
To replace the water pump on a classic VAZ model, you will need a flat, illuminated area or a warm garage (in the cold season). Since all work is carried out from under the hood, a surveillance channel is not needed.
You will need the following tools:
- set of socket wrenches and heads;
- flat screwdriver; crowbar;
- Gloves made of material and rags.
- In addition, high temperature sealant and 1 liter of coolant are required for refilling. To seal the coolant, prepare a 10-liter container with a wide neck (a plastic container or cut from the side of a canister) and a stretch meter for a regular hose.
To avoid burns, all work must be done on a cold engine.
To remove the pump on classic VAZ models, you don't need to rotate the crankshaft, align the toe markers, or disassemble the gear drive like you do in the housing on front-wheel drive vehicles. Simply park your car on a level platform and immobilize it with the handbrake.
Fault prevention
Everyone wants every part of their car to work for as long as possible. What affects the life of the fuel pump?
- Quality of antifreeze, timely replacement and level control. This is perhaps one of the main factors in the normal operation of the entire cooling system: from the engine jacket to the radiator.
- Cleanliness in the cooling system. The absence of solid particles and impurities will slow down the wear of the pump.
- Timely replacement of sealing gaskets of pipes that deteriorate (“tann” and crack) under the influence of coolant and high temperatures.
One of the most serious consequences of a malfunctioning water pump is boiling of the coolant and overheating of the engine, especially in the heat in traffic jams. When standing in city traffic jams in the summer, you need to monitor the engine temperature and prevent critical heating. And on long trips, always have a supply of antifreeze for topping up.
Malfunctions of “classic” water pumps
In older Zhiguli models, the engine is cooled using a special non-freezing liquid - antifreeze, circulating from the engine water jacket to the main radiator. The fluid is forced to move through the system by the rotating impeller of the pump built into the front part of the power unit. It is driven by the crankshaft via a belt drive.
The pump and generator pulley rotates with a belt from the crankshaft
To understand the causes of pump malfunctions, you need to know its structure. The part consists of the following main elements that perform certain functions:
- a housing with a flange serves for hermetically sealed fastening to the engine;
- the shaft is necessary for attaching the impeller and drive pulley;
- roller bearing ensures shaft rotation;
- an impeller with blades pumps coolant;
- hub - fastening element of the drive pulley;
- the seal prevents antifreeze from seeping into the bearing;
- The locking screw secures the bearing race inside the housing.
The cause of pump failure is usually the roller bearing and oil seal.
The vast majority of water pump malfunctions occur due to wear of two elements - the oil seal and the bearing. Owners of “classics” have to deal with the following breakdowns:
- antifreeze leaking through the oil seal and pump shaft;
- increased shaft play due to bearing wear;
- an impeller broken due to emergency contact with the surface of the second housing (occurs with increased shaft play);
- jamming of bearing rollers and breaking of the shaft into 2 parts;
A shaft with a broken end can be pulled out and replaced with a new one.
Due to bearing wear, the impeller begins to touch the housing and breaks a hole where all the antifreeze goes
All of the listed problems can be eliminated by replacing the corresponding elements, provided that the housing itself is not broken. In this case, the pump is replaced entirely.
Replacement process
The sequence of the process is as follows:
- The VAZ 2109 is placed in the garage and the handbrake is tightened. The gearbox must be in the “Neutral” position. If the car is just back from a trip, you need to let the power plant cool down.
- The working fluid must be drained from the system using drain plugs and a container to collect the fluid. At the same time, you can assess the condition of the system - brown and dirty liquid will indicate that the system is very dirty and needs to be flushed.
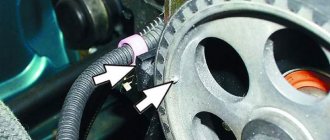
Using keys “10”, unscrew the three bolts securing the protective cover of the timing belt. It is located on the left side of the power plant. Afterwards, the cover is removed, but is not removed far, since there are marks on it for setting TDC in the 1st cylinder.
Removing the protective cover
Aligning the marks on the camshaft
Using a key set to “17”, the tension roller nut is first loosened and then completely unscrewed. Then the video is removed. It should also be checked for wear - there should be no play in it, and it should rotate without jamming.
Remove the belt from the camshaft gear and lower it down. Next, use a “17” key to unscrew the bolt securing this gear, and it must be locked using a powerful screwdriver through the technological holes in the gear.
The gear must be removed carefully, since it is locked on the shaft using a key; when removing it, it is important not to lose it.
Then the nut and three bolts securing the back cover are unscrewed, this is done with a “10” key. This cover is then removed, providing access to the pump mounting bolts.
- The pump mounting bolts are also unscrewed. To remove the faulty pump, you will need to pry it off with a screwdriver.
- Simply removing the pump from its seat will not work, since the distance between the engine and the fender liner is not enough. To pull the pump out, you will have to jack up the engine itself a little from the pump side until it becomes possible to remove it.
Removing the pump - Before installing a new one, the pump seat will need to be thoroughly cleaned with a knife to remove any remnants of the old gasket and wiped well.
- The new pump is placed in place so that the markings on the end of the housing are at the top. The pump mounting bolts must be tightened well, but carefully, since they are screwed into a block made of aluminum.
Reassembly is carried out in the same sequence as disassembly, but some nuances must be taken into account.
The final stage of pump replacement
Pour coolant into the radiator. To avoid air locks, you need to open the stove valve to maximum. Don't forget to disconnect the antifreeze supply hose from the intake manifold. Put it in place only when antifreeze starts flowing from this hose.
After filling the antifreeze to the required level, start the engine and let it warm up to operating temperature. After letting it run for a while, turn it off, after the engine has cooled, add the missing amount of antifreeze, if necessary. Also check the belt tension. After all these steps, the car is ready for use.
How to check the pump's performance?
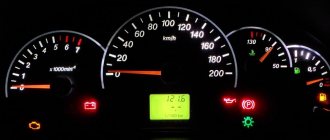
How to check a pump is a simple question. Any car owner can do this without resorting to the help of specialists. The first thing that can become an alarming signal in the operation of the VAZ 2114 pump is the excess temperature of the liquid in the engine cooling system. This information will be given to you by an arrow on the dashboard. The fluid temperature in the engine should not exceed 90 during normal operation of the system.
If you notice that the temperature indicator has risen above the permissible norm, this may indicate either a coolant leak, which is also the reason for the incorrect operation of the water pump or its components, or its complete failure. In any case, even after watching the training video, you should conduct a couple more tests. You need to warm up the car engine to operating temperature (82-90 degrees) and clamp the upper radiator hose.
If the water pump is working properly, you will feel pulsating pressure in the pipe. In addition, it is worth inspecting the oil seal and determining whether coolant is leaking through the pump holes. To do this, remove the timing belt cover. If there are brownish streaks or deposits on the pump holes, this is a sure sign that the seal needs to be replaced. A pump malfunction, namely a bearing failure, can be identified by the characteristic noise when the pump operates.
If it is impossible to visually determine damage to the water pump, but all the prerequisites may indicate its malfunction, the only correct step is to remove the pump from the outside. This way you can evaluate by eye the performance of the reverse side of the rotor, namely the blades, which are often destroyed by rust. In any case, replacing the water pump will not cause you any trouble if you study the process in detail in the video and follow the instructions described below.
Pump on the VAZ-2106: how it works, what it consists of, features of do-it-yourself replacement
On VAZ-2106 cars, the pump needs to be changed if it shows even the slightest signs of breakdown - extraneous noise, knocking, or an antifreeze leak. The pump in the cooling system must operate quietly and smoothly; no grinding noises are allowed. But just before starting work, be sure to make sure that the reason is not in the generator, but in the liquid pump. If leaks are detected, only the oil seal can be replaced. But practice shows that this does not last long - due to wear on the pump rotor, the oil seal quickly collapses.