When to replace?
Replacement must be made only when the above-described malfunctions occur, but before starting work, you must check the sensor itself for contamination and integrity.
The check should begin with the connector. You need to remove the chip from the sensor and check it for contamination and integrity of the contacts, both on the chip itself and on the sensor. All contacts must be clean and intact without traces of oil, dirt or rust.
If, upon inspection of the connector, the problems described above are discovered, it must be replaced. Connectors are sold in auto parts stores for domestic cars.
Next, you need to remove the sensor itself; to do this, use a ratchet and a 10-point socket, unscrew the nut and remove the sensor. The plastic housing of the sensor should be free of cracks, chips, dents and metal shavings. If necessary, we clean it and install it in place.
Quite often it happens that chips formed during the friction of gears in the gearbox stick to the DS and it, in turn, begins to display incorrect readings.
If all these manipulations with the DSA did not help, then it needs to be replaced.
Checking fuses
Often the cause of a speedometer malfunction is a blown fuse. Most often, a fuse fails due to water getting on it, which flows onto the contacts, which leads to an interruption in the operation of the electrical circuit. If the check reveals that the fuse responsible for the operation of the dashboard has blown, then the car owner will simply need to replace it with a new one. Finding the right fuse is quite simple by marking “IG/METER”, but if the replacement process does not help solve the problem, then you will have to check the integrity of the wires that go to the dashboard from the speed sensor.
How to easily and quickly remove the dashboard on a VAZ 2110 with your own hands?
How to remove a dashboard on a VAZ-2110: step-by-step instructions
Without a doubt, the dashboard is the most noticeable interior detail in a car, because it is located right in front of the eyes of passengers and drivers. The need to remove the dashboard on a VAZ 2110 may arise for car owners for a variety of reasons.
So, by removing this part, you can get full access to all the electrical components of your vehicle, replace the burnt-out wiring with a new one, connect additional devices or lighting, install a Euro trim or sound insulation.
Options for replacing the standard VAZ 2110 panel:
Old-style panel trim for VAZ 2110 Panel trim for VAZ 2110 Euro-2 Panel trim for VAZ 2110 Euro-1 Panel trim for VAZ 2110 Euro-3 Panel chestnut trim for VAZ 2110 (instrument panel in the center) Panel chestnut trim for VAZ 2110 (instrument panel in the center) Trim panels VAZ 2110 Kashtan Panel trim VAZ 2110 Kashtan Panel trim VAZ 2110 Kashtan
If desired, you can cover the dashboard with various materials of your choice, thereby making the desired changes to the interior of the cabin.
Subtleties
I would like to say right away that removing and replacing a torpedo on a VAZ 2110 will require a lot of time and patience from you
In addition, all repair work must be carried out extremely carefully and carefully so as not to accidentally break the fastening, since the dashboard will not fit back as it should and will creak when driving
To work you will need the following tools:
- marker;
- self-adhesive labels;
- set of screwdrivers and wrenches.
Removal instructions
It is recommended to remove the VAZ 2110 torpedo in the following sequence:
- Interior details. Before starting work directly, it is necessary to prepare the interior, since disassembling the front panel of the VAZ 2110 is best done with room for maneuvers. Therefore, the first thing we do is remove the front seats and steering wheel of the car. It is advisable to carry out dismantling in exactly the same sequence as indicated above, since otherwise it will be extremely difficult to remove the driver’s seat. In order not to break anything, consider your strength when pulling the wheel out of the column splines; to do this, loosen the steering wheel nut a little, and then pull it towards you while loosening it from side to side;
- Transmission tunnel. After the salon is prepared and there is a place to work, we are faced with the next task - dismantling the floor tunnel in the salon. Simply unscrew the screws and push the top of the part being disassembled back. Then do the same with the bottom of the tunnel;
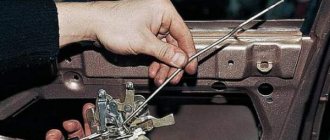
- Steering wheel and steering column. Unscrew the screws on the steering column casing of the VAZ 2110, and then remove the steering column switches. Mark all the wires and connectors released during disassembly with a marker or labels; this will later work to your advantage when, when assembling the torpedo, you end up with a large number of wires of different colors. It is recommended to use the marking especially for owners of cars that are already equipped with an audio system and alarm system;
- Glovebox. The next stage of work will be to dismantle the glove compartment, after which it is necessary to remove the relay and mounting block. Don’t forget to mark the wires as you work and take special care with the fragile speedometer and other dashboard elements that also require special treatment;
- Torpedo. And now we can move on to the immediate purpose of the repair - we have to remove the dashboard. To do this, it is necessary to unscrew the screws in the resulting void behind the glove compartment and unscrew the fastenings. After that, use a screwdriver to hook the air duct on the left side and remove it. Then all that remains is to unscrew the nut, holding the torpedo with your hand, the torpedo and pull it out from the studs, at the same time do not forget to mark the wires with a marker so as not to get confused.
How to remove the instrument panel on a Lada Priora yourself
How to remove the center console on a Prior? you never know why you need it
In comparison with earlier car models that were produced at the plant, VAZ has significantly improved the dashboard in Lada Priora car models. During the development of the new instrument panel, the manufacturer used SoftLook plastic material, which in its appearance is very reminiscent of high-quality leather. In addition, this material is highly durable and difficult to damage or scratch. The car manufacturer decided to use plastic of this type, in addition to the dashboard, also in the door trim. The dashboard of Priora model cars contains elements that are varnished black. In addition, the cars are equipped with a GLONASS-GPS navigator, the advantage of which is a large touch screen. The color screen displays the necessary navigation information: audio system interface, navigation connection, route system configuration, and so on.
To control the navigation system, there is a steering column switch on the right side, which allows you to comfortably carry out the necessary actions. Most experts who reviewed the domestic car noted that Priora is equipped with a high-quality built-in computer
This device is ideally suited for users, and the information is displayed on the screen in Russian, which is very important for many drivers
It is also worth noting that the navigator has full support for 83 regions of the country. It has a built-in detailed road map, where there are more than 300 thousand different objects for the driver. For example, a user can easily find a gas station, car service center, hotel, cafe or restaurant nearby.
What does the dashboard consist of?
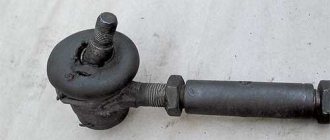
How to remove the tie rod end without a puller? there is such a way
The Priora instrument panel contains all the necessary parts that no modern car can do without:
- regulator of external lighting and internal panel lighting;
- switch for turning, side and headlights;
- signal regulator;
- car instrument cluster;
- windshield wiper and washer regulator.
This is how the dashboard works
In addition, the panel contains an ignition switch connected to the anti-theft system. It contains 3 positions. Among the secondary mechanisms, we can note the presence of regulators for the rear window heating system, alarm and interior cooling. It is also worth mentioning the glove compartment, built-in clock and radio input jack.
How to remove a beard on Prior 2?
We suggest you familiarize yourself with the topic: “how to remove a beard on a Prior 2?”, including the latest trends.
| If you need to install sound insulation on the floor, or paint, or reupholster the interior plastic of the Lada Priora, then you first need to remove the central tunnel (beard). The procedure is not complicated and you can easily do it without an assistant in 30 minutes. |
Tools required: 10mm socket, Phillips screwdriver, tall 10mm socket, flathead screwdriver.
Disconnect the negative terminal from the battery, and for ease of work you can remove the front seats. Then:
- Unscrew the nut securing the air duct to the feet of passengers in the rear seat using a 10mm socket.
- Remove the air duct. Remove the second air duct on the right side in the same way.
- Raise the armrest and pry off the armrest hinge pad.
- Remove the armrest of the Lada Priora.
- Unclip the latches to pry open the container for storing small items. Get him out of the tunnel.
- Unscrew the 2 bolts securing the armrest hinge using a 10mm socket and remove it.
- Unscrew the 4 screws securing the floor tunnel using a Phillips screwdriver.
- Through the opening, press the latch and remove the block with wires from the trunk lock control button.
- Unscrew the 2 tunnel fastening nuts using a high 10mm socket.
- Place the front seats in place and move them forward as far as possible. Unscrew the self-tapping screw securing the tunnel to the base on the left and similarly on the right, using a Phillips screwdriver.
- Remove the plastic plug at the bottom of the cup holder using a flathead screwdriver.
- Unscrew the tunnel fastening screw using a Phillips screwdriver.
- Unscrew the 2 screws securing the floor tunnel on the left and similarly on the right, using a Phillips screwdriver.
- Remove the plug in the handbrake housing using a slotted screwdriver.
- Unscrew the screw securing the side panel of the tunnel using a Phillips screwdriver.
- Remove the left tunnel shield, and similarly the right shield.
- Unscrew the screw securing the front part of the tunnel using a Phillips screwdriver. Unscrew the screw on the right side in the same way.
- Unclip the latches and remove the Priora gearbox cover. Leave the frame with the cover on the gearshift lever.
- Remove the 2 screws securing the tunnel to the instrument panel console using a Phillips screwdriver.
- Lift up the tunnel.
- Press the latch and disconnect the block with wires from the cigarette lighter. Remove the central tunnel of the Priora.
Installation of the tunnel lining is carried out in the reverse order.
The question of removing the center console on a Priora worries quite a few car owners, since this has to be done quite often and here’s why. The fact is that some control elements, such as a clock, a heater control unit, or the central heater deflector, cannot be replaced without removing the console.
To remove it, you will need a minimum of tools and the main one, which you simply cannot do without - a Phillips screwdriver.
Removing and installing the center console of the instrument panel on a Priora
The center console trim on cars with “standard” and “luxury” configurations may differ in the size of the cutout for the radio. Otherwise, there will be no difference in fastenings. Moreover, many owners cut a hole out of a regular one for installing a 2-din radio and everything works out quite successfully. So, let’s get closer to the point - if you have a radio installed, you must first remove it, using special removable keys that usually come with it.
After the niche is free, pressing on the button connectors from the inside, we take them out, approximately as can be seen in the photo below.
Then we disconnect the block with wires from the buttons that go to the console.
Next, you need to remove the ashtray by pulling it with a certain force from each edge in the open state, since it is attached along guides in the grooves:
After this, two fastening screws are clearly visible in the recess, which, of course, will need to be unscrewed.
In this case, we are dealing with a 2-din console that has already been cut out, so the two remaining screws are not visible, and only a little lower are the attachment points that were once there visible. In the photo above they are visible - slightly in the recess. If you have everything in factory form, then everything will look like this - a couple of screws are under the cover:
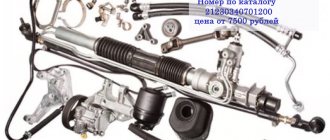
Standard instrument panel - article number and price
The original car tidy exists in three types.
- the first is an option for a pre-restyling car;
- the second panel is for a restyled car;
- and the third is the “Lux” option for the restyled one, which has become faintly similar to all previous torpedoes.
Each of them contains standard elements such as a tachometer, so their functionality does not decrease. . Who wants to do tuning of the instrument panel, this option is for them.
Priora first generation
The instrument cluster for the first generation Lada Priora received catalog number 2170-3801010. Cost – about 6,000 rubles. Everything is standard with it - from left to right there are four arc scales with red arrows: odometer, speedometer, coolant temperature, fuel level. Below the speedometer there is a small on-board computer display, and above the arches are all the indicators, including the direction indicators.
Priora 2
For the Priora “Lux” variation there are two more “subtypes” - with or without a CAN bus. Different subtypes were made so that the panel could be connected to any car. Catalog number – 2170-3801010-50 without tire, 2170-3801010-60 with tire. It is distinctive in that it contains an elongated display with a screen that can highlight the navigator.
How to remove the center console on a Priora
The reasons for removing the console may be its damage in the form of cracks, the appearance of extraneous noise or knocking under the panel while driving. Or you may simply want to install a console of a different color.
Before getting started, it should be noted that on the Priora the console body and the instrument panel are one solid part. However, an independent decorative trim on the console itself can be removed for easy access to the cavity of the instrument panel. The decorative panel of the console itself, together with the gearbox tunnel, is also called the “beard”.
Since in the process of removing the console it will be necessary to disconnect various electrical contacts, in order to avoid a short circuit it is recommended to turn off the ignition or disconnect the negative terminal from the battery. To remove the console you will need a Phillips and flathead screwdriver. It would also be a good idea to pick up some small box for collecting unscrewed screws and other small items.
So let's get down to business. First of all, you need to remove the radio. If you have a car with a standard radio, then you should not try to pick it out with something sharp. To remove it, it’s time to use available materials. Stiffening plates from VAZ windshield wiper blades can help with this. Locking grooves are provided along the edges of the plates. There are narrow grooves on the radio under the Scan (on the left side) and Tab (on the right) buttons. We insert the plates from the windshield wiper blades into these grooves, move them slightly apart and carefully pull the radio towards you.
If a regular, non-factory radio is installed, then removing it is much simpler. It is enough to pry the radio frame with a small screwdriver, and the entire assembly can be easily removed. It happens that special keys are needed to remove the radio frame itself.
After removing the radio, remove the heated rear mirror button. The button is carefully pryed up with a screwdriver and pulled out, and the chip with wires is disconnected from it. Afterwards you need to remove the ashtray. The plastic insert is removed from it and, by slightly pulling outward, the ashtray body itself is removed. Then the glove compartment lid is removed from the pins.
Then four screws are unscrewed: two are located under the already removed ashtray and two are located just below the glove compartment. To get to the screws located under the ashtray, you must first remove the decorative panel with a cup holder located on the gear shift lever. To do this, use a thin screwdriver to pry up and remove the leatherette cover from the box lever, and unscrew the fastening of the panel itself, or, as it is also called, the tunnel cover. After this, access to the lower console mounting screws opens. For convenience, we put all the unscrewed screws into a pre-prepared box or jar.
When unscrewing the console mounting screws, it is recommended to use a magnetized screwdriver. This will prevent you from losing screws during disassembly and assembly of the panel. It happens that washers are placed under the mounting screws, which should also be carefully and carefully collected in a jar for small items.
Next, remove the top panel of buttons and disconnect the chips with wires. The chips are disconnected from the power window buttons, heated windows and the hazard warning light buttons. After disconnecting this panel of buttons, two more screws are unscrewed, located a little deeper in the vacated niche. It is recommended to mark all disconnected chips by sticking self-adhesive paper on them and sign which button or regulator the connection corresponds to.
After releasing all the mounting screws, carefully, without sudden movements, pull the console panel towards you. It should come off without much effort. After removing the console from it, you need to disconnect the interior heater control unit. It is detached by unscrewing the four screws on the back of the console. After this, you can consider the console removed.
As you can see, there is nothing complicated in this process. The main thing is to remain patient and carefully handle the console parts when prying them with a screwdriver, otherwise you may leave burrs on the edges of the plastic parts. If you are removing the console for the first time, then not everything will work out right away. Next time everything will be much easier.
Now all that remains is to disconnect a few connectors.
The first is from the heater control unit:
Second from standard quartz watches:
- And the last one is from the hazard warning button. The most convenient way to do this is with the button already removed from the console body:
- Now you can remove the console, since nothing else prevents this.
- I think there is no need to explain that if it is necessary to replace this part, from the inside it will be necessary to unscrew and remove the control unit from the heater, as well as the clock and the central nozzles of the heater air duct.
New Lada: ➤ What is better than Priora or Granta liftback - comparison
Installation occurs in reverse order. If you need to buy a new console, this may be a problem. It is not so easy to find it in stores and car markets, although the price is not high and is about 700 rubles. You can buy a similar thing at a car disassembly for no more than 400-500 rubles, and the quality is better than “new” ones.
How much do watches cost?
Instead, you can put three options:
- Analog – original and with modifications;
- Conventional electronic;
- Voltmeter and various accessories.
Analog ones are available in parts stores and the aftermarket. Their price starts from 200 rubles - lovers of the classics can get themselves a new device to replace the faulty ones. A factory malfunction may be the result of a breakdown in the electrical wiring or the mechanism itself.
The main options for improvements from craftsmen are the backlighting of numbers and hands, as well as a black bezel instead of the original gray
It will become easier to tell the time at night, but note: according to statistics, in order to tell the time, a person looks at an analog device much longer than at an electronic one. This can play a key role in a traffic situation, because according to traffic rules it is not recommended to be distracted from the road
Regular electronic watches are sold in 2 versions: assembled and in parts. Collected ones can cost from 450-500 rubles. They come in a variety of colors, with tinted glass, but most sellers only offer the original gray bezel, so aesthetes will have to paint this part black themselves. You can assemble this simple device yourself: tint the glass, connect the electrical, set the time. The whole set will cost about 400 rubles.
Where is the speed sensor located on Lada Priora 8 and 16 valves: diagram
One of the most important elements on a Lada Priora car is the speed sensor, the operation of which requires continuous monitoring. Incorrect operation of this sensor can lead to a decrease in traction, increased fuel consumption, and its complete incapacity can create an emergency situation on the road. Experienced motorists are familiar with the situation when, at a speed of 100 km/h, the car’s speedometer slowly slides to 80, while the car continues to move at the same pace. If you have encountered such a situation, then it is advisable to know where the speed sensor is located on the Priora and possible solutions to this malfunction.
The speed sensor on the Lada Priora is located on the top of the gearbox housing. A faulty sensor transmits incorrect information, which is reflected in the form of incorrect operation of the car.
Checking the speed sensor
Finding out the functionality of this element is much easier for the owner of a Priora with an on-board computer. A message will appear on the display informing you that there is no signal being received from the speed sensor.
It is also easy to understand this without a computer by changes in idle speed, unstable traction, incorrect speedometer readings and increased fuel consumption.
Method No. 1 without removing the sensor
The Priora must be positioned so that one of the wheels does not touch the surface. Next, the contact of the speed sensor should be connected to the voltmeter and the suspended wheel should begin to rotate. The appearance of voltage on the tester will confirm the working condition of the sensor.
Method number 2
To check the sensor using this method, you will need a test lamp. Next, you need to disconnect the terminal that supplies the pulse. We hang the wheel above the surface and, after connecting the test lamp to the positive terminal of the battery on one side and to the impulse terminal on the other, we begin to manually rotate the wheel. If the lamp blinks when the wheel rotates, then you need to look for the fault in other components.
Removing and replacing the speed sensor
To get to it you need to have some tools and a little time. Tools you will need:
- Two screwdrivers: flat and Phillips.
- Socket head for 10.
- Handle with ratchet.
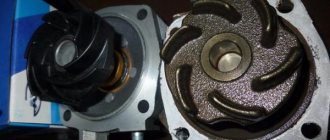
To get to the location of the required element, you need to unscrew the clamps and remove the injector inlet pipe, which is routed from the air filter to the throttle assembly. To do this, unscrew the coupling bolts on both sides of the pipe, unscrew the bolt of the thin hose and remove the entire structure. After completing these steps, you will be able to see the location of the speed sensor.
Once nothing interferes with the view of the speed sensor, you can dismantle it.
Disconnect the wiring going to the sensor from the power connector. Using a 10 mm socket and a ratchet, unscrew the nut on the stud. Carefully pull the sensor housing out of the seat
If it is difficult to dismantle, you can use a flat-head screwdriver to make it easier.
Carefully pry the housing of the element being removed from below and remove it from the gearbox
Next, we install a new speed sensor and securely fix it, having previously lubricated the sealing rubber with machine oil. We return the air duct pipe to its original position and secure it. Connect power to the battery.
Sensor selection
You need to purchase a new speed sensor to avoid problems. Visually, the sensor intended for the Priora is almost no different from the Kalina element, and many sellers claim that one model can easily be replaced by another model. Sensors that look similar have completely different fillings, and after installing an inappropriate element, frequent malfunctions in the operation of the ECU and incorrect readings on the speedometer will occur. Therefore, before purchasing, you need to carefully study the old part, rewrite the catalog number and purchase exactly the same model.
https://youtube.com/watch?v=7drLW_Qlgj4
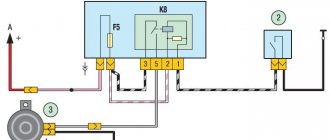
How to eliminate error 4 on BC Lada Kalina: check light is on, photo
How to remove the bumper on a Lada Priora yourself
According to the service manual, error number 4 in the control unit indicates a malfunction of the coolant temperature sensor. According to reports from members of our community and according to motorists, this error is quite common and appears often on the Lada Kalina. It’s worth figuring out why errors pop up and how to fix the problem.
Causes of 4 errors
There are several reasons why error 4 appears in the ECU. Let's consider all possible options:
- The coolant temperature sensor has failed. In the process of replacing and repairing the coolant sensor on Kalina
- Open circuit with sensor. Checking the wiring and voltage supply to the sensor
- Random error in the control unit system due to impact or other factors.
- Loss of contact on the sensor due to plaque buildup.
All of these reasons are fairly easy to fix and are not a cause for serious concern.
Elimination methods
In order to eliminate the cause of error 4 in the Kalina ECU, you should perform the following operations:
- Check the sensor for functionality. If it “died”, then it should be replaced.
- Check if there is contact and if there is any plaque. Clean the seat and replace the sensor.
- Check the on-board circuit and make sure there is contact in it.
- But a random error will have to be treated only by flashing the ECU and resetting all errors. To do this, it is recommended to contact a car service.
Thus, you can solve the problem yourself, but as practice shows, this does not always work out. Error 4 occurs quite often in the cold season, when the car is parked in the fresh air for a long time, and not in the garage.
conclusions
Finding and eliminating the cause of error 4 on the Lada Kalina turned out to be quite easy. Although deciphering error codes requires special knowledge, the necessary information can be found in this article.
carfrance.ru
Is it possible to install LED lamps?
Instead of conventional dashboard lamps, some owners install LED ones. The advantage of them is that they provide brighter light and you can choose lamps of different colors. However, some LED lamps are longer than conventional lamps, so when installed in the instrument panel, they fit closer to the light filter and create a bright spot. But at the same time, the panel itself and the indicators become brighter.
Advantages of LEDs in the shield
- brighter light, allowing better illumination of devices
- Possibility of choosing lamps of different colors at will
- longer lifespan of quality LEDs
Minuses
- Too bright LED lamps create glare on the panel, which does not look very good
- sometimes the panel looks too bright and distracts from movement
- The bright light of the panel can cause eye fatigue
What lamps are installed in the Priora dashboard
Depending on the year of manufacture, Lada Priora can be equipped with both lamps with a conventional socket and with a VDO socket. To accurately determine the lamps, you must first remove the shield and determine the type of socket. The lamps in the sockets are the same, however, from the factory, the lamp mustaches are soldered to the socket and to replace the lamp, you need to unsolder or pull out the old one and install a new lamp in its place, while soldering the mustaches.
However, you can take a simpler route by purchasing ready-made lamps with sockets. Note that the lamps are installed in them without soldering the mustaches. That is, if the lamps burn out further, you simply change the lamp and that’s it.
A regular lamp socket looks like this
This is what a lamp with a VDO socket looks like
Adjusting the speedometer without a stop
The adjustment process described above was typical for a device with a stop. For a speedometer without a stop, the procedure is slightly different, since in such a device, when the needle is scrolled, it continues to spin, even after passing the 220 km/h mark.
To set the speedometer correctly without a stop, you need to move the needle to 140 km/h. Then you should carefully lift the scale sticker from the side of the nail and tighten the latch, using tweezers, or, if you don’t have one, thin scissors.
Then you need to remove the stud itself and move the arrow to 0. Make a mark on the dashboard opposite this place.