We notice a flat tire or a “sick” starter immediately and take urgent measures to eliminate the problem. And a tired hood lock, according to most car enthusiasts, “does not affect speed.” Indeed, it does not affect, but many are terribly annoyed by repeated clapping, nervously tugging at the handle in the hope that Sesame will finally open. And all this happens, as a rule, at the most inopportune moments. It seems like a small thing, but an irritated driver is a threat on the road, and for absolutely all road users.
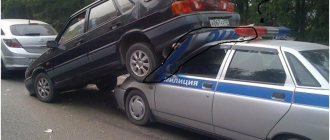
Or a hood that opens of its own accord while driving... Even at low speed this can create serious problems.
Let’s not put off such a “trifle” as adjustment. Moreover, all operations can be performed independently, without resorting to the help of service station workers, and most importantly, completely free of charge!
And this happens sometimes!
In what cases will adjustment help?
Let's list the main malfunctions that you can fix yourself by just adjusting the car hood lock:
- The hood has become difficult to close; it requires repeated slamming and significant force to close it
- It has become problematic to open it (we pull and pull, but the reaction is zero)
- Doesn’t “bounce” when the cable is pulled; when closing, an extraneous knock of metal on metal is heard
- Rattling when the engine is running, in the pits.
Since it is almost impossible to describe all the models in one article, let’s take as an example a masterpiece of the domestic automobile industry - the VAZ car. Whatever they say, Lada cars roam the expanses of the former CIS more often than any foreign car. And, given their survivability, I think this will last for a long time... And based on the principle that this procedure, on almost all cars, comes down to similar actions (if you do not take into account the design features of the locks), you can derive a general adjustment formula. Let's start adjusting the locks, for example, for VAZ 2108, VAZ 2109, VAZ 21099.
Tools
To adjust we need:
19mm wrench.
Screwdriver, I usually use a "magic" set.
Oil for lubricating the lock (only liquid oil is suitable; “solidol”, “litol” and other similar lubricants are not suitable, since they harden at low temperatures, which makes the mechanism difficult to operate).
Desire, some free time, a head and two arms (preferably straight).
Installation of sports locks
Sports hood locks can be installed instead of standard parts or as additional insurance. It is recommended not to abandon the original locking mechanism; this is an additional guarantee that the hood will not be opened by intruders; the latches on VAZ cars are quite strong and can withstand significant mechanical forces if they are opened.
Installing sports locks on the hood of a VAZ will require additional tools and some skills; the whole process takes several hours.
Tools and materials
- tape measure or ruler;
- round file;
- drill;
- open-end wrench 19;
- crosshead screwdriver.
Preparing for installation
Before installing the sports lock, it is necessary to accurately measure the places where the rods are attached on the bar.
- Holes are drilled in the frame above the headlights and rods are installed.
- the tops of the rods are smeared with grease, and the hood lid is covered so that fingerprints remain on the lid.
- On the hood, on the printed marks from the rods, the necessary holes should be drilled.
Hood drilling steps:
- The hood cover is drilled from the inside out.
- Take the smallest drill and drill a hole on a solid wheel.
- The hole is expanded with a large drill.
- Checking holes for additional boring.
- The hole should be 1-2 mm away from the rod.
The preparatory procedure before installing the sports lock is completed.
Installation
Installing the lock also requires using a drill to secure it to the hood. Stages of work:
- For example, the protective coating is removed from the plate on the hood lock of a VAZ 2106, the plate is applied to the hood and the four mounting holes for the plate are measured.
- Use a thin drill to drill the cover for the screws.
- The plate is screwed on with self-tapping screws.
- The rods are tightened to the optimal position.
- Studs are inserted into the holes of the rods.
- Installation of safety cables.
- Installation completed.
Of course, repairing and adjusting the lock is not a complicated procedure that you can easily do yourself. A well-reinforced hood means driver safety on the road; it’s hard to imagine what the consequences of a hood suddenly opening on the highway could be.
The adjustment process on the selected car model
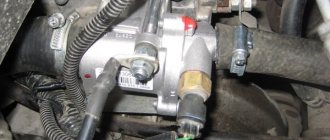
The device of the hood lock VAZ 2108/2109/21099
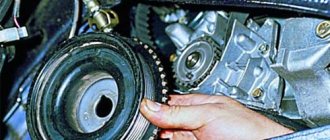
To begin, open and secure the hood. Let's pay attention to the lock and try to understand the principle of its operation.
The photo shows the main elements of the castle:
- Lock latch spring
- Lock-nut
- Latch
- Safety hook
- Safety hook handle.
From what we saw, it follows that after we pulled the opening handle in the cabin, the cable opens the latch, which releases the lock latch. Thanks to the latch spring, the hood “jumps” up, but it is still held half-open by the safety hook. And only by pressing the handle of the safety hook, we can fully open it and gain access to the engine compartment. Quite a reliable system. At first sight…
Adjustment, although not a very difficult operation, requires patience and accuracy. Sometimes you have to repeat the same jewelry movement many times until everything starts working as it should!
Vertical adjustment of the lock
If the hood does not want to close normally (you slam it, put pressure on it, but it still closes with difficulty, or does not lock in the closed position at all), or a rattling noise appears when driving on our perfectly smooth roads (sometimes it is noticeable even just when the engine), then adjustment in the vertical direction is necessary. Namely, adjusting the length of the lock latch.
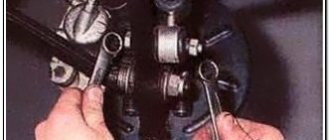
To do this, use a 19 mm wrench to loosen the lock nut on the latch, holding the latch itself from turning with a flat-head screwdriver.
If the hood is poorly or not at all fixed in the closed position, then you need to slightly increase the length of the latch, which we will achieve by unscrewing it with a screwdriver.
If the hood rattles, on the contrary, you need to shorten the latch by tightening it several turns inward. The required latch length is determined experimentally.
Detailed instructions for adjusting doors on a VAZ 2114
If the driver cannot open the door structure of the car or it is difficult to do so, then the VAZ 2114 doors are adjusted. Incorrect operation begins to appear after prolonged use, an accident or unsuccessful repair. The information will allow every car enthusiast to repair his car if the door begins to rattle or sagging appears.
Hood opening while driving
The body of a car, in particular the hood, can easily be damaged without even applying much effort. Scratches of varying depths can occur from branches, careless movement of the car owner or unauthorized persons. What can we say about collisions that result in dents. Straightening will help straighten the hood and return it to its original appearance. Many specialized auto repair shops offer a similar service, but it is not always possible to contact specialists. At the same time, it is necessary to correct problems on the hood as quickly as possible, since corrosion can appear in a short time, which is several times more difficult to deal with. There is only one way out of this situation - to return the original appearance of the hood with your own hands. This task is not easy, but with a strong desire it is quite possible to cope with it.
If you have dented the hood of your car, then there is no reason to despair, because in this article we will tell you how to fix it
Hood straightening - what can it be?
Straightening works are presented in several versions. The choice of the most appropriate one depends on the nature and extent of the damage.
- A suction cup is suitable for working with a large but shallow dent.
- If the damage is represented by a dent with metal bends and deep depressions, then it is necessary to resort to the use of a straightening hammer.
- Elimination of deep damage, which is characterized by the presence of strong stretching of the metal, will involve straightening and removing the resulting excess.
- In case of very serious damage, it makes sense to remove the damaged section of the hood and weld a new piece of metal in its place.
Straightening work can be performed using the following tool:
- A straightening hammer allows you to tap a previously removed damaged element.
- If it is not possible to dismantle the damaged area of the hood, then a special spoon is used, with the help of which the dent is squeezed out and the metal takes on a normal shape.
Almost all straightening work is carried out according to the following scheme:
- When working on a large area dent, pulling/tapping is carried out from its boundaries.
- Aligning a small dent starts from its center.
- In some cases, it makes sense to warm up the metal before starting straightening work. In this case, a blowtorch or torch will be needed. The heated surface is covered on all sides with wet rags, which creates a temperature difference. As a result of such actions, it is possible to achieve contraction of the metal.
Features of aluminum hoods
Repair of aluminum hoods has a number of features:
- Elimination of defects on aluminum body parts is carried out only with tools that have not previously been in contact with metal. Otherwise, the part is subject to electrochemical corrosion.
- Straightening is carried out only in the presence of minor damage, using a rubber hammer, and supporting the work area with wooden blocks.
- The work must be done promptly. Aluminum is covered with an oxide film that protects against corrosion; it is damaged after mechanical impact.
Practical advice
In fact, there are a huge number of tools, methods and methods with which you can straighten the damage on the hood. You should start straightening dents with your hands and only then apply more drastic methods in practice.
The body of many cars consists of such thin metal that it easily responds to manual straightening and does not require the use of additional tools. It happens that the dent itself is not serious and can easily be squeezed out with your hands, but it is difficult to get to it. In this case, you can use a heat gun, which will heat the dent from the inside. You should be careful here, since if the temperature conditions are not observed, you can observe swelling of the paintwork. The paint should not heat above 110 degrees.
When leveling out serious dents, it will not be possible to avoid damage to the paintwork, which will have to be restored. There are such complex damages that to correct it is necessary to make holes in the hood, insert hooks into them and pull them. You can weld washers to the metal on the outside, by which the metal will be pulled or twitched. With this straightening method, each shift of the metal can be controlled, achieving high precision in the work.
It is rare that straightening does not require the application of putty. Lumps and various irregularities remain on the straightened part, which have to be painstakingly worked on. The former dent on the hood needs careful degreasing and application of automotive putty. This material quickly becomes hard, tightly adheres to the metal, can be sanded and promotes even painting. If all this work is done efficiently, then it is impossible to see the difference with the naked eye.
Now that you know how to straighten the hood, you can take further steps. First of all, you should try to bend the dent out with your hands. And only after failure you need to think about your further actions. In principle, there is nothing supernatural or impossible in removing even complex damage. No straightening master is born with his own skills, everything comes with experience. Perhaps you already have a similar talent that just needs to be revealed, and you can not only straighten your car.
Removal and installation
Removing and installing the hood of a VAZ 2114 is quite easy without the help of others, without resorting to the help of a car service. How to do this will be discussed further. The hood is held in place by hinges located along the rear edge of the front part of the body. A hood lock with a hook is installed in front, which protects it from opening while the car is moving. In the open position, the hood rests on an iron stop. The lock has a cable drive with a handle, which is located inside the cabin under the instrument panel on the left side.
In order to remove the hood, you need to open it and put it on the stop. Then you need to disconnect the windshield washer tube from the tee, and also disconnect the electrical wires from the engine compartment lamp. Now you can unscrew the four bolts securing the hinges to the hood. It is better to have an assistant nearby at this time to hold the hood suspended. By unscrewing these bolts, you can remove the hood of the VAZ 2114 from the body. The withdrawal operation is completed. Installation is done in reverse order. But at the very end, before tightening the fastening bolts, you will need to adjust the gaps between the hood and the body wings.
Hood lock device
The entire VAZ line has a mechanical lock device, with similar main parts. VAZ 2114, 2115 have additional plastic protection installed under the bumper. This is important to remember when the cover jams after the cable breaks. Otherwise, the locking mechanism has the following parts. Using the example of the hood lock of the VAZ 2110.
- latch pin;
- springs - lock latches, hook;
- lock-nut;
- lock washer;
- hook - hook axis, handle;
- cups - upper, lower;
- traction mechanism - holders, bushing, seal, shell;
- lever.
The lock on the entire line of Zhiguli cars works extremely simply: by slamming the hood, the pin falls into a standard hole on the frame and is held in place by a spring. By pressing the traction handle in the passenger compartment, the latch is released, opening a small gap. By pressing the safety hook handle, the lid opens completely.
Adjusting the gaps between the hood and wings of the VAZ 2114
Open and place the hood on the stop. Loosen the bolts securing it to the hinges. There are two of them on each side. Then we cover the hood and install it in such a way that the gaps between the wings and the hood are equal on both the right and left sides. Now carefully lift the hood and tighten the fastening bolts well.
The height of the hood can be adjusted using the height configuration of the adjusting buffers. There are two of them. These buffers must be installed in such a way that the surfaces of the wings and hood coincide.
The height of the buffers can be adjusted by turning them in or out. Having completed all these operations, you need to make sure that the hood now simply opens and is securely locked with a lock. In case of unreliable closing or other problems associated with closing, you need to adjust the hood lock.
Hood with gas stop VAZ 2114
How to replace and adjust the hood lock on a VAZ 2113, 2114, 2115
Photo and video instructions for those who want to independently replace and adjust the hood latch on cars of the LADA Samara family.
1. Before starting work, you need to mark the position of the latch on the hood with a marker.
2. Using a screwdriver and a 17mm wrench, loosen the locknut.
3. Unscrew the locking nut and washer.
4. Using a screwdriver, remove the lock washer of the safety hook axis.
5. Then we take out the axle and remove the lever from the 2 plastic holders.
6. Remove the safety hook assembly with the drive lever.
7. Remove the upper end of the lock spring from the panel hole.
8. Disconnect the drive rod from the spring and remove it from the body panel.
9. Installation is carried out in reverse order.
Adjusting the lock
Read
Adjusting the lock can be useful when the hood does not lock well or you have to make quite a lot of effort to close it. This adjustment is also necessary if there is vertical free movement of the hood when it is in the closed position.
In addition, hard impacts when closing, as well as difficulties when opening, also require this adjustment. In order to complete this procedure you will need:
You need to loosen the tightened locknut, immediately holding the latch with a screwdriver to prevent it from turning. Adjusting the height of the latch is painfully simple. To do this, you need to either wrap it, or, on the contrary, turn it away. To adjust the horizontal position of the latch, move it in the required direction. After the adjustment is completed, you need to make sure the lock is working correctly. If it still does not lock or any defects still remain, the adjustment function will need to be repeated.
Just an adjustment
Often the hood begins to close poorly or refuses to close at all due to a violation of the position of the lid or its latch. Moreover, the latter can move both in the vertical and horizontal directions. The solution to the problem is simple, and for all manipulations you only need a screwdriver and a 13mm wrench.
If the height adjustment is broken, you have to apply significant force to close the hood. And even if you managed to slam the lid, it still moves: a noticeable play remains, and while moving the hood bounces and rattles. To fix the problem, you need to loosen the locknut on the latch, holding it with a screwdriver so that it does not turn along with the fastener.
If the latch has moved horizontally, a hard blow is felt when closing the lid, and opening becomes problematic. Again, the locknut is loosened, after which the latch moves to the desired position. Before pinching the fastener, you need to check the ease of closure and its tightness; if the desired result is not achieved, the manipulations are repeated.
If the lid simply does not fit into its allotted space or the latch does not engage when closed, the hood will need to be adjusted in relation to the fenders and latch. The lid hinges; the mounting bolts are loosened. Just don’t unscrew them too much so that the hood doesn’t dangle, but sits quite firmly in place. The lid is carefully lowered; The main thing here is not to latch the lock. There are equal gaps along the edges. To do this, just move the hood slightly in the desired direction.
To be sure that the cracks are even, you can make 4 measuring pegs of the required thickness. It is very convenient to use wine corks for this (not plastic ones): they are easy to cut and do not scratch the body. When you are sure that the gaps are the same, carefully lift the hood and fix the bolts on the hinges.
The end of all such work should be lubrication of the adjusted parts and checking the functionality of the cover with the degree of tightening of the fasteners. Do not overdo it with the latter: an overtightened locknut can prevent the hood from opening freely.
How to ensure ease of opening and reliable fixation?
For these purposes, a special part is sold that can be installed on the car independently. This part is called a gas stop. They replace the standard rack and, as a result, the consumer characteristics of the car increase sharply. The opening of the hood begins to occur as follows. You just need to lift the hood a little with one hand. Next, the gas stop gets to work. He himself will raise the hood to the required height and firmly fix it on it. The standard stop will no longer be used. During operation, this stop does not require any maintenance.
Many owners of VAZ 2114 cars prefer to install a gas strut on their car, especially since the installation process does not require much effort. To perform this operation you will need:
Problems with the hood hinge. Body repair.
VAZ 2114
hit us with a head-on blow.
Deformation of side members with body geometry configuration. Bumper, hood
,...
Repair of the hood of a VAZ 2114 car
How to expose the hood
in height on the mounting mounts if there is no adjustment Device In the video.
- The stops themselves;
- Two keys for 13;
- Four nuts with washers for 13mm;
- Drill;
- Eight-millimeter drill;
- A little enamel and bitumen.
First, we lift the hood and install it on the still old stop. Then you need to mark the places where there will be holes that will need to be drilled without the help of others. It is necessary to measure 530 mm on both sides of the hood.
In this case, the internal distance between the 2 holes will be equal to 310 millimeters. Holes will be drilled in the thickening of the hood, inside of which there is emptiness. Nevertheless, the procedure should be approached with all responsibility, because if you overdo it, you can drill a hole in the hood itself. Having made sure that everything is marked correctly, we proceed directly to drilling. Using a drill, you need to make four holes. Two in the hood thickening and two under the hood, one on each side of the body cross member. To prevent the possibility of corrosion, it is better to treat the resulting holes with an anti-corrosion compound and paint. After which you can proceed directly to the installation. We take the gas stop and install it in the drilled holes on one side. We do the same with the second emphasis. They will need to be screwed. For those who work without an assistant, it is better to first screw the stops onto the hood, and only later onto the body. If there is someone nearby who can support the hood, then the sequence of actions does not really matter. When everything is ready, it will be possible to test the installed stops in action. You will need to test opening and closing the hood a couple of times. It should open simply and smoothly, and closing should not be accompanied by significant effort.
Caring for the body in general and the hood in particular
Read
It's no secret that the body is the main and most expensive part of any car. VAZ 2114 is no exception in this regard. The body of this car is made of high-quality metal and is quite well protected from corrosion. But the effectiveness of factory anti-corrosion treatment also depends on the attention and care of the owner, the storage conditions of the machine, and also the operating conditions.
You can see scratches and abrasions on the hoods of some cars. This in most cases occurs due to the fact that the owners removed dust, remaining dirt and sand from the body with a dry cloth. This is absolutely impossible to do. To remove dirt from the hood in advance, you need to soak it with water, and also use a moistened and soft sponge. If you find bird droppings on the hood or the entire body, you need to get rid of it as quickly as possible. It is very aggressive to enamel and, if left on it for a long time, can even corrode the paint until the metal is exposed.
If you wash the body yourself, then in the summer you need to do it in the shade. If this condition cannot be met, you should immediately wipe the washed surface dry, since when water drops dry under the bright and very hot sun, stains can be created. In winter, after washing your car in a warm room before leaving, wipe the body and door seals dry, because when the remaining drops freeze, cracks may form in the paintwork and the seals may freeze to the body. It is not recommended to use soda and alkaline mixtures, as well as waste water, to wash the car, so that the coating does not fade.
In cases where even the smallest signs of corrosion are detected, you need to clean such places with small sandpaper until the bare metal is removed. Later, these places should be treated with a special agent for cool phosphating, covered with primer and painted over with car enamel.
If there is no experience in carrying out such work, then it is better to entrust this function to specialists, because the operation is quite responsible. Traces of corrosion on welding joints and connections of body parts are superficial and can be removed at the initial stage with polishing pastes. This is easy to do without the help of others. If measures are not taken in a timely manner to eliminate defects in the protective and decorative coating, this will lead to the development of corrosion under the coating layer, its peeling and swelling.
During operation of the machine, the bottom is subjected to brutal exposure to chemical reagents, salt and sand. The mastic and soil that protect the bottom wear off over time, and the bare metal becomes unable to resist corrosion. That is why you need to carefully monitor the condition of the bottom covering, and, if necessary, restore damaged areas.
To preserve the shine of the paintwork for as long as possible, it is necessary to polish the body frequently, using special polishing pastes. This especially applies to cars that are stored outside the garage in the open air. Polishing pastes are capable of sealing microcracks and pores that inevitably appear during operation. This prevents rust from forming under the paint layer. You should also not leave the car under bright and very hot sun for a long time.
Sound insulation of the hood
Many owners of the VAZ 2114 would like to feel less noise while driving the car. It must be admitted that the engine in this car is far from quiet. The noise from its operation is clearly transmitted into the cabin. Soundproofing the hood can help overcome this problem. But you shouldn’t limit yourself to just that. For a more tangible effect, you need to soundproof the front fenders and the wall of the engine compartment.
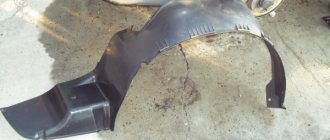
The hood is a rigid frame, which consists of a welded steel profile, as well as a steel sheet, which is, in fact, the hood cover. Only the inside of the hood cover needs to be glued with soundproofing material.
Pieces need to be cut out of the material for vibration absorption, repeating the shape of the cells between the stiffening frame. After gluing all the cells, it is necessary to glue another material on top of them, which is called foil splen. This will help significantly reduce the noise level coming from the engine department.