Once I saw a penny car with a low wooden trunk on a drive and wanted to do something similar. I bought slats, an iron pipe, nuts, bolts and got to work. I cut the tube slightly larger than the size of the roof, then bent it with a sledgehammer.
Then I sawed the boards and drilled the holes
Then 3 layers of stain and 3 layers of varnish were used. So that the screws do not stand out too much, I wrapped a rope. The most difficult thing was to find ready-made mounts for the gutter, I had to go to Moscow to the southern port, I found it with great grief, I also bought a new adapter for the steering wheel, and so on, and so on, there were other little things. In the end, this is the gate we got)
To increase the vehicle's carrying capacity, an additional structure is used that is mounted on the roof - the trunk. Factory models do not always meet configuration or price requirements. The way out of the situation is to make a simple compartment for cargo with your own hands.
Drawing selection
You can take the diagram of the factory model as a basis. We decide on the type of mounting of the trunk - to gutters, to a smooth surface or to longitudinal rails. The first and second were used on old car models, the second are equipped with modern cars. But there are exceptions.
Then a drawing of the future structure is drawn up, indicating the location of the frame, reinforcing elements and places of fixation with the upper part of the car. For normal operating conditions, it is not recommended to make a complex circuit in order to avoid unnecessary costs and reduce the labor intensity of the work. A frame base with transverse slats and stiffeners will be sufficient.
When designing, you need to pay attention to the following:
- Measuring the dimensions of the mounting surface. The trunk should not extend beyond them.
- Full opening of the rear door.
- Number of attachment points. For standard models, 4 pieces are enough, if the roof length exceeds 2.5 m - 6 pieces. and more.
- For independent production, galvanized steel pipes or aluminum alloy blanks of square or round cross-section are used.
- The maximum weight of cargo is no more than 120 kg. Decreases depending on the condition of the body.
- To ensure fixation, it is recommended to purchase a factory installation kit.
The bottom of the structure is a lattice frame that serves as reinforcement and uniform load distribution. A device for securing cargo of forwarding type is considered difficult to produce with your own hands. It contains components for installing lights, the sides should be higher than standard. This type of trunk is designed to withstand significant loads.
Installing the trunk on the roof rails
The VAZ 2111 is equipped with roof rails installed during assembly at the factory. These are the so-called high rails, in their upper part spaced from the roof by about 6 cm. Installing the trunk on the rails in this case is not difficult, but if these elements were integrated, a special installation kit would be required to install the trunk. Many models of roof racks are suitable for installation on high roof rails, both from foreign manufacturers - for example, Thule (Sweden) or Nord (China), and domestic ones - Omega-Favorit (manufactured by the Ant rack) or Atlant (Atlant rack). The luggage carrier is supplied with two crossbars of rectangular or aerodynamic cross-section, made of steel or aluminum alloy, and two pairs of their fastenings to the roof rails of the VAZ 2111.
Installing the trunk begins with choosing a location for the crossbars. To transport long items that protrude beyond the dimensions of the body, place the cross members as far apart as possible, and to transport compact loads, install them closer to the middle of the distance between the axles of your station wagon, approximately above the front of the rear door.
Having chosen the location for installing the crossbars, secure them to the rails with fasteners. Often this operation does not even require a wrench - the mounting screws have their own plastic flywheel and are tightened by hand.
Preparation of materials and tools
For manufacturing you will need a square steel profile. The side guides are made of pipes measuring 30*20 mm and thickness 1.2. The bottom is formed from a 20*20 mm profile, the frame is 25*25. Material – thin-walled stainless steel, ferrous metal. It is preferable to use the first option, but welding requires specific skills.
You will need the following tools and consumables:
- welding machine and electrodes;
- ruler, tape measure, building level;
- angle grinder with metal discs;
- drill, drill bits, nozzle for cleaning welds;
- set of mounting components.
Stages of work
Before purchasing components, a design drawing is drawn up. Based on it, the volume of consumables is calculated and purchases are made. Before forming the blanks, the dimensions of the roof are once again checked against the data from the diagram.
Stages of self-assembly of the trunk:
- Blanks. Their length is 3-5 mm longer than the calculated length, taking into account the cost of welds.
- The frame is welded and pre-fitted onto the roof of the vehicle. If there are discrepancies with the calculated data, the workpiece must be remade.
- Welding of stiffeners and bottom.
- Installation of fastening elements - factory and additional lugs.
- Installation on the roof of the machine, reliability control.
Upon completion, the welds are processed with an angle grinder. If the car trunk was made from ferrous metal pipes, you need to apply a layer of primer and paint. It is advisable to process it using powder painting. It has better performance qualities and will keep the protective layer sealed longer.
The video shows an example of self-production:
Every car owner once feels too cramped in the car - for example, when he starts repairs and carries tiles and plaster in the car or rushes to the dacha in the spring with seedlings. The most effective way in this situation is to place luggage on the roof of the car using a special device. However, prices for high-quality luggage racks range from several thousand to two to three tens of thousands of rubles. A simple and practical solution is to make a trunk yourself.
Why do you need a roof rack on a car?
A roof rack will definitely come in handy if you:
- started renovations and transport building materials yourself;
- moving, transporting a large number of things;
- are interested in active recreation, be it cycling, snowboarding, skiing, fishing, hunting, hiking, etc.
Trunk rail - a minimalist solution for avid travelers
Types and photos of the most common designs
First, you need to decide on the type of roof rack that you need. There are several types of structures:
- universal type trunk. It consists of several transverse slats and fixing brackets. Suitable for almost all car models: from the cargo “Sable” to the cool “Jeep”;
A universal roof rack with fastenings can be easily installed on a smooth car roof
Expedition racks are most often installed on SUVs
A bicycle rack is indispensable for nature and cycling lovers
A roof rack is the most convenient, but quite expensive option.
Before proceeding directly to the process, it should be noted that the car owner undertakes the manufacture of the trunk at his own peril and risk and he himself is responsible for the possible consequences.
Video: how to make a good trunk with your own hands
And it’s also worth paying attention to the fact that you are unlikely to need the trunk all the time, so you should think about making it removable and using it as needed.
Types of luggage racks
Based on their purpose, roof racks are symbolically divided into three categories: utility, sports, and tourism.
Each of them plays an important role:
- The first type is used for suburban transportation of building materials, tools, and harvested crops, complemented by a basket with a mesh.
- The second allows you to transport bicycles, kayaks, sports equipment, and is equipped with special fastening devices.
- The third is necessary for travel, long voyages. It is a resealable container made of high-strength plastic. The shape resembles an elongated, flattened drop, creating minimal resistance to the oncoming air flow. It is installed on the longitudinal railings on the roof of the car, called roof rails. Protects transported cargo from the vagaries of weather and theft. Allows you to develop high speed.
Universal car trunk
It is better for an inexperienced craftsman to start with making the simplest type of trunk. In fact, there are two crossbars to be made. For this you will need:
- metal profile, for example, with dimensions of 20X30 mm and a wall thickness of 1.5–2.0 mm (ideally aluminum, since it is lighter);
- clamps for muffler - 4 pieces. With their help, the trunk will be attached to the roof (if there are roof rails);
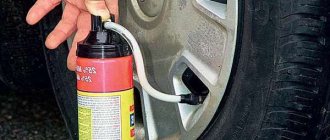
- polyurethane foam;
- grinding machine;
- fiberglass with a density of 300 g/m2. m.;
- dye.
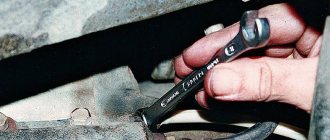
How to adjust the latch and replace the trunk lock on a VAZ 21099, VAZ 2109, VAZ 2108
Removal
1). First, remove the lock from the trunk lid. We unscrew the two nuts with which the lock is attached to the lid.
2). Next we remove the lock itself.
3). From here we remove a small spring and check its condition. If the spring is heavily compressed or skewed, we replace it with a new one.
4). After this, we remove the button with the cylinder from the inside of the trunk lid and check the condition of the button in the same way. If, when pressed, the button slows down or is not working at all, then we also replace it with a new one.
Attention! On the VAZ 21099 car, the lid lock cannot be disassembled, and therefore there is no need to try to repair it. In case of defect or malfunction, we replace it with a new one.
Installation
1). First, we put the entire system back together. That is, the previously removed button with a cylinder and a small spring are installed in their places.
2). Next, we install the new lock and tighten it with the same nuts.
3). Then we check how the trunk lid opens and closes. If a distinct knocking sound is heard in the area of the lock, this means either the latch lock does not fit into the latch hole, or the lid closes very poorly.
In this case, it is necessary to make adjustments.
— using a socket with an extension, unscrew the two bolts that secure the clamp.
— After that, we adjust the clamp, and then screw the bolts back.
This is approximately how you can adjust the trunk lid lock on the VAZ 2109 and VAZ 2108
Expeditionary trunk type "basket"
The technology for manufacturing an expeditionary trunk will be much more complicated. In this case, you will need to first draw up a drawing. In addition, you cannot do without a welding machine and the ability to handle metal.
Mesh base - a practical solution for expedition luggage
Construction drawing
Let's take a homemade trunk for a Chevrolet Niva as an example. The length of the trunk will be 163 cm, width - 123 cm. To make an expedition trunk, you will need a metal profile 15X15 (approx. 9 linear meters), 20X20 (approx. 7 linear meters), 25X25 (approx. 7 linear meters) and 30X20 (approx. 6 p.m.).
It’s quite possible to make an expedition rack for Niva using this drawing yourself
Sequence of actions of the wizard:
- We start making the trunk from the base: we cook the perimeter. Longitudinal guides are made from profile 30X20, transverse jumpers are made from profile 20X20.
- We weld load-bearing lintels from a 30X20 profile into the perimeter. For them the platform will be attached to the rails.
- We reduce the distance between the load-bearing jumpers by welding additional transverse ones from the 20X20 profile.
- We make an arc that will be located in front in order to improve aerodynamics: we measure 5 cm from the edges of the profile and cut out a triangular sector, after which we bend the profile. We weld the arc on the outside of the perimeter.
- To increase the strength of the structure, we fasten the jumpers together with sections of 15X15 profile. If desired, non-load-bearing lintels can be replaced with metal mesh or stainless steel sheets.
- We make the sides. We cut the profile into pieces 6–10 cm long and weld it to the base. If desired, they can be mounted on a thread - then the sides and the upper part of the trunk can be removed.
- It was the turn of the top crossbar. It should be the same size as the bottom one, but the side crossbars should be slightly shorter, and the posts connecting them to the base should be angled to improve aerodynamics.
- We fasten the trunk in a manner similar to that described above. An important point: to evenly distribute the weight, the expedition rack should be secured to six points.
Dimensions
When starting to make the roof rack, you need to measure the roof and mark where the supports will be placed. Only after this can you think through the design of the future accessory, draw a drawing, and calculate the weight of the trunk.
That is, by the time the work begins, the master should have in his hands:
- measurements taken;
- calculated frame weight;
- total weight of all trunk parts.
The overall weight of the rack is important for design. It depends on the material used.
- Aluminum
is an excellent material for making structures: it is durable, lightweight, strong, flexible, etc. - As another option, you can use profile thin-walled pipes
, which also weigh a little. - Another simple option is stainless steel or plain metal strips
. These materials are heavy, but easy to process.
The standard dimensions of the trunk for a loaf can be taken as follows:
- total length of the structure - 3650 mm;
- rear width - one and a half meters;
- front width - 1400 mm;
- a longitudinal rib runs through the center of the structure;
- transverse stiffeners can be installed with an equal distance between them of 566 mm.
Some people make a trunk with dimensions corresponding to the roof, for others it is more convenient to make a smaller structure: for example, 2160 mm in length, 1200 in width both front and rear.
The distance between the stiffeners in this case is calculated differently. In order for the load to be evenly distributed over the roof, you need to make at least 8 supports.
Roof rack: pros and cons
We have already started talking above about the benefits that roof racks provide to car owners. Now let's look at them in more detail.
Advantages of the design
There are many advantages of a roof rack:
- The most obvious benefit is, of course, the extra space for things. So, on the roof you can easily place three bicycles or everything you need for outdoor recreation - a tent, inflatable boat, fishing equipment, etc. And the capacity of seemingly quite compact boxes can be up to 300–800 liters;
- it becomes possible to transport non-standard, for example, very long loads (such as ladders, boards, pipes, etc.);
- due to the fact that part of the luggage is moved to the roof, it becomes much freer, more comfortable and safer in the cabin;
- Due to the roof rack, the load is distributed more evenly. So, if all the cargo is in the trunk, the car “sags”. This reduces ground clearance and creates a risk of rollover.
Possible problems
Along with obvious advantages, car roof racks have a number of disadvantages:
- they, as a rule, negatively affect the aerodynamic properties of the car. An irregularly shaped trunk will create additional resistance to air flow, which means the stability of the car will also suffer. This may also cause additional noise.
- a car with a roof rack significantly increases its height, which means it will not be able to drive along sections of the road where appropriate restrictions have been established.
- the trunk itself, even empty, weighs from 1.5 to 15 kg or more, which increases the overall weight of the car and, consequently, fuel consumption. According to some estimates, an unloaded trunk increases gasoline consumption by 0.2 liters per 100 km in urban conditions.
So, you have found out what kinds of car roof racks there are, got acquainted with their advantages and disadvantages, and found out how to make some of them yourself. Now you don’t have to rack your brains about how to place all the tents, spinning rods, backpacks and other equipment in the car - all of this will have a place on the roof of the car. All you have to do is relax and enjoy your vacation. Good luck on the roads!
How to make a trunk
If the car is equipped with roof rails - standard metal railings on the roof - it is recommended to make aluminum or steel crossbars that will serve as the bottom of the trunk.
If the standard equipment of the car does not include roof rails, you can make a welded trunk structure with a bottom and sides. It is not practical to make a car roof box with your own hands; the cost of work and materials will cost 50-60% higher than buying a ready-made roof rack.
The trunk manufacturing process is divided into the following stages:
- Selection of material, preparation of tools.
- Taking dimensions, drawing a drawing.
- Making the perimeter and fastenings of the trunk with your own hands.
- Welding.
- Installing a trunk on a car.
Materials and tools
One of the main stages of production when making it yourself is the correct calculation of the weight of the finished structure and the creation of a drawing. The ideal material for a car trunk would be aluminum profiles. Aluminum is characterized by high strength, flexibility and low weight.
Profile pipes can become an alternative material. The weight of the material is relatively small, thin-walled profile pipes are resistant to corrosion, high strength and low price. The cost of a profile pipe is two times lower than a similar aluminum one.
Strips of stainless steel sheet should be used as a roof rack material in extreme cases, as the material is heavy and expensive.
To make fasteners, you can use prepared industrial steel plates.
Tools you will need:
- Bulgarian;
- welding machine;
- Sander;
- primer;
- car paint.
Design measurements and drawing
If you want to make your own roof rack, where standard roof rails are installed, you just need to measure the distance between them. The crossbars will be fastened to the mentioned roof rails. If these elements are not present in the car, then it is necessary to measure the length and width of the roof. Based on these numbers, a design drawing is created, where the following parameters are calculated:
- frame length and width;
- the location for the reinforcing jumpers is determined;
- the height of the sides is calculated;
- the number of fasteners is determined.
When drawing a drawing, make the front side streamlined, and install an aluminum arch in the front part of the structure. If the roof length exceeds 2.5 meters, six support points will be required; if less, four fasteners are sufficient.
According to the drawing, blanks are cut out from the selected material, then the frame is welded.
Welding work
Correctly making a trunk with your own hands depends on the accuracy of preliminary measurements and the design drawing. Welding work is carried out in the following sequence:
- The perimeter of the structure is welded from a profile pipe or sheet of steel, depending on the material chosen.
- Jumpers are welded on to strengthen the bottom. Considering the weight of the cargo that is supposed to be carried on the roof, you can weld the jumpers with a grill.
- An aluminum arch is welded to the front of the platform, which will ensure optimal aerodynamics of the car.
- For the sides, 6-15 cm long posts are cut. The side posts are welded to the top of the frame, which coincides with the base and bottom.
- A grinding machine is used to remove material deposits that remain after welding. The crossbar fastenings are sanded and primed.
- Painting the structure. A primer is applied before painting.
- Mounting the luggage rack on roof rails or on the roof. To install the trunk directly on the roof, brackets are mounted on which the cargo compartment will be installed.
Tool steel is heavy; you should not use more than three strips of steel to reinforce the bottom of the trunk.
Ensuring aerodynamics and fixing the sides
In order to minimize the reduction in the aerodynamic performance of the car due to the installation of a homemade trunk, it is recommended to use inclined mounting of the struts on the front and rear of the structure.
To do this, the upper side tubes should be slightly smaller than the similar lower ones. Therefore, the racks on the front and rear of the bottom of the structure are welded at an angle. The angle of inclination and length of the upper side parts are calculated during the process of drawing up the design drawing.
Aesthetic touches
After all welding work, the structure on the machine is carefully ground, primed and painted. Before priming, parts are degreased.
Using a primer with a high zinc content will maximize the protection of the metal trunk from corrosion and make painting easier.
A few days after the structure is primed, painting is done.
As an additional aesthetic touch, you can install decorative nuts that completely cover the mounting bolts.