Posts 1 page 2 of 2
Share10/102/2011 17:44
- Author: CY.
- Tsar. Just a king.
- From: Magnitogorsk
- Registered: 10/01/2011
- Posts: 1951
- Respect: +349
- Gender: Male
- Age: 33 [1986-08-19]
- Skype: zvalexandr
- Spent on the forum: 4 months 19 days
- Last seen: Yesterday 09:51
- Car data: 1986 VW Passat Variant 1.6 CY, 5speed manual transmission 3M; 1999 AUDI A6 C5 2.4 ALF
Taken from one of the “bourgeois” sites. Translation attached:
How to roll out wheel arches yourself. Have you always dreamed that 17” wheels would not catch on the arches? Or lower your Golf extremely low without any problems? The easiest way is to take your sketches to a local studio and order arches to be rolled.
There are only a few things in life worse than a broken car, one of them is wheels catching on the arches. My father once told me, if you want a lowered suspension and a new type of wheel arches, the only way is to roll them from the inside. For those who don’t know, “rolling” is a term that means extruding the metal of an arch so that the lip of the arch does not touch the wheel. A handy tinsmith can do this kind of work with a hammer. But if you don’t know all the subtleties, it’s easy to mess things up. Rolling the arches using my method will not take much time and will cause minimal damage to the paintwork. But still, in case of failure, a locksmith cannot be avoided, so it is better to take into account the cost of possible consequences in advance. You can, of course, buy a special tool, but it is possible to assemble it yourself, as Denny Allen did.
Step one: You will need a jack for VW Golf 2. Make a number of changes to it as in fig. 7. Cut the native site at an angle of approximately 45 degrees. Then remove the bracket at the top of the jack and cut off the hooks that hold it in place.
Step two: you will need a 10mm bolt to weld it to the central part of part No. 4, as shown in Fig. 5.
Step three: now you must weld part No. 1 to the main part of the jack; Weld part No. 4 to the top of the jack. As shown in Fig. 8.
Step Four: Parts No.2 (bent as shown) and No.3 should be welded together as shown in Fig. 6. And drilled according to the axle you will be using. We used a long M8 nut, a bolt and a skateboard wheel. Since it has proven itself well in work.
Step Five: Once pieces #2 and #3 are welded to each other and fit to the wheel, they need to be screwed to piece #4, which should be welded to the rest of the tool. Do not tighten them all the way so that you can adjust the length while running the arch. Congratulations, you've assembled your arch rolling tool. Now is the time to put it to the test.
Tips for using arch rolling tools. Before you start work, remove the plastic wheel arch liners and also remove any dirt from the inside of the arches, otherwise they may cause damage to the outside of the arches when you start work.
If possible, practice on an old car as this tool requires some skill.
Don't skimp on time, don't pull too much in one try, otherwise you'll end up with too flimsy arches, or even be forced to buy a new set
When using this tool correctly, if you need to roll the entire arch, you should remove the brake calipers, otherwise they will get in the way. But, as practice shows, you will only need to pull out a few sections where the wheels touch the arch.
Be aware that the paintwork may crack as you lift the arch lip. This can be eliminated by heating the dye with a hair dryer. Remember that excessive heat may cause the paint to bubble.
Remember! Buy the wheels first so you can always check if they fit before finishing the job.
KIA Spectra Saber › Logbook › Rolling out the arches (bending the edge, trimming the bumper mount)
I did it before the snow fell, but there was no time to make a recording.
When installing wheels with an offset of 34, as I said, we get grout on bumps, even on small ones. Of course, I got an offset of 34 because of the 8mm spacers. It would be possible to remove them and not have any problems with the 42 offset, but the wheels with the 34 offset look so good, as if this is exactly how they should have been done from the factory. Especially from behind. In principle, you can remove the spacers from the front; visually the difference will not be noticeable, but from the rear it is already critical.
In general, as always, I did not take the easy path and began to look for who would roll out the arches. And, as usual, I came across a standard problem. Firstly, you can’t find normal rollers in the city, they don’t fire or are absent. Secondly, from what we managed to find, there are some inadequate price tags, in the region of 5-6 thousand rubles. for a couple.
Well, I’ll activate another search. I go to the top 100 cars in Perm and find cars with Stens. Who else if not these guys?) I find a Skoda there, study my friend’s BZ and see that he did a lot of things himself and understands the nuances. And I’m just asking in a personal way, like this and that, don’t you know who can roll arches in the city adequately for the money? Well, lucky. He says that he can do it himself, he has a roller, because... I've done stens before. In short, that’s what I was hoping for, let’s be honest))
Niva 21214 Cutting arches - Community “VAZ: Repair and Improvement” on DRIVE2
All Nivavods know that installing non-standard wheels will require widening the wheel arches. I would like to share my experience of cutting arches visually with photographs.1. Front arches.
Mark the cut location on the vertical side of the arch just below the middle of the side
We cut with a small grinder using the thinnest metal circle
We clean the arch so that when bending it does not spoil the paintwork of the wing
We begin to bend the arch inward with pliers, then carefully bend it with a rubber hammer. We do everything gradually, stretching the metal.
We prime, paint, movil,
2. Rear arches. Everything is a little more complicated here. The difficulty lies in the fact that the rear fender liner of the body is welded to the rear wing arch.
We mark in the same way as before
We cut off the wing, bend the lower part and then cut the fender liner
We bend everything the same way as before. We fit the wing to the fender liner and spot weld it.
We coat the weld seam with sealant and paint it
We install larger wheels, increase the ground clearance, improve the appearance and enjoy the result
Why are wheel arch extensions needed?
Off-road driving or frequent visits to rural areas necessarily requires further car washing. The fact is that wide-profile tires, most suitable for driving on such terrain, protrude significantly beyond the car’s arches. All the dirt collected on the tire treads, when the wheel rotates, flies towards the body, as a result of which it becomes quite dirty. To combat this problem, many SUV designers have made the vehicle body significantly wider by increasing the protrusion of the wheel arches.
Rolling out wheel arches with your own hands - DRIVE2
Good morning to all readers! For a long time in my head I had the idea of making something with my own hands, something intricate, interesting and at the same time, so that the production would force me to specifically strain my brain, and of course my hands... The idea was not long in coming. Rummaging around in one While spending the evenings on the Internet, I came across a very interesting thing, which later turned out to be that very idea, and if you consider that this product is also applicable to cars, then it was just a GIFT for me!
If desired, the thing could be imported from China for 6000-8000 rubles, but I didn’t see the point in this, because if you have sawdust in your head and hands, you can do the rolling yourself.
At first I tried to find at least some rough sketches of drawings for rolling out, but there weren’t any in good execution on the Internet. At first I was a little upset, but after another conversation with Pavel over a cup of coffee in my garage, it turned out that the designers have a special program that can convert an image from a photo into a drawing with the most approximate dimensions. This news made me happy, but I was immediately warned that I would draw the drawings myself, because Pavel was already having these drawings in his nightmares... I had to agree and take a few lessons on working with the program from a professional. At first I suffered for a long time, but if I had the desire, things went uphill exponentially.
80% of the milling work was done by myself, but 20% had to be entrusted to specialists working with high-quality precision equipment. I’m generally silent about the unique work of one of the most excellent turners, everything was done with soul and such accuracy that it’s even a pity to use a rolling tool.
In the near future, the rolling will fulfill its direct function.
What happened is for you to judge, but I will say that I am 1000% satisfied with the work done.
Another interesting mandrel for working with an S series motor was captured in the frame.
Actually that part, in the manufacture of which precision was required
They decided to make the roller from caprolon
Find 10 differences from the Chinese original
Well, a video with the principle of operation
ARCH ROLLER WITH YOUR OWN HANDS) — Lada 2109, 1.5 l., 2004 on DRIVE2
GOOD EVENING EVERYONE! As they say, the time has come! It came down to widening the arches. While the car is under body repair, it's time to roll the arches before painting! The first thought was to buy an arch roller, but its price was very high! After surfing the Internet and on Drive2 I found a lot of information on how to make it yourself from a VAZ jack. Charged with information, I began to implement my plans. I bought a jack, VAZ-2110, while disassembling it.
THE MOST COMMON JACK FROM VAZ!
Next, we saw off all the excess, these are two platforms and the mounting lugs for the platform. Sorry for the bad photos =) The base for the jack and its mounting on the car hub were cut out using a laser. One of the descriptions said that this base made of 5mm turned out to be rather weak, I decided to make it from 10mm steel)))
YOU WILL FUCK YOU!
A guide for the tube with a roller was also laser cut and bent. And don’t forget about the holes for further securing the tube.
THE HOLES SHOULD BE ON THE OTHER SIDE)
We boil everything thoroughly!
UNCLE ANDRE!
We also weld the nuts to the guide. We prepare the pipe on which the roller will be located. I made a through hole for attaching and turning the roller. The laser helped again. I cut out and bent two brackets. We welded them together. We assembled everything that came out. It turned out to be such a beauty! I bought the roller from polyurethane, but then I decided to make it completely metal and I was right. In my version, the metal one was better than the polyurethane one. After trying it on, I modified it a little more. In the photo you can see where I had to cut!
A LITTLE FUCKED UP
STARTED TO GO LOWER!
Not even a photo of the process! THANK YOU SO MUCH FOR YOUR ATTENTION! RESULTS COMING SOON =)
Page 2
GOOD EVENING EVERYONE! As they say, the time has come! It came down to widening the arches. While the car is under body repair, it's time to roll the arches before painting! The first thought was to buy an arch roller, but its price was very high! After surfing the Internet and on Drive2 I found a lot of information on how to make it yourself from a VAZ jack. Charged with information, I began to implement my plans. I bought a jack, VAZ-2110, while disassembling it.
THE MOST COMMON JACK FROM VAZ!
Next, we saw off all the excess, these are two platforms and the mounting lugs for the platform. Sorry for the bad photos =) The base for the jack and its mounting on the car hub were cut out using a laser. One of the descriptions said that this base made of 5mm turned out to be rather weak, I decided to make it from 10mm steel)))
YOU WILL FUCK YOU!
A guide for the tube with a roller was also laser cut and bent. And don’t forget about the holes for further securing the tube.
THE HOLES SHOULD BE ON THE OTHER SIDE)
We boil everything thoroughly!
UNCLE ANDRE!
We also weld the nuts to the guide. We prepare the pipe on which the roller will be located. I made a through hole for attaching and turning the roller. The laser helped again. I cut out and bent two brackets. We welded them together. We assembled everything that came out. It turned out to be such a beauty! I bought the roller from polyurethane, but then I decided to make it completely metal and I was right. In my version, the metal one was better than the polyurethane one. After trying it on, I modified it a little more. In the photo you can see where I had to cut!
A LITTLE FUCKED UP
STARTED TO GO LOWER!
Not even a photo of the process! THANK YOU SO MUCH FOR YOUR ATTENTION! RESULTS COMING SOON =)
How to roll out a wing arch?
All this stuff rusts very quickly due to our roads and the design of the arch, which is made in the form of a shelf on which the swamp collects and blooms successfully.
In a bent or rolled out arch, the swamp collects in a smaller volume and is easier to clean. It also allows you to install wheels with a shorter offset.
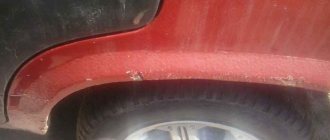
In the photo below we see the factory arch, albeit without any corrosion spots yet. the arch was regularly processed as needed, as evidenced by the black gamule along the edge:
We wash and dry the arches.
We hang the rear axle on trestles, or jack up one side so that the wheels can be rotated freely:
Working tool for rolling out car arches:
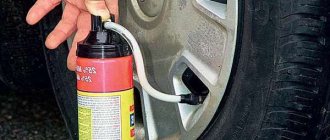
We will use a hairdryer to warm up the arch, which will give elasticity to the paint and possibly help avoid damage.
Using a hydraulic jack under the lever, lift the wheel so that you can roll the edge at an angle with a bat.
Those. squeeze the bit between the wheel and the arch and begin to rotate the wheel.
The bit, accordingly, also scrolls, crushing the shelf.
As you roll the bat, lower the handle lower and lower to the ground:
The ax in the photo is accidental, it is not in business
When you can’t roll the bat anymore, take a rubber mallet and start hitting the shelf from the inside.
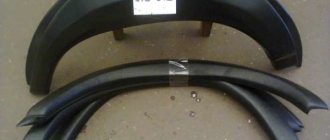
Ways to widen wheel arches
There are two ways to increase the width of the wheel arches. The first is to install special car linings, and the second involves making these parts yourself, based on the driver’s taste preferences.
Wheel arch extensions found on sale can be of three main types:
- Universal . For universal extenders, there is no clear restriction on the make and model of the car. They are sold in the form of special rubber rolls, which are adjusted to the arch of the car and attached to the arch from the reverse side. This extender allows you to protect the car body from the ejection of small pebbles or dirt, but it has a rather significant drawback for drivers - an ugly design. Their execution worsens the appearance of the car, which is why such arches are used only by SUV drivers. However, the ugliness of these parts is offset by the low cost.
- Universal plastic pads . They have a more advanced design and look good on many cars. There is already a limitation on the make and model of the car, since they are manufactured only in special sizes. Installing an extender from one car to another model is not possible. Fastening to the body is carried out using self-tapping screws. For all their aesthetic advantages, these arches do not protect the body well from dirt and are best used as decoration.
- Fiberglass arch extensions . They are a perfect addition to the body and have some installation difficulties. They are made from rough material, the appearance of which is far from comparable to the commercial one. Such expanders are also fastened using self-tapping screws, but the surface of the linings is cleaned and a layer of putty is applied to them. After which, the part is aligned with the body and painted in the color of the car body. Thus, the result is a wheel arch extension that becomes one with the body and invisible to the naked eye. Installing such an overlay will require additional painting experience.
How to roll out arches with your own hands?
I set the rollers to 18 +30 8 inches and summary 2354018 began to touch the arches, I was puzzled to roll them out, there was nowhere and nothing. I decided it myself. My task was simply to round them and not bend them to zero. it turned out like this. don't be scared by this. Here you can see my edge of the border of the varnish, but this is with a flash and a lens, there is almost no eye, you need to stare at it point-blank, without polishing, I just peeled off the tape
Tools: 1) medium hammer 2) small hammer 3) stationery knife 4) Gasoline galoshes, for degreasing 5) paint in the color of the car 6) Varnish in an aerosol can, from expensive branded ones. 7) sandpaper 600 800 1500 for a sheet of each 8) cotton rags 9) medium masking tape, brown which is yellow shit. 10) a bunch of newspapers or sheets, or you can buy a polytelene cape for the car when painting, it costs a penny and covers the entire car. in short, anything to partially cover the car so that the varnish does not shrink when painting the arches.
1) remove the wheel, otherwise it’s inconvenient 2) take a stationery knife and carefully along the arch with a small indentation in depth, cut a strip along the paint to the metal, until then we will bend it. The paint will burst along this slot and it will not go any further and should not peel off (theoretically) I immediately started hammering, and then I saw the light. 3) take a heavy hammer and wrap it in a rag and secure it with tape. We begin to bend it smoothly around the perimeter, select the crescent of the vertical wheel so that it strikes, there will be no current along the top horizontally. You can take a heavy wooden block or a metal one, in short, any strong flat one, and carefully wrap it tightly in a thick layer of fabric and hold the place of impact on the back side of the arch so that the metal does not vibrate. in this way you can achieve a deeper bend of the arch. The main thing is to feel the limits of the metal so that deformation does not go outward of the arch; the metal is two-layered and durable and, in addition, soldered, it is difficult to bend. DO ALL HAMMER OPERATIONS CAREFULLY 4) after finishing, all the paint will definitely peel off. finish it and trim it so that it looks nice with a small hammer (it will be easier to sand this way), take 600 or 800 sandpaper and begin to remove the rust until it’s clean, and generally prepare the metal. The edge of the cut paint can be lightly walked to smooth it flush with the metal. If the paint still peels off somewhere, go tangentially with a stationery knife and cut off the peeling part and sand it later. 5) We degrease the galoshes with benzine, it does not burn the varnish coating. we glue the masking tape on the outside along the front part of the arch a little 1-2MM with an outlet on the front part, we glue the tape inside out, as it were, since the arch is a semicircle, the main thing is not to create flaws, this is not good, smoothing only the edge of the tape is good, the rest is purely symbolic so that later It was easier to tear it off. THIS WILL BE THE BORDER OF THE VARNISH. 6) take a newspaper and stick some tape around the arch, this is only around the arch, we cover the rest of the car with a cape THIS IS IMPORTANT OTHERWISE THE VARNISH WILL SIT TO THE GLOSS. 7) everything is ready for painting. If you have a spray gun and a compressor, you can use paint from a spray gun and professional varnish, it is much stronger than from a can, BUT the can dries quickly (NITRO) to a professional one based on a HARDENER, it needs to sit for about eleven hours. choose for yourself. In the SUMMER it paints without problems, in the cold winter the varnish takes a long time to dry, even nitro, here the paint dryer rules. The paint under the varnish is all nitro, so it dries quickly. We apply paint to cover the metal, and apply varnish with a grip on the front part. You can paint a couple of layers of Varnish 3-4 Without fanaticism, the Varnish is very fluid and does not like greasy layers in one application. Layer-pause to dry a little-layer-pause. and soooo 3-4 layers. IF I DON’T have a compressor and a spray gun, I painted with a selection of paint with an expensive brush of medium hardness for artists who, from the wool of the BEAVER under the area it is invisible. You need several layers, otherwise the brush smears and makes gaps to the metal. And just varnish from a can. 8) Everything has dried, it’s quite simple, even just the varnish went off and everything went into battle. It is VERY IMPORTANT to remove the masking tape, you need to tear it off in the direction opposite to the varnish line, NOT IN PARALLEL, NOT AT THE SEAM, but like tearing a rag into two parts, here is one tape and the second is the painted part, well, something like that. so that the film on the tape does not pull all the varnish with it. 9) removing the edge of the varnish transition THIS ITEM IS FOR THE VERY scrupulous, I haven’t done it myself, and it’s almost imperceptible. Ride it for a week and let the varnish dry out. SKIN 2000 water and gently walk along the edge of the varnish, removing it.
We wipe it dry, use 3M polish no. 2 or 3, and go manually along the line with a special rag and polish, they sell it in the same place as everything else.
We enjoy ALL the beauty, BUT THE CHIPS will still go away after a while, you can just touch them up with a paint brush.
IF THE ARCHES ARE NOT PAINTED, THE RUST WILL COME OUT AFTER THE FIRST RAIN, AND IT WILL BE HARD.
I spent 4 hours leisurely in the cold, waiting a lot for it to dry.
Workshop: Rolling out arches
Let's look at how to properly roll out arches from our own experience. For those who have never done this before and are perhaps wondering if it’s time, it would be worth reading.
1. The device for rolling out arches should look like this.
You can try to make it from a jack, but it might turn out like this:
The main thing is not to get eye cancer from your experiment! ))))
2. The thickness of the arch bend on the BMW e46 is 15 mm, and the same edge goes up parallel to the wing itself.
3. We clean the inside of the arch from dirt and see the factory sealant, petrified over 10 years, with which the void in the arch is filled.
4. To remove sealant, you can use mechanical or manual methods using a grinder or screwdriver. We chose the method of removing the sealant using a small angle grinder with a cutting disc. When cutting sealant, thick smoke is released, so it is advisable to use a hood. Removing sealant from one arch with a machine takes 20 minutes. If you choose to remove the sealant with a screwdriver, you can hang your head in the arch for a couple of hours.
5. Be sure to wear a protective mask - hot pieces of melted sealant fly out from under the disk. It is necessary to provide good lighting - it is the sealant that needs to be cut, not the metal of the wing. It is not recommended to do this with a hangover. As you know, the hand is not so stable)
6. We achieve the maximum possible cleaning using an angle grinder, then proceed to manual finishing using a knife or screwdriver. It is especially important to remove pieces of sealant from the corner of the bend, otherwise, when rolling, unevenness and waves may appear on the edge of the arch.
7. Transmission in neutral, parking brake released. Before starting to work with a roller, it is necessary to determine the places of the arch with increased rigidity and begin rolling with short movements from them. We adjust the angle of the roller so that first of all the emphasis is on the inner edge of the arch, trying to move it upward. The upper and side parts of the arch can have different diameters from the hub; for this we use the length adjustment. First we go through the entire length of the arch, then tighten the clamp and continue. I don’t recommend rolling up too much in separate sections - ribs may appear on the edge of the arch.
8. Simultaneously with rolling, we use a hairdryer to heat the varnish in order to give it plasticity to avoid cracking. We do this carefully and from a distance, controlling the heating level by tactile sensations from touching the heated surface. The heating temperature should not be higher than the point at which the varnish transitions into liquid and gaseous states)
9. We adjust the final degree of bending by the position of the roller and the force of its pressure.
10. If you want to avoid painting the wings, do not try to roll them up tightly. We settled on a thickness of 7 mm. If desired, you can also eliminate the outer side of the arch by finding a few more millimeters, but in this case painting will not be avoided.
11. Treat the inside with seam sealant.
12. We put our wheel with a bad offset, look under the arch and make sure that the wheel fits. We rejoice)
How to roll out arches with your own hands
Good afternoon to all readers! For a long time in my head I had the idea of making something with my own hands, something intricate, interesting and at the same time, so that the production would force me to specifically strain my brain, and of course my hands... The idea did not take long to arrive. While rummaging around the Internet one evening, I came across a very interesting thing, which later turned out to be that very idea, and if you consider that this product is also applicable to cars, then it was just a GIFT for me! If desired, the thing could be imported from China for 6000-8000 rubles, but I didn’t see the point in this, because if you have sawdust in your head and hands, you can do the rolling yourself.
How to restore a rotten arch
Before working with the welding machine, you need to disconnect the power supply, that is, the battery. The problem we have is this: we need to heal the corroded arch.
First of all, we clean everything with an emery machine and cut out the damaged area with a grinder.
After we cut out the damaged area, we treat everything with acid so that there is no more corrosion. We make blanks, cut out patches. Made from food grade stainless steel 0.8 thickness.
We scald it from the inside and cover it with baxite soil. Carefully, even under the seams.
If it is not convenient or difficult for you to make a patch according to the diameter, you can use cardboard for this. Apply and press along the perimeter of the cutout. You will be left with a mark, cut it out and apply it to the metal to cut out a patch according to your cardboard model. For in-depth processing, you will also need a Movil, a hose with a spray nozzle in all directions.
After all the processing, take the first patch and insert its hole where the cutout was. In order to be able to safely operate the patch, it is necessary to weld an unnecessary screwdriver or a metal rod.
Thanks to the fact that you weld it to the patch, you will have the advantage of not only adjusting it, but also pressing it tightly to the metal. And so we weld all the patches.
Then it is necessary to clean everything so that the surface is even and when painting everything does not stick out. We clean it with an angle grinder and then go through it with a special iron brush for an angle grinder.
We clean everything inside the seams with a brush so that there are no deposits and in the future it does not oxidize or become covered with rust. And just to be sure, we go through the Circoram again. Next you need to take 120 sandpaper and apply marks. After applying the marks, everything must be degreased.
After it dries, cover it with baxite primer. Once the primer has dried well, re-apply the marks with 120-grit sandpaper. Then apply a thick layer of putty.
We apply the putty, pushing it tightly under the seam, and tightly without air. Afterwards we sand it with a die so that it is smooth and without holes.
Degrease again before applying universal putty.
We apply universal putty and smooth out the marks from 120-grit sandpaper and the remaining unfinished parts, pores, and edges.
We wait for the putty to dry and begin sanding. We sand it with 240 sandpaper. At the end, if there are any pores left, we go through it again with putty and sand it.
Then we apply several layers of primer, letting it dry for 5 minutes between coats.
The end we will have is painting, paint it according to color, and your arch is ready.
Mitsubishi Lancer “2.0 manual transmission” › Logbook › Rolling out the rear wheel arches, buying an arch roller
Greetings to all! In a previous post, I wrote about installing wide Enkei wheels from the Mitsubishi Evo 8 www.drive2.ru/l/502027939345335266/. So, despite the fact that I have a rigid suspension at the back - Kayaba shock absorbers of the NSR series from Out XL with springs from Rallyart, which I described in detail www.drive2.ru/l/8700593/, when driving on the highway several times I managed scrape your wheels against the wheel arches, well, we have such sections along the highway that when driving fast you will jump pretty well after falling through)) I am against rolling the arches of the wheel fenders, because I think that after this the factory seal will be broken and they will begin to rust and even the paint spoiling it in the process is a piece of cake. But considering that my plans include installing 235-wide tires in the future, there is nowhere to go - I’ll have to roll the arches) I decided to approach this process carefully. After a long search in my region, I could not find a master with a normal tool that was not homemade (I have nothing against homemade tools and I even think it can be done better than the manufacturer) or at least so that the tool looks like a professional one and also guarantees that as a result of rolling out the paint on the wings will not burst. The body was still in factory paint and I didn’t want to spoil the paint on the wings as a result of rolling it out. Surprisingly, the search was not crowned with success (In the near future, a trip to other regions where there is an ATT garage and others was not planned. Well, what to do - the only way out is to buy the tool yourself!)) Finding an arch roller on the Internet is not difficult, there are many offers for various Price, apparently, and quality are different. At my own risk and fear, I ordered via the Internet, and after a certain time, as in the picture in the seller’s ad, a new disassembled arch roller arrived in the package.
It is not difficult to assemble it following the informative picture instructions.
During the rolling process, I helped by heating the wing with a hairdryer so that the paint would not burst. Body sealant was purchased, as the factory sealant came out in places when the fender edge was bent
We left the fender liner and pressed the edge of the fender liner inward with the bend of the wing. The place where the metal layers were bent and joined were carefully covered with body sealant.
Some write that when rolling out the rear wings swell, I have such a minimal effect, apparently I didn’t roll out the arches much, but that’s enough for me)
The paint remained intact, which I am very happy about, and besides, treatment with body sealant will also protect against corrosion. I am pleased with the result of the work, thank you very much Khizri for your skill. Considering that I would no longer need the tool, I agreed with the master to leave it to him, and when he beat the price, I would pay for the tool. If anyone needs competent rolling of the car's wing arches, you can write in a personal message - I'll give you the phone number. masters
Source