We remove the collector and spider for convenience)
There are many ways to plug the return flow from the stove: 1. Which is what I used - cut it off before the outlet to the manifold and plug it with a bolt, lubricated with sealant, or put on a pipe and plug it. 2. The simplest one is to put a piece of pipe on the end and clamp it. 3. Unscrew the entire tube and cut out a plug from a piece of metal, drill holes and cover everything with sealant and tighten it.
I used the second method, cut it off, coated it with sealant and capped it with a bolt.
Recently I began to notice that the coolant temperature arrow on the dashboard on a warm car shows 80-85 degrees no more
...and it’s even more interesting in a traffic jam in winter (it can creep beyond 90 degrees). After googling the Shniva forum, I discovered the reason... THERMOSTAT. Without hesitation, I decided to replace this “penny” part. In the Lada-Detal store, the thermostat Chevy Niva 2123-1306010 costs exactly 500 rubles (plus for the domestic auto garden - I bought a “thermos” the other day on a Pegeon - original Gates 1970 rubles. The difference is noticeable). In the LADA-do box there was a thermostat from the manufacturer T/A (Thomas Auto).
supposedly an original that is installed at the factory. I didn’t take a long time to choose a manufacturer (and there are at least 4 of them) because the manager in the store diligently assured that it was really high quality + I checked everything right away in the old way - I blew into the “large circle” outlet - it doesn’t let through. Ok, let's take it. (I thought))) Then we google and understand that changing the thermostat yourself is as easy as shelling pears, having in your arsenal a minimal set of tools, a warm garage and a good friend)) We drove it into the garage, cooled it for about 20 minutes, removed the hose from the coolant tank, drilled it into the old one there was a hole in the lid of the coolant tank (the lid remained after replacing the coolant tank), we connected a car compressor through a hose to inflate tires (so as not to blow into the tank ourselves) and “squeezed out” a couple of liters of antifreeze through the return line, then removed the hose supplying coolant to the throttle body and squeezed it out again grams 500. Next, calmly loosen the thermostat clamps, remove the old one and install the new one. Here is the new handsome guy
new TOMOS - car, pull the clamps, fill in antifreeze, remove the hose supplying coolant to the throttle body to bleed the air - bleed the air, put it back on and tighten it.
Antifreeze ARCTIC Here he is, an old man. I checked in the same way - I blew into the “large circle” outlet - it blows out easily. CONCLUSION - not working.
old Started the car, drove it out into the street, warmed it up to 90, tightened the clamps again. ALL OK. p.s. changed on 01/22/2016, today (01/25/2016) in the morning it was -22 outside, the coolant warmed up to 90 degrees. the arrow stands straight, not moving anywhere, the car is warm, everything is fine.
Lada 2107 ツツツ LADA RAZVOLUTION® › Logbook › ➀➅➀✍ Thermostat 2123 Chevrolet Niva…
I went, I went. The temperature with the stove open was 80 degrees all the time. When I close the stove a little 2 degrees it warms up. This is not a problem for winter at all. It also took a long time to warm up. I decided to change it before it gets too cold. I bought it from a Chevrolet Niva.
In our village I found such a Pramo thermostat for 80 degrees, also Luzary, there is nothing else, the choice is off the charts))). The old standard Luzar was also 80 degrees. The asking price for a new one is 300 rubles. Later I’ll look for something better, if I’m lucky I’ll take it to 85 degrees.
Tuning of the Niva 2121 engine, modification of the intake system for the VAZ engine with your own hands, VAZ 2131, chip tuning of the Niva 2131 engine. Modernization of diffusers of the Niva 2131, VAZ 2121. Tuning of VAZ cars is an increase in the factory characteristics of the car. Refinement of the Niva 2121 is, first of all, the installation of new bumpers, crankcase protection, and a winch. If desired, the owners of these SUVs install additional fog lights. Our sections describe instructions and tips for modifying the Niva 2131 of various units, such as the transfer case, etc. Even a car enthusiast can do complex tuning of vases with his own hands. You will also find categories for engine tuning, gearbox tuning, interior and exterior tuning, as well as many photo reports of VAZ 2121 tuning. Thanks to interesting solutions, Niva tuning will give you a lot of pleasure and benefits. If you have photos of tuning vases, send them to us by email.
We buy:
Thermostat LUZAR — 340 rub. Set of pipes LUZAR VAZ 21213 - 300 rub. Clamps in assortment 200 rub. (a few left) Hose Ø16mm - 90 rub. meter (I took a meter) Sealant - 40 rubles. There was about 0.5 liters of antifreeze. Let's start the installation: Drain the antifreeze, dismantle the thermostat along with the pipes. We are figuring out the location of the new thermostat, I decided to put it higher and in a horizontal position, as was done on Shnivy. We cut the pipes according to location. In general, nothing complicated, except for a couple of points: I plugged the outlet from the stove into the block with a stud of the GAZelle wheels, ran a hose from the outlet pipe of the stove to the VAZ 2131 thermostat (there is an electric pump in the section), to the carburetor heating nipple (on the Niva 2121 thermostat ) put on a suitable hose and plugged it with a bolt. Fill with antifreeze and remove the plugs. ALL! Installation time - 4 hours with swearing and smoke breaks, without much stress. It feels like - I start the car, turn on the heater - warm air blows from the heater when the needle moves to o, as it warms up the heat increases. As a result, at idle the car warmed up to 80 degrees in about 7 minutes! At an outside temperature of -13°C, while driving the engine warmed up to 90°C and the needle froze... Hot air came out of the stove, and then the “Piano in the Bushes” came in, or rather the electric pump from the GAZelle! And this whole thing is blown through by a heater motor from a VAZ-2108! Can you imagine what Tashkent is like? And I felt the RESULT:
With the heater on, the car warmed up to operating temperature, just like with the original one WITHOUT turning on the heater! The engine operating temperature reached REAL 90°C. Due to its simplicity, cheapness and USEFULNESS, I advise you to take care of this alteration. Due to the transfer of the thermostat higher, to replace it it is enough to drain the antifreeze from the stove-thermos pipe, unscrew the 4 clamps and repeat the assembly in the reverse order. I'm happy, like an elephant! Plus, it seems to me that the plugged “nipple” for heating the VAZ 2121 carburetor can be used to bleed air from the system, so it is level with the intake manifold.
Lada 4×4 3D Gardener › Logbook › Thermostat 2123 on Niva 21213 (We continue to search for heat...)
We continue the fight for warmth in Sadovnik)) His thermostat was dead, i.e. the replacement was forced. And since we need to change it, why not install Shniva right away. As I said earlier, I purchased a 2123 Luzar thermostat, I also purchased one lower hose and one upper one from the standard thermostat (the old lower hose was used instead of the middle one); Norma clamps in assortment; hose from the Gazelle heater (internal diameter 18 mm, length 1 meter, about 40 cm was enough); wheel stud from Gazelle.
Everything was done on this topic. There was nothing complicated, we chose the 2nd installation option (after an unsuccessful search for a plug for the pump from 2123). We drain the antifreeze/antifreeze (the old valve on the radiator was replaced with one “with a drain tube”)
Next, we dismantle the old thermostat with pipes
Everything old was assembled without sealant, using Chinese clamps
The lower pipe was taken from the old system and cut according to the instructions in order to turn into the middle one. The pump was also shut off using a simple option using a chisel door bolt (this is the hose that was on the carb heating) and using a Gazelle wheel stud (this is the exhaust hose from the stove, the top one)
Lada 2106 › Logbook › Thermostat from Shnivy to Classic
They soldered the main radiator in two places... The heater radiator was not touched, the reason is trivial, the faucet was not fully open (fucking Luzar). And at the same time I bought a thermostat from Shnivy. The choice was small, either Luzar or VAZ. Having bitter experience with the Luzar company, I took the VAZ, although it was almost 200 rubles more expensive. What you will need: 1) A thermostat from a Chevy Niva 2) Several Zhiguli pipes that come from a standard thermostat 3) A hose with a diameter of 18 mm and a length of 1 m 4) I don’t remember what diameter the hose is, but it would fit on the thinnest outlet on a new thermos 5) A bunch of different clamps sizes (just don’t take the above-mentioned company such a g... because of them this whole thing has been delayed.) 6) Antifreeze about 10 liters 7) Two bolts or plugs (can be purchased at any plumbing store) Straight arms and a partner (you can do it with beer) Let’s get started : Drain the antifreeze. We remove all the pipes (the inlet from the head to the stove can be left untouched). Next, we turn off the two outputs from the tube that goes from the pump to the stove. I plugged it in a simple way: on one outlet, which had a larger diameter, I put a pipe that went to the stove, cut it off and put a plug, tightened it with a clamp, and in the second, which went to heating the carb, I screwed in a bolt and also tightened it with a clamp. Next we are going to adjust the thermostat. First you need to adjust the pipe that comes from the radiator. We took the old one and turned it around, i.e. the part that was put on the radiator is now put on the thermostat and it was trimmed by 5 cm. Now the thermos is turned as it should and has risen a little higher. The old pipe, which goes from the thermos to the pump, is short, so we cut any purchased one so that there is a straight piece without bends, 10 cm. The upper one, which goes to the head, can be left old. Next, we measure and cut a thin hose; it will go from the manifold to the thin outlet of the thermostat. I also measured an 18mm hose from the outlet from the stove to the one remaining on the thermostat (we took it with a reserve, the reserve turned out to be large and the hose broke in one place, but nothing was done to tie it to the body with ties). At this point the fitting process is completed, you can tighten the clamps. Well, then we fill in antifreeze and expel all the air)) I expelled it in the following way: I disconnected the hose from the manifold and the 18mm hose from the stove to the thermos on the thermos side. Open the stove tap. Through the funnel we begin to pour antifreeze into the hose from the stove. As soon as the antifreeze flows from the thermostat, put on the hose into which it was poured and tighten it with a clamp. Next we pour it into the radiator. As soon as it runs from the collector, we put the remaining hose there. We start it up and keep the revs at 3-4 thousand while adding fuel to the radiator... Impressions: On the old thermostat, even with + temperament outside, it managed to cool down, and the fan turned on every 10 seconds when heating up. Now the engine has quickly reached operating temperature, it’s already -5 outside and there’s wind, the cooling doesn’t turn on, it’s Tashkent in the cabin, it’s burning my fingers)). Satisfied in one word)) I’ll check it completely in winter))
Installing a thermostat from 2123 (Chevrolet Niva) on a Classic VAZ 2107 2105
- https://www.niva-faq.msk.ru/tehnika/dvigatel/sis_ohl/tsshn.htm
- https://www.niva-faq.msk.ru/tehnika/dvigatel/sis_ohl/st.htm
The thermostat from Shniva fits onto thick radiator pipes (aluminum radiator with electric fan) without any problems. The only thing for complete happiness was that the lower radiator hose was turned upside down (the end going to the thermostat was moved towards the radiator) and shortened
5 mm. But this must be selected live. The links above describe how fellow nivovods muffle the entrance to the pump, to which a tube is connected through which antifreeze from the stove and from the intake manifold is drained. But I’m lazy and I’m too lazy to pick out this tube from behind the starter and make a plug for the pump. And therefore, the old antifreeze drain hose from the intake manifold is cut and plugged with a suitable bolt, and the 16 mm antifreeze drain hose from the stove is removed from the brass pipe protruding into the engine compartment and plugged with a fitting for a 16 mm hose with a cap. In this context, a fitting means a plumbing adapter: on one side there is a herringbone thread for fixing the hose, on the other side there is a thread. In order to plug the fitting, screw the cap onto it. When purchasing, do not forget about the rubber sealing ring, which should be in the lid or purchased separately.
The fitting on the thermostat under the heater for the hose is 18-20 mm, and we have a drain fitting from the heater radiator of 16 mm. It would be necessary to organize a transition from one hose size to another. The transition is organized using a fitting for a hose 16 mm 1/2″ - coupling 1/2″ - 18 mm 1/2″. That is, we screw the threaded parts into the coupling, not forgetting to seal them with tow or special plumbing tape, and insert the herringbone notches into the hoses under the clamps. A 1/2″ ball valve can also be used as a coupling, especially for those who are fed up with the stove faucet and would prefer to open the hood and open or close the ball valve. It can be even simpler - find in a plumbing store a plastic adapter between 16 and 18 mm hoses, which ends in 16 and 18 mm herringbones. A regular 18 mm hose is still inconvenient to connect to the thermostat. It will be too close to the exhaust manifold pipes, and it will be somewhat shapeless. I recommend using a figure-eight, S-Yu-shaped hose. It is the longest and is similar in shape to an integral; on one side of the hose it has a widening pipe. So, how does the drain hose go from the stove drain fitting:
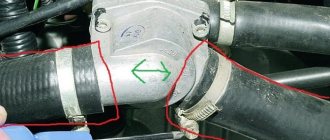
drain fitting 16 mm - hose 16 mm towards the wing - transition from 16 to 18 mm - the figure-eight hose continues to move towards the wing, and then goes down, then again a horizontal platform and by widening the pipe we connect to the thermostat. Photos in two planes explain the idea of laying the hose away from the exhaust manifold
At the moment, in addition to the thermostat, I also have an electric pump from Gazelle and the drain from the stove does not go to the thermostat immediately, but first to the pump. There are old-style electric pumps for a 16 mm hose and a new one for a 20 mm hose. I have the old model. The pump is screwed onto the studs of a standard ignition coil, which I don’t have, so I use an MPSZ-ZH. The pump fits perfectly onto the standard ignition coil mounting studs... True, it’s on the left wing, but I have a hose of the required length. Therefore, I lay a hose from the stove drain fitting to the pump. the hose runs between the valve cover and the thick radiator hose. After the pump, from a 16 mm hose there is a transition to an 18 mm hose, which is connected to the fitting of the thermostat heater.
Grant thermostat for VAZ classic
653
October 13, 2016
Ivan Ivanov
The Shnivo thermostat from the Luzar company gives the same Tashkent. Its intake from the cylinder head is narrower and draws more liquid through the stove. It works in the same time as the others and is better than the Polish Metal-incar, which likes to jam. Operated the car in Siberia down to -45. There is heat from the stove when the temperature needle moves from zero. Paired with a thermostat is a radiator valve. Native removed. Up to -20, warming up the cabin to a comfortable temperature in 10 minutes. At -40 minutes 20-25, because The engine idles for a long time.
IG-Technique
I have a classic engine with a volume of 1.6 liters, compression ratio = 13.11 compression = 16 kg/cm2, standard cooling system, aluminum radiator, in the summer on hot days the temperature in the engine compartment reaches 80 degrees Celsius, everything works and does not overheat.
Show me how it works on the car.
Andrey Vasiliev
Look, if you change the iron tube on the pump to another one where the piss is located near the stove, will it be better or will the circulation be better or worse?
Vladimir Shestakov
Complete nonsense. I installed a thermostat from a John Deere combine, it’s really big, I had to cut a hole in the hood, but it dries the grain and my feet feel warm!
Sanya SHS
Damn how many people have you fooled here!
Sanya SHS
How will he behave when we close the stove tap in the summer? The circle will close. There is no faucet on the grant and it is designed for the grant, there is no need to deal with bullshit.
Evgeny -Pechorsky-
An interesting option, but for a small circle the diameter of the siphon will be too small, there will be an additional load on the pump, as well as on the engine itself at increased speeds, the excess resistance will begin to take away torque when working only on a small circle, just like the power and efficiency of the engine, and it is also possible cavitation in the pump which will kill the impeller and more. It is already there; when disassembling, you can see how the liner of the first cylinder opposite the pump outlet is snapped. Plus, the supply to the stove will need to be organized through a tee, otherwise, with the valve covered and especially closed, the above-described effect will only intensify, and the engine without circulation will generally overheat, especially the cylinder head. I wouldn’t risk betting in this option. It seems to me that you need to throw out the saxophone, make one similar to the diameter of the Grant hose and turn around the pump inlet, or turn it off, and make a tee between the hose going to the bottom of the radiator and the pump and connect a small circle from the thermostat there, to which the stove will also be connected through a tee , the entrance to the stove will remain standard from the head.
Alexander Vovchuk
Many thanks to the author! I installed this thermostat today. I didn’t bother with the adapter plate, but simply welded the thermostat to the outlet pipe, cutting off all the excess from it (after removing the inside of the thermostat for the duration of welding). In the Tashkent cabin, the temperature according to the sensor is a little more than 90°, and the engine warms up much faster. Very pleased, thank you again. Niva 21213
Show me how it works on the car
Lada 4×4 3D VYATSKAYA GUN › Logbook › Installing a thermostat according to the principle of the NIVA-Chevrolet scheme.
For a long time I was planning to switch to a thermostat from a Chevrolet Niva on the Niva; before that, it was this one that was installed on the 2106... Unlike the native one, a more thoughtful scheme ensures: - supply of coolant/oil directly to the cylinder block. -Air jams are quickly expelled. -Faster warming up of the engine and, as a result, the heater heats up faster in winter.
For the remodel you will need:
-2 pipes (in the figure No. 1 and No. 16) -Hose of 18 mm in internal diameter to the stove. -Hose from the expansion tank to the radiator (now it will be the return line (in figure No. 13) -Expansion tank (I took from 21214) -Chevrolet Niva thermostat. -Plug for the coolant/oil supply channel to the stove from the pump. (I made it myself) - The clamps (it is advisable to take NORMA GM) are very high quality.
We remove all the old parts of the coolant/oil system and attach the thermostat to the pump with the purchased hose.
From the old hose we cut out a new pipe from the thermostat to the head.
We adjust the purchased hose from the thermostat to the radiator in place...
Take a purchased hose with an internal diameter of 18mm
And pull it onto the upper pipe of the stove.
We connect the carburetor heating to the smallest fitting of the thermostat. I recommend using a very strong oxygen hose…
We install a pump plug made from a former pipe.
The radiator fitting, which previously served to supply coolant/fuel from the expansion tank, has a double cross-section; we attach a hose to the smaller one.
And we pull it into the new expansion tank.
Now coolant/fluid will circulate through it, expelling air pockets and constantly maintaining the required level of coolant/fluid in the radiator.
Replacing the thermostat on a Chevrolet Niva - step-by-step instructions
Author: Makeev Vasily
Reading the article will take: 1 minute
Replacing the thermostat on a Chevrolet Niva is a fairly simple process. This article is about how to do this.
As you know, there are not many signs of a thermostat malfunction. If there is something wrong with this device, it usually manifests itself in the following:
- the engine overheats quickly;
- the car cannot warm up properly;
- a sharp drop in the temperature sensor needle during acceleration and a rise during deceleration
A necessary tool.
From the tool you need to have:
Replacement process.
Difficulty level: medium Execution time: 65 - 70 min Execution frequency: in case of malfunction
- Open the hood;
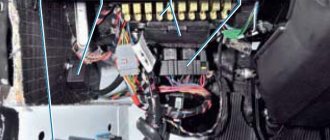
- Remove the plastic casing from the engine;
- Before replacing the thermostat, drain the coolant as described here.
- Using a Phillips screwdriver, loosen the crimp on the hose coming from the radiator and remove it;
- Loosen the clamp of the outlet hose to the throttle body heating unit and pull it off the pipe;
- Loosen the crimp on the hose coming from the motor head and remove it from the pipe;
- Loosen the clamp of the heater radiator outlet hose and pull it off the pipe;
- Loosen the clamp of the hose coming from the pump and remove it from the pipe;
The thermostat has been removed and a new one can be installed.
Installation is performed in reverse order. After completing the assembly, you need to fill in the coolant; you can read about how to do this in the second part of this article.
Now you know how to replace the thermostat on a Chevrolet Niva.
And if you need detailed information about the cooling system, then this is your place.
Replacing the thermostat in the field | Niva Repair
An internal combustion engine is designed to operate at a certain temperature. Only within a certain range of heating of the coolant are the correct temperature gaps of the rubbing parts and the factory-set characteristics observed. To speed up warm-up, the coolant first passes through a small circuit (bypassing the radiator). Then, as it heats up, the flow is redirected along a large circuit through the radiator. If necessary, the cooling fan is also forced to turn on. Thanks to this three-stage system, heating occurs more evenly and operating temperature is reached faster.
To switch antifreeze between cooling circuits, a special valve is provided - a thermostat. It opens under the influence of a certain temperature and is a regulator of engine cooling.
This item is actually a consumable. If a breakdown occurs, the thermostat must be replaced, since it cannot be repaired. Correct operation of the thermostat is especially important on vehicles operated in difficult conditions: for example, SUVs. NIVA 2121 falls into this category. When driving off-road, the engine works under heavy load and gets very hot. And external cooling by air flow is not effective due to the low speed. It is in such a situation that a broken thermostat can lead to overheating of the internal combustion engine and deformation of the cylinder block.
Which manufacturers of thermostats for Chevrolet Niva should you trust and how to replace them yourself?
Thermostat is a device in the engine cooling system that automatically regulates the temperature of the coolant.
The device maintains optimal thermal operating conditions of the engine; with its help, the engine warms up faster.
Structurally, it is a valve, inside of which there is a heat-sensitive element that blocks the flow of water, antifreeze, antifreeze through the radiator until the engine is completely warmed up.
Installation location: in Chevrolet Niva it is located on the left front edge of the engine, connecting the lower pipe of the stove, pipes from the radiator, engine and throttle valve.
TOP thermostat models
The list of thermostat manufacturers for Niva is quite large. The average price level for a device is around 500 rubles. Based on reviews, the most popular models for 2020/early 2021 will be:
| Manufacturer | vendor code | Price |
| Lugar | LT 0123 | 540 |
| Lugar | LT 0124 | 660 |
| LADA | 21230-1306010-83 | 680 |
| Belmag | BM.0240 | 390 |
| Pilenga | Tt-P 4002 | 350 |
All thermostats from the listed manufacturers are of the required level of quality and are recommended for purchase by many automotive professionals. It is difficult to determine which is better from the list. All of them interact well with the standard Chevy Niva engine cooling system, passing related tests for trouble-free operation.
Manufacturers and types
Standard sizes of thermostats, which by their design are suitable for installation in the engine of a Chevrolet Niva car, are produced by a number of global companies. The table below presents a list of products.
| Model | Product serial number | Opening temperature |
| Thomson | 21230-1306010-05-0 | 80° |
| Zommer | 2123-1306010 | 80° |
| Metal Inkar | 2123-1306010-01 | 80° |
| Pramo | 2123-1306010-02 | 80° |
| WEEL | 182-0114 | 80° |
| Luzar | LT0123 | 80° |
| Herzog | HL36010 | 80° |
| Vkt | VT29003 | 80° |
| Fenox | TS009E7 | 80° |
| Finord | 21231306010 | 80° |
| Baker | 21231306010 | 80° |
| Finwhale | FinwhaleT123 | 80° |
| Gallant | GLTH14 | 80° |
| Hofer | HF 445 730 | 80° |
There is an opinion among car owners that the highest quality, reliable and durable thermostats are products produced by Russian factories. There are currently three such enterprises:
- City of Stavrovo, Vladimir region, ATO plant;
- City of Rzhev, Tver region, PRAMO plant;
- City of Vladimir, Thomson LLC.
Among foreign models, car owners have good reviews of the Metal Inkar model from the Polish manufacturer.
These products work great in the Chevrolet Niva cooling system, the engine warms up quickly, there are no complaints.
The only negative is that the body is made in two versions - plastic and brass. The second option is not very popular among drivers, although it also works well in a circuit.
Zommer, Luzar, WEEL thermostats should only be selected from approved manufacturers. There are a lot of fakes on the market and on the Internet. Retailers seek to sell their dubious products under the guise of original ones to newcomers in the automotive business. To avoid getting burned, when purchasing, you must require licenses, certificates and supporting documents from sellers.
Which thermostat is better to install on a Chevrolet Niva: photos and videos
The primary and most basic task of the Niva Chevrolet cooling system is to maintain optimal temperature conditions. Since a low temperature has a negative effect on the operation of the motor as a whole, and a high temperature is accompanied by burnout of the lubricant, an increase in gaps in parts, which can lead to their seizing and jamming.
The video below will tell you about replacing the thermostat on a Niva Chevrolet:
https://youtube.com/watch?v=g7ADSj3iKcc
More information about the thermostat on a Chevrolet Niva
To ensure that the engine temperature is optimal, a thermostat is included in the system design. It is installed in the path of coolant movement. There are two types of thermostats, and on the Niva Chevrolet it is of the liquid type.
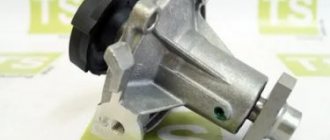
New thermostat installed.
The body is made of a brass cylinder, inside there is a rod and a double valve, and until the liquid reaches operating temperatures, it circulates in a “small circle”. But as soon as the temperature reaches a limit of 90 degrees, the rod unclenches, opening the way for movement in a “big circle”.
Reasons for replacing the thermostat
Most often, the reason to replace the thermostat is its failure.
It is very easy to diagnose it; to do this, on a warm engine, touch the upper pipe going to the cooling radiator and if it is cold, this will mean that the thermostat is not working properly, because it does not send coolant to a large circle.
Replacing the thermostat is very easy, you just need to minimize the amount of coolant in the system and unscrew all the fixing pipes. But it’s quite difficult to approach the choice of a truly high-quality thermostat, because the choice is very large and among them there are obvious outsiders and leaders.
TOP 5 thermostat manufacturers
Below we will present to you the five best thermostats that have proven themselves not only among real car owners, but also among experts.
- Thermostat "PRAMO" 2123-1306010-02.
- Thermostat "Luzar".
- Thermostat "WEEN".
- Kraft thermostat.
- Thermostat "AvtoVAZ" 2123-21230-1306010-82.
Please note that the design of these elements is completely identical, only the workmanship and appearance differ. But it is from this list that all devices are similar, have almost the same price of 400–450 rubles
When choosing a thermostat in a store, you should not be fooled by low prices from unknown manufacturers, since a difference of 50–100 rubles does not bring much savings, and can add to engine malfunctions.
Articles and prices
To make it easier for you to decide which one is best to install on your car, the table below shows the article numbers and prices for the previously discussed models.
| Model | vendor code | Price, rub |
| Thomson | TA2123-1306010 | 390 |
| Zommer | 2123-1306010-06 | 420 |
| Metal Inkar (polyamide) | 10.0300.01 | 515 |
| Pramo | 2123-1306010-02 | 600 |
| WEEL | 181-0034 | 630 |
| Luzar | LT0123 | 605 |
| Herzog | HL36010 | 520 |
| Vkt | VT29003 | 480 |
| Fenox | TS009E7 | 490 |
| Finord | 21231306010 | 510 |
| Baker | 21231306010 | 450 |
| Finwhale | FinwhaleT123 | 520 |
| Gallant | GLTH14 | 500 |
| Hofer | HF 445 730 | 550 |
Reviews from Chevy Niva owners
Alexey Bondarenko, Kazan
For a year now I have been driving with a WEEN thermostat, article number 181-0034. The device turns on at a temperature of 87°C. My first thermostat was also a WEEL brand. I traveled with him for less than a year. He stopped maintaining his temperature. I've had my current device for one year and a summer. There were never any problems. The temperature always stays between 85-92 degrees.
Maxim Kalashnik, Pskov
I have been operating a VAZ Chevrolet Niva for more than 10 years with a Thomson thermostat. I have no complaints about the thermostat. Its peculiarity is that thermal inserts work for about 2 years in normal mode. Then they begin to underestimate their indicator. The standard temperature for them is 81°C. In the summer they work fine, that is, 87°C, and in the winter it feels a little cool at 81°C.
Sergey Poltorak, Bologoe
Finnord installed it on the previous Shniva, it worked 100%, last year it started to freeze on the new Shevik, but I couldn’t find Finnord, I installed Luzar - not cold but not so hot either...
Reasons for failure
There are two main thermostat failures:
- The car does not warm up normally and quickly;
- The engine overheats quickly.
The malfunction can be identified by a characteristic sign - the needle of the instrument indicating the engine temperature drops sharply down when the car accelerates and jumps up if the car slows down.
A sensitive valve is installed inside the thermostat. It can become clogged with dirt, oil, and foreign bodies. Then it gets stuck in the open or closed state.
Replacing the thermal switch
The thermostat is replaced if the engine's thermal conditions are violated. This usually happens after 60 thousand km. The replacement process is not difficult. It is not necessary to completely drain antifreeze or antifreeze from the system.
Important! When the pipes are disconnected, a certain amount of coolant spills out, so you need to buy it first to top it up.
Required materials and tools:
- screwdriver;
- new clamps;
- sealant;
- Coolant for topping up.
1.Loosen the screws on the five clamps, using a screwdriver, tightening the pipes.
2.Pull off the rubber pipes from the thermostat housing.
3.Remove the old thermostat.
4.Install the new device in reverse order. Before installation, lubricate the joint with sealant. Tighten the new clamp screws securely with a screwdriver.
Note! All thermostats used structurally for the Chevrolet Niva are unified and suitable for VAZ classics.
Installing a thermostat from a Chevrolet Niva to a Classic
thermostat modification
A regular 18 mm hose is still inconvenient to connect to the thermostat.
Large selection of new and used spare parts for Chevrolet in Russia with prices and photos. Search…
After the pump, from a 16 mm hose there is a transition to an 18 mm hose, which is connected to the fitting of the thermostat heater. The engine temperature was normal, but they opened the heater tap, and a cooled flow came out of it, mixed in the thermostat with the flow from the engine and created a picture similar to a reduced engine temperature.
We loosen the nut that secures the starter flap under the air heating pipe closer to the left end of the pipe: It cannot be said that the new thermostat fits like a glove, it will be “pulled” up a little, but it seems to the authors that this is not fraught with anything serious. Connecting hoses leading from the heater and carburetor heating unit Option 1.
Since my trips were mostly short, the interior usually finally warmed up by the time I had to get out of the car. Now it is hot “hot” and not “warm” air that starts coming out of the stove when the coolant temperature reaches 90°.
The engine warm-up time decreased slightly, but I did not measure the difference in time. The greatest effect should be expected when the temperature outside drops to about o or below. I had a chance to drive in temperatures about 0, and here’s what I can say: About 20 minutes after the start, it became hot in the car, I started turning on the heater only at traffic lights.
At speed, the heater was turned off - not because it was noisy, but because it was hot. Anyway, I wish I had had the “implantation” done sooner! We leave the metal pipe for draining coolant from the heater in place, and remove from it the hose coming from the carb heating. We cut a piece of about 5 cm from the hose, from which, using a suitable bolt, tightened with a clamp, we make a plug and put it on the above pipe. We put the hose itself on the thinnest thermostat pipe. We cut off the hose coming from the heater so that we can insert a pin into the piece remaining on the tube and make a plug from it.
We screw in the pin and tighten it with a clamp: Remove the section remaining on the heater pipe.
How to warm a Niva, installing a thermostat from a Niva Chevral
We take a hose from the Gazelle heater, put it on the outlet pipe of the heater, run it away from the exhaust pipes, and put it on the thermostat: In the second car, in addition to the Shniva thermostat, we installed an electric pump from the Gazelle, so when “debriefing” it is necessary to keep in mind that the intervention in the machine’s body was complex.
What happened before the alteration: Previously, I always put cardboard in front of the radiator for the winter. What happened after the alteration: The warm-up time of a stationary car was greatly reduced, the air from the stove became noticeably hotter.
When the engine operating temperature is at idle, the lower thermostat pipe is cold. If you travel, it gets warmer.
Checking the VAZ NIVA thermostat without removing it. Choosing a VAZ NIVA thermostat
In order to further increase the temperature of the air coming from the stove at XX, I turn on the electric pump, and within seconds the air becomes simply hot. The electric pump from Gazelle definitely rules. I didn’t even think that it could be so warm in Niva. The pump is installed at the outlet of the radiator; by the way, Kerosene has the same position at the outlet.
It is possible, of course, at the inlet, but there will be a lot of hassle with the installation, since it is difficult to secure the pump, or the length of the hoses is inadequate. The pump itself sits on a stud under the expansion tank, with the motor towards the front of the car and tilted at about 30o. The pump really only works when it’s filled with antifreeze, if you take the pump and just put its inlet pipe into the water, it doesn’t suck, and if water gets inside, it works like a charm. I did the experiment at home. By the way, in the conference there was a question: Therefore, it is highly advisable to install a pump below or not above the heater core Chocolate Hare - Trener - Mason.
Message in the forum, author Renegat original: Now I’m driving on Nivka, not bothering anyone. Suddenly I feel the sweetish aroma of antifreeze beginning to spread throughout the cabin. Read to the end, it’s not the heater faucet that’s leaking, it’s my ball valve. The second part of that article is devoted to installing an electric pump.
Replacing the thermostat on a Niva Chevrolet: photos and videos
The correct operating temperature of the engine largely depends on the condition of the thermostat. A simple Niva Chevrolet engine cooling system will allow you to remove, check or replace the thermostat yourself, spending a minimum of time. Let’s figure out how to do this quickly and without loss of antifreeze right now.
Pre-check the thermostat on the Niva Chevrolet
Thermostat removed for testing.
Of course, no one will remove the thermostat for fun. Just for the preliminary check, we will carry out several simple operations in order to make sure that it is not working or, conversely, that it is working properly.
To do this, start the cold engine and touch the lower radiator pipe. It should be cold.
This means that the thermostat is closed and the coolant flows in a small circle: expansion tank, pump, thermostat valve, cylinder head and cylinder block, throttle heating system (in an injection engine), heater radiator.
At this engine temperature, the lower hose should already be hot.
As soon as the engine warms up to operating temperature (82-85 degrees), as can be judged by the temperature gauge on the dashboard, the lower radiator hose should begin to warm up.
This indicates that the thermostat valve has opened and antifreeze flows in a large circle through the radiator of the cooling system. Fast and easy. If the hose begins to warm up when the engine is cold or does not begin to warm up when the engine is hot, the thermostat must be checked in more detail or replaced. Let's start with replacement.
How to remove the thermostat on a Niva Chevrolet for replacement
After removal, we saw that the valve in the thermostat was stuck.
Before removing the thermostat on a Chevrolet Niva, you need to let the engine cool down if it has been warmed up. After this, there are two options for the development of events: remove the thermostat with partial draining of the antifreeze, or without draining it at all. The fundamental difference is that with partial draining, we in any case lose some of the liquid.
Without draining coolant
To avoid draining the liquid, you can do this:
- We take two identical open-end wrenches, two screws 30-40 mm long and two corresponding nuts.
- Clamp the antifreeze supply hose with two wrenches.
- We fix them with a threaded pair.
- We pinch the hose.
Not a drop of antifreeze will spill, except what is in the thermostat itself. However, before starting this operation, you should make sure that the hoses are in good condition, without cracks and have not lost their elasticity.
With drain
If you don’t want to experiment, then drain all the antifreeze that is located above the thermostat. To do this, we use the drain plug in the cylinder block. At the same time, you must continue to ensure that antifreeze does not get on the generator. He doesn't like it. After the antifreeze has been drained or the hose is pinched, you can begin dismantling the thermostat.
The algorithm of actions is as follows:
- Using a Phillips screwdriver, loosen the clamps and unscrew the clamping screws. This must be done first on the inlet hose, then on the outlet hose.
- We do the same with the heater hose and the hose that goes to the cylinder block and the upper hose.
- Carefully remove all the hoses, making sure that no liquid gets on the generator.
- We remove the thermostat and install a new one.
Traces of spilled antifreeze are visible.
Installing the thermostat is carried out in reverse order.
Thermostat disassembled. Apparently it is not repairable.
Now all that remains is to check at home to understand whether to change the thermostat or try to deal with the old one. It is non-separable, therefore, if the test shows that the valve does not work as it should, it is scrapped. But the new thermostat is still worth checking. Anything can happen.
Installing a thermostat from a Chevy Niva to a Classic
Overall a good approach. Here the problem is solved not by raising the temperature of the coolant, but by increasing its flow. It is pleasant and safe to drive in a warm interior with transparent glass.
Only such a bath lover gets the opportunity to cool the engine. The heater is turned on bypassing the thermostat.
Grant thermostat for VAZ classic
Here everything is necessary in moderation, within reason. Otherwise, a cold engine throws a bunch of crap into the air, pulls poorly and tends to stall. Which is also not comfortable and not safe.
Here it’s up to everyone to decide for themselves whether it’s risky to include this option in the FAK. In order to plug the fitting, screw the cap onto it.
When purchasing, do not forget about the rubber sealing ring, which should be in the lid or purchased separately. The fitting on the thermostat under the heater is for a mm hose, and we have a drain fitting from the heater radiator of 16 mm.
That is, we screw the threaded parts into the coupling, not forgetting to seal them with tow or special plumbing tape, and insert the herringbone notches into the hoses under the clamps. It can be even simpler - find in a plumbing store a plastic adapter between 16 and 18 mm hoses, which ends in 16 and 18 mm herringbones. A regular 18 mm hose is still inconvenient to connect to the thermostat. It will be too close to the exhaust manifold pipes, and it will be somewhat shapeless.
Lada 4×4 3D Range Niver › Logbook › Thermostat from Chevy Niva to Niva
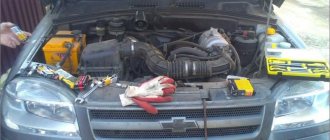
I came to the garage, drained the antifreeze and dismantled the old cooling system.
From the popma you need to twist the metal tube going to the stove. Instead of this tube, I cut a plug from a piece of three and put it in place on the sealant.
It would seem that everything is fine and it’s time to collect this junk in a heap, but... How can there be no jambs?