Electrics and electrical equipment of a scooter
Dedicated to all owners of Chinese scooters...
To begin with, I would like to present a wiring diagram for a Chinese scooter.
Since all Chinese scooters are very similar, like Siamese twins, their electrical circuits are practically no different.
The diagram was found on the Internet and is, in my opinion, one of the most successful, since it shows the color of the connecting conductors. This greatly simplifies the diagram and makes it more comfortable to read.
(Click on the image to enlarge. The image will open in a new window).
It is worth noting that in the electrical circuit of a scooter, just like in any electronic circuit, there is a common wire . On a scooter, the common wire is the minus ( – ). In the diagram, the common wire is shown in green . If you look more closely, you will notice that it is connected to all the electrical equipment of the scooter: headlight ( 16 ), turn relay ( 24 ), instrument panel backlight lamp ( 15 ), indicator lamps ( 20 , 36 , 22 , 17 ), tachometer ( 18 ), fuel level sensor ( 14 ), horn ( 31 ), tail light/brake light ( 13 ), start relay ( 10 ) and other devices.
First, let's go over the main elements of the Chinese scooter circuit.
Egnition lock.
Ignition switch ( 12 ) or “Main switch”. The ignition switch is nothing more than a regular multi-position switch. Even though the ignition switch has 3 positions, the electrical circuit uses only 2.
When the key is in the first position, the red and black wires are connected. In this case, the voltage from the battery enters the electric circuit of the scooter, the scooter is ready to start. The fuel level indicator, tachometer, sound signal, turn relay, and ignition circuit are also ready for operation. They are supplied with power from the battery.
If the ignition switch malfunctions, it can be safely replaced with some kind of switch like a toggle switch. The toggle switch must be powerful enough, because the entire electrical circuit of the scooter is, in fact, switched through the ignition switch. Of course, you can do without a toggle switch if you limit yourself to short-circuiting the red and black wires, as the heroes of Hollywood action films once did.
1 is shorted to the housing (common wire). In this case, engine operation is blocked . Some scooter models have an engine stop button ( 27 ) to block the engine, which, like the ignition switch, connects the white- black and green (common, body) wires.
Generator.
The generator ( 4 ) produces alternating electric current to power all current consumers and charge the battery ( 6 ).
There are 5 wires coming from the generator. One of them is connected to a common wire (frame). The alternating voltage is removed from the white wire and supplied to the relay regulator for subsequent straightening and stabilization. The yellow wire removes voltage, which is used to power the low/high beam lamp, which is installed in the front fairing of the scooter.
Also in the design of the generator there is a so-called hall sensor . It is not electrically connected to the generator and there are 2 wires coming from it: white- green and red - black . The hall sensor is connected to the CDI ignition module ( 1 ).
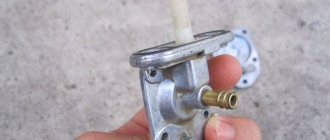
Relay regulator.
Regulator relay ( 5 ). People may call it a “stabilizer”, “transistor”, “regulator”, “voltage regulator” or simply “relay”. All these definitions refer to one piece of hardware. This is what the relay regulator looks like.
The relay regulator on Chinese scooters is installed in the front part under a plastic fairing. The relay-regulator itself is attached to the metal base of the scooter in order to reduce the heating of the relay radiator during operation. This is what the relay regulator looks like on a scooter.
In the operation of a scooter, the relay regulator plays a very important role. The task of the relay regulator is to convert the alternating voltage from the generator into direct voltage and limit it to 13.5 - 14.8 volts. This is the voltage required to charge the battery.
The diagram and photo show that there are 4 wires coming from the relay-regulator. Green is the common wire. We have already talked about it. Red is the output of positive DC voltage 13.5 -14.8 volts.
The regulator receives alternating voltage from the generator through the white wire to the relay. Also connected to the regulator is yellow wire coming from the generator. It supplies the regulator with alternating voltage from the generator. Due to the electronic circuit of the regulator, the voltage on this wire is converted into a pulsating one, and is supplied to powerful current consumers - the low and high beam lamps, as well as the dashboard backlight lamps (there may be several of them).
The supply voltage of the lamps is not stabilized, but is limited by the relay regulator at a certain level (about 12V), since at high speeds the alternating voltage supplied from the generator exceeds the permissible limit. I think those who have had their dimensions burned out due to malfunctions of the relay-regulator know this.
Despite all its importance, the device of the relay regulator is quite primitive. If you pick apart the compound with which the printed circuit board is filled, you will find that the main relay is an electronic circuit consisting of a thyristor BT151-650R , a diode bridge on 1N4007 , a powerful diode 1N5408 , as well as several wiring elements: electrolytic capacitors, low-power SMD transistors, resistors and a zener diode.
Due to its primitive circuitry, the relay-regulator often fails. Read about how to check the voltage regulator here.
Delta moped wiring diagram china
The electrical circuit diagram of Chinese scooters is shown in the figure:
As with other electrical connections, there is a common wire on all cube mopeds. In this diagram it is the negative tire running along the entire body. The corresponding battery terminal is also connected to the scooter's frame, ensuring that each electrical component's ground is in constant contact with the power source.
Electrics and electrical equipment of a scooter
The main components in the 4t moped circuit are:
- central locking;
- battery charging source – generator;
- voltage limiter;
- spark formation and control systems;
- control elements for headlights, brake lights, turns;
- fuel level indicator in the tank.
All circuits are connected together using wiring.
Depending on the modifications and dimensions of the scooter, the instrument panel may include a tachometer - a device for monitoring the number of engine revolutions.
All of the listed nodes of the general scheme perform a strictly assigned role. Failure of at least one of them leads to the cessation of operation of the connected devices. Therefore, monitoring the serviceability of the main elements must be done every certain period for the purpose of prevention.
P O P U L A R N O E:
- Installation of a pre-heater on a VAZ-2107i
The "Seven", purchased under the recycling program, is finally out of warranty. My hands were itching for a long time, but my inner voice kept repeating: “No way!” After 2 “sixes” my impressions of the VAZ-2107 were, to put it mildly, quite average.
Particularly annoying were the poor ventilation, the heater and the rear-view mirror (unlike the 2106 - without a lever). It’s easier with a mirror - we buy (from us -150 rubles) a “six” and install it.
Therefore, it was decided to start serious alterations with remaking the stove and installing a pre-heater. Read more…
Indicator for checking and monitoring the battery on TCA965.
Not all cars are equipped with electronic voltmeters. And this is quite a necessary device in a car. It allows you to monitor the charging and condition of the battery. This is very important, especially in winter. Read more…
A program for calculating the time it takes to remove alcohol from the blood
Sometimes we drink. Some more often, some less often. On holidays or...
How much should we drink and how long will it take us to be sober? When can you drive? How long should it take?
Blood alcohol concentration greatly affects driving.
Read more…
Popularity: 7,398 views.
Bendix scooter device
Nowadays, no one will be surprised by the presence of a starter, even on very cheap and simple scooters and motorcycles. And once upon a time, during the times of the USSR, it was difficult to imagine that a motorcycle or moped could be started with a button (O tempora! O mores!). But ok, what happened is past. Let's better move on to studying the device with which almost any internal combustion engine is electrically started.
First, a little theory: as you know, starting a modern internal combustion engine is carried out using a starter. The starter is a simple DC motor; when starting the engine using the “START” button, the driver supplies current from the battery directly to the starter.
The starter, when current passes through it, begins to rotate and then, through the bendix directly connected to it, transmits its rotation to the engine. After the engine is started and the “START” button is turned off, the Starter stops, and Bendix at this moment disconnects the engine and starter.
On different models of scooters, the bendix may be located differently or may be absent altogether (a freewheel may be installed instead). In our case, the bendix is on top.
And this is what the starter bendix looks like when removed.
A theory is a theory... To understand the structure of the mechanism in more detail, it simply needs to be disassembled and studied in more detail.
Remove the retaining ring
Removing the thrust washer
Now you can completely disassemble the mechanism
As you can see, the Bendix consists of two gears rigidly connected to each other, the connection between the gears is carried out using a helical gear located on the shaft along which the second gear (in the hand) moves relative to the first in the axial direction, there is also a stabilization mechanism in the Bendix design, which the required moment rigidly fixes the gears together.
Information on ordering spare parts on the website www.stelsmoto.ru
Question: How to order spare parts?
- Answer:
There are three options for ordering spare parts (Through the shopping cart, Feedback or by phone) indicating the original part number.
Question: Where can I find part numbers?
- Answer:
All part numbers are available on our website in the spare parts section. https://stelsmoto.ru/zapchasti/
Question: I can’t put parts in my cart, what should I do?
- Answer:
Write to us by email [email protected] indicating the numbers of these parts, the manager will process your order himself.
Question: I can’t pay for my order through the website, what should I do?
- Answer:
You place an order without payment and send it. Payment for goods is available only after checking your order by our manager. If you need delivery, immediately indicate the full delivery data (Zode, address and full name) of the recipient. After confirming your order, you will receive a payment link via email where you can pay for your order.
Question: How to arrange and pay for delivery?
- Answer:
When placing an order using one of the above options, in the order notes you indicate the full address, as well as the delivery service. (Mail, EMS, SDEK). When ordering delivery through SDEK, indicate the pick-up point where you want to receive the order. - Addresses of delivery points:
https://cdek.ru/offices - All orders are shipped only after full payment for shipping items has been received. When sending parts by SDEK, you pay only for the parts; payment for delivery is made upon receipt.
Question: I paid for the order by following the link from your letter, what next?
- Answer:
Nothing more is required from you. Since we sent you a payment link, it means we have all the details and delivery address. As soon as we send your order, you will receive a scan of the invoice, which you can use to track where your package is.
Question: I want to pick up the part myself from your store, is this possible?
- Answer:
Yes, of course. But for your convenience, it is better for you to place an order through the website, indicating “pickup at your own expense” in the comments. Wait for confirmation from our managers that the order is ready. Then, when visiting the store, you will only need to indicate your order number, which will be collected for you in advance.
1
LU017021
Electronic ignition (CDI) unit
Electronic ignition (CDI) unit
Article: LU017021
| Material |
| Weight |
| Height width depth |
| Strength |
| Life time |
| Nozzle type |
Availability:
In stock Out of stock in store
To order Out of stock at the central warehouse
Delivery:
From Moscow 7-14 days
*Part prices may not be accurate. Check availability and exact prices with our managers
1
LU012343
Electronic ignition (CDI) unit
Electronic ignition (CDI) unit
Article: LU012343
| Material |
| Weight |
| Height width depth |
| Strength |
| Life time |
| Nozzle type |
Availability:
In stock Available in store
To order Out of stock at the central warehouse
Delivery:
From Moscow 7-14 days
*Part prices may not be accurate. Check availability and exact prices with our managers
2
LU017022
Clamp for mounting the electric ignition unit (CDI), rubber
Clamp for mounting the electric ignition unit (CDI), rubber
Article: LU017022
| Material |
| Weight |
| Height width depth |
| Strength |
| Life time |
| Nozzle type |
Availability:
In stock Out of stock in store
To order Out of stock at the central warehouse
Delivery:
From Moscow 7-14 days
*Part prices may not be accurate. Check availability and exact prices with our managers
3
LU017035
Ignition coil assembly
Ignition coil assembly
Article: LU017035
| Material |
| Weight |
| Height width depth |
| Strength |
| Life time |
| Nozzle type |
Availability:
In stock Out of stock in store
To order Out of stock at the central warehouse
Delivery:
From Moscow 7-14 days
*Part prices may not be accurate. Check availability and exact prices with our managers
4
LU016276
Phillips screw M5x0.8x20mm, steel
Phillips screw M5x0.8x20mm, steel
Article: LU016276
| Material |
| Weight |
| Height width depth |
| Strength |
| Life time |
| Nozzle type |
Availability:
In stock Out of stock in store
To order Out of stock at the central warehouse
Delivery:
From Moscow 7-14 days
*Part prices may not be accurate. Check availability and exact prices with our managers
5
LU014721
Battery 12V 3Ah
Battery 12V 3Ah
Article: LU014721
| Material |
| Weight |
| Height width depth |
| Strength |
| Life time |
| Nozzle type |
Availability:
In stock Out of stock in store
To order Out of stock at the central warehouse
Delivery:
From Moscow 7-14 days
*Part prices may not be accurate. Check availability and exact prices with our managers
LU014721
Battery 12V 4Ah
Battery 12V 4Ah
Article: LU014721
| Material |
| Weight |
| Height width depth |
| Strength |
| Life time |
| Nozzle type |
Availability:
In stock Out of stock in store
To order Out of stock at the central warehouse
Delivery:
From Moscow 7-14 days
*Part prices may not be accurate. Check availability and exact prices with our managers
6
LU017036
Wiring harness assembly
Wiring harness assembly
Article: LU017036
| Material |
| Weight |
| Height width depth |
| Strength |
| Life time |
| Nozzle type |
Availability:
In stock Out of stock in store
To order Out of stock at the central warehouse
Delivery:
From Moscow 7-14 days
*Part prices may not be accurate. Check availability and exact prices with our managers
9
LU017036
Wiring harness assembly
Wiring harness assembly
Article: LU017036
| Material |
| Weight |
| Height width depth |
| Strength |
| Life time |
| Nozzle type |
Availability:
In stock Out of stock in store
To order Out of stock at the central warehouse
Delivery:
From Moscow 7-14 days
*Part prices may not be accurate. Check availability and exact prices with our managers
10
LU017036
Wiring harness assembly
Wiring harness assembly
Article: LU017036
| Material |
| Weight |
| Height width depth |
| Strength |
| Life time |
| Nozzle type |
Availability:
In stock Out of stock in store
To order Out of stock at the central warehouse
Delivery:
From Moscow 7-14 days
*Part prices may not be accurate. Check availability and exact prices with our managers
7
LU017025
Battery negative terminal wiring harness
Battery negative terminal wiring harness
Article: LU017025
| Material |
| Weight |
| Height width depth |
| Strength |
| Life time |
| Nozzle type |
Availability:
In stock Out of stock in store
To order Out of stock at the central warehouse
Delivery:
From Moscow 7-14 days
*Part prices may not be accurate. Check availability and exact prices with our managers
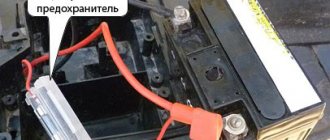
8
LU017026
Fuse, 8A
Fuse, 8A
Article: LU017026
| Material |
| Weight |
| Height width depth |
| Strength |
| Life time |
| Nozzle type |
Availability:
In stock Out of stock in store
To order Out of stock at the central warehouse
Delivery:
From Moscow 7-14 days
*Part prices may not be accurate. Check availability and exact prices with our managers
9
LU017027
Starter relay, assembly (12V)
Starter relay, assembly (12V)
Article: LU017027
| Material |
| Weight |
| Height width depth |
| Strength |
| Life time |
| Nozzle type |
Availability:
In stock Available in store
To order Out of stock at the central warehouse
Delivery:
From Moscow 7-14 days
*Part prices may not be accurate. Check availability and exact prices with our managers
9
LU017028
Starter relay, assembly (12V)
Starter relay, assembly (12V)
Article: LU017028
| Material |
| Weight |
| Height width depth |
| Strength |
| Life time |
| Nozzle type |
Availability:
In stock Available in store
To order Out of stock at the central warehouse
Delivery:
From Moscow 7-14 days
*Part prices may not be accurate. Check availability and exact prices with our managers
9
LU017029
Starter relay, assembly (12V)
Starter relay, assembly (12V)
Article: LU017029
| Material |
| Weight |
| Height width depth |
| Strength |
| Life time |
| Nozzle type |
Availability:
In stock Out of stock in store
To order Out of stock at the central warehouse
Delivery:
From Moscow 7-14 days
*Part prices may not be accurate. Check availability and exact prices with our managers
10
LU017030
Clamp 8x250mm, plastic
Clamp 8x250mm, plastic
Article: LU017030
| Material |
| Weight |
| Height width depth |
| Strength |
| Life time |
| Nozzle type |
Availability:
In stock Out of stock in store
To order Out of stock at the central warehouse
Delivery:
From Moscow 7-14 days
*Part prices may not be accurate. Check availability and exact prices with our managers
11
LU017034
Resistor, 30W
Resistor, 30W
Article: LU017034
| Material |
| Weight |
| Height width depth |
| Strength |
| Life time |
| Nozzle type |
Availability:
In stock Out of stock in store
To order Out of stock at the central warehouse
Delivery:
From Moscow 7-14 days
*Part prices may not be accurate. Check availability and exact prices with our managers
12
LU013750
Bolt with flange M6x1.0x12mm (galvanized), steel
Bolt with flange M6x1.0x12mm (galvanized), steel
Article: LU013750
| Material |
| Weight |
| Height width depth |
| Strength |
| Life time |
| Nozzle type |
Availability:
In stock Out of stock in store
To order Out of stock at the central warehouse
Delivery:
From Moscow 7-14 days
*Part prices may not be accurate. Check availability and exact prices with our managers
13
LU017031
Clamp 8x200mm, plastic
Clamp 8x200mm, plastic
Article: LU017031
| Material |
| Weight |
| Height width depth |
| Strength |
| Life time |
| Nozzle type |
Availability:
In stock Out of stock in store
To order Out of stock at the central warehouse
Delivery:
From Moscow 7-14 days
*Part prices may not be accurate. Check availability and exact prices with our managers
14
LU017032
Clamp 8x150mm, plastic
Clamp 8x150mm, plastic
Article: LU017032
| Material |
| Weight |
| Height width depth |
| Strength |
| Life time |
| Nozzle type |
Availability:
In stock Out of stock in store
To order Out of stock at the central warehouse
Delivery:
From Moscow 7-14 days
*Part prices may not be accurate. Check availability and exact prices with our managers
15
LU014002
Nut M6x1.0mm, steel
Nut M6x1.0mm, steel
Article: LU014002
| Material |
| Weight |
| Height width depth |
| Strength |
| Life time |
| Nozzle type |
Availability:
In stock Out of stock in store
To order Out of stock at the central warehouse
Delivery:
From Moscow 7-14 days
*Part prices may not be accurate. Check availability and exact prices with our managers
16
LU015628
Spring washer 6mm, steel
Spring washer 6mm, steel
Article: LU015628
| Material |
| Weight |
| Height width depth |
| Strength |
| Life time |
| Nozzle type |
Availability:
In stock Out of stock in store
To order Out of stock at the central warehouse
Delivery:
From Moscow 7-14 days
*Part prices may not be accurate. Check availability and exact prices with our managers
17
LU015609
Washer 6mm, steel
Washer 6mm, steel
Article: LU015609
| Material |
| Weight |
| Height width depth |
| Strength |
| Life time |
| Nozzle type |
Availability:
In stock Out of stock in store
To order Out of stock at the central warehouse
Delivery:
From Moscow 7-14 days
*Part prices may not be accurate. Check availability and exact prices with our managers
18
LU016273
Spring washer 5mm, steel
Spring washer 5mm, steel
Article: LU016273
| Material |
| Weight |
| Height width depth |
| Strength |
| Life time |
| Nozzle type |
Availability:
In stock Out of stock in store
To order Out of stock at the central warehouse
Delivery:
From Moscow 7-14 days
*Part prices may not be accurate. Check availability and exact prices with our managers
19
LU013899
Washer 5.3x10x1.0mm, steel
Washer 5.3x10x1.0mm, steel
Article: LU013899
| Material |
| Weight |
| Height width depth |
| Strength |
| Life time |
| Nozzle type |
Availability:
In stock Out of stock in store
To order Out of stock at the central warehouse
Delivery:
From Moscow 7-14 days
*Part prices may not be accurate. Check availability and exact prices with our managers
20
LU017033
Fuse housing, plastic
Fuse housing, plastic
Article: LU017033
| Material |
| Weight |
| Height width depth |
| Strength |
| Life time |
| Nozzle type |
Availability:
In stock Out of stock in store
To order Out of stock at the central warehouse
Delivery:
From Moscow 7-14 days
*Part prices may not be accurate. Check availability and exact prices with our managers
21
LU017037
Starter Relay Wiring Harness
Starter Relay Wiring Harness
Article: LU017037
| Material |
| Weight |
| Height width depth |
| Strength |
| Life time |
| Nozzle type |
Availability:
In stock Out of stock in store
To order Out of stock at the central warehouse
Delivery:
From Moscow 7-14 days
*Part prices may not be accurate. Check availability and exact prices with our managers
22
LU013968
Bolt with flange M6x1.0x10mm, steel
Bolt with flange M6x1.0x10mm, steel
Article: LU013968
| Material |
| Weight |
| Height width depth |
| Strength |
| Life time |
| Nozzle type |
Availability:
In stock Out of stock in store
To order Out of stock at the central warehouse
Delivery:
From Moscow 7-14 days
*Part prices may not be accurate. Check availability and exact prices with our managers
Why doesn't the starter work?
Initially, you need to exclude battery discharge from the list of possible breakdowns. If this were the case and the battery suddenly became low, you would hear a peculiar sound when you press the “start” button. This sound indicates that the starter is not engaged with the bendix and is running without load, idle. If you still hear this sound when starting up, do certain things:
In most cases, these points will help you solve the problem with your scooter.
However, there may be other breakdowns, which in themselves are considered more serious when compared to a dead battery. We are talking about audible clicks when the starter operates. This is a deeper problem and it is necessary to look for its causes.
Causes and solutions
Step 2. When you press the engine start button, you hear the sound of the relay turning on. If yes, then try bridging the power terminals of the relay. If there is no sound, disconnect the relay from the power supply, and then use the wires to connect the battery and starter.
Step 3. Once you have connected the starter, it works fine. If yes, then you just need to replace the relay. If not, check the contacts of the start button, the wires from the starter, and replace all worn parts.
Step 4. If, after you bridge the power terminals of the relay, the starter begins to operate normally, replace the relay. If not, then you are faced with a more serious task: you need to disassemble the starter and check the condition of its parts (brushes, windings and springs).
By analyzing your scooter breakdown using these simple steps, you can easily identify and fix the breakdown. Of course, you don’t have to worry too much about this and just bring your scooter to a service station. But at the same time, you will spend your money and will not be able to gain that invaluable experience that you will gain when diagnosing and repairing yourself.
Source
Thursday, September 28, 2020
Carburetor diagram for 139qmb
| Carburetor outlet channels. “Fuel injection channels” - used at the moment of opening the throttle valve, that is, they are used as transition channels at the moments of closing and opening the valve |
Throttle valve limit screw.
Information from a post on one automobile forum regarding the same screw, but on a car carburetor:
But what about this (quote from the Daewoo Nexia primer):
. The initial position of the throttle valve when the accelerator pedal is released is adjusted and fixed with a limit screw at the factory. This damper position provides sufficient air flow in the intake manifold to install the IAC shut-off element in the required discrete position during automatic frequency control. It should be noted that in relation to this engine, the initial position of the throttle valve cannot be considered as the position corresponding to the minimum idle speed. The head of the idle speed limit screw is closed with a cap. Warning It is prohibited to remove the protective cap of the limit screw and make adjustments. Incorrect adjustment may result in damage to the IAC or throttle body. .
| The throttle stop screw is not intended for adjusting idle speed! This screw limits the movement of the damper to prevent wear and jamming. |
| According to the manual, the standard setting for the idle speed adjustment screw is two turns +- 14 |
Check all O-rings for damage. Replace if necessary. A poor seal at the seat of the enrichment valve has a very negative effect on the stable operation of the carburetor and, accordingly, the engine.
When cleaning the carburetor, remove the vacuum diaphragm before using purge air or cleaning solvents. This will prevent damage to the diaphragm.
Excellent video with an animated demonstration of the carburetor:
Possible malfunctions of the CVK carburetor
1.The engine is difficult to start
— No spark - Poor compression
2. There is no fuel in the carburetor
-Closed fuel line -Closed fuel filter -Blocked vacuum line -Damaged Broken vacuum line -Clogged inlet needle -Float level set too high
Float level: with this position of the float, the needle should just close the fuel line.
| The carburetor is in an inverted state, the float presses on the needle with its own weight. The measurement was taken from the center of the protruding seam of the float and to the horizontal plane on the carburetor body, photo below. |
| reference points for measuring the position of the float |
It is also worth paying attention to the needle itself and the float. It has a spring-loaded stop or, correctly speaking, a rod, through which the float tongue presses on the needle. So, when adjusting the carburetor or repairing it, you need to pay attention to this emphasis. It happens that when the equipment is idle for a long time, this spring-loaded rod gets stuck and it does not play on the spring. If this happens, you need to develop it using liquid keys or diesel fuel. If the rod turns sour tightly, it is better to replace the needle.
| Compressed needle stop |
In a strictly horizontal position, the protruding line on the float and the line on the exhaust tract of the carburetor, the spring-loaded stop of the float needle should take the middle position.
3. Too much fuel for the engine
-Dirty air filter -Air leak in the intake manifold -Faulty enrichment valve(
stuck or bad seal where it fits
) -The air channel in the carburetor is blocked
4. Air/fuel mixture too rich or too pale
-The enrichment valve is faulty(
stuck or bad seal where it fits
) -Idle screw too tight -Float needle stuck or dirty -Float height too high or too low -Carburetor air passage blocked -Air filter dirty -Carburetor or manifold leaking air
5. Engine does not accelerate
-Bad spark -Air mixture screw too tight -Accelerator pump faulty
6. Almost does not respond to the throttle
-Weak spark/poor ignition -Blocked fuel line -Blocked fuel filter -Bad fuel -Water in fuel -Air leak in carburetor or manifold -Faulty enrichment valve -Fuel movement in carburetor is difficult -Vacuum choke stuck -Damaged vacuum diaphragm -Dirt in carburetor
Setting up and testing the scooter
Check the power interrupt switch. This safety feature "interrupts" engine power when you apply the brakes. If your scooter does not work after adjusting the brakes, then the problem lies in this unit.
Adjustment procedures may vary depending on the scooter model. You can usually loosen the brake adjustment tension by turning the brake adjuster built into the handle toward the lever. This releases the tension on the adjustment and safety switch. Check the owner's manual or contact the motor manufacturer.
If this setup doesn't work, there is an easy way to test the generator. Disconnect it from the controller, then try to start the scooter. If the problem is with the switch, then the scooter will only work when the brake lever switch is disabled. Make sure the power switch is turned on.
If the scooter uses a fuse, look at the inside of the fuse to make sure it hasn't blown. The fuse may need to be removed from the scooter and held up to a light source so you can determine whether it is blown or not.
fuse in scooter
For scooters that use an automatic fuse, press or flip the automatic switch to check its functionality.
Automatic power switch
Perform a test using a multimeter. Sometimes fuses burn out in a hard-to-reach place. Also, circuit breakers can mechanically reset but still not work. Testing the continuity of a fuse or circuit breaker using a multimeter is the best way to determine whether it is working or not.
Also try charging the battery for 8 hours. Electric scooters that have not been charged for more than 3 months will have their batteries partially discharged. Try charging the battery for 8 hours and then see if that helps.
Remove the generator base plate or cover and try to locate any burnt or melted wires, wire connectors, or electrical components. Also look for loose, disconnected or damaged wires or wire connectors. Pull and push on all individual wires and wire connectors to ensure they are not loose.
Sniff the engine speed control to make sure there is no burning smell. Any components that appear burnt or melted, or have a distinctive odor similar to burnt plastic, are almost always defective and should be replaced. Engines that smell burning should be replaced to prevent damage to the speed controller. Burnt or melted wires or wire connectors indicate overheating of the motor, which can cause the plastic insulation to melt the motors' electromagnetic copper wire windings.
If the insulation melts from the copper windings, a short circuit will occur, which will lead to complete breakdown of the generator. A short circuit can also burn out the speed controller by giving it too much resistance, causing it to work too hard to the point of overheating.
Data on the health of electric motors is, in most cases, obtained using a braking test. Power consumption is calculated based on current and voltage. During the test procedure, the engine is freely accelerated and stopped to no-load speed. From the moment of inertia and acceleration, the engine torque is calculated and the power at full speed is set. Since the entire measurement time, depending on the size of the engine, is usually less than one second, the engine does not have time to warm up. During this time, it remains at room temperature.
Check the battery with the scooter running. If the scooter is running, you can perform a battery test on it by fully charging the battery and then checking how long the battery lasts. Most electric scooters will have a range of about 30-45 minutes. If the generator runs for less than 30 minutes, it is worn out and may need to be replaced. If the generator runs less than 20 minutes, it is moderately worn and should be replaced. Severely worn generators will only run for 5-10 minutes.
If you have a multimeter and the scooter is in working order, you can check the load on the battery pack by fully charging the battery. Next, lift the rear wheel, connect the multimeter to the battery, and give the scooter full throttle while engaging, but do not lock the rear brake. When you apply the rear brake, the battery will be "stressed" and you can then read its voltage to determine how much it drops. If the battery is in good condition, the voltage will only drop a few volts, however, if the battery is worn out, the voltage will drop more rapidly.
Batteries are an integral part of the operation of an electric generator. You won't get far without good batteries. Always use a charger recommended by the manufacturer. This charger should have an indicator light or sensor that will tell you when the battery is charged.
Do not leave the battery in the charger after charging it. This may damage the battery.
If you notice that your battery no longer holds the same amount of charge that it used to, this means that your battery is getting old and you will need to replace it. Pay attention to corrosion and any chemicals that may be leaking from the battery. If you notice any leaks, replace the battery immediately. If you see corrosion on the battery terminals or connectors, clean the corrosion. Remember to charge the battery after the battery has cooled down. This will help extend the battery life.
Payment via Yandex Cashier
After selecting payment via Yandex, the Yandex Cashier payment system will launch, where you need to select a convenient payment method (bank card, QIWI, Yandex Money account, etc.)
After specifying payment details and confirming payment, payment for the goods will occur.
If you have a bank card in a currency other than the ruble, then the money will be debited from the card at the rate of the Central Bank of Russia at the time of the purchase.
This payment method is optimal for residents of Russia, Kazakhstan and Belarus.
Official website of the Yandex Kassa payment system https://kassa.yandex.ru
Design and principle of operation of a scooter generator
To the average person who is not experienced in electrical matters, a scooter generator may seem like a very complicated device.
This is partly true: electric current is an invisible thing to the eye, and if we can see or touch mechanical faults, then we can only guess about faults in the electrics of a scooter or identify them using special measuring devices. However, “it’s not the Gods who burn the pots” and if a person has a desire for something, then this article will be a good help, but for those who don’t want anything, there’s no point in continuing.
The scooter generator is a flywheel type generator with permanent magnet excitation. This type of generator is used on the vast majority of scooters, as well as mopeds and small motorcycles.
Designation of the main elements of the generator
The scooter generator consists of a rotor (in collective farm language - “anchor”) and a stator. The rotor is mounted directly on the crankshaft and while the engine is running, the rotor rotates around the stator coils
The stator is attached directly to the engine crankcase. And while the engine is running it remains motionless. The stator is a metal base made of several plates of special transformer iron. On the base of the stator there are special projections (coils) on top of which a copper wire is wound in a strictly defined order - forming the generator windings.
Depending on the generator model, there may be two or three windings. The generator shown below has three windings: supply, control and high-voltage
Permanent magnets are installed on the inner surface of the rotor. Magnets have different polarities. The magnets in the drain are covered with a lid; if you remove it, you can see them
Each magnet forms a static (constant) magnetic field around itself. In turn, the field of each magnet will be different: blue is negative (“north”), red is positive (“south”)
If we insert the stator into the rotor in the same way as is done on the engine, then we will see that the stator coils will be in the magnetic field of the magnets located next to them
After we start the engine, the rotor magnets will begin to rotate around the stator coils. During the rotation of the rotor, magnets of different polarities will approach the coils, which always stand still, and the field in which the coils are located will change at a very high speed. Due to the rapid change of magnetic fields, magnetic induction will occur in the generator coils and the generator will begin to generate electric current.
Current is good. But the current of a generator with excitation from permanent magnets is not a constant value and directly depends on the engine speed: the higher the engine speed, the more often the field of the coils changes - the induction increases and, as a result, the voltage in the coils increases. So it turns out that at idle engine speed the generator voltage will be 8-10V, and at maximum 60-70V.
In order to stabilize the generator voltage to specified limits, a special generator voltage regulating module was introduced into the scooter’s power supply system. That’s what it’s called: generator relay regulator
The principle of operation of the relay regulator is very simple: there are three windings on the generator stator: supply, high-voltage and control. The power winding is the main one and is designed to power the lights, sound signal and charge the battery.
The control winding is auxiliary and if the voltage in the supply winding increases, the relay-regulator supplies voltage to the control winding - the induction is disrupted and, as a result, the voltage in the supply winding of the generator drops.
When the voltage decreases, the opposite happens: the relay-regulator stops supplying current to the control winding, induction is restored, and the voltage in the supply winding increases.
The control and auxiliary windings of the generator are wound on the same coils
The high voltage winding is wound on individual coils or coil. The high-voltage coil is needed to form a spark on the spark plug and is only partially related to the generator. Rather, it relates to the ignition system, and this is a separate module and has little to do with the operation of the generator
Another auxiliary module of the generator is a load resistor. It is needed to ensure that the generator does not operate without load. For devices that generate current, working without a load is like death. The designers foresaw this possibility in advance and, in order to prevent the generator from running idle, they slightly loaded the supply winding onto the resistor
In addition to the elements described above, the scooter’s energy supply system includes an ignition sensor, which, at the right moment, ensures the formation of a spark at the spark plug.
This module is the same generator only in miniature and it works exactly on the same principle
On the outside of the rotor there is a small magnet in the form of a rectangular protrusion. This magnet, just like its larger brothers, forms a constant magnetic field around itself, and what happens next, you probably already guessed: while the engine is running, the field passes through the sensor coil and a small current is generated in it, which goes directly to the switch, controlling the torque in it sparking
Source
Stealth Tactic 50: cheaper only on foot
Motorcycles in the most budget category will always be popular and in demand. The lightweight Stels Tactic 50 scooter is an excellent example of this; due to its low price, it was produced for many years.
The Stealth Tactic 50 scooter did not shine with impressive technical characteristics, catchy design or other advantages even at the moment when it first went on sale. Why did he become so popular? It's simple - dealers offered it at a very low price , and this attracted a large number of thrifty buyers for whom the cost of purchase and maintenance is of paramount importance. Over the past years, tens of thousands of copies of this model have been sold, and many of them are still in use, because there are no problems with spare parts, and budget motorcycles are always relevant.
Relay regulator
This is the same rectifier that converts alternating voltage to direct voltage, with a range of 13.5-14.9 V. C
.
The regulator is located under the plastic cover of the scooter at the front. It is attached to a metal backing for better heat dissipation.
The main circuits of the relay circuit are:
- The green wire is common.
- Red – output of converted and stabilized voltage within the established limits.
- White and yellow – AC input to the regulator. Due to electronics, the voltage is converted into powerful impulses. The yellow wire supplies power to a heavy load on the on-board network - headlights and instrument panel lighting.
The current for lamps is not stabilized, but is limited to acceptable values. At high generator speeds, the voltage goes beyond the operating ranges of the lamps, which leads to their burnout. The situation is very familiar to those who have encountered faulty relay regulators.
Because of one unit, you can lose all the light bulbs in a matter of seconds, so you should monitor the on-board voltage regularly.
CALCULATE THE COST OF DELIVERY IN RUSSIA
× Your message has been successfully sent to us. Thank you!
Feedback
Design and principle of operation of a scooter generator
To the average person who is not experienced in electrical matters, a scooter generator may seem like a very complicated device. This is partly true: electric current is an invisible thing to the eye, and if we can see or touch mechanical faults, then we can only guess about faults in the electrics of a scooter or identify them using special measuring devices.
However, “it’s not the Gods who burn the pots” and if a person has a desire for something, then this article will be a good help, but for those who don’t want anything, there’s no point in continuing.
The scooter generator is a flywheel type generator with permanent magnet excitation. This type of generator is used on the vast majority of scooters, as well as mopeds and small motorcycles.
Designation of the main elements of the generator
The scooter generator consists of a rotor (in collective farm language - “anchor”) and a stator. The rotor is mounted directly on the crankshaft and while the engine is running, the rotor rotates around the stator coils
The stator is attached directly to the engine crankcase. And while the engine is running it remains motionless. The stator is a metal base made of several plates of special transformer iron. On the base of the stator there are special projections (coils) on top of which a copper wire is wound in a strictly defined order - forming the generator windings.
Depending on the generator model, there may be two or three windings. The generator shown below has three windings: supply, control and high-voltage
Permanent magnets are installed on the inner surface of the rotor. Magnets have different polarities. The magnets in the drain are covered with a lid; if you remove it, you can see them
Each magnet forms a static (constant) magnetic field around itself. In turn, the field of each magnet will be different: blue is negative (“north”), red is positive (“south”)
If we insert the stator into the rotor in the same way as is done on the engine, then we will see that the stator coils will be in the magnetic field of the magnets located next to them.
Specifications
If you dig deep into the depths of this bike and conduct a small comparative analysis, you will find that it is assembled from the same spare parts as dozens of other similar models produced in China. At the same time, all the main components are quite reliable, since they were copied many years ago from outdated Japanese models, and since then they have been produced on an industrial scale without any changes.
Engine
Take the most primitive 2-stroke engine from the last century and get the power unit installed on the Stels Tactic. Its resource is short, but it is more powerful than 4-stroke engines of comparable cubic capacity - as much as 4.9 hp. and 3.6 Nm , with peak torque already at around 4000 rpm . The engine is very torquey, so the scooter quickly picks up a maximum speed of 65-70 km/h .
Transmission
Like other similar bikes, an ordinary stepless variator . It is quite reliable, but does not operate smoothly, so when the gas is opened sharply, nothing happens for a split second, and then a jerk follows. Perhaps this feature is partly due to imperfect operation of the carburetor.
Chassis and brakes
The entire structure described above is located in the depths of a tubular steel frame , which does not differ in significant strength and resistance to high loads. But Chinese engineers were generous with a disc brake for the front wheel , installing a 220 mm disc with a single-piston caliper. The rear wheel has a conventional drum mechanism. The suspensions are rigid and short-travel, extremely budget-friendly and devoid of adjustments - a monoshock absorber with a pendulum at the rear and a telescopic fork at the front. The wheels are 12-inch, standard width for scooters, 120 mm and 130 mm front and rear, respectively.
Electronics
What kind of electronic stuffing can we talk about when we have before us a scooter that is cheap in all respects and has a production cost of several hundred dollars? A compact battery, a headlight comparable in power to a flashlight, a bundle of wires – that’s all. But the likelihood of malfunctions with electronics tends to a minimum, and if something happens, everything can be repaired easily and quickly.
Weight and dimensions
The dry weight of the scooter is only 94 kg , and the curb weight is 5 kg more, according to the manufacturer. The Stels Tactic 50 seems very light; if desired, a couple of average men could easily lift it with outstretched arms. Its compact dimensions make it not very convenient for tall drivers, and those with long legs may even have a specific problem - the steering wheel rests on their knees when turning.
Controllability
Any small scooter is very easy to steer, and Stealth Tactic 50 only confirms this rule. And how else can a bike weighing less than one hundredweight and with a wheelbase of 1275 mm be controlled? Its turning radius is comparable to that of a baby stroller, and it easily darts between cars even in dense traffic jams. All this makes the Chinese scooter an excellent choice for urban conditions.
Fuel consumption
Fuel consumption averages about 2.5 liters per 100 km, although it largely depends on driving style. This is not the smallest figure for a 50 cc moped, but the archaic two-stroke engine is not particularly economical. For models with a larger piston engine, gasoline consumption also increases to approximately 3 liters per 100 km.
Ignition circuit components
The ignition system is an important element in the operation of the entire scooter.
The formation of a spark and a precisely calculated impulse that ignites the fuel depend on it. The scooter ignition circuit includes many components that are responsible for a specific job.
CDI ignition module
The first item in the list is the CDI module. This abbreviation stands for Capacitor Discharge Ignition - ignition from a capacitor discharge.
The switch module is made in a non-separable box, so if it fails, it is replaced with a new one. 5 wires are connected to it, distributed throughout the entire ignition circuit of the scooter.
The block is hidden inside the scooter, so getting to it is not easy. The plastic covers will have to be completely dismantled.
Ignition coil
The purpose of this component is a fast pulse of high voltage voltage based on a signal from the switch. It goes directly to the spark plug, where it is converted into a spark.
The coil is located on the right side of the Chinese scooter and is attached to its supporting structure. It is easy to recognize - it is made in the form of a plastic barrel. On the reverse side there is a thick wire connected. It is he who transfers the discharge according to the circuit from the transformer to the spark plug.
To protect against dirt and dust, the coil is placed in a rubber cover.
Spark plug
Its function is simple - to form a spark and ignite the mixture inside the cylinder. The scooter uses an A7TC spark plug.
Its position is hidden from view, but experienced owners know where to look for it. Having passed along the high-voltage wire, we reach the engine block and the spark plug cap.
The rubber seal protects the contact from accidental electrical breakdown. Remove with a little effort towards you. Do not pull the wire too hard - the cap may come off.
The spark plug is unscrewed with a socket wrench. After removal, you need to inspect the color of the contacts and their condition. An indicator of good engine performance is a brown tint without traces of soot. Deviation from the norm indicates a malfunction of the carburetor.
Starter
The device is used to make it easier to start a scooter engine, without using a kick pedal. The starter is located in the middle part of the moped, near the engine. To open it, you need to remove the decorative plastic.
The starter is connected through the starting relay, which is located on the scooter frame.
Fuel gauge and indicator
The sensor measures the amount of gasoline in the tank and signals the need to refuel. It is located in the tank itself and is connected by three wires.
The indicator is directly connected to the sensor. Both are powered by stabilized current from the rectifier. If problems are observed in the operation of the indicator, you should check the connection to the circuit.
Voltage is supplied only when the ignition switch is turned on.
Turns relay
The breaker is used to control the turn lights. When the button is closed, the relay produces current pulses with a frequency of 1 Hz.
The block is located under the instrument panel. To change the relay you need to remove the plastic protection.
Switching the circuit is not difficult. When turning right, voltage flows through the blue wire, which is responsible for the corresponding lamps. The left position of the switch shorts the gray bus to the orange one.
Duplicate lamps on the instrument panel are connected in parallel to the turns circuit lines. They signal that the lamps are on on a specific side of the scooter.
Sound signal
The purpose of the sound horn is clear to everyone. On the scooter it is located near the limiter relay.
The signal is powered by direct current through the ignition switch and is activated by a button on the handlebars of the moped. The component is non-separable, so if it fails, it is completely replaced.
FAQ
- Everyone says that two-stroke engines have low engine life. Approximately what? On average, according to owner reviews, for this model it exceeds 10,000 km. Replacing the piston with a new one is inexpensive.
- Do you need to fill it with gasoline already mixed with oil, like in a Soviet motorcycle? No, the oil is poured into a separate tank, from where it gradually enters the combustible mixture in the required quantities.
- I'm going to change the CPG to a new one, I want to plug it into 100 cc, will I need to run it in again? Yes, but not as hard as at first, since the engine has been broken in for a long time. But for the first 500-700 km it is better to drive at a moderate speed, without high revs, and after the break-in is completed, you need to change the oil again.
Scooter electronic ignition device
The modern ignition system of a 4t scooter is designed as follows: the switch and coil, which are its main elements, supply high voltage to the spark plug, which generates an electrical discharge that can ignite the fuel. The coil generates high voltage due to electromagnetic induction. The switch is needed to distribute its interruption voltage at the right time. Inside there is an electronic circuit, a thyristor and three outputs for wires. At the right moment, the switch supplies voltage or turns it off.
The principle of operation of the scooter ignition system is as follows: the battery supplies voltage to the coil, which is often connected to a switch in one unit, the switch supplies voltage to the spark plug, and decides when to interrupt it. The mixture in the cylinders lights up at the right time. The correct operation of the engine and whether it will start at all depends on how the ignition is configured and set.
Switch
In many scooter models, the commutator is combined with a coil, so if one of the devices fails, the entire unit has to be replaced. Such spare parts are inexpensive.
Externally, the switch looks like a plastic box. Inside there is a microcircuit, a variety of electronics that cannot be repaired. In addition, there is a thyristor. The task of this element is to interrupt the electrical impulse at the right moment; for this purpose it has three outputs. When current enters one of them, the thyristor turns into a conductor, and the current moves from the input contact to the output. When a certain voltage is reached and the current drops, the pulse is interrupted, after which the Hall sensor returns the thyristor to its original position so that the signal arrives again at the third output. The process is repeated every time the voltage is applied again.