Electrical wiring components
The standard Niva Chevrolet wiring diagram is divided into several sections for better maintainability and ease of maintenance.
- Front part - a set of cables connects all equipment located in the engine compartment of the car.
- The interior part - the unit is additionally divided into independent zones, which allows you to power different groups of equipment without the risk of damaging or overloading the main elements.
- Instrument panel compartment - a bundle of cables combines the lines from all gauges, sensors and indicators.
- The stern assembly - the bundle is responsible for voltage and control of equipment located on the rear side of the vehicle.
Chevrolet Niva power windows: what to do if they don’t work?
Long gone are the days when drivers used physical force to lower or raise the side windows. Now just one finger manipulation is enough and the two front side windows are lowered automatically. Now all work is based solely on electronics and devices that directly raise and lower the windows. These devices are called window regulators and do an important job. Why important? Because when the driver lowers the window manually, there is a danger of creating an emergency situation. The driver is distracted to one degree or another, especially if the window lifter handle jams. Now the Chevrolet Niva is produced with automatic windows on the front doors and with mechanical controls on the rear ones.
About the main elements of an electrical circuit
The vehicle's electrical circuit includes the following components:
- Sources of electrical energy.
- Devices responsible for its consumption.
The main location of the block is to the left of the steering column. The device is closed from below with a special lid. You only need to unscrew two screws to get to the internal contents. After this, squeeze out the upper edge of the lid, gradually freeing this part from all fasteners. The entire connection diagram for the VAZ 2123 speed sensor and other devices becomes available.
A block will appear, which is held on a special bracket. Depending on the configuration and year of manufacture, the circuit itself varies, as does the total number of fuses.
Pinout of Niva Chevrolet connectors responsible for the front part of the wiring
- 1/6 – front right/left headlight block;
- 2 – joint assembly of the machine starter;
- 3 – voltage supply for traction starter;
- 4 – battery connection terminals;
- 5 – generator module for powering the electrical circuit;
- 7/15 – units for combining head optics fog lights;
- 8 – contact group for the drive of the electric motor for the front windshield washer;
- 9 – input of a temperature sensor that measures indicators outside the vehicle;
- 10 – contact plug for the engine compartment lighting lamp;
- 12 – standard sensor for measuring the remaining brake fluid level;
- 13 – plug of the standard electric motor for driving the windshield wiper;
- 14 – designation of a standard horn;
- 16/17 – plug inputs to the dashboard.
Chevrolet Niva wiring diagram, part of the ECM
- 1 – spark plug pins;
- 2 – contact group of injector drivers;
- 3 – ignition unit;
- 4 – control controller;
- 5 – main protective relay of the internal combustion engine;
- 6 – area for location of fuse links;
- 7 – main relay fuse;
- 8/9 – protective circuits of the right and left head fans of the radiator;
- 10 – protective element for the control fuse of the main fuel pump;
- 11 – controller circuit fuse;
- 12 – secondary protective element of the main radiator fan on the right side;
- 13 – auxiliary fuse of the above circuit;
- 14 – fusible link of the fuel pump control circuit;
- 15 – fan of the main radiator, located on the left side;
- 16 – standard oxygen concentration sensor in the intake manifold;
- 17 – drain output of the detonation channel meter;
- 18 – DPKV output;
- 19 – control by the adsorber purge valve;
- 20 – output of the mass air flow sensor group;
- 21 – idle speed control drive;
- 22/23 – activation of the left/right fan motor of the main engine cooling system;
- 24 – auxiliary resistor;
- 25 – control of the TPS device;
- 26 – output from antifreeze temperature sensor;
- 27 – status indicator of the above-described sensor;
- 28 – standard module for measuring lubricant pressure in the crankcase compartment of the power plant;
- A/B – battery terminal blocks;
- C – “mother” input for connecting to the dashboard;
- G1/G2 – grounding outputs of the wiring section.
Also interesting: Fuses and relays (location and purpose of fuses and relays) Niva Chevrolet
What to do if the Niva Chevrolet windows do not work
VAZ 2123. Niva-Chevrolet. Mechanical windows
There are three to five relays under the fuse block. To determine which one is responsible for the window regulator, turn on the ignition, hold down the button and remove each relay in turn. At the desired relay, the glass will stop rising.
We bridge two contacts: If you purchased a ready-made jumper, it is recommended, for safety reasons, to insulate it. We install the relay in its original place. The second method is to modify the ESP relay. Two contacts also close, but not outside the relay, but inside.
This modification is done at a car dealership. The third method is to connect the power windows to the cigarette lighter: On the passenger side, remove the lower valve of the torpedo, remove the cigarette lighter wires. We connect the wire to the plus of the cigarette lighter. We connect the wire to the ESP buttons. We connect the assembled structure to the black and white wire. The power windows have a common plus, so we choose any wire.
Remove fuse ESP F5. We replace the cigarette lighter fuse with a 30 A one. Important! Remember that changes in the connection of power windows significantly increase energy consumption; Chevrolet Niva front power windows quickly drain the battery.
They are not as convenient as electric ones, but are more reliable. The main element of the window lifter mechanism is the drive device.
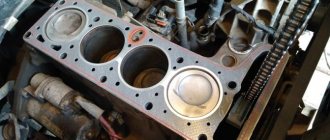
Chevrolet Niva front power windows The drive consists of a simple set of elements: The handle regulates the degree of window opening. If the window regulator is broken, the window will not open when the handle is turned. There may be several reasons: The handle slots have ground down. This is due to the soft plastic of the handle itself, at the junction with the gearbox shaft. The handle is replaced by choosing the option with a metal insert. The gear teeth of the gearbox have ground down.
The gearbox is a block of two gears in a housing, with space for a cable. The body is connected with rivets. Scheme for switching on the electric windows of the front doors: Gear motors 4 and 5 are switched on by switches 3 and 6 located on the door armrests.
Power is supplied to the switches through fuse F5 only when the ignition is on, when the contacts of relay 2 are closed. Disassembly is complete.
Now you need to buy a new gear motor and install it in place. But here you have to be careful! Gearmotors for them come in two types. They differ from each other in the connector and tip. One is square, the other is rectangular. In this case, we need one with a square tip, and we will remake the connector.
Unscrew the fasteners of the window lifter frames at the Chevrolet Niva front window lifter points. The motor connector is disconnected and the entire mechanism is removed: the front windows of the Chevrolet Niva and the lower window of the doorway. Three rubber dampers are unscrewed along with the studs. Removal at this stage is completed, now all that remains is to replace the device with a new one.
After the replacement has been made, you need to assemble all the parts in the reverse order of removal. A few words about the malfunction of the rear window regulators In most cases, the rear devices have not so complex faults, so only repairs can correct the situation.
But before carrying out repairs, you will need to remove the device.
Electric window diagram
The rear window lifters are removed in the following sequence: The decorative upholstery is removed in the same way as from the front door. The rod of the inner lock handle is disconnected.
The glass rises as high as possible.
Relay and fuse locations
The main part of the fuses is located inside the cabin, under the panel to the left of the steering column. There are four blocks in total:
- Engine control system fuses.
- Windshield wiper.
- General fuses.
- The engine management system, which is always complemented by the Chevy Niva circuit.
The last block is located at the bottom.
The main and additional blocks are always connected to each other. 10 fuses are included in the top block. There are six of them in the lower one. Cooling works, among other things, due to such a device.
The relay box for the engine management system is located below the main, additional fuse box. There are a total of five relays and one fuse in this part. Sometimes the so-called starter relay is additionally included in the circuit; the year of manufacture becomes the determining factor.
There are also mounting blocks, which are also located to the right or left of the steering column.
Window regulator Niva Chevrolet: connection diagram, why it doesn’t work and how to change it | Niva Repair
It turned out that the service center does not carry out repairs, but replaces the entire electric window regulator.
Repair and replacement of Niva Chevrolet power windows, as well as connection methods without ignition
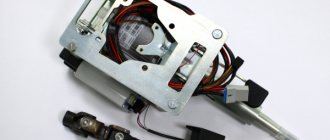
window lift motor on a Chevrolet Niva I installed the buttons in the doors, that is, the electric windows are controlled in the same way as mechanical ones. In the future, I’ll probably connect them to the door closer and to additional buttons, if I decide that’s what I want.
I have three wires going to the cigarette lighter, the black one is ground, the red one is 12 V. The first is the graphite brushes of the window lifter motor on the Chevrolet Niva, the springs that are pressed against the rotor.
The first one came off easily since it was still warm, but an incident happened with the second one: It is most likely held on by glue. Instead of a transparent film, I used Splen, since I was too lazy to cut out the template from the film, and then glue the edges, clean the dirt from the metal, and so on. We find a dirt-proof film with the casing, carefully peel it off if we want to glue it back.
The most interesting thing is under the film. We unscrew the three nuts securing the handle of the window regulator motor on the Chevrolet Niva, then the two nuts securing the window regulator itself, and finally the two bolts securing the glass to the window regulator, and with the help of a person or sleight of hand with the window FULLY RAISED, we pull out the window regulator and install the new electric one in the reverse order. I disassembled the door and tore off the polyethylene insulation from the door. I removed the motor block and rang the bell again, it turned out that there was voltage.
On the block. Then I unscrewed 7 nuts securing the mechanism and 2 nuts from securing the glass.
Then, pressing the button, I tried to lift the glass with my hand. Everything worked. However, with the window lift motor on the Chevrolet Niva, when the glass was raised to the top position, the sounds of turning the mechanism began to be heard. So I traveled for another year and a half. The window regulator made itself known by jamming once every month. I fought it with the same method - I pressed the button and pulled the glass up. The windows of the Chevy Niva still remained, to put it mildly, not good, despite all the manufacturer’s assurances.
The circuit works as follows: At the same time, the window lift motor on the Chevrolet Niva illuminates the control buttons. When you press any key, the process of raising or lowering the glass occurs. The current flows through the circuit: Only after pressing the button does the window lift operate. Thus, the diagram gives a clear picture of not only the functioning of the device, but also its malfunctions.
Replacing the front electric window in a Chevrolet Niva.
How to troubleshoot? So, if the front door power window does not work, then you need to perform the following manipulations: Check the fuse for suitability. It is located under the window motor panel on the Chevrolet Niva mounting block number 5.
If it malfunctions, it must be replaced. Replacing the front electric window in a Chevrolet Niva. It served for a long time and regularly, but at one unfortunate moment it suddenly stopped working. Troubleshooting should begin by checking the fuse; it supplies power to both window regulators. If it is intact, you will have to disassemble the door. To do this: The Niva fuse box is located on the driver's side under the dashboard.
Access to the mounting block is closed with a lid. To remove it, unscrew two screws. We remove the cover from engagement with the instrument panel.
Lift it up, remove the pins from the rubber bushings and remove. In the photo you can see where the relay and fuse box is located.
In Niva Chevrolet cars, fuse F5 protects the power supply circuit for the front door window lifter.
The power window relay is located in a block with remote relays. This block is located below the mounting one. Eliminating ESP malfunctions To prevent the front door window lift mechanism from breaking, it is enough to lubricate all its parts once a year. In case of breakdowns, remove the ESP and carry out repairs: The fuse is checked in the standard way.
Using the diagram or visually we find the required fuse. We inspect it for broken wires and burnt marks. You can check with a multimeter tester for resistance or voltage.
We check the relay for serviceability. To do this, either connect a new one, or close contacts 30 and 87 between. The relay cannot be repaired; it must be replaced. The power window buttons are easier to remove and replace. The reason for their malfunction is oxidation of the contacts.
Niva electrical circuit responsible for the equipment built into the front doors
The following is a general breakdown of the electrical equipment of Chevrolet Niva car doors manufactured after 2009. The representation is based on the fact that both sides are almost identical:
- 1/10 – door position limit switches;
- 2/11 – drive of electric window regulator gearboxes;
- 3/12 – plugs for control drives for adjusting the position of rear-view mirrors;
- 4/13 – door lock gearboxes;
- 5/14 – standard terminal blocks for the speaker outputs of the standard acoustic module;
- 6/15 – window switch drives.
Repaired the window regulator of a Chevrolet Niva
When I was going to buy a Chevrolet Niva back in 2007, among other advantages of this year’s model it was mentioned that the problem with regularly breaking window regulators had been solved. It was nice to know that I had gotten rid of some unpleasant moments in advance. But some time passed and the passenger front window in my car stopped going down...
I want to say right away that I was lucky, since a couple of my acquaintances, the happy owners of a Chevrolet Niva (by the way, also from 2007), for some reason, had windows that stopped going up. Not only is it impossible to safely leave a car with the window down, but for both of them it happened in rainy weather. Now do you understand why I consider myself lucky?
So, my car was still under warranty, it was quite possible to try to claim some rights to free repairs, but I didn’t want to waste a lot of time on this. The fact is that in Ukraine at that time new sales records were being set every month and official car dealerships and service stations were, to put it mildly, overloaded. Yes, and I didn’t want to deal with a very unqualified official service once again. So I decided to wait for something else potentially covered by a warranty so that I could make all the claims at once. But for some reason, in general, the Chevrolet Niva showed itself to be a relatively reliable car and, despite the rather harsh operation, nothing else was broken under warranty and, by the way, nothing out of warranty either. As a result, I never got to the warranty service. And I almost forgot about the window regulator... I got used to it in the sense that it doesn’t work.
I forgot, but not forever. After about a year and a half of operation, the window lift motor on the driver's side also jammed for the first time. On the advice of a co-worker, he removed the card from the door and hit it with a heavy object. It did not help. Then, pressing the button, I tried to lift the glass with my hand. Everything worked. However, since then, when the glass was raised to the top position, the sounds of the mechanism turning were heard. I suspect that some teeth on the “gear” broke off. So I traveled for another year and a half. The window regulator reminded itself of itself by jamming once every 4-5 months. I fought it with the same method - I pressed the button and pulled the glass up.
The windows of the Chevy Niva still remain, to put it mildly, not good, despite all the manufacturer’s assurances. Tested for yourself!
But at the height of the last hot summer, jamming became more frequent and I essentially lost the ability to open the front windows in my Chevrolet Niva, because... One day my method stopped working.
Then, armed with a wrench and a Phillips screwdriver, I disassembled the card, removed the motor and headed to the grocery store to buy a new one. Removal is not a very difficult procedure if you do it not for the first time. The first successful attempt to remove the device took me (with an assistant) about two hours. But then we reassembled it in 15 minutes. At the same time, they forgot to install the glass guide and had to disassemble it again. And it didn’t even take 15 minutes.
The technology for removing the gearmotor (that’s what it’s called scientifically) on a Chevrolet Niva is simple. First you need to remove the card from the doors. Then unscrew all the nuts that you see in front of you. The glass will go down. You should be careful that it does not go away too quickly (it may break). In the Chevrolet Niva maintenance book they advise removing the glass from the door before removing the gear motor from the doors, but we somehow failed to do this on the first try. Therefore, with a little contrition, they got it like that.
The new right window lift motor (photo above) was purchased for 192 hryvnia ($24) and happily installed in place. Like many post-Soviet spare parts, this device marked EPS-4KM smacks of leftism a little, i.e. I did not find any human packaging or detailed information about the device and its manufacturer. Let's hope that it will work at least as well as the crappy "original" from the factory.
By the way, along the way the seller almost sold me a motor “from Kalina”. In principle, it can also be installed on a Chevrolet Niva. But I was somehow very confused by the fact that it is smaller in size and as a result, part of the window lift cable, which is covered by the original gear motor, remains uncovered. As a technically illiterate person, I cannot explain this on my fingers, so I advise you not to rush to buy a window lift “from Kalina” without trying it on.
I haven't gotten around to the driver's window yet. I'm going to remove the gear motor and see what's inside. It may be possible to assemble two parts into one worker, if the hypothesis about the broken teeth on the gear is confirmed, and they are not damaged on the removed one.
Long live fresh air!
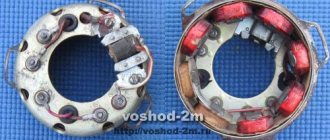
Photo of new and old window lift motors for Chevy Niva. On the left is the “factory” gear motor, and on the right is the one that I was lucky enough to buy.
The NIVA electrical circuit is responsible for powering the equipment built into the rear doors
Here all the equipment is also mirrored. The elements and wiring completely duplicate the opposite side:
- 1/2 – outputs for the aft cable harness;
- 3/6 – terminal block for powering the door lock gear motor;
- 4/5 – door position limit switches.
- 1 – main lighting device;
- 2 – fuse box;
- 3 – headlight switching regulator;
- 4 – part of turning off the ignition;
- 5 – headlight switches;
- 6 – designation in the instrument cluster of the area responsible for turning on the high beam;
- K4/5 – protective relays for turning on the high- and low-range modes of the head optics;
- A – terminal pins going to the circuit’s power source.
Electrical circuits
Generator
- accumulator battery;
- generator;
- battery charge indicator lamp located in the instrument cluster;
- mounting block;
- ignition switch
Lighting and light signaling
- block headlights;
- mounting block;
- headlight switch;
- ignition switch;
- outdoor light switch
- high beam headlight warning lamp in the instrument cluster;
- K4 – headlight low beam relay;
- K5 – headlight high beam relay;
- A – to power supplies
External lighting switching diagram
- side light lamps in headlights;
- engine compartment lamp;
- engine compartment lamp switch;
- mounting block;
- ignition switch;
- outdoor lighting switch;
- side light lamps in the rear lights;
- brake lamps in the rear lights;
- additional brake signal;
- license plate lights;
- control lamp for turning on the outside lights in the instrument cluster;
- brake light switch
- K1 – lamp health monitoring relay (contact jumpers are shown inside the relay, which must be installed in the absence of a relay);
- A – to power supplies;
- B – to instrument lighting lamps
Direction indicator switching diagram
- turn signal lamps in headlights;
- ignition switch;
- turn signal switch;
- side direction indicators;
- turn signal lamps in the rear lights;
- hazard switch;
- instrument cluster with turn signal and hazard warning lamps;
- mounting block;
- K3 – relay-interrupter for direction indicators and hazard warning lights;
- A – to power supplies
Scheme for switching on headlight correctors
- motor reducer for headlight level control;
- mounting block;
- headlight switch;
- ignition switch;
- outdoor lighting switch;
- headlight leveling control;
Electrical Harness System
Due to the ignition system, a spark appears in the cylinders corresponding to the current power strokes. In modern engines, wires go to sensors that are responsible for monitoring several indicators:
- Motor temperature.
- Ignition, and so on. The injector also becomes an important part.
The ignition system harness is in most cases connected to several other parts:
- controller;
- instrument panels;
- "mass".
Next, the wires are sent to the rear harness. Moving on to the engine compartment, the main harness splits into two wires. Of these, the largest is sent to the radiator, connecting with the following components along the way:
- DMRV.
- Crankshaft sensor.
- Resistor.
- Electric fans.
Through the power steering pump, other wires are thrown from the core, going to additional sensors:
- phases;
- idle move;
- throttle valve;
- detonation;
- injectors - a fuse for them is not added to the system.
Due to the wiring, the operation of the engine is clearly controlled. Ensures uninterrupted operation regardless of environmental conditions.
The second core goes up, after which it is divided into two parts. The wires to the plus and minus go to the right. The battery is also located there. To the left they connect to the adsorber, fuel pressure sensor and oxygen sensor. This is how electrical wiring is arranged in most cases.
Also interesting: Winch for Niva 2121 at a low price in Moscow, buy a winch
A branch from the harness may go to the air conditioning fuse if the car is equipped with such equipment.
If even one part of this system shorts, there is a high probability that the engine simply will not start. The controller stops seeing information regarding temperature, fuel supply to the injectors, and throttle valve position.
Under such circumstances, it is better not to resort to diagnostics, but to replace the entire harness at once. It may take too much time to find one wire, and the result will be questionable. The wiring works better when new.
Functionality of the standard multimedia system
In short, we can highlight the main functions that the multimedia system performs:
- Multimedia;
- Navigation system;
- Bluetooth + E-Link connection with phone;
- Display image when reversing + obstacle detection.
Quite a modern multimedia with, in our opinion, an exhaustive list of what an MMC should be able to do. Well, probably all that remains is to add output of sensor readings to the display. But that is another story. Here we will not stop and analyze what and how it works there, but will limit ourselves to just a general listing, and will try to pay more attention to the installation process.
By the way, most likely you have one more question: what cars can you install it on? So, the position of the plant, reflected in the technical specifications for installation, is as follows:
On our own behalf, we can add that, at first glance, this device can be adapted to any Shevik. At least, after sitting and thinking about the connection methods and components, we did not find anything that would prevent us from using it on earlier models: power connectors from a regular radio, everything else is included, the panel at the installation site did not change much. The only hassle that we think may arise is installing a rear view camera. If your car does not have harnesses for parking sensors and a camera, and you would like to be able to use this function, you will have to tinker.
Connection between battery and starter
Each car has its own starter installation scheme. There may be several access options:
- on right;
- left;
- from the radiator side;
- from the salon side.
It is often necessary to use a lift or inspection hole to reach this component. The mechanism is needed to ensure engagement between the gear and the flywheel. Therefore, the device is most often located in the area where the clutch housing is attached. The electronic version is no exception.
For connection, only one connector is used, to which a special terminal is added. The starter starts working every time the owner turns the key.
It is best to use a multimeter to detect breakdowns in one of these parts of the car. But faults can be easily determined using other simple manipulations.
In most cases, repairing the starter is possible, even if such an important part as the windings has failed. The electrical equipment of a car in most areas is subject to complete restoration.
Common faults
If everything is clear with the description, then let's talk about breakdowns. There can be many faults in the electrical circuit. But they are all divided into several groups. If, for example, you doubt the performance of the spark plugs, and the spark plugs themselves, as it turned out as a result of the test, are operational, then you need to check the high-voltage wires. Failures in the operation of this or that equipment may be caused by failure of the device itself, improper operation of the battery or generator.
Let's start with the battery, its typical faults:
- the occurrence of a short circuit between the electrodes of the structure;
- the structural plates were damaged;
- cracks have formed on the battery body;
- The battery terminals have become acidic (the author of the video is Boris Anisimov).
All this can lead to battery drain. As for the reasons, if the battery has not yet exhausted its service life, then most likely they are a violation of the rules of use, as well as manufacturing defects.
To use the battery correctly, you must consider several rules:
- the electrical wiring system must function only with a working generator unit, otherwise the battery will be overcharged or discharged;
- destruction and acidification of contacts is facilitated by poor contact at the terminal of the structure;
- deep discharge of the device can be caused by frequent starts of the power unit or an attempt to start it by prolonged operation of the starter;
- In addition, the service life of the device may be reduced due to its poor fixation in the engine compartment.
On average, the service life of a battery is about 3-4 years. But the service life may be reduced as a result of intensive use, as well as the use of the battery in harsh conditions. In any case, all breakdowns have only one consequence - the battery will not be able to crank the starter mechanism and provide the electrical equipment of the vehicle with current. If the battery is working normally, then perhaps the cause of the problem lies in the generator unit.
Since its design itself is more complex, the generator also has more breakdowns:
- breakdown of current collecting brushes;
- failure of the regulator relay;
- breakdown of the diode bridge;
- failure of slip rings (their wear);
- bearing element failure;
- problems in the operation of the pulley due to damage to its teeth or wear;
- a short circuit has occurred in the stator winding;
- The charging circuit cables may be damaged (video author: Chevy Niva repair).
If the problem is a bearing, the generator as a whole will be much louder. As for other breakdowns, they can be checked by low voltage levels. The corresponding indicator on the control panel will light up.
You can repair the device yourself, since the design of almost all generators is the same, and the repair procedure is generally universal. In this article, it is described using the example of a VAZ 2114 car. If you have never encountered such a task, then it is better to seek help from a qualified electrician.
Instrument panel pinout
Here is a description of the terminals and terminals of standard instrument panel wiring:
- 1 – diagnostic output, located on the underside of the board under the steering wheel;
- 2 – plug connector for connecting the ECM;
- 3/4 – standard modules for connecting the front connection of the cores responsible for the engine control systems;
- 5/7 – left and right steering column switches;
- 6 – ignition switch device connector;
- 8 – instrument panel combination;
- 9 – output for powering the connector of the contact group of the interior ventilation and heating system;
- 10/11 – lighting plugs for the above equipment;
- 12 – button switch of the alarm device;
- 13 – mounting box for fuse insertion;
- 14/15 – the lamp itself and the button to turn off the lighting of the glove compartment;
- 16 – contact pin for turning off the brake lights;
- 17 – switch of the standard sound warning module (horn);
- 18 – automatic protection of fog lights of head optics;
- 19 – automatic window lifters;
- 20 – protective relay for sound signal;
- 21 – safety module for the seat heating system;
- 22 – starter control relay;
- 23 – switch for the external lighting system;
- 24 – contact group for connecting the stove fan;
- 25 – built-in switch for turning on the heated windshield;
- 26 – device for turning off the front fog lights;
- 27 – switch for stern lights, fog lighting group;
- 28 – air conditioner setting button;
- 29 – position regulator of heating manipulators;
- 30 – cigarette lighter pin;
- 31 – buttons for adjusting the direction of the light flux of the head optics;
- 32 – adjust the brightness of the instrument panel illumination;
- 33 – auxiliary resistor mechanism of the heating fan;
- 34 – standard immobilizer module;
- 35/36 – standard-type onboard acoustic module terminals;
- 37/38 – terminal connectors for connecting the rear harness of the on-board circuit.
Also interesting: Replacing the drive gear seal of the front axle VAZ 2121 Niva 2131
Window malfunctions
During the operation of a Chevrolet Niva, owners most often encounter the following window regulator malfunctions :
- the window goes down or up too slowly;
- the window does not go down when the driver interacts with the window lift system;
- The window can be lowered, but it can no longer be raised;
- When the window lifter operates, extraneous noises and knocks are heard.
Signs
Signs indicating problems with the window regulator include any change in its operation . This includes jamming of the lifting mechanism when the glass is pulled out jerkily or very slowly, and knocking sounds that occur during the operation of the system.
also worth paying attention to the performance of the switch , since with frequent use it often jams or even breaks down.
If you find similar signs of malfunctions in the system , try to determine the cause of such a problem and solve it yourself or with the involvement of specialists. This will not be difficult and will not entail large expenses.
Pinout of contacts of the Niva Chevrolet fuse mounting block
The car is supplied to the market with several types of mounting blocks. The exact type of device depends on the configuration of the vehicle and its year of manufacture. Further description is given using the example of Bosch M,1,5,4:
- 1 – cylinder ignition system;
- 2 – empty;
- 3 – fuel pump connection contact;
- 4 – stepper motor;
- 5 – free;
- 6 – connection of the main power plant cooling fuse;
- 7 – incoming pulse from the MRI;
- 8 – empty;
- 9 – standard speedometer;
- 10 – not busy;
- 11 – knock sensor;
- 12 – voltage supply for sensors;
- 13 – L-line;
- 14 – weight on the body from the injectors;
- 15 – control of injector drives for cylinders 1-4;
- 16/17 – not used;
- 18 – power supply of devices from 12 volts;
- 19 – common ground cable for electrical appliances;
- 20 – ignition supply to cylinders 2 and 3;
- 21 – stepper motor terminal;
- 22 – engine check lamp;
- 23 – empty;
- 24 – mass of the stepper motor;
- 25 – air conditioning system relay output;
- 26/29 – stepper power plant;
- 27 – voltage to terminal No. 15 of the ignition switch;
- 28 – empty;
- 30 – mass of motor control sensors;
- 31/32 – not applicable;
- 33 – control of settings of injector drivers for cylinders No. 2/3;
- 34-36 – empty;
- 37 – device for powering the main relay;
- 38-40 – not used;
- 41 – submitting a request for an air conditioning module inside the cabin;
- 42 – empty;
- 43 – tachometer control signal;
- 44 – signal supply from the potentiometer;
- 45 – DTOZH;
- 46 – control of the main relay;
- 47 – device for confirming admission to ECU programming;
- 48 – low level of impulse from DPKV;
- 49 – opposite meaning;
- 50-52 – empty;
- 53 – receiving an impulse from the TPS;
- 54 – fuel consumption detail;
- 55 – K-line.
Troubleshooting
If, for example, the right window regulator does not work in a Chevrolet Niva, you will have to perform the following steps :
- Make sure the fuse is functional. It is located in the mounting block. If the fuse does not work, you will have to change it.
- Check the functionality of the relay - connect a new device in its place and make sure that the system is functioning normally. If there is no other relay, you need to connect contacts 30 and 87. Since the relay cannot be repaired, if it malfunctions, only replacement will help.
- Problems with the button. If it sticks or jams, it is replaced with a new one.
- Motor malfunction. In such a situation, you will have to replace it.
- The contacts on the electric motor have oxidized. This can be corrected by regular cleaning.
- Wiring is damaged. In such a situation, you will need to check the presence of voltage on the wires that power the device’s motor. If there is no power, but other components are operational, repair the wiring damage.
To prevent breakdown of the power window mechanism, it is enough to lubricate all its parts annually and at the same time check the contacts.
How to remove and replace a window regulator
Replacing a Chevrolet Niva window regulator will only be needed if the device's motor does not work , and the remaining elements of the system are in good working order. Since this is a non-separable device, it is impossible to repair it, especially at home.
To replace you will need to do the following:
- Remove the plugs and fasteners (screws, self-tapping screws) from the door handle.
- Unscrew the screw from under the handle to remove the trim.
- Remove 2 more fasteners from below and remove the cover panel.
- If there is a built-in speaker, remove it by removing the fixing screws.
- Remove door trim.
- Remove the glass bracket.
- Unscrew and pull out the glass guide.
- When removing the window regulator, lower the window, lift the right edge slightly and remove it from the door.
- Pull out the fasteners of the electric window frames at four points.
- Disconnect the motor connector and remove the entire mechanism.
- Unscrew the three rubber dampers.
Then all that remains is to replace the mechanism with a new one and sequentially assemble the entire device in the reverse order.
Prevention
To prevent breakdowns, the manufacturer recommends following several tips.
- Once a year, treat all terminals and connectors with special oil - this will prevent the formation of oxides.
- Periodically check the tightness of the contact connectors. If the connections are loosened, short circuits may form or the conductivity of the circuit may decrease, which will be perceived by the ECU as a mechanism failure.
- Check the degree of wear of power cables and lines. During active use of the vehicle, braids made of flexible polymer may wear out and crack. This circumstance can provoke short circuits and mechanical shedding of insulators. Therefore, it is better to prevent a breakdown than to fix it.
If you adhere to the above rules, the car will serve for a long time and with high quality all the time.
Read news about the new Niva
- Electrical diagram of Niva Chevrolet: electrical wiring diagram of VAZ 2123, Chevrolet Niva, electrical diagram and connection of speed sensor, charging with description
- Pump for Chevrolet Niva - Auto workshop online
- Niva Chevrolet installation of air conditioning - Auto magazine MyDucato
- Niva Chevrolet installation of air conditioning - Auto magazine MyDucato
- Why the Chevrolet Niva air conditioner does not turn on: reasons and installation (diagram), belt replacement
- Niva Chevrolet installation of air conditioning - Auto magazine MyDucato
- Niva Chevrolet air conditioning installation - Online auto workshop
- Replacing a Chevrolet Niva heater radiator with air conditioning without removing the panel
Modernization of the heating device in a Chevrolet Niva car
Before the heater is improved, it is necessary to understand the principle of operation of the dampers. Then you should completely dismantle the decorative panels located on the left side of the Chevrolet Niva stove. The next step is to remove the regulator responsible for the position of the dampers. When optimizing your car, you need to understand the design of the heating device, which will allow you to dismantle the “unnecessary” equipment without unnecessary delays. The motorist must remove the lower part of the regulator, through which the front flap is activated.
When dismantling all the plastic elements, you should not try to abruptly remove the parts, since almost all the components of the device being disassembled are made of fragile plastic, which breaks even under more or less significant impact. If, however, due to haste or carelessness of the owner of the movable property, the lower part of the device being removed gets a crack, it can be hidden with a soldering iron.
Modifying the Chevrolet Niva stove with your own hands involves the need to secure the lower damper so that it is tightly closed in the upper position. Of course, such a modernization completely eliminates the ability of the motorist to take advantage of the “front” position, however, it provides many other more significant advantages.
Once the “front” of the stove is in the closed position, you will need to think through the trajectory of the element that regulates the simultaneous supply of heat to the glass and legs. It is worth noting that skilled craftsmen, when upgrading their Chevrolet Niva, use all available means, in particular, an ordinary discount card will be useful for optimizing the stove. By means of which a cut line is drawn, then the element is glued with cyanoacrylate and filed to size with a file.
The modification of the Chevrolet Niva heater should be completed after the hand-cut part is glued with superglue.