Independent Wheel Bearing Clearance Repair
If you feel or feel vibration in the steering column while driving, then most likely the clearance on the front wheels in the bearings of the hub itself has increased, so their service life will be reduced, and the tires will begin to wear unevenly. And if there is no gap at all, then the hub will rotate tightly, which will also lead to a decrease in service life, so its gap should be greater than zero fifteen ml. Adjustment of the front bearings is carried out using a wheelbrace wrench, a twenty-seven wrench and a hammer.
- A wheel that is in a suspended state should be rocked; if there is play, the gap must be adjusted. After this, press the brake pedal and rock the wheel; if there is no play, then there is a gap in the bearings.
- It is necessary to dismantle the decorative cap and unscrew the lock nut from the hub, and hold it with a wrench to prevent it from turning. When repairing the chassis while adjusting the hub, it is advisable to install new hub nuts, since even after adjustment there is a high probability that the old ones will take their original place, which will not allow them to be properly locked. If this is not possible, then you can take the nut from Drugov’s car.
- Then you need to twist the hub nut so that the torque is 19.6 Nm. turning the hub several times, ninety degrees in two directions, will install the bearing itself. After this, loosen the adjusting nut and tighten it to 6.8 Nm. Having done all this, simply unscrew the nut twenty-five degrees.
- After everything is done, change the collar of the nut on the pin of the external drive joint.
- After the adjustment is made, check how the wheels rotate; if they rotate easily, then everything is fine. The final check can be made only after driving several kilometers without braking, assessing how the hub heats up.
Also interesting: Chevrolet Niva instrument cluster tuning
Adjusting the front wheel bearing of Niva Chevrolet
Good afternoon, dear car enthusiasts, stay in touch https://period-vaz.ru/. Today we want to tell you about how to properly adjust the Niva Chevrolet wheel bearing.
As a rule, during long-term operation of a particular car, sooner or later some components of the car require adjustment, and adjustment of the Niva Chevrolet wheel bearing is no exception.
To adjust the front wheel bearing of the Neva Chevrolet we need:
- jack;
- hammer;
- socket wrench “27” or amplifier head;
- screwdriver.
If all the necessary tools have been collected, we proceed to adjusting the bearing. To do this, we need to raise the front part of the car using a jack so that the wheel on which we will adjust the bearing does not touch the ground and can rotate freely. After the car is raised to the height required for adjustment, remove the chrome safety cap from the wheel hub (position 1)
After the safety cap on the hub is removed, you should unlock the nut that compresses the wheel bearing (position 2).
Once the nut is loosened, it should be replaced with a new one if possible. After the nut has been replaced and tightened to the original position of its predecessor, we proceed to tighten it so that the wheel rotates freely and there is no play. When you achieve these parameters, the nut should be loosened slightly by turning it back 25°. The degree of heating of the hub will help you make sure that the Niva Chevrolet front hub bearing is adjusted correctly after you have driven the car for a little more than 1 km. without using the brakes.
Replacement
To replace the front wheel bearing in the field, it is necessary to remove the front axle brake calipers. Why you should:
- Hang up and unscrew the wheel;
- Using a chisel, knock the cap off the hub;
READ How to increase engine power in Niva Chevrolet
Using pliers, remove the cotter pin located on the lower axis of the clamping lever;
Carefully remove the axis of the clamping lever with a metalworker's drift and then remove it with pliers;
Using a flat-head screwdriver, having previously removed the clamping lever and springs, remove the brake caliper from its seat and place it behind the steering knuckle in such a way as not to interfere with the further process (hang it).
Adjustment
Having restored the structure until the calipers with pads are returned to their place, a dial indicator clamp is placed on the steering knuckle. The indicator is positioned so that its leg rests against the adjusting nut.
Having built a lever on studs, the mechanism smoothly rotates around its axis.
If the permissible gap exceeds 0.15 mm, the adjusting nut is replaced with a new one. By successively changing the degree of twisting, the clearance in the bearings is measured. At the end of the work, the nut is locked.
Diagnostics
In the absence of a special stand, it is possible to identify the problem. To do this, with precautions, hang up the supposedly faulty wheel. And then grab the extreme points in the horizontal and vertical planes and make swinging movements. serviceable bearing has no play or it is insignificant, requiring replacement, on the contrary. In addition, when turning, you can hear rolling or cracking sounds. What then? bearing yourself , because there is no talk of adjustment.
Step-by-step instructions for replacing the cylinder head gasket
The design features of the Niva Chevrolet make it possible to remove the cylinder head without good access from below. However, the presence of an inspection hole or lift greatly facilitates access to some nuts and the coolant drain valve. There is no need to remove the engine, but it is advisable to clear the space under the hood of interfering hoses and wires.
For repairs you will need the following tools:
- set of keys and socket heads;
- powerful wrench, ratchets, extensions;
- hammer;
- flat screwdriver;
- head or special wrench 38 for cranking the crankshaft;
- torque wrench;
- brake pipe wrench (suitable for oil line).
Conventionally, all work on replacing the cylinder head gasket on a Niva can be divided into 2 stages: removing all attachments and all electrical sensors from the cylinder head, removing the timing mechanism and attaching the head to the cylinder block.
Procedure for removing the cylinder head of a Chevy Niva
The work algorithm is as follows:
- Drain the antifreeze from the radiator and engine block. To do this, unscrew the plug on the block with a 13 key. In this case, there is no need to drain the oil from the crankcase. Remove the terminal from the battery. We move the gearbox to neutral position.
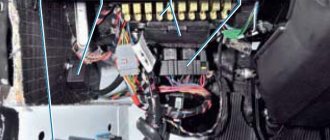
- While the coolant is draining, we begin to disassemble the engine from the hood side. We unscrew the throttle valve, remove the throttle cable, remove the wires from the spark plugs, disconnect the electrical connectors of the injectors, TPS, IAC, oil pressure and coolant temperature sensor.
- Now you can disconnect all the cooling system hoses going to the thermostat, heater core and throttle body heating. Remove the brake booster hose from the intake manifold.
- We take the engine wiring harness and all removed hoses to the side and secure them if necessary.
- We unscrew the protective screen of the exhaust manifold, loosen the 4 nuts securing the exhaust pipe to the exhaust manifold. For the convenience of further actions, the exhaust pipe can be removed from the lower mounts and completely lowered under the car.
- On a Chevy Niva with power steering, the pump mounting bracket will interfere with us. It is not necessary to remove it completely - just unscrew the fastening bolts and carefully hang it on the wire.
- Now you can start opening the engine. Remove the valve cover. Using a special wrench, unscrew the oil line to the hydraulic compensators and chain tensioner.
- Set the piston of the first cylinder to TDC until the marks align by turning the crankshaft. Loosen the chain tensioner and unscrew the top sprocket. We immediately fix it in this position with wire to prevent the circuit from jumping and phase failure.
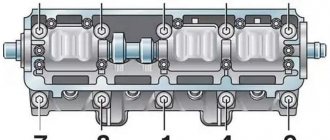
- Unscrew the 10 nuts securing the camshaft housing with bearings. You need to unscrew evenly around the entire perimeter (according to the tightening order in the instructions). Remove the assembly from the engine.
- Access to 10 cylinder head mounting bolts is now open. You need to tear them off with a wrench, starting from the middle and moving to the outer bolts. The bolts are removed from their places and checked for thread condition and possible elongation (no more than 117 mm).
- Gently tapping and prying from below with a screwdriver, pull the cylinder head out of its place. After which you can remove it from the engine along with the collectors. The mass of this unit allows you to perform the operation yourself.
After removing the old gasket, possible damage and wear of the surfaces are assessed. If no repairs are required, the valves do not have carbon deposits, and all dimensions are within tolerance, then you can immediately begin replacing the cylinder head gasket and assembling the engine.
How to tighten a wheel bearing on a Chevrolet field
Step 8
Adjusting Axle Bearing Preload
Adjusting Niva wheel bearings. 3 ways. Tightening the Niva hub nut Method 1
This part is important; if not done correctly, the bearings can be damaged. Rotate the brake rotor several times, tightening the nut just enough to remove the Loosen, remember that this nut should not be tight, but when it is tightened, just a little loose. This action sets the bearing in its race and allows proper bearing play and preload. The axle nut should be just about loose, allowing for minimal bearing play or play. Don't overtighten, you can see how to set the preload in the video in this tutorial.
Then install the axle nut retainer onto the axle nut and align the retainer with the cotter pin hole in the spindle. Some cars use a castle nut, in which case the nut becomes the retainer, as well.
Then install a new cotter pin and do not use the old one. Find the through hole and insert the cotter pin into place.
Once the cotter pin is installed, use a pair of sockets to bend the long end of the cotter pin over the spindle, cutting off any excess cotter pin material.
After installing the cotter pin, install the grease cap with the gap at the top.
Use a hammer to evenly install the grease cap onto the bearing hub, then wipe with a cloth.
Once the cap is installed, wipe the surface of the rotor pad with a towel and install the caliper in place, then complete the braking work.
wheel bearing adjustment Niva Chevrolet
Step 1
Lower the brake caliper into place in the caliper mounting bracket.
Step 4
Screw the nuts onto the studs and tighten with a wrench.
Items you will need
- Car jack
- Jack stand
- Wrench
- Set of heads
- Plastic wire tie
- Flat blade screwdriver
- Needle nose pliers
- Set of wrenches
- Set of car keys
- wheel bearing removal tool J-29117 or equivalent
- Bearing grease
- GM Wheel Bearing Installation Tools J-8092 and J-8850 or similar
- Flat plate made of wood or steel
- Torque wrench
- Wood block
- Hammer
READ How to change the support bearing of a Ford Focus 3
Independent Wheel Bearing Clearance Repair
If you feel or feel vibration in the steering column while driving, then most likely the clearance on the front wheels in the bearings of the hub itself has increased, so their service life will be reduced, and the tires will begin to wear unevenly. And if there is no gap at all, then the hub will rotate tightly, which will also lead to a decrease in service life, so its gap should be greater than zero fifteen ml. Adjustment of the front bearings is carried out using a wheelbrace wrench, a twenty-seven wrench and a hammer.
- A wheel that is in a suspended state should be rocked; if there is play, the gap must be adjusted. After this, press the brake pedal and rock the wheel; if there is no play, then there is a gap in the bearings.
- It is necessary to dismantle the decorative cap and unscrew the lock nut from the hub, and hold it with a wrench to prevent it from turning. When repairing the chassis while adjusting the hub, it is advisable to install new hub nuts, since even after adjustment there is a high probability that the old ones will take their original place, which will not allow them to be properly locked. If this is not possible, then you can take the nut from Drugov’s car.
- Then you need to twist the hub nut so that the torque is 19.6 Nm. turning the hub several times, ninety degrees in two directions, will install the bearing itself. After this, loosen the adjusting nut and tighten it to 6.8 Nm. Having done all this, simply unscrew the nut twenty-five degrees.
- After everything is done, change the collar of the nut on the pin of the external drive joint.
- After the adjustment is made, check how the wheels rotate; if they rotate easily, then everything is fine. The final check can be made only after driving several kilometers without braking, assessing how the hub heats up.
Also interesting: Suspension lift in the field yourself
Unregulated
As a rule, the Niva has a standard adjustable hub, which requires periodic adjustment. But to get rid of this inconvenience, non-adjustable hubs were developed for Niva Chevrolet , which have such positive qualities as:
- No maintenance required. They don't need to be adjusted
- The bearing in the device does not rotate
- It is filled with special lubricant from the factory, so there is no need to lubricate it.
- Due to the fact that the work occurs thanks to the ball bearing in the unit, friction is reduced
- There is no wear on the seat in the rotary cam
- Not adjustable as it is tightened from the factory
- No need to change the bearing
- Long service life which is equal to 100-120 thousand kilometers
READ Replacement of rear wheel bearing for Skoda Octavia
Therefore, thanks to all the positive characteristics listed above, many car owners change the standard part to a non-adjustable one.
It is also worth noting that the non-adjustable part can be produced as a reinforced Niva Chevrolet , which solves the problem of wear of the oil seals on the steering knuckle. It is best to choose companies such as VolgaAvtoprom, IVECO, OmegaInterAuto.
The main disadvantage of this unit is its high price, but by installing this part you can forget about the problems that appear in the standard element. By installing a reinforced version of your SUV, the cross-country ability will increase and reliability will increase, and having a standard set of tools, you can make an independent replacement without any problems.
Engine
| Name of the unit, parts | Tightening torque, Nm |
| Bolt securing the left power unit support bracket to the gearbox housing | 48 |
| Bolt and nut securing the adapter to the left power unit support bracket | 68 |
| Bolt securing the rear power unit support bracket to the gearbox housing | 90 |
| Nut of the bolt securing the rear support of the power unit to the subframe/transmission bracket | 68 |
| Nuts and bolt securing the right power unit support bracket | 55 |
| Upper/lower front and rear timing cover bolt | 10 |
| Cylinder head cover bolt | 10 |
| Bolt securing the automatic timing belt tensioning mechanism | 25 |
| Camshaft pulley bolt | 67 |
| Camshaft bearing cap bolt | 16 |
| Cylinder head bolt | 25add 70°add 70°add 50° |
| Accessory drive pulley bolt | 95add 30°add 15° |
| Flywheel bolt | 35add 30°add 15° |
| Main bearing cap bolt | 50add 45°add 15° |
| Connecting rod cover bolt | 25add 30°add 15° |
| Air filter mounting bolt | 12 |
| Nut securing the intake manifold to the cylinder head | 25 |
| Throttle body bolt and nut | 15 |
| Thermostat housing mounting bolt | 20 |
| Nut securing the expansion tank of the cooling system | 4 |
| Coolant pump screw | 10 |
| Nut securing the exhaust manifold to the cylinder head | 25 |
| Intermediate pipe fastening nut | 40 |
| Coolant temperature sensor | 20 |
| Fuel rail mounting bolt | 25 |
| Crankshaft position sensor mounting bolt | 10 |
| Ignition coil mounting bolt | 10 |
| Exhaust Gas Recirculation Valve Bolt | 20 |
| Knock sensor mounting bolt | 20 |
| Phase sensor mounting bolt | 10 |
| Oxygen concentration sensor | 40 |
| Low oil pressure sensor | 40 |
| Pan drain plug | 35 |
| Spark plug | 25 |
Tightening torques for Chevrolet Aveo T250 threaded connections
| Application | Nm, (rotary angle) |
| Compressor piping screw | 33 |
| Compressor mounting screws | 27 |
| Compressor mounting screws | 50 |
| Air filter housing mounting screws | 12 |
| Generator adjusting bolt | 20 |
| Generator mounting bolt | 20 |
| Connecting rod bearing cap bolts | 25 +30° +15° |
| Coolant pump mounting screws | 10 |
| Coolant temperature sensor | 20 |
| Camshaft bearing cover screws | 50 + 45° + 15° |
| Crankshaft pulley mounting screw | 95 +30° +15° |
| Camshaft Position Sensor Bolt | 10 |
| Cylinder head mounting screws | 25 + 60° + 60° + 60° +10° |
| Ignition coil mounting screws | 10 |
| Ignition coil plate mounting screws | 10 |
| Engine lift bracket bolt | 25 |
| Engine mount nuts | 40 |
| Engine Mount Fastener Bolts | 60 |
| Engine Mount Bolts | 60 |
| Exhaust Pipe Bolts | 40 |
| Nuts securing the exhaust pipe to the catalytic converter or connecting pipe | 30 |
| Nuts securing the exhaust pipe to the exhaust pipe | 40 |
| Exhaust pipe heat shield mounting screws | 15 |
| Exhaust pipe nuts | 25 |
| Flex plate mounting screws | 60 |
| Flex Plate Inspection Cover Screws | 10 |
| Flywheel mounting screws | 35 +30° +15° |
| Flywheel inspection cover mounting screws | 12 |
| Beam bolts | 25 |
| Intake manifold nuts | 25 |
| Intake manifold support bracket mounting screws | 22 |
| Fastening screws for the lower cover of the timing belt of the camshaft drive | 10 |
| Oil sump mounting screws | 10 |
| Oil pan drain plug | 55 |
| Oil pressure sensor | 40 |
| Oil pump mounting screws | 10 |
| Screws for securing the support bracket and oil pump (supply tube) | 10 |
| Oil pump pressure reducing valve | 30 |
| Oil pump rear cover screws | 6 |
| Power steering pump mounting screws (hereinafter referred to as power steering) | 25 |
| Power steering pump pulley mounting screws | 25 |
| Screws for securing the rear cover of the camshaft drive timing belt | 10 |
| Right shift bracket mounting screws | 60 |
| Spark plug | 40 |
| Thermostat housing mounting screws | 20 |
| Throttle cable bracket mounting screws | 8 |
| Automatic tensioner bolt for camshaft timing belt | 20 |
| Screws for fastening the gear shift basket housing | 75 |
| Shift mechanism mounting screws | 45 |
| Screws for fastening the upper cover of the camshaft drive timing belt | 10 |
| Valve cover screws | 10 |
Video about “Tightening torques for threaded connections” for Chevrolet Aveo
Tightening torque, torque wrench, fastener strength and handy table
Tightening the connecting rods, checking the correct installation of the pistons
The tightening torque of threaded connections, why is it so important?
Let's start disassembling (procedure)
- The first step is to remove the air filter. The four screws along the edges of the cover are unscrewed. The pipes are detached.
- The cable and the gas damper drive open.
- The valve cover must be cleaned of dirt; this is done in order to avoid clogging the engine from dust and debris accumulated under the cover.
- Next, you need to loosen the camshaft fastenings. It is important to secure the engine from accidental rotation; fixation can be done using any strong metal object clamped between the chain and the sprocket (for example, a screwdriver).
After completing all these steps, you can start replacing.
How to determine the tightening torque
This tool should be selected in such a way that the tightening torque of the fastener is 20-30% less than the maximum torque on your wrench. If you try to exceed the limit, the key will quickly fail.
The tightening force and type of steel are indicated on each bolt; how to decipher the markings was described above. For secondary broaching of bolts, several rules must be taken into account:
- Always know the exact tightening force required.
- When checking the tightening, it is worth setting the force and checking all the fasteners in a circular order.
- It is forbidden to use a torque wrench as a regular one; it cannot be used to tighten parts, a nut, or tighten a bolt to the approximate force; control pulling is done with a torque wrench.
- The torque wrench must be spared.
Without torque wrench.
To do this you will need:
- Socket or open-end wrench.
- Spring canter or scale, with a limit of 30 kg.
- A table indicating the tightening force of the bolts and the tightening torque of the nuts.
The tightening torque is the force applied to a lever measuring 1 meter. For example, we need to tighten the nut with a force of 2 kgf/m:
- We measure the length of our spanner; for example, it was 0.20 meters.
- Divide 1 by 0.20 to get the number 5.
- We multiply the results obtained by 5 by 2 kGf/m and ultimately get 10 kg.
Moving on to practice, we take our key and scales, attach the hook to the key and tighten it to the desired weight, according to the calculation described above. But even this method will ultimately turn out to be better than pulling from “hand to eye”, with an error, the higher the effort, the smaller it is. This will depend on the quality of the scales, but it is better to purchase a special key.
When carrying out vehicle maintenance, questions often arise that are only briefly discussed on forums or in the literature. One of them is the tightening torque of the fastenings of the main components of the car. To clarify all the nuances of fastening the cylinder head bolts, we will concentrate on the engine, the “heart” of the car. And if you understand the principles of tightening torque for threaded connections, the knowledge gained will be easy to extrapolate to any vehicle component.
Niva cylinder head bolts, installation
To work with bolts, a special tool is required. E16 head, which is not always included in universal tool kits, and a torque wrench. To make the process logically complete, the price list includes an E16 head (Sata or Force) and a torque wrench (JTK).
I won’t invent anything about the installation technology, just completely follow the factory manual.
- Submerge the bolts in a container of engine oil.
- Let it drain. Exposure for at least 30 minutes.
- Wrap and tighten according to the diagram.
Stage 1 – tightening with torque (12…20) N.m;
Stage 2 – tightening torque (50...70) N.m;
Stage 3 – turning the bolts by 90-110 degrees;
Stage 4 – turning the bolts 90-110 degrees.
Tightening torque of bolt 11 (at the cylinder head tail): preliminary – (14…16) N.m; final – (32…40) N.m.
This article will describe in detail the most important aspects of installing a camshaft for the famous domestic SUV NIVA.
Block plane and broken gasket
A “punched” cylinder head gasket on Nivas and Shnivas is a birth defect. At some point they just went en masse. There is no need to be surprised. With modifications to the engine to meet new environmental standards, the designers are pushing the fan operating temperature further and further. This gives us an element of “glow” ignition. At a mileage of 15-25 thousand, the cylinder head gasket breaks, and so on down the list. Antifreeze to oil, oil to antifreeze. What do they do in the Papuan service? They buy a Fritex metal bag, install it, and 10 thousand later the client comes back with a new one, with the same question. Or rather, with two. How long? And the classic “what should I do?” It is not the Niva cylinder head gaskets or bolts that are to blame, it is the factory quality of processing of the block plane and the cylinder head plane that is to blame. Below I publish a photo of one of the blocks. I personally changed the gasket on it twice until I found the optimal set, which I now recommend. The metal bag does not help, but rather hinders. It cannot be crimped and does not fill uneven surfaces of the block. You need a shrink gasket that will completely accept the topography of the surface and the bolts that will constantly press it. This is the reason why hardened bolts are not rolled here. For a long time, the plant installed the Yaroslavl metal package “Fritex”, and now they have switched again to shrink gaskets. In a decent production facility, it would be easier to update the machine park and equipment, but at AvtoTAZ it turned out to be easier to go back ten steps along the road of technical progress.
In what cases is it necessary to change the cylinder head gasket on a Niva?
In principle, the element of the main cylinder block in question does not have a certain resource, that is, the gasket is replaced when it is damaged, which, however, usually occurs after 60,000 or 80,000 km. A breakdown is indicated by:
- air entering the antifreeze circulation system;
- lack of operating pressure in the combustion chamber of the air-fuel mixture;
- the presence of coolant in the lubricant or, conversely, the latter in the antifreeze (an oil film appears in the expansion tank).
All these problems lead to unstable operation of the Chevrolet engine.
In these situations, the gasket must be replaced immediately.
new cylinder head bolts
Remove the ten cylinder head bolts. Remove the block head.
It is more convenient to remove the cylinder head with an assistant, since it is quite heavy. Remove the gasket located under the head.
To determine the cause of gasket failure, inspect carefully. Burn marks between the combustion chambers of adjacent cylinders will be visible on the edges of the gasket holes. Thoroughly clean the surface of the block from any remnants of the old gasket.
Helpful advice: It is better to clean the old gasket with a pointed object, such as a scraper, but do not scratch it. After cleaning the gasket, the surface of the block should be cleaned with fine sandpaper until the surface acquires a matte, uniform shade.
A crack begins to appear in the water jacket, thereby mixing with engine oil, which leads to serious problems. Warping forms between the block and the mating surface. At the same time, coolant begins to leak into the engine and out. This malfunction is almost impossible to eliminate, so most often a complete replacement of the part is required.
Well, I immediately decided to change the tensioner to an automatic “PILOT” Full size Installing how to stretch the block head of a Niva Chevrolet is simple, I did everything according to the instructions from the box.
The process cannot be described. Let me just say that the process is not so much complicated, but rather dreary.
Spark plug torque
To repair and install spark plugs, a special tool is used, which is called a torque wrench, and this should not be forgotten. You also need to understand that not only the diameters of the threads in the engine housing itself differ, but also the tightening torque for each car manufacturer is different.
Therefore, experts talk about the importance of understanding the “torque” of the spark plug being installed. Everything depends not only on the structure of the thread itself, but also on the force with which installation is carried out
If you need to mount a candle, but there is no specialized tool at hand, then installation using improvised tools is allowed. In order to understand with what force the candle should be tightened, you first need to become familiar with it. Most often, manufacturers leave information of this nature on the packaging or in the product manual. In addition to a detailed diagram, as well as the correct installation sequence, such instructions most often include information about the thread of a given candle. Before you begin installing candles, a number of necessary conditions must be met. The first rule that must be followed is to carry out installation only when the engine is cold. You should also thoroughly clean the threads from carbon deposits.
Initially, the candle should be screwed in by hand, but you should not be too fanatical in this matter and screw it in all the way. After you have secured the spark plug, you should tighten it with a spark plug wrench a few turns. The number of revolutions in this case depends on the type of gasket used, as well as the size of the thread. For example, for a standard type of spark plug with an M14 thread, 180 degrees, that is, 20 Nm, will be sufficient. Information about the thread size can be found on the packaging or on the candle body itself (sometimes engraving is done on the insulator).
You should not screw the part all the way in, as in this case you can damage the already fragile threads not only on the spark plug itself, but there is also a high probability of damaging the groove in the engine, which is fraught with more serious consequences. In order to install a candle you do not need a lot of experience or knowledge of technical literature
The most important thing in this matter is to be careful, and it is also a good idea to familiarize yourself with the information provided by manufacturers
Signs of trouble
Every driver must understand that a completely destroyed unit will lead to disconnection of the hub. If this happens at speed, the consequences can be disastrous. That is why it is important to recognize the first signs of a malfunction and carry out repair work in a timely manner.
The bearing life can be about hundreds of thousands of kilometers, since all elements are made of durable hardened steel. However, in practice, the node fails much earlier. There are several main causes of failure.
- The manufacturer supplies non-adjustable bearings with a sufficient amount of lubricant, which cannot be said about adjustable ones. It is the lack of lubrication that can cause the unit to quickly fail.
- The oil seal, on the one hand, retains the lubricant, and on the other hand, prevents the penetration of foreign bodies into the separator. Even a small grain of sand can lead to accelerated wear of moving parts.
- The presence of lubricant does not guarantee long-term operation, since everything depends on its quality.
- Prolonged absence of work to adjust the gap will lead to increasing play and subsequent wear.
- Operating features of the Chevrolet Niva mean disabling the differential lock when driving at high speed. If you do not follow this recommendation, the bearings will fail.
The first sign of a malfunction is extraneous noise when the car is moving. Over time, it intensifies, but it is difficult to guess from which side the bearing comes under suspicion. On a free and fairly wide road, you will have to make maneuvers by slightly turning the steering wheel left and right. If the sound gets louder when you turn right, the first thing you should do is check the left unit and vice versa. Finally, you can verify the malfunction by hanging the wheel. It is rocked in a plane perpendicular to the axis, checking for play.
You should also determine if there is any grinding, crunching or noise when the wheel rotates. These symptoms indicate the need to replace the bearing.
Bolt torque
You can easily determine this indicator yourself without resorting to the services of specialists in the table, but you should keep in mind that for this you need to know exactly what information is contained on the marking, which is located on the top of the bolt. The marking located on the bolt head must contain the following information:
The mark of the factory that produced the product. Information about the strength class of the product. The thread on the right side does not contain markings, but the thread on the left side contains markings, which are located clockwise. Carbon steel bolts are marked with a strength class, which is indicated by two numbers separated by a dot. For example: 12.8,10.5,8.7 The first digit of the marking informs about 0.01 nominal value of tensile strength. This value is measured in MPa. If the value class is 8.7, then the first number 8 means 8 * 100 = 800 MPa or 800 N/mm2 or 80 kgf/mm2 The second indicator on the marking informs about the ratio of tensile strength to yield strength, this value is multiplied by ten. That is, with marking 8.7 it turns out 8*7*10=560 N/mm2
This indicator is the maximum possible load of the bolt used.
Stainless steel products are marked with the appropriate steel marking, that is, A2 or A4 and the corresponding tensile strength equal to 50, 60, etc. For example: A2-60 or A4-70. In a special table you can find out the practical tightening torques for the corresponding bolts made of carbon steel N/m. It should be taken into account that the bolt still has a margin of safety so that, as they say, it does not “drip”. However, this does not mean that all connections should be tightened to the maximum. Most often, such force leads to the connection becoming unusable, that is, there is a high probability of pushing through, damage to the elastic gasket, etc. It turns out that the values given in the tables are acceptable, but the load level in this case is approximately 60-70% of the yield strength.
Rear suspension
Chevrolet Niva is designed for driving on asphalt and off-road. Therefore, the car, in addition to all-wheel drive, has increased ground clearance. The latter performs three functions:
- Reduced shock loads on the body, wheels, bearings.
- Providing traction.
- Reduced body vibrations when driving over uneven surfaces.
The pendant is divided into two parts:
- The front one is shown in the diagram below. Includes four control arms (two on each side), ball joints, telescopic shock absorbers, coil springs and anti-roll bar. The front suspension is independent - vibrations of one of the levers do not affect the position of the other.
- The rear is shown in the diagram below. Includes rear axle beam, torque rods, telescopic shock absorbers and coil springs. The beam rigidly connects the wheels. They cannot oscillate independently. Accordingly, the rear suspension is dependent. This slightly reduces comfort and maneuverability. But the beam increases the rigidity and reliability of the structure.
In addition to the listed parts, the suspension also includes other elements: rubber bumpers, silent blocks, bolts, nuts, fasteners, gaskets, brackets. All of them are subjected to large dynamic and static loads. In addition, the rubber parts of the silent blocks and the boots of the ball joints dry out over time and need to be replaced even after the car has been stored in a garage for a long time.
How to replace a Niva Chevrolet wheel bearing
Replacement of the wheel bearing is carried out according to the given algorithm.
- With the vehicle stationary, loosen the bearing nut.
- The jack is placed under the lower arm to partially compress the spring. Hang up and dismantle the wheel.
- Remove the brake caliper.
- Press out the steering pin.
- Unscrew the ball joints from the arms.
- Unscrew the bearing nut completely and remove the hub with the steering knuckle.
- Press the hub out of the inner races (the outer bearing cage may come out of its race).
- Using a screwdriver, remove the oil seal and thrust plate from both sides of the steering knuckle axle.
- Press out the outer bearing races.
- Install the bearings in the following order: race, cage, washer, seal.
- Press in the hub.
Sources:
https://autoprivat.ru/remont_avto/kak_podtyanut_podshipnik_perednej_stupicy_niva_shevrole.html https://fenix72.ru/raznoe/stupichnyj-podshipnik-na-nive-shevrole-kak-podtyanut.html https://chevniva.ru/stupichnyj-podshipnik- nivy-chevrole/
Self-replacement of the cylinder head gasket Niva Chevrolet
The process of removing the cylinder head is not a frequent task, but if you have such a situation when replacing a gasket, you should know how to do it. Replacing the gasket may be necessary due to leakage of engine oil, antifreeze or antifreeze. The cylinder head is an important part of the car, with a complex structure, but you can disassemble it and replace the gasket.
To ensure that the connection between the head and the cylinder block itself is sufficiently tight and airtight, a gasket is used. It performs three functions:
- seals the cooling system channel;
- prevents oil leakage;
- distribution - the cylinder functions normally, as a result of which the mixture of gasoline and air does not leak out.
The seal is used only once and is changed during any engine repair. You can use the following types - asbestos, non-asbestos, steel. Each gasket is good in its own way: metal gaskets distribute mechanical stress well, asbestos gaskets are more elastic and can withstand high temperatures.
General rules suitable for any car, including the Chevrolet Niva:
- When disassembling, mark all attached parts with a marker - this way you will not get confused during the reverse process;
- when purchasing a gasket, buy exactly the type recommended by the engine manufacturer;
- be sure to remove any oil deposits on the fastening bolts;
- perform half or one turn when loosening the bolts to reduce the pressure;
- The cylinder head is assembled using special bushings;
- The bolts are finally tightened with a special wrench very carefully so as not to twist.
After replacing the gasket, carefully observe to see if there are any signs of leakage to ensure that it is properly replaced on the Chevrolet Niva.
- We remove the battery wiring and drain the antifreeze.
- We free the carburetor from cables and hoses.
- We dismantle the controller with voltage wires.
- Carefully remove the starter screen and heater tube from the manifold.
- Remove the antifreeze temperature sensor.
- Remove the brake booster hose.
- Remove the hoses from the cooling system and heater.
- Disconnect the camshaft and valve levers.
- We dismantle the chain and secure it.
- We unscrew the fasteners and remove the cylinder head with the pipe, carburetor and manifold.
According to reviews from Chevrolet Niva owners, you need to pay attention to the following subtleties:
- you should buy a metal seal as it is more durable and of higher quality;
- If the head fastener does not unscrew, you need to tap it with a hammer - this way you will minimally damage the surfaces and the key will not turn.
Replacing the axle bearing
Another element that experiences heavy loads while driving is the Niva Chevrolet . Which are recommended to be changed along with the axle.
To make the replacement, first of all you need to remove the axle itself and do the following:
- To remove the retaining ring with the bearing, take a vice and clamp the axle shaft in it
- We take a grinder and cut the stopper and bearing in several places, this must be done carefully so as not to touch the axle shaft
- Take a chisel and split the retaining ring and bearing
- We remove rust and dirt from the ring and bearing seats
- We take the pipe and use it to press the new bearing into place; during these actions, we must not allow the cage to rotate
- We take a blowtorch and use it to heat the locking ring until red and use pliers to install it in its place
- We wait until the axle shaft cools down, while it cools down in the brake flap we replace the oil seal
After everything has been changed, you need to check the transmission oil level in the rear axle. At this point, all replacement work can be considered completed. As you can see, all the work can be done independently without the participation of a specialist; it is enough to have a little knowledge and a standard set of tools.
Removing the hub
To do this, dismantle the conical bushing.
Unlocking the nuts is done by gently tapping them through a chisel.
After which, using a size 19 wrench, the rear and front clamps of the lever to the knuckle are unscrewed sequentially,
not forgetting to get rid of the locking plate.
Then, using the keys “17” and “10”, as well as a flat screwdriver, the brake circuit hoses are removed from the steering knuckle.
Having placed the stop under the lever from below, use two “13” keys to unscrew the nut located on the bolt that secures the ball mount to the upper lever. Unscrew 2 more nuts in the same way. And take the knot to the side.
The lower ball joint is also dismantled.
When the part is freed from the fastenings, holding the steering knuckle with both hands together with the hub, brake disc, upper and lower ball joints, it is removed.
When separating parts, it may be necessary to clamp the steering knuckle in a vice, after which the hub is knocked out without extra effort.
Next, the bolts securing the steering knuckle to the lever are removed.
The brake disc is knocked out by screwing the nuts onto the stud, followed by concentrated blows to the resulting structure.
The result of the work at this stage: the brake system disc and hub are separated from each other.
They hook up the ring that protects against dirt, after which, using a “10” key, remove the casing that protects the steering knuckle.
Replacing the wheel bearing
The steering knuckle is placed in a vice, then the seal (oil seal) is removed with a straight-slotted screwdriver.
Next, the ring with the separator as part of the inner ring is pulled out sequentially. The bearing components are removed from the inside in a similar manner.
Pay attention to the side of the outer bearing and remove the outer ring from there with a punch. The same manipulations are typical for the opposite outer ring.
With this read the Niva suspension lift yourself drawing
Disassembly is complete. Parts are defective and then, if necessary, replaced with new ones, components are cleaned of old lubricant, and filled with a new compound. It is recommended to use Castrol LMX universal grease for bearing joints and spline units. Assembly - in the reverse order using suitable pipe sections for pressing in bearings, oil seals, etc.
When is it necessary to change the cylinder head gasket?
The need to replace the cylinder head gasket of a Chevrolet Niva and, accordingly, the need for its tightening torque arises in some cases. The gasket in a vehicle needs to be changed if it is damaged. This refers to the occurrence of cracks and breakdowns in the structure of the cylinder head gasket. In this case, the owner of a Chevrolet Niva will be faced with a breakthrough of gases into the cooling system, as evidenced by the regular bubbling of antifreeze.
Tightening diagram for cylinder head screws for Niva Chevrolet
In addition, the need to replace the Chevrolet Niva cylinder head gasket appears due to insufficient compression levels in the combustion chambers. Perhaps the gasket has worn out and is no longer able to fully perform its tasks. In addition, if a crack appears in the cylinder head gasket, antifreeze will leak into the engine fluid and vice versa.
In these cases, replacing the cylinder head gasket is simply necessary. If you let this matter go, things could turn out even worse. Therefore, if at least one of these signs mentioned above is found in your Chevrolet Niva, you need to start replacing the cylinder head gasket as quickly as possible.
Reasons for retightening cylinder head bolts
Tightening the cylinder head bolts.
Before we begin to consider the tightening torque of the cylinder head itself, it is necessary to understand for what reasons the cylinder head can be removed . So, let's look at the main ones:
- Engine repair , both major and “throwing up” oil scraper rings. To do this, you need to remove the cylinder head, and then tighten the bolts correctly.
- One of the diseases of Lanos can be called a head gasket failure . At the same time, to replace it, it is necessary to remove the cylinder head itself. It is worth noting that the new gasket must maintain a tight seal, so the tightening torque plays a big role.
- Burnout of valves is a good reason to remove the “head”, so after repair you will need to tighten the bolted connections.
- Replacement of connecting elements , which requires dismantling the block head.
Trying on the cylinder head gasket.
Tightening process and tightening torque on a Chevrolet Lanos
Tightening sequence for cylinder head bolts.
The reasons why it is necessary to remove the cylinder head have been established and further it is worth considering the process itself and the tightening torque of the cylinder head. After installing the new gasket between the head and the block, we begin to tighten the bolts. The bolts must be tightened in a certain sequence so that the cylinder head is pressed tightly against the block through the gasket.
Instructions for tightening cylinder head bolts
The next tightening of the cylinder head must be carried out during each routine repair or maintenance of the power unit (change of oil or consumables). It is mandatory to carry out the procedure after intervention in the internal combustion engine structure, and additional tightening after 500-700 kilometers. It is not recommended and there is no need to climb into the mechanism anymore. After full tightening, the bolts sit firmly in their sockets and do not loosen due to vibration. Otherwise, leaks or burnout of the cylinder head gasket may occur, which can lead to major repairs.
Modern motors manufactured after 2010 do not require periodic tightening of the studs due to the updating of the device and mechanism.
Wheel bearing Niva Chevrolet
Repair of chassis elements of any car must be carried out in a timely manner, since the issue concerns not only driving comfort, but also safety. In particular, wheel bearing of the Niva Chevrolet, in order to avoid an accident, even before it is completely destroyed, according to the first symptoms. At any service station, such work is considered standard work and will not cost the owner significant expenses, however, repairs can be carried out independently, having certain theoretical knowledge.
Causes of cylinder head gasket failure
A crack or burnout of a gasket is a fairly common occurrence on a Chevrolet Niva. The vehicle is operated in extreme conditions; the engine runs at high speeds or with poor cooling off-road. The temperature in the combustion chambers reaches 1000°C, so the appearance of the slightest crack leads to rapid burnout of the gasket in this place.
A damaged node can be easily identified by the following symptoms:
- white steam from the exhaust pipe of the car (antifreeze enters the cylinders);
- drop in coolant level in the expansion tank;
- bubbling of antifreeze in the expansion tank;
- the appearance of an emulsion on the oil dipstick and timing components under the valve cover;
- increase in oil level due to antifreeze entering the crankcase;
- oil leaks from under the gasket outside the engine;
- the engine begins to stall and run intermittently;
- low compression in the cylinders.
The manufacturer does not regulate gasket replacement on a Chevrolet Niva. It is designed for the entire service life of the engine - 125 thousand km. This part is disposable and is replaced with a new one every time the cylinder head is removed. Dismantling the engine head may be necessary to repair valves and their seats, replace pistons and piston rings.