Kinds
Lada car belts may vary. Lada 2110-15 may have a hydraulic booster, the pump of which will be driven by the same belt as the generator.
The differences, in turn, depend on the presence of power steering or its absence. A car equipped with hydraulic power steering will have a longer belt than a car without it.
The picture below clearly shows the difference between the two belts.
There is a long belt on the left, a short one on the right (car without additional equipment)
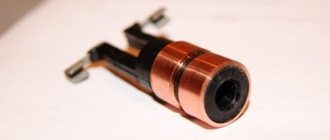
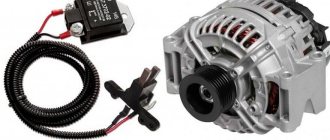
There are a large number of varieties of alternator belts. In the 90s, with the advent of the VAZ 2109, the generator drive belt was of the V-type. Subsequently, it was abandoned and with the advent of the VAZ 2110, the V-belt was replaced by a poly-V-belt.
V-belt on the left, poly V-belt on the right
The VAZ 2110-15 generator belt without power steering has a length of 742mm, and with additional attachments it is 1115mm.
Replacing the alternator belt on a VAZ 2110, VAZ 2111, VAZ 2112
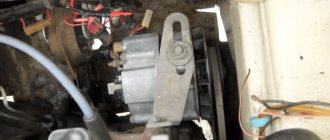
Welcome! Alternator belt - on cars of the tenth family it goes to only two pulleys, namely the generator pulley and the crankshaft pulley, thanks to it torque is transferred from the crankshaft to the generator, thanks to which when the car is running (When the crankshaft is spinning), the car is charged, the battery is charged, and also the current is supplied to the on-board network of the car (This is a tape recorder, windshield cleaning brushes, etc.), therefore, when the engine is started, the battery no longer makes sense to supply current to the on-board network (It makes sense when the generator can handle it won’t, that is, music plays loudly when the subbuffer is on and similar situations), thanks to which the battery does not run out and the voltage in the network is kept at one constant level.
Note! To replace the alternator belt, you will need a minimum of time and a minimum set of tools, which includes: Wrenches or, even better, if you have ring wrenches, then stock up on them, because they are much easier to use and the likelihood of breaking the nuts will be much less!
Summary:
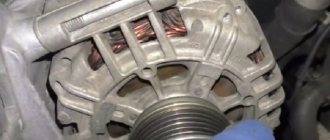
Where is the alternator belt located? As we have already said, it is placed on two pulleys, one pulley rotates (This is the crankshaft pulley) and due to this, the belt is also set in motion, thereby the second pulley also begins to rotate (Both pulleys, by the way, are indicated by arrows, the same crankshaft pulley is shown in red, and blue generator pulley), in general, for clarity, in the bottom photo the belt itself can be clearly seen, as well as the generator and the place where it is installed.
When should you change the alternator belt? From time to time it needs to be checked, to do this, of course, you will have to remove it, but it can be removed very easily and you will spend more than 5 minutes on the entire check, so when the belt is removed, begin the inspection, there should be no cracks or marks on it ruptures, in addition, the material of the generator belt itself should be rubber, and not rough (That is, there should be no signs of hardening of the rubber), and if you have a toothed one, then make sure that the teeth are not worn out and are in normal condition.
Replacement
Replacing a belt is not a complicated process, so this work can be completed by a person who does not have high knowledge in auto mechanics.
First you need to prepare the necessary tools and purchase a belt.
Tool:
- Key for “17mm”, “13mm”, “10mm”;
Step-by-step instruction
- Use a key set to “13” to loosen the generator mount
- Loosen the belt tension screw with a “10” key and move the generator to the engine side
- Removing the old belt
- We install a new belt and tighten it with a screw.
- The belt tension should be such that it can be turned 90 degrees by hand, or with a pressure of 10 kg/cm on the belt it should bend no more than 15 mm.
Insufficient belt tension can lead to a lack of battery charge and the belt squealing under load, and excessive tension can damage the alternator bearings or the belt itself.
The process of replacing the alternator belt on the VAZ 2110-15 has been completed. We hope our article was useful to you.
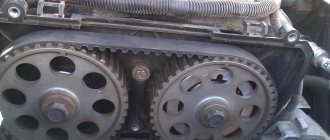
Let's consider replacing the timing belt of a VAZ 2110 (8 valves without power steering)
We are starting to replace
- We start by unscrewing the two front protection bolts.
Unscrew the timing belt protection bolts
- Then unscrew the nut in the center.
Unscrew the central protection nut
- Remove the timing belt protection cover.
We take out the protective casing
- Remove the right wheel and the protection behind it. We turn the generator pulley using the head by 19, turning it clockwise.
Turning the generator pulley
- Rotate the pulley until the marks on the cover and on the pulley match.
The marks on the cover and on the pulley match
- Remove the plug from the top of the gearbox.
Removing the plug
- We check the coincidence of the marks in the hole.
The marks in the hole must match
Marks with the gearbox removed
- We block the rotation of the flywheel by inserting a screwdriver into the hole.
Block the rotation of the flywheel with a screwdriver
- Then we remove the generator pulley itself with a 19mm head.
Unscrew the pulley
- We take out the pulley and put it aside.
Pull out the pulley and set it aside
- Using a 17 wrench, loosen the tensioner roller nut.
Loosen the tensioner nut
- We take out the old timing belt.
We take out the old belt
- We unscrew the tensioner roller and replace it with a new one.
Removing the tensioner roller
- Don't forget to install a special washer under the roller.
Install the washer under the roller
- Now we put on the new timing belt and, using a roller, tighten it.
Tensioning the timing belt
- Checking the location of the marks. Everything must remain in place. We proceed to assembly in reverse order.
Checking the marks
- Check the tension by unscrewing the belt. We make sure that it is not overtightened.
Checking the tension of the timing belt
Replacing the VAZ 2110 timing belt (8 valve gas distribution system) has been completed. Start the engine and let it run. Take a close look at the operation of the timing belt. If everything is fine, wear protection. The whole procedure took about 30 minutes.
Belt tension
This video shows how tension occurs correctly.
Every driver should be aware that a poorly tensioned drive reduces battery charge and can lead to faster wear on the belt drive. In addition, it often slips and a characteristic whistle is heard.
If you tighten the belt, then this is fraught with rapid stretching (increase in size) and failure of the generator bearings.
Checking the tension is very simple. If you press on the drive in the middle part between the pulley and the crankshaft with an approximate force of ten kilograms, then it should bend by ten to fifteen millimeters.
Tension check
Adjustment is made using a special bolt. If you turn it clockwise, the belt will tighten and vice versa, if you turn it counterclockwise, it will loosen.
Adjusting bolt
Attention! If there is power steering, then the tension is performed not with a bolt, but with a tension roller.
Timing belt price
The price of a VAZ 2110 timing belt, depending on the manufacturer, can vary from 400 to 1000 rubles. The tension roller costs about the same, which is recommended to be changed along with the belt. The cost of replacing these timing drive elements is 600-1000 rubles.
To save money, you can replace the belt and roller yourself. There is nothing complicated in this procedure, and no special tools are required. You just need to purchase spare parts.
Motorists Council
As practice shows, many experienced VAZ 2110 drivers, who have been driving this particular model for many years now, carry an additional alternator belt with them in the trunk. This is due to the fact that its breakdown can occur at the most inopportune moment. This node cannot be called the weakest point of the “ten”, but problems may arise with it. And it is better for you to be prepared for such a situation.
Otherwise, you will have to call a tow truck, go to the nearest service station, and pay a lot of money for the services of specialists. Although, if you have a spare alternator belt and a standard set of tools, if it breaks, you would spend literally a couple of tens of minutes and calmly continue driving with a new belt. Because the choice is always yours!
Didn't find the information you are looking for? on our forum.
How to replace the alternator belt on a VAZ 2110-VAZ 2112?
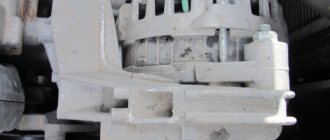
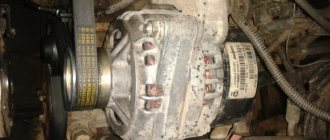
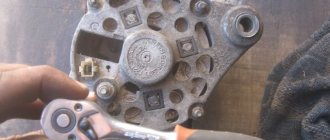
1) First you need to somehow make the generator move, to do this you need to loosen the upper (Indicated by a red arrow) and lower nut (Indicated by a white arrow) that secure the generator (Just loosen them, there is no need to turn anything out completely), as soon as this is done done, start rotating the adjusting bolt in the direction in which you exactly need (indicated by a blue arrow), that is, if you tighten the adjusting bolt, thereby rotating it clockwise, the belt will be tensioned and the generator itself will move away from the cylinder block, if you decide unscrew the adjusting bolt, the belt will loosen and the generator itself will move closer to the block at this time, so you can remove it (When the generator rests all the way against the cylinder block), so immediately unscrew it, take off the belt and install it in its place new.
2) After installing the new belt, adjust it, it is done using the same adjusting bolt, so once the belt is installed, rotate this bolt clockwise until the belt is tensioned to the required tension, and the required tension is when the belt bends by 10-15 mm (1-1.5 cm) with a force of 100 N (10 kg), if suddenly the tension is greater (Like a string, for example), then after a while the bearings of the generator will become unusable and it will have to be removed and disassembled to change them for new ones, but if, on the contrary, the belt is weakly tensioned, then when the engine is running, due to the weak tension, the belt will simply spin and thus the charging that the generator provides will not be constant, but variable (either it will give current, or not ).
3) After all the operations performed, we recommend turning the crankshaft (This can be done by rolling the car in fourth gear a little forward) and again checking the tension of the generator belt, if necessary, tighten it or, on the contrary, loosen it, and finally tighten the lower and upper nuts until they stop attaching the generator to the brackets.
Additional video clip: If you have never replaced a belt and are doing this work for the first time, we recommend that you also familiarize yourself with the video clip, which will serve as additional information for you and from which you will learn a lot more.
Note! After installing the new alternator belt, you will need to adjust it, you can also see how to do this in the video below: