Technical regulations Lada Granta
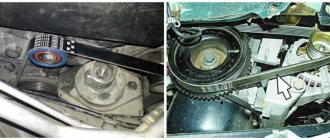
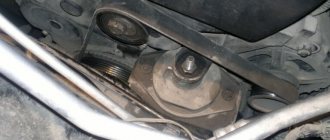
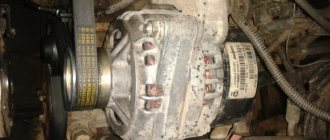
The alternator belt is located under the alternator itself
If you rely on the manufacturer’s technical regulations, then the belt should be checked at least once every 15,000 km. And every thirty thousand kilometers, this belt needs to be replaced.
That is, it turns out to be a cycle with an interval of fifteen thousand kilometers, in which the alternator belt is alternately checked and replaced.
And, given that the tensioner, as such, is not used, the belt is focused solely on one-time stretching during installation.
There are options for reusing the belt, but this practice is highly discouraged.
We check the condition of the alternator belt ourselves
To make sure that the belt is in good condition, you need to perform simple steps. Initially, fifth gear is engaged. On it, leaning on the front bumper, we try to push the car back. At the same time, we are trying to conduct a visual inspection of the belt along its entire length.
All the grooves have been cut off, the belt is on the verge of breaking
There, according to the general rule, there should be no cracks, even the smallest ones, as well as ruptures and peelings that occur due to long-term use of rubber products.
This belt is no longer any good.
If such problems are found, the belt must be replaced. The timing belt is checked in the same way.
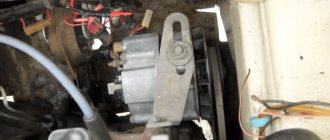
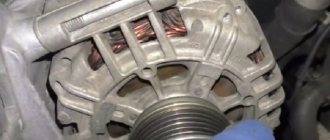
It is also a good idea to check the external condition of the generator itself, since its quality raises questions. Don't forget to inspect the generator roller.
The belt is already bad, but the generator pulley is still good
Alternator belt replacement process
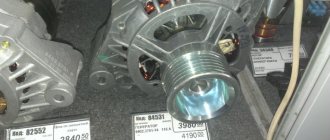
To carry out the replacement work, we will need the alternator belt itself, which can be purchased from official dealer representatives at a price of approximately 800 rubles.
Standard article number for alternator belt: 1118-1041020-07
- The length of this belt is 823 millimeters.
- You can find it in the catalog by name or by your own unique number 1118-1041020-07.
- The marking on the box will indicate the index 6РК 823.
In addition, prepare in advance a sufficiently long screwdriver, as well as a “13” key. You may also need a knife to remove the old belt.
- To begin with, we remove the old belt, or what is left of it. As we have already said, this needs to be done every thirty thousand kilometers, even if the condition of the belt appears to be completely satisfactory. The belt can be removed with a simple knife.
We remove the belt by simply cutting it off, most conveniently with a stationery knife
After this, all that remains is to take care of tightening the lower bolt and the nut of the upper generator mounting bolt. This will be enough to set everything in place.
Alternative options
Of course, many car enthusiasts are well aware of the consequences of not having a belt tensioner. The fact is that the belt, quite often, is overtightened, which leads to too rapid wear of the generator bearing. You can recognize this problem by a characteristic sound reminiscent of a howl. This design flaw can be eliminated by installing a generator belt tensioner. The most common option is to install a tensioner from the Lada Kalina.
Installing the alternator belt tensioner
The reason for abandoning the tensioner is simple. The manufacturer tried to save additional money by making the car one of the most affordable in the world. And this is typical only for the cheapest trim levels (standard and norm), which are supplied with eight-valve power units.
Snapshot53252323
Marking of the drive belt for auxiliary units 6РК 995 (six-V-ribbed, length - 995 mm).
Marking of the drive belt for auxiliary units 6РК 995 (six-V-ribbed, length - 995 mm). In order to improve visual control, remove the plastic engine casing. To check the condition of the belt, engage fifth gear in a manual transmission, push the car (or rotate the suspended wheel) and inspect the belt along its entire length. On a car with an automatic transmission, remove the right mudguard of the engine compartment and, by rotating the crankshaft by the bolt of the auxiliary drive pulley, check the condition of the belt.
With any of the gearboxes, the following method is also possible: apply chalk marks to sections of the belt and, turning on the starter for short periods of time, turn the crankshaft at small angles. We inspect the belt along its entire length, checking the areas covered by the marks.
The belt should not have cracks, tears or separation of rubber from the fabric base. A defective belt must be replaced. To do this, from the engine compartment side...
conclusions
This technical “mistake” did not happen by accident. The fact is that the Lada Granta was developed with a low retail price in mind. And, given the depreciation of the ruble, this car managed to enter the top ten cheapest cars in the world. At the same time, the equipment of the Lada Grant is much higher than that of its competitors on the list.
And some problems, like the alternator belt tensioner, can be solved yourself. Only consider warranty issues that may be violated during installation.
Despite the external similarity of the Lada Granta models with 8 and 16 valves, the method of replacing the alternator belt is different. 8-valve modifications: “Norma”, “Standard” are not equipped with an air conditioning system. The gas distribution design does not have a mechanical belt tensioner.
The Lada Granta “Lux” version with a 16-valve mechanism and pre-installed air conditioning has a built-in drive belt tensioner.
In order to provide methodological assistance to inexperienced Lada Granta owners, we will consider two ways to replace the alternator belt.
Replacing the alternator belt on the Lada Grant 8 valve
- We place the car on a flat platform (platform) and open the hood.
We begin work after the engine has cooled down, the temperature is safe, which eliminates burns and injuries.
- For convenience, we remove the expansion tank of the cooling system and move it to the side.
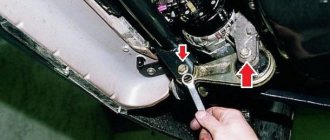
- Using a key set to “13” we release the upper and lower fastenings of the generator, but do not twist the nuts.
- Move the generator housing forward towards the wall of the cylinder block until it stops.
- We reset the old RPM.
Removing the old belt
- We carry out troubleshooting of the generator splines and crankshaft shaft. If there are no comments or deformations of the grooves, we install a new RPM.
- Using a pry bar, move the body to its original position, screw in the nut of the lower and upper fastenings.
- We complete the assembly.
We fix the nuts 1 - lower, 2 - upper
Replacing the alternator belt without tensioner on the Lada Grant is completed.
Setting the exact tension of the RPM at home is quite difficult, because... This requires special equipment. Use a regular tester (multimeter), every second motorist has the device.
We set the tension in the following way:
- After putting on the belt, start the engine.
- We put two terminals of the multimeter on the battery.
- We look at the voltage at the “output”, its value should be close to 14.00 V. If it is less, then we increase the tension, if it is more, we release it.
Signs of generator malfunction, ways to eliminate them
| Sign | Cause/remedy |
| The warning light on the dashboard does not light up | Open circuit in the power supply from the converter to the battery. Check the integrity of the electrical circuit |
| The warning light does not go out after the engine starts | Insufficient belt tension, insufficient tension in the chain. Measure the voltage in the circuit. |
| —/— | Worn brushes, faulty diode bridge. Measure the voltage with a multimeter and replace worn elements with new ones. |
| Short to ground | The insulation of the power cable is damaged. Check the condition of the insulating coating. |
| The converter does not produce the proper voltage of 14 V | Oxidation of terminals, cleaning with a metal brush, replacement |
| —/— | The battery is worn out, replace the battery |
| —/— | Loose belt tension. Adjust the tension. |
| —/— | Diode (rectifier) bridge is unusable, replace with a new one |
| The battery is not receiving a charge | Replacing the diode bridge with a new one |
| —/— | Rectifier failure. Replacement of components |
| Voltage drop in the network (circuit) | Checking the quality of connections of terminals and clamps. Tightening, replacing with new ones |
New Lada: Reviews of the operation of the Lada Granta air conditioner
Replacing the alternator belt on a Lada Granta 16 valves (Lada Granta with air conditioning)
- Jack up the right side of the car and remove the wheel.
- Unscrew the five screws in the wheel arch and remove the lower part of the “protection”. This is necessary to ensure unobstructed access to the engine mount; it must be removed.
- Unscrew the 8 bolts around the perimeter of the oil pan protection and remove it.
Mounting points for the mudguard and fender liner: 1 — screw with a Torx T-27 key for general fastening of the mudguard and fender liner to the wheel arch; 2 — two Torx T-20 screws for general fastening of the mudguard and fender liner to the wheel arch and fender; 3 - Torx T-20 key screw for fastening the fender liner to the wing; 4 — four self-tapping screws “8” for fastening the fender liner to the wheel arch; 5 - four Torx T-20 screws for fastening the fender liner to the front bumper.
- We install a wooden block in the center of the oil pan and lower the car onto the block.
- We unscrew the engine mount; it is secured with two bolts and one nut (at “17”).
Signs of wear on the RPM
Before you start replacing the RPM, conduct your own diagnostics and evaluate the actual condition of the parts and mechanisms. Perhaps the cause of the malfunction is in another unit adjacent to the generator.
- We open the hood, the engine must cool down so as not to damage the skin of the hand and fingers.
- We put the gear in neutral and turn the alternator belt. Rotation occurs quite easily, by hand, without special equipment.
- We inspect each area one by one.
Signs of wear on the RPM
The following will indicate the need to replace the RPM:
- fraying, side abrasions;
- peeling of rubber, thread fiber;
- other mechanical damage;
- teeth tears;
- the presence of oily traces and streaks on the surface of the belt.
If there are no comments on the RPM, we proceed to inspect the tensioner roller. Often the reason for the appearance of third-party noise is precisely this, worn-out roller bearings. We loosen the structure with our hands and check that it is working properly.
If the belt breaks on the way, it is allowed to travel on the battery's reserve energy, but not more than one hour. In practice, experts recommend no more than half an hour of free movement.
Signs that replacement is needed
When conducting an inspection, we must pay attention to the presence of the following signs:
Some stripes on the belt are already worn out
- abrasions;
- cracks;
- rubber lags behind the base;
- ruptures.
If there is any of them, the belt needs to be changed.
Review of manufacturer prices for Lada Granta alternator belt
Belt technical parameters:
- Length: 823 mm.
- Thickness: 3.0 mm.
- Material: ethylene propylene rubber.
- number of ribs: 6.
| 2. | —/— | Southern Autonomous District |
| 3. | —/— | Western Autonomous District |
| 4. | Car service "Autotechnical center Garage+" | Moscow, Matrosskaya Tishina street, 1Ас8 weekdays: from 10 to 21, weekends: from 11 to 21 |
| 5. | Auto service "Open" | Moscow, 2nd Nagatinsky proezd, 2с1 • daily from 9 to 21 8 |
| vendor code | Price, rub.) | vendor code | Price, rub.) |
| Original | |||
| Alternator belt for Granta with air conditioner Gates MICRO-V 6PK995 | |||
Addresses of companies providing services for replacing RPMs
| № | Name | Address |
| 1. | Service | Eastern Autonomous District 1st st. Izmailovsky Menagerie, 8 st. Amurskaya, 3 building 32 (Golyanovo) st. Montazhnaya, 11 building 2 |
| 2. | —/— | Southern Autonomous District Kanatchikovsky proezd, 13 building 3 Kashirskoe highway, building 10, building 3 st. Dubininskaya, 76 |
| 3. | —/— | Western Autonomous District Kutuzovsky prospect, 36, building 15 Vernadsky Avenue, 12d Skolkovskoe highway, 31 building 9 st. Krylatskaya, 30 building 3 st. Marshala Timoshenko, 17 building 1 |
| 4. | Car service "Autotechnical center Garage+" | Moscow, Matrosskaya Tishina street, 1Ас8 weekdays: from 10 to 21, weekends: from 11 to 21 |
| 5. | Auto service "Open" | Moscow, 2nd Nagatinsky proezd, 2с1 • daily from 9 to 21 |
How to choose an alternator belt for the Lada Granta
- Wedge-shaped: the shape of the teeth is wedge-shaped, trapezoidal in outline. The strap is designed to transfer increased force between two nearby shafts. The wedge shape is not designed for reverse bending. That is, it is prohibited to install it on the Lux model.
- Poly-V-ribbed is a universal type: its shape resembles several belts glued together.
- Toothed: There are transverse grooves on the inside. This type of RPM is designed to transmit the maximum number of rotation and traction force. Installed on the Lada Granta to ensure the operation of the gas distribution mechanism.
Reviews
| Analogs | |||
| GATES 6PK1113 | From 400 – 450 | LYNXAUTO 6PK0823EL | From 400 – 450 |
| GATES 6PK1123 | —/— | LYNXAUTO 6PK0995 | —/— |
| GATES 6PK745 | —/— | AYWIPARTS AW2120354 | —/— |
| LYNXauto 13X1050LX | —/— | AYWIPARTS AW2120037 | —/— |
| LYNXauto 10X938LX | —/— | LYNXauto 10X825LX | —/— |
| LYNXauto 10X750LX | —/— | CONTITECH AVX13X1050 | —/— |
| CONTITECH AVX10X750 | —/— | CONTITECH AVX10X825 | —/— |
| JP GROUP 1118005100 | —/— | FLENNOR A5361 | —/— |
| № | Positive |
| 1. | Victor: The factory RPM served me for 35,000 km, after which it was replaced by LYNXauto 13X1050LX. Both are good quality at an affordable price. |
| 2. | Ivan: after 30,000 km the RPM whistle appeared, tightened it a little, disappeared. It served for another two thousand, after which it broke off. I am satisfied with the quality of the original belts, there are no complaints. |
| 3. | Vladlen: I’ve heard negative reviews about RPM, I can’t confirm. Every 15,000 km I carry out diagnostics, moderate driving style, do not exceed 3500 rpm. |
| 4. | Ignat: at the first maintenance after purchase, the master tightened up the RPM a little, after which it served for more than 35,000 km. This is very good for the domestic auto industry. |
| 5. | Gennady: at the third maintenance, he did not change the “traditions”; he bought the original RPM, since there were no problems with the previous one, and served over 30,000 km. |
| 6. | Vasily: my recommendations to motorists, install the original RPM. Mine worked 33,000 km. I'm happy with the quality, no complaints. |
| 7. | Georgy: Every maintenance in a row I carry out RPM prevention, keep the engine compartment clean. There are no complaints about the quality of the belt, my recommendations are to buy the original one. |
| Negative | |
| 1. | Victor: My RPM has already flown 15,000 km. A whistle appeared and after 50 km it was torn into pieces, fortunately the speed was 90 km/h. |
| 2. | Gennady: despite the manufacturer’s specified service life of 30,000 km, my strap only lasted 20,000 km. I don’t recommend domestic ones; I think it’s better to pay extra for imported ones, but in good quality. |
| 3. | Vladimir: I join the negative reviews addressed to RPM, since domestic ones do not last more than 20,000 km. |
Basic faults
Failures associated with the failure of the Granta generator lead to discharge or, conversely, overcharging of the battery and its boiling. In both cases, this will make further operation of the car impossible. If the belt is overtightened, problems with high bearing wear will soon arise. If the belt tension is insufficient, slipping will occur and the battery will receive too little charge.
Normally, a working generator produces 14.5 V; exceeding this value is most often due to a breakdown of the voltage regulator. Without urgent replacement of the element, constant recharging of the battery will lead to shedding of lead plates and battery malfunction. If the unit does not produce the required voltage, and it is below 13 V, then the problem may not only be with the regulator, but also with the fact that the brushes are worn out, the diode bridge or windings are damaged.
| Analogs | |||
| GATES 6PK1113 | From 400 – 450 | LYNXAUTO 6PK0823EL | From 400 – 450 |
| GATES 6PK1123 | —/— | LYNXAUTO 6PK0995 | —/— |
| GATES 6PK745 | —/— | AYWIPARTS AW2120354 | —/— |
| LYNXauto 13X1050LX | —/— | AYWIPARTS AW2120037 | —/— |
| LYNXauto 10X938LX | —/— | LYNXauto 10X825LX | —/— |
| LYNXauto 10X750LX | —/— | CONTITECH AVX13X1050 | —/— |
| CONTITECH AVX10X750 | —/— | CONTITECH AVX10X825 | —/— |
| JP GROUP 1118005100 | —/— | FLENNOR A5361 | —/— |
| Cause of malfunction | Remedy |
| The warning lamp on the instrument panel does not light up | |
| Open circuit in the power supply between the generator, ignition switch or the lamp itself. | Check the wiring and eliminate the break. |
| The charge indicator lamp does not go out after starting the engine | |
| Insufficient belt tension. | Adjust the belt tension, replace the belt, and replace the tensioner if necessary. |
| Wear of the brush assembly, short circuit of the windings, malfunction of the diode bridge or voltage regulator. | Replace faulty components. |
| Short to ground in the power wire from the generator to the control lamp. | Insulate the power wire. |
| The generator does not provide sufficient charge | |
| The battery terminals have oxidized. | Clean the terminals and replace them or wire tips if necessary. |
| Battery failure. | Replace battery. |
| Insufficient belt tension. | Adjust the tension and replace the belt if necessary. |
| Malfunction of the diode bridge or voltage regulator. | Replace parts. |
| The battery is being recharged | |
| Failure of the voltage regulator or diode bridge. | Replace components. |
| Voltage drop in the generator-battery circuit section. | Check contact connections, clean or replace if necessary. |
The table shows the main faults. Mechanical and other damage is also possible.
Replacing the alternator belt on Granta (Video)
Hi all. The time has come to replace the alternator belt and then away we go. It would seem that it would be difficult to take off the old one and put on the new one. but it was not there. ardent greetings to that fool who decided not to install a belt tensioner. he’s just not a good person, I would say it differently, but I don’t want to swear, I think whoever changed himself will understand what I mean.
so. This means he simply cut off the belt with a knife and began trying to pull on a new one, and yes, just pull it on. Like a chain on a bicycle, this is the principle of replacement without a tensioner. and I did everything I could, guiding it with a screwdriver, turning the wheel, and pushing the car. I looked on the Internet for all possible replacement methods, but nothing helped. Everything was to no avail and I just walked away without tightening my belt. He didn’t get into anything, he just started to tear
We replace the belt tensioner with our own hands
The procedure for replacing the alternator belt tensioner is not difficult to carry out yourself. The only thing you need to have is a high-quality tool for installing the tensioner. The Grant generator belt tensioner is changed in the following order:
— disconnect the contacts on the battery terminals;
— then we weaken the tension force of the roller and remove the generator belt;
— unscrew the bracket nuts and remove the bracket itself;
— install a new bracket with a roller installed on it;
— We install the generator belt and tension it.
In order to prevent breakdowns in the future, it is extremely important for a car enthusiast to follow only two rules. The first rule is that when replacing the belt, it is important to check that the crankshaft pulleys, alternator and tensioner pulley are in line, and according to the second rule, it is important not to allow the belt tension to be too high.