About the UAZ Patriot generator with 409 engine
A generator is an electrical device that converts the mechanical energy of an engine into electrical energy. This electricity is used to operate electrical appliances and equipment inside the car. In addition, without electricity, an internal combustion engine (internal combustion engine) will not work, since spark plugs are vital for it to work (unless we are talking about diesel engines).
Dismantling the device
How is the generator removed or replaced? UAZ " Loaf ", like any other car, also requires maintenance or repair from time to time.
It should be noted that the process of dismantling the device is somewhat different from that on VAZ models - a longer belt, or even two, as well as driving auxiliary units, which complicate the work. Before starting the operation, be sure to remove the negative terminal of the battery. Next, all wires and terminals are disconnected from the device itself, which generates current. To remove generator , you need to remove the power steering belt (if there is one), loosen the generator tension bar and remove the belt completely. The two bolts holding the upper mounting bar are unscrewed. Next, unscrew the long bolt securing the generator to the cylinder block from below. After this, the generator is successfully removed from the car. UAZ “Patriot” has a certain feature - it does not require removing the second belt, and the tension is adjusted with a special roller. Installation of the device is carried out in the reverse order.
Reviews about the repair
I had my car's air conditioning system serviced here. The technician carried out a full diagnosis. I did everything according to the technological maps, and now the air conditioner works as it should.
Good and fast service. If you have any problems with your alternator or starter, this is the place for you. I really liked the attitude and professionalism. I recommend.
There were problems with the generator. The diagnosis was carried out immediately. The faults were corrected within 2 days. The repair was guaranteed. Excellent service with normal prices.
As the weather warmed up, I discovered problems with the air conditioner. The problem was identified and within a few days the technicians fixed everything. Happy with everything! I will contact you again!
Basic faults
The most common breakdown is breakdown of diodes in the rectifier unit (the so-called “horseshoe”). In this case, the entire unit must be replaced. Also, generator malfunctions due to the failure of the voltage regulator. Because of this, the voltage in the on-board network drops when the engine is running. The battery is undercharging. Also, during operation, the brushes in the brush assembly are worn out. Here, too, the voltage in the on-board network drops under load. Due to the natural wear and tear of carbon brushes, they shorten and are less able to press against the slip ring during operation.
Site about off-road vehicles, SUVs, off-road vehicles
Periodically check the tension and condition of the fan drive belt and power steering pump, generator and cooling system pump of the ZMZ-5143 engine on the UAZ-315148. Replace drive belts if they are damaged or overstretched.
Replacing and tensioning the fan and power steering pump drive belts, the generator and the ZMZ-5143 engine cooling system pump on the UAZ-315148.
Tension the fan drive belt and power steering pump on the UAZ-315148 in the following sequence:
— Loosen the power steering pump mounting bolt, the roller nut and the locknut of the adjusting unit. Rotate the tension bolt and move the power steering pump until the belt tension is normal. — Check the belt tension by applying a load of 8 kgf in the middle between the fan and power steering pump pulleys, while the belt deflection should be 8-9 mm. Tighten the power steering pump mounts, the roller nut and the adjuster locknut.
Tension diagram of the fan drive belt and power steering pump on the UAZ-315148.
Replace the fan drive belt and power steering pump on the UAZ-315148 in the following sequence:
— Loosen the power steering pump mounting bolt, the roller nut and the locknut of the adjusting unit. Rotate the tension bolt to release the belt tension. — Replace the belt and tension it as indicated above.
Tensioning and replacing the generator belt and cooling system pump on the UAZ-315148.
Tension the generator drive belt and cooling system pump in the following order:
— Loosen the tension roller bolt. By tightening the bolt that moves the roller, set the tension roller to a position that provides the required tension on the drive belt. — Check the belt tension by applying a load of 8 kgf in the middle between the generator and water pump pulleys, while the belt deflection should be 13-15 mm. — Tighten the bolt securing the tension roller to the axle.
Tension diagram of the generator drive belt and cooling system pump on the UAZ-315148.
Replace the generator drive belt and cooling system pump on the UAZ-315148 in the following sequence:
— Remove the fan and power steering pump drive belt. — Remove the upper and lower casings of the injection pump drive belt. — Remove the injection pump drive belt. — Loosen the bolt securing the tension roller to the axle. — By unscrewing the tension roller moving bolt, loosen the belt tension. — Replace the belt and tension it as indicated above. — Tighten the bolt securing the tension roller to the axle and install the injection pump drive belt and the injection pump drive belt covers. — Install the fan and power steering pump drive belt and tension it.
Malfunctions and repairs
- Lack of battery charging occurs when the drive belt slips due to wear or low tension. Repair consists of installing a new part and adjusting the tension. Another reason may be wear on the brush assembly, which needs to be cleaned of dirt and carbon deposits. At the same time, it is recommended to inspect and clean the collector; if there is severe wear, the surface is worn away.
- Constant overcharging of the battery occurs due to a breakdown of the voltage regulator or damage to the power circuit of the integrated unit. The burnt part is replaced with a new one.
- Low generator power occurs when the belt slips or the regulator is damaged. It is also possible that there is an interturn short circuit inside the stator windings, which will have to be replaced. It is recommended to check the functionality of the diode bridge.
- Accelerated wear of the brushes occurs when the commutator beats or the surface of the unit becomes oily. Repair consists of grinding the surface and degreasing it with gasoline.
How to check
Testing the generator is carried out using a test device that is connected to the positive terminal and the housing. The voltage should be in the range of 13.5-14.6 V.
The voltage regulator is tested using a lamp and applying increased voltage. You can thoroughly check the generator in a workshop using a special stand.
Replacing the alternator belt
The type and size of the belt depends on the engine model. For example, the ZMZ-409 injection unit uses a poly-wedge part with a length of 1220 mm. To remove the element, you need to loosen the tensioner pulley and then unscrew the generator mount. After this, the belt is removed from the pulleys and a new part is mounted.
To replace the V-belt used on carburetor engines, you need to loosen the generator. After installing the new part, tension is ensured by moving the housing along the guide bracket. It is important to align the generator and crankshaft pulleys in the same plane, which extends the life of the belt and reduces noise during operation.
Connecting a Moskvich generator
Reviews about the repair
I really liked the Genstar service station. Repaired a generator for Renault. In 3 hours they removed the generator, washed it, diagnosed it, repaired it and put it back in place. They gave me a six month guarantee. Well done.
They serviced, cleaned and repaired my generator in about an hour. I liked the politeness of the staff. There is a relaxation area. I will contact you again.
I contacted this workshop because the starter had failed. The guys carried out diagnostics, found the problem and fixed it. Now it works great, thanks Genstar!
The service station really does its job. We repaired the generator on the car. Professionals work here. Good luck and success in development and expansion.
Wiring diagram UAZ 3303
- Installation of a 90 Amp generator in a UAZ 469
- Transfer of the generator to the top of the UAZ-469 (417 Engine) UAZ 3151
- Replacing the UAZ 3962 generator
- Generator ZIL 131 in UAZ 469
Installation of generator 90 AmPuAZ 469
After the first use of the winch, the native (USSR) 40A generator stopped charging the battery. A 90 Amp generator from a steer was found in the garage. The mount is the same as on the UAZ. This generator has been sitting for 5 years and it is not known what condition it is in. If you don't put it, you won't know. A voltage regulator (hereinafter referred to as RN) from Volga (13 3702) was purchased. In order for the new generator to fit correctly into place, you need to install a pulley from the old generator on it. It was not possible to remove the pulley from the Soviet generator manually and using a screwdriver.
I bought a bearing puller and removed the pulley.
Next, we cut the wires, attach the terminals, and connect them to the LV.
Now, we install and connect the new generator.
So why did I redo the wiring for the generator, and not connect everything to the new one as it was before?
The fact is that my old generator schematically looked like this:
The new one from the 90 A bull looks a little different:
90 A generator from Bychka
Because Since we get different terminals of the brush assembly, the connection diagrams will be slightly different.
I used this connection diagram:
Scheme for connecting a generator with a two-pin output from the brushes
Result: the voltage, as expected, is 14 V. But, when the headlights are turned on, it drops to 13 V. My fault is that: 1. Used generator. 2. I left the pulley from the old generator, and it is slightly smaller in diameter, this also affects the voltage depending on the speed. 3. The idle speed of the UAZ is low compared to other cars. 4. According to experienced people, this problem (voltage drop) is observed in almost all Soviet cars, so many install running lights and drive without a neighbor during the day. I think I'll do that too.
Transferring the generator to the top of the UAZ-469 (417 Engine) UAZ 3151
— Generator 90A BATE — 1 pc. 4300 rub. — Alternator belt Klinova 1225/10 200 rub.
The old generator stopped holding a charge, and I decided to repair it and carry it as a spare, and buy myself a more powerful one with 90A and immediately raise it higher from the future water level, so that it would live with me a little longer than the one that constantly floats in the water, yes and have some charging when you’re standing up to your knees in water... I found a corner from a friend, bought a 1225/10 belt, bought a 90A BATE generator and off I go! First, I removed the old generator, I had no problems, except that the new Volgov barrel for the snorkel was a little in the way. I marked and drilled on the corner and tried it on the engine, everything seemed to be going according to plan, then I drilled two more holes on the other side of the corner for attaching the genes and we put everything together and put it in place. I thought everything worked out, but after putting on the alternator belt, we see how the belt passes under the thermostat, and it gets in our way. We try to re-drill the holes 1 cm lower in the corner and it doesn’t give us anything - it still hurts a little. Then my friend said, this is all nonsense and we need to do it right - throw out this corner! I took a piece of cardboard and scissors and began to make a pattern for the future part, crumpled something there, bent it, and here it is - a work of art. We trace it onto the metal, and I, with a grinder in my hands, begin to shape it from a rough and ugly piece of metal into a high-quality and processed, almost factory-made part, even if you put a stamp on it for sale! As a tuning, I would add a cutout on top and, of course, paint it red, but since there was little time, we were content with what we had! Then a friend welds the whole thing, makes a stiffener and gives it back to me to drill four holes: 2 for the engine, 2 for the generator. In just minutes. 10 we put everything back and connect the wiring. I installed the tensioner bar in its original place, only now it was turned upside down - the bar had to be worked on a little in the forge - it was simply bent with the letter Z so that it stood beautifully and did not touch anything in the engine compartment. Well, everything is in place, everything is connected, the first launch and everything works, great! We dance around the car for 10 minutes.
Systems and Strategies for Victory
This error is related to the previous one. When a player believes that there are special strategies to help him win, he automatically believes in a connection between the spins, which does not exist. Obviously, no one will forbid you to change the bet size, the number of active lines, and others. This makes the game more interesting and helps control costs, but does not guarantee success in slot machines.
The only safe way to win is with a few simple steps. First, you need to choose the best model for your game, pay attention to the possible bets, the number of lines and combinations. Then you must set limits in terms of money and time. It is very important not to lose everything.
Repair of the UAZ “loaf” generator - economically and accurately!
Hi all! Today we will make a generator from a loaf of bread. Here it is, it’s already been filmed. The bearing got stuck here and was unscrewed. He spins like this. Something was scraping there, it was jammed, the belt began to slip, and began to squeal. Apparently dirt got in because the generator was all dirty.
This is when they were slipping in the mud, the car was drowned, when the clutch was being made. When I did the clutch, everything on the generator was covered in dirt. All these cracks and holes were covered with all sorts of sticks, sawdust, garbage, sand. Dirt most likely got into the bearings here. Maybe this bearing should also be looked at to see what's wrong with it. I have replaced this bearing before.
READ How to remove the rear seat on a Lada West
First, we remove this cover, bend it here, there are 3 plastic tabs here, you bend them like this, here and here, and the cover is removed. So you pick at it, it comes out, and you need to remove this voltage regulator with brushes. A brush assembly, so to speak. So I removed it, the terminal is connected here. Oh, what a production! That's it, he's no longer fit. You need to look for a new rotor or buy a whole generator.
Now you need to unscrew the nut here, remove the pulley, then these 4 bolts can be halved. I inserted the screwdriver here, there are these slots inside the rotor. He carefully inserted it into the slot and tore off the nut, the nut was so special. I decided to take it off so I could pick it out. The end of the bearing came, of course, the rollers were collected in a heap, the separator fell apart. I changed this bearing.
I couldn't unscrew the bolts with a screwdriver. So (inaudible 03:04) I twisted it like this, knocked here and here. I couldn't unscrew all the screws. I used a small chisel from the valve, hit it with a hammer, and knocked it out. I couldn't unscrew it with a screwdriver, it was too tight. Now it will be necessary to halve it. That's it, I sorted it out.
Look how much dirt flew out of the generator, how much sand, sticks. generator was completely clogged . When I cleaned it, all the holes were filled with dirt. Here and ahead too. There are holes for ventilation; everything was clogged with debris, dirt, and sand. Now he has become normal. This is dirt, you see. This is the reason for bearing failure, one of the reasons, or simply poor-quality bearings.
There is a plastic insert, a ring where the bearing is inserted, where it is pressed into place. You need to take it apart, it doesn't fit that tightly, it comes out easily. I need to get him out of here. Now I'll knock him out of here carefully. This is how I knocked the rotor out of the housing. He pounded and pounded at first, then like this. There is such a hammer and a special drift from a bolt. So I pointed it here with a hammer. So I put it on a vice. Carefully placed the body in a vice and tapped it a couple of times, and it fell out immediately. And before that, I was just pounding and pounding on the table, something didn’t work out. This bearing became interesting. Lately I’ve had some luck with generators, first in the Urals, now in a UAZ. It happens that something always breaks. Here the roller is completely rusty, when you put the bearing on, it is advisable to lubricate the shaft. Here and here too. Then it will be easier to knock out. Made in Belarus, but for some reason I can’t see what brand of generator it’s called.
We continue to make a generator. I found this thing, I don’t know from eights or nines, these are slip rings. I don’t know if it will work or not, now I’ll chemistrate something. These rotors are not for sale. Now I need to remove this bearing. I still can’t figure out how to remove it. Remove the bearing , then remove this thing and install this new one. That's how she stands. Here the contacts are soldered. The wires go here, it is soldered here and here.
I removed the bearing, this bearing. I picked at these sides, using screwdrivers to knock it in from the inside on both sides at once. Then I used this chisel to knock him down and slowly crawled out. Then I poked at it with a screwdriver, and he moved away. It was glued with epoxy resin. Here an insulator is made of some kind of cardboard, the ends are soldered here and here, it needs to be unsoldered. They should roughly fit.
I removed the old contact rings. How I removed it: I heated the plastic with gas, and then pulled them out with pliers; The plastic softened and it was easy to pull it out. These ears broke off here, I picked them up with a screwdriver and pulled them out. Everything here was filled with epoxy resin; everything in these grooves had to be cleaned. I cleaned it up and corrected it with a file on this side. Apparently, when I knocked it out, it made dents. I knocked it a little with a hammer, and she immediately came in. You have to push it so that it goes further, so carefully knock it out. It's going fine. That's it, I scored until the end. Now all that remains is to solder the wires. I couldn’t find the bearing, I’ll install the old one. I soldered the wires, put this thing on. So I snap this thing, it clicks and goes on.
The old bearing was lubricated, washed and cleaned. There should be such a bearing. Both 202s, only this one is wide and this one is narrow. On generators they usually install such wide ones 6 202-2RSC3, PFI company. This new one bought DPI 6 302-2RS. I opened it, checked it, there was grease, it was well filled, it looked like it was Chinese.
We install, hammer in the bearings, and we can the generator . The bearing was pressed into the housing, hammered and backed up in 3 places, here, here and here with a bit made from a bolt. I tightened the pin, tightened this nut. You can insert the rest and connect the halves like this. Assembled the halves, install the regulator with brushes and the lid. The regulator is in place, we put the cover on. The cover is installed like this: here is the plus and this terminal; everything clicked into place. There's still some left on this side. Everything is in place, the latches are in place. The generator is ready, you can install it. It will continue to work for a long time.
Bye everyone! See you again! See you!
Sources:
https://favorit69.ru/kak-podklyuchit-generator-na-uaz-buhanka/ https://avtotop.info/kak-snjat-generator-na-uaz-buhanka/ https://mtz-80.ru/ bez-rubriki/podkljuchenie-generatora-uaz-buhanka-shema https://buhanka-uaz.ru/remont-generatora-uaz-buhanka-ekonomno-i-akkuratno
Device
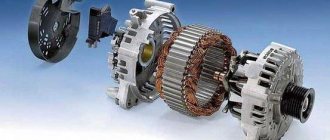
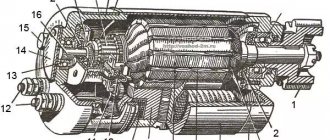
The UAZ Patriot generator itself consists of several parts, which, if they fail, can be replaced with new ones purchased at the store. So don't rush to buy a new one if there is something wrong with the old one. It may be possible to get by with a little money by replacing one part in it. By the way, the UAZ Patriot, even in versions with air conditioning, has a 120A “Iskra” model installed. If you take it apart, you can see several main parts:
- silicon rectifier
- voltage relay
- diode bridge
There is also a shaft inside, to which a pulley is attached to the outside of the housing, and the pulley is driven by a belt drive from the engine crankshaft. But it happens that the generator suddenly stops producing the required voltage, or stops working altogether. Some UAZ Patriot owners complain about the constant undercharging of the battery, but the whole point is that the device, instead of the required 14 volts, barely produces 13. And so, in what case will you have to resort to dismantling the generator:
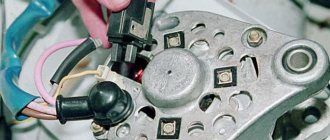
- when replacing voltage relays (brushes)
- when repairing or replacing a diode bridge
- when replacing a bearing
Three-level regulator
To prevent voltage sags, as well as to get rid of the problem of constant undercharging of the battery by the generator, it is recommended to install another three-level one instead of the standard regulator (which comes from the factory to the UAZ Patriot). Such a regulator allows you to vary the output voltage produced by the generator within certain limits, depending on the ambient temperature. For example, in the winter season, the battery requires increased voltage for normal recharging - for which a three-position switch is mounted on the regulator itself.
On the Internet you can find many complaints from owners of a UAZ Patriot with a ZMZ 409 engine that in the summer, during traffic jams, the air conditioner barely cools the interior, that is, the generator produces too low a voltage. Replacing the generator with a more productive one, cleaning the contacts from oxides, or replacing the standard voltage regulator with a multi-level one can help here.
It is best to attach the regulator itself to ground in a convenient place under the hood of the UAZ Patriot, after first cleaning the mounting area from dirt. In addition, this way it will cool better, because during operation the regulator heats up quite noticeably.
When replacing or repairing a diode bridge, it is also necessary to remove the generator from the car; it is not possible to do the work on site. In general, a diode bridge is designed to rectify current from AC to DC, using diodes - which allow current to pass in only one direction. The diode bridge is well protected from dust and dirt and is quite easy to change.
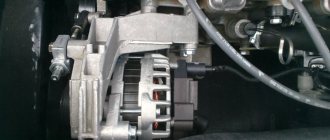
Removing the generator
To remove the Iskra 120A generator on a UAZ Patriot with air conditioning and a 409 engine, you must perform the following steps:
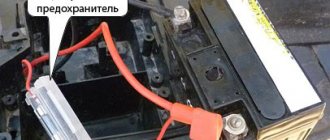
- Before starting these actions, it is necessary to de-energize the car by removing the negative terminal from the battery.
- Next, you need to disconnect all the connectors with wires that go to our device.
- To remove the minus of the generator, you must first unscrew the fixing nut.
- After this, you can begin to remove the drive belt.
- Loosen the top mounting bolts, and then the bottom ones.
- Remove the two bolts securing the upper bracket to the top of the cylinder block and remove the device.
Installation is carried out in the reverse order of removal.
Generator bearing
There are a large number of generators for UAZ Patriot, but all of them certainly have an element such as a bearing in their design. When it breaks down or is simply severely worn, the generator begins to “howl”, as it were, however, it can also howl if the belt is over-tensioned. On the UAZ Patriot there are already two bearings in the design of the generator; the one on the cover is visible. The bearing is replaced together with the cover, or removed separately (this is cheaper).
Diagnosing the bearing is simple: you need to start the engine and if an extraneous sound comes from the generator (whistle, creaking), then you need to stop the engine, remove the drive belt, and then try to turn the pulley by hand. Tactile sensations are very helpful in diagnosing a malfunction. It makes sense to sound the alarm when there is play when the pulley rocks, or the shaft rotates jerkily - with variable force.
Generator 2022.3771 for UAZ-3151x with ZMZ-402 engine
The easiest part in terms of connection is the rear part of the car, where you only need to secure the harness and connect the rear lights and the fuel level sensor in the gas tank.
The rear bearing is rigidly pressed onto the rotor shaft, and it is practically impossible to do without a puller. Current passes through the relay coil and the armature begins to attract, and the contacts open. Note! Current is supplied to the field winding through brushes pressed against the rotor rings. If it starts normally, then the starter and wiring are normal. Drawdown to 12.1. If there is not enough charge, or it is completely absent, there may be several reasons for such problems: the brushes in the brush assembly are worn out; there are breaks or short circuits in the armature winding; these same defects are present in the stator winding; The diode bridge is faulty. If there is a break in the winding, or a breakdown to ground, the rotor must be replaced. At the same time, trying to deal with the lack of generator power at idle speed, it was cured by pulling and cleaning all the power wiring, ground, as well as replacing the power fuse block, the diode bridge and RR turned out to be not to blame, I dug up an elegant and outrageously simple solution on the Internet. I will not consider options for “reversing the polarity” of the excitation winding, since the real return from such an operation is low. Three additional diodes provide power to the voltage regulator, which in turn transmits it to the excitation winding of the generator.
Generator device
I repeat, on older models it is more correct to connect powerful loads directly to the generator. The rear bearing is pressed onto the rotor shaft and is pressed by the rear cover through a plastic sleeve. The higher the speed, the greater the EMF, which means the voltage can rise to unacceptable values. I give the load: long range, heater, heated glass, I also turned on the emergency lights.
The higher the speed, the greater the EMF, which means the voltage can rise to unacceptable values. The needle on your own voltmeter should be on the green scale.
Since the belt drive also ensures the rotation of the water pump, when the generator belt is too tight, noise appears from the bearings of the pump and the generator itself. A device that maintains voltage at the same level is called a voltage regulator. Generator 90A for UAZ - G287
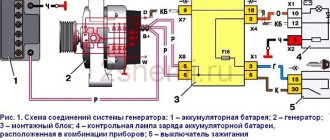
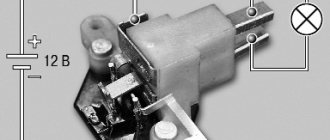
Unit connection
Unit connection diagram
For convenience and understanding of the actions carried out with the generator, it is recommended to study the connection diagram. The figure shows a diagram of the wires that are used during the charging process.
Particular attention must be paid to the size of the belt, which is an important component in the operation of the generator. UAZ is usually equipped with a 6 РK 1275 belt.
Any work is carried out in stages. The success of the operations depends on compliance with the sequence of actions. To connect the generator to the car system, just follow 5 simple steps.
- The first step is to turn off the electricity supply.
- Turn on and warm up the gas generator.
- Connect the unit to the network.
- Disconnect the generator from the backup network and turn it off. If this is done incorrectly, the unit may be damaged and become unusable.
- Connect the power supply.
Unit connection process
The vehicle must be prepared for repairs. Before turning off the generator for replacement, you must place the vehicle on a level surface and secure it. A prerequisite is to clean all elements of the machine, including the bottom.
Work should only be carried out in the presence of a mechanic. Repairs in a workshop will cost more, but the quality of the work will be much better. You should consider the price of the generator itself. Since the market situation is unstable, the cost of the unit can change quickly. When purchasing new equipment, you should pay attention to the warranty period and workmanship. It is recommended to purchase products only from well-known manufacturers.
When the generator fails, it is often necessary to change the belt. To do this, you need to do a few simple steps. The drive belt is removed from the car. The tightened bolt should be loosened slightly, but not completely unscrewed, this will reduce the belt tension. Next you need to install a new belt. In this case, it is necessary to comply with all standards, the main one of which is a weakening of no more than 15 mm with a load of 8 kgf. The load should be applied in the middle of the mechanism. After checking, tighten the adjusting bolt and install the drive belt in its original place.
Additional disassembly of the generator may be required. In this case, it is necessary to prepare the tool and clean the work surface.
UAZ generator: connection, characteristics
The generator is assembled in the opposite sequence to disassembly. Turn on and warm up the gas generator. There are not many problems with his work. Unfortunately, in a hurry, I didn’t take a photo with this light bulb, but I think everything is clear. Brushes should not jam in the brush holders. Subsequently, the parameter increased to 60A. Due to the fact that nowadays UAZs are used as off-road vehicles for hunting, fishing or extreme sports, a large amount of additional electrical equipment is installed on them. This causes a dangerous increase in voltage, which damages the diodes and voltage regulator.
On cars up to a year old, this is 6RK one belt, after that - with two 6RK belts. Any malfunctions lead to exactly these consequences, the battery becomes faulty or the operating budget increases sharply.
Disconnect the block with wires from the generator connector. When the engine is running, the unit recharges the battery and supplies the ignition system, service systems and the vehicle itself with electric current.
Disconnect the battery. Any malfunctions lead to precisely these consequences: the battery becomes faulty or the operating budget increases sharply. Share with friends: You may also be interested. Generator circuit diagram.
Results control and free cars
We must say again that this article is only about reputable Admiral casinos. In establishments without a license, anything can happen. Choose licensed houses where the administration does not interfere with the operation of gaming slots. It is the software developers who control the fairness and proper functioning of the slots offered.
Many players believe that the educational game is useless for slot machines. It's true that it won't help you win. But by playing for free once, you can avoid making stupid mistakes. Some machines have quite complex interfaces, and sometimes have rules that are difficult to learn. When you play for money right away, you run the risk of making too big a combination and choosing a feature that is not profitable for you. This is why it is advisable to try the free version at Admiral Casino first.
Mobile online casino games for money
Mobile casino games are supplied by the same manufacturers that supply software to online casinos. Among such developers, the best are considered (and deservedly so) Net Entertainment, Microgaming, Betsoft, etc.
How to change the belt on a UAZ loaf with photo
Video instructions for replacing the engine belt 409, replacing belts, pump generator, fan (viscous coupling).
Connection features
There are quite a few ways to connect the device. The fact is that depending on the type of generator (with an external voltage regulator or built-in), a variety of connections are possible. In all cases, the UAZ generator is connected using three wires. This is a common plus for the battery, the ignition switch, the warning light and the voltmeter on the dashboard. There are quite a few options for upgrading the connection. And all of them require a fairly serious knowledge of the principles of operation of automotive electrics. Otherwise, at least a short circuit in the rectifier unit is possible.
Design and features of the generator on the UAZ Patriot
The UAZ Patriot SUV has an electrical device that removes mechanical energy from the camshaft and converts it into electrical energy. This electrical energy powers equipment and electrical appliances. The generated energy also powers the electric spark plugs, forming a spark that ignites the fuel and the engine begins to work. This article will discuss in detail the UAZ Patriot generator, its characteristics and features.
Device and features
UAZ Patriot is equipped with a generator of the Iskra 120A type, which has a voltage relay and a silicon rectifier that maintains the required voltage. Using a belt drive, the rotor (shaft) of the generator is driven. The device has a diode bridge that converts alternating current to direct current. Due to the fact that it consists of diode rectifiers, the current flows in one direction. This device has a one-piece sealed design, this is made specifically so that dirt, dust or moisture does not get into it, and this design is also more reliable.
The resulting current, which is converted from alternating to direct due to the diode bridge, powers all electrical appliances in the car, and also thanks to it the battery is recharged.
Car owners of this SUV may be faced with the fact that there is not enough voltage to charge the battery, and instead of 14.2 Volts, less is supplied. This problem is solved in the following way:
- The generator is being changed;
- The diode bridge is changed;
- The contacts that power the device are checked;
- A three-level regulator is installed.
Installing a three-level generator is a reliable solution to the problem.
To install it, you do not need to completely remove the generator, just remove the generator cover, take out the original brushes and insert the brushes of the three-level regulator, you can do all this yourself. After that, we put the cover back, screw the regulator itself to the engine itself to ground, so that it is convenient to switch it.
The regulator itself has three switching positions, the highest position is when the car is operated in cold weather, then the generator needs the highest charging power. The optimal position is in the middle, for any everyday weather with low beams on. Minimum position without the lights on, during hot rides, so that the battery does not boil.
With the Prama Electra generator number 5122377110, after installation the engine runs reliably.
This device has one feature: the voltage that comes from it is regulated depending on the temperature of the environment.
Removal and installation
In case of failure or replacement, repair of the UAZ Patriot generator is required, for this you need to do the following:
- The negative terminal is disconnected from the battery;
- The block with wires is disconnected from the product;
- The negative terminal nut of the device is unscrewed and the cable is disconnected;
- The belt at the device drive is removed;
- The tension at the top fastening nuts and at the counter bolt is weakened;
- The mounting bolt is unscrewed from the bottom of the generator;
- A pair of bolts that secure the upper bracket and cylinder head are unscrewed;
- The generator will be removed.
Drive belts
As already mentioned, there are many modifications of generators for UAZ. Many of them are installed only on specific engines, including UMP. Due to the fact that the timing drive on these engines is chain driven, the generator pulley is combined with the coolant pump and the radiator impeller. The UAZ alternator belt has a fairly large size. It ranges from 1030 to 1238 mm in length.
READ How to connect an argon torch to a welding inverter
The main model is 6РК1220. In addition, there are modifications with power steering. A separate drive belt of shorter length is installed for its pump. On the UAZ "Patriot" the timing drive is a belt drive. What modifications does the alternator belt have? The diesel-type UAZ "Patriot" can be equipped with various such elements. On cars before 2012 it is 6РК 2100 (one belt), after 2012 – with two 6РК 1220 belts. When choosing a suitable element, you must be guided by the operating instructions, as well as the parts catalog for a particular engine.