REPAIRING THE CYLINDER HEAD FOR A VAZ 2109 WITH YOUR OWN HANDS
According to many years of experience of various car enthusiasts, replacing the cylinder head of a VAZ 2109 is most often associated with problems arising from the gasket. But there may be others that can cause the engine to overheat or even seize.
Any driver can repair and modify the cylinder head on a VAZ 2109, but special tools and a little knowledge of the operating principle of this unit are required. Recently, tuning of this unit has become more and more popular, thanks to which the power of the car increases. You can do tuning yourself if you have experience in such work. Working with valves and cylinders requires special knowledge and skills.
The procedure for removing the cylinder head on a VAZ 2108-2109
Of course, first you will need to perform some preparatory procedures, without which it will be impossible to remove the head.
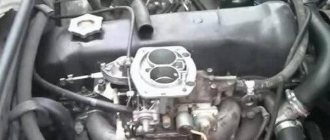
- First you need to remove the air filter housing.
- Then disconnect all fuel hoses and power wires from the carburetor or injector (depending on engine type).
- Completely drain the coolant from the system.
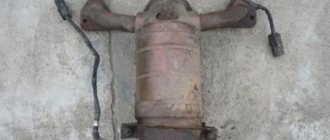
- Disconnect the pants from the exhaust manifold
- Remove the distributor, although this is not a prerequisite - this will be enough to disconnect the high-voltage wires.
- Unscrew and remove the valve cover
In general, you need to clear your head of everything unnecessary so that no unnecessary problems arise during disassembly. Of course, if you decide to completely replace or rebuild it, you'll have to do more work and remove the carburetor and manifolds. Well, if it's just a gasket, you can do it with minimal work.
READ How to Remove Air Conditioning Compressor Opel Astra H
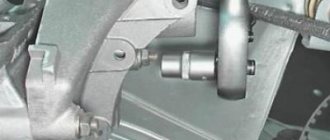
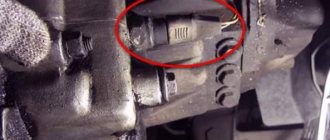
To unscrew the cylinder head on a VAZ 2109-2108, you must use a powerful wrench and hexagon, since the bolts that secure it to the cylinder block are screwed in with great force. A total of 10 bolts need to be unscrewed, shown in the photo below:
As a lever, you can use a nozzle in the form of a regular metal pipe:
Then you can remove the bolts along with the washers as shown in the picture:
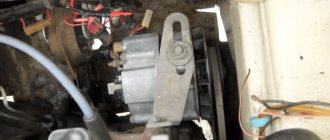
2109 cylinder head up, removing it from the cylinder block:
Then the following picture opens for us:
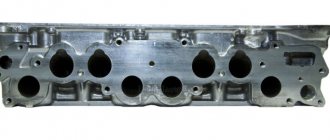
What is a cylinder head
Cylinder head for VAZ 2109 in disassembled condition
The VAZ 2109 cylinder head is a special unit whose main purpose is to close the cylinders. It is attached directly to the block itself using special bolts. The cylinder head is important because it is a direct participant in numerous processes during engine operation. The cylinder heads of power units of cars produced today are distinguished by a rather complex structure and are assembled from a significant number of parts.
Removing the head and replacing the cylinder head gasket
Burnout of the gasket under the cylinder head on VAZ 2109-2108 cars is the most common reason why the head has to be removed from the engine, and accordingly with further repairs, or rather, replacement of the gasket. If this problem is not noticed in time, it can lead to quite sad consequences, since the engine can overheat and even jam. The procedure itself for removing the cylinder head and replacing its gasket is not complicated, but at the same time it requires certain technical skills and a small number of tools, the list of which is given below:
When is it time to change?
- There may be a need to replace or repair the cylinder head if you begin to notice that fuel consumption has increased or the power of the power plant has decreased.
- Incorrect assembly and installation of valves and cylinders can also lead to malfunctions in the cylinder head system.
- If you constantly fill your car with low-quality gasoline, then do not be surprised that over time this system will begin to malfunction and will need to be repaired.
- A crack that appears in a block cannot be eliminated in any other way than by completely replacing this element.
- A symptom indicating problems in the cylinder head may be white smoke coming from the exhaust pipe, this is caused by antifreeze getting into the engine cylinders.
White smoke from the exhaust pipe
- If oil stains appear on the surface of the coolant in the tank, this also indicates that repair of the unit is necessary. This is due to the fact that oil, in one way or another, began to get to places where it should not be.
- Not often, but sometimes exhaust gases begin to break through the gasket. There is no other choice but to dismantle the head and replace the gasket.
- Removing the head may be necessary in the case of VAZ 2109 tuning, modifications, problems with plugs, tightening bolts or boring cylinders.
In what cases does the gasket need to be changed?
Now it’s worth talking about why the cylinder head gasket is changed. Firstly, quite often you can purchase low-quality products. Secondly, sometimes the reason for replacement is a violation of the integrity of the gasket, resulting in antifreeze leakage. Moreover, all the coolant is mixed with oil, as a result of which the engine life is reduced. This happens for various reasons, but the most common is uneven tightening of the fastening bolts.
Often, exhaust gases begin to break into the cooling system. At the same time, antifreeze begins to be thrown out of the radiator. True, there is an expansion tank that allows you to correct this problem. In addition, removing the cylinder head on a VAZ 2109 is necessary in the event of a major engine overhaul. Also, when repairing the valve mechanism, it is necessary to replace the cylinder head gasket. To put it simply, the gasket must be changed every time the cylinder head is removed.
Stages of work
As we have already said, the replacement process is not complicated, but if you decide to take on it for the first time, then it is better to invite someone with experience in this matter to help. You may also need help if you decide to improve the performance of the VAZ 2109 engine by tuning it using channel boring. Replacing the plugs also requires additional assistance. In this case, removing old plugs and correctly installing new ones requires certain skills.
Tools
- hexagon;
- torque wrench;
Torque wrench
- knob;
- screwdriver.
Replacing the valve cover gasket of a VAZ 2108, 2109, 21099 engine
We will replace the valve cover gasket of the engine block head 21083 (2108, 21081) of VAZ 2108, 21081, 21083, 2109, 21091, 21093, 21099 cars.
This work will have to be done, for example, if there is an oil leak under the cover. It is also recommended to do this every time you remove the valve cover during car engine repairs.
Necessary tools, accessories and spare parts
— New valve cover gasket for engine 21083 (21081, 2108)
— Key or head at “10”
Preparatory work
— Remove the car engine air filter housing
— Wipe the engine valve cover with a rag, removing dirt
Replacing the valve cover gasket of a VAZ 2108, 2109, 21099 engine
- Remove the engine valve cover
To do this, use a “10” key to unscrew the nut securing the carburetor throttle valve drive bracket and move it to the side.
Disconnect the two hoses of the crankcase ventilation system from the valve cover fittings. It is necessary to loosen the clamps with a Phillips screwdriver and tighten the hoses, turning them slightly to the right and left.
Fastening the valve cover of the VAZ 2108, 2109, 21099 engine
Using a wrench or socket 10, unscrew the two nuts securing the valve cover. Remove the nuts, large washers underneath them and rubber bushings.
Valve cover fastening parts for engines 2108, 21081, 21083 for VAZ 2108, 2109, 21099 cars
Remove the engine valve cover by lifting it up. If you can’t lift it on the first try (the sealant is stuck), pry it off with a screwdriver and repeat the removal.
Remove the valve cover of engine 21083 (21081, 2108)
- Remove the valve cover gasket
On engines 21083, 21081, 2108 this gasket is installed in a groove along the edge of the cover. Let's pull her out of there. If the first attempt fails (perhaps the gasket and the groove under it were lubricated with sealant), pry it off with a slotted screwdriver.
— Clean the groove for the gasket and the mating surfaces of the block head
For cleaning, you can use gasoline as a solvent, a wire brush and rags. Even if the entire gasket was not lubricated with sealant, it is still applied under its edges according to engine assembly instructions 21083, 21081, 2108. Therefore, we carefully remove its remains from the gasket and the mating surface of the cylinder head in order to later avoid loss of tightness.
Groove for the gasket in the valve cover of the VAZ 2108, 2109, 21099 engine
— Install a new gasket in the groove of the cover
The gasket can be placed in the groove in only one position since it is shaped. Apply a little oil-resistant sealant to the corners of the mating surface of the cylinder head under the valve cover. The layer thickness should be less than 1 mm. The gasket itself does not need to be lubricated.
Places for applying sealant on the mating surface of the engine block head, under the valve cover
— Install the valve cover on the car engine head
During installation, hold the gasket so that it does not fall out, become wrapped or pinched. There have been cases when, due to careless installation, the gasket became jammed on the back of the cover and oil was driven from there directly to the manifold.
We install rubber bushings and washers on the cover mounting studs. Tighten the nuts. The tightening torque is not large, just until it stops.
Notes and additions
— Along with replacing the valve cover gasket, it makes sense to clean the oil separator installed in it, since it can cause an increase in the pressure of crankcase gases in the engine, accompanied by squeezing out engine oil under the oil seals and seals (in particular, on the valve cover gasket).
Source
Process
Before proceeding with the removal and repair of the VAZ 2109 cylinder head, it is necessary to carry out some preparatory work in accordance with the order.
Removal
- First of all, remove the air purifier housing.
- Disconnect the hoses and wires from the carburetor or injector.
- Next, you need to disconnect the pants from the manifold.
- We remove the distributor.
- Unscrew the valve cover.
- Remove the carburetor and manifolds.
- To unscrew the head bolts on a VAZ 2109, you will most likely need a wrench and a hexagon, because the bolts are tightened with decent force.
Pipe as a lever
- Remove the head mounting bolts and washers.
We take out the bolts
- We remove the VAZ 2109 cylinder head from the power plant unit.
- We remove the gasket.
Gasket that has expired and needs to be replaced
- Also, if necessary, we carry out repairs or modifications to engine block components.
Tuning
Qualified adjustment, modification and tuning of the VAZ 2109 head will help to fully reveal the capabilities of your power unit. You've probably heard a lot about this, read or even watched videos on the Internet. Typically, when tuning, the channels are bored and smoothed, thereby reducing the turbulence that reduces power. The valves are changed to larger ones and ground into the seats. Tuning may also involve replacing standard valve guides with bronze ones.
Valve lapping
Lapping control is carried out as follows:
- the assembled head lies on its side;
- liquid is poured into the collector holes (ordinary water can be used).
If the liquid does not flow through the valves, this means that the work was done efficiently and the valves were ground in correctly. After all faults have been eliminated, you can begin installing the head.
Installation
- Begin assembly by installing a new gasket. Attention! The holes in the gasket must coincide with the guides, which are located at the corners of the block.
New gasket
- You need to install the head carefully, do not move the gasket from its place at this moment.
- We insert the bolts into their places and begin tightening with a torque wrench.
Tightening with a torque wrench
- Next, we install the dismantled equipment, injector or carburetor, in reverse order. Fresh coolant is added. Wires and hoses are connected.
Attention! This operation requires some knowledge and skills. Therefore, before performing it, you should know that the bolts need to be tightened according to a certain pattern and with a certain force. It would be useful to read additional material on this topic and watch video instructions.
Also check
- When removing the valve train, place a block of wood under the valve plate.
- Enter the valve. Remove it from the cylinder head guide sleeve.
- Unscrew the 2 nuts securing the inlet pipe using the “13” wrench.
- Remove the gasket and pipe.
Reassemble and install the cylinder head in reverse order.
Recommendations :
- The valve is connected to the engine oil. The same applies to guide bushings.
- Before installation, remove dirt, oil, and old gasket remnants from the surface of the cylinder block.
- Replacing the cylinder head gasket is then followed by two special central bushings.
- Install the mounting screws, the diagram below shows 4 ways to tighten them.
- The first tightening torque is 20 nm (2 kgf);
- The other is with a torque of 69.4–85.7 Nm (7.1–8.7 kgf);
- The third is with 90° coverage;
- Fourth , turn the screws 90°.
READ Heater fuse for VAZ 2107 is on