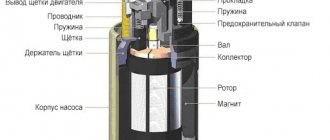
The principle of operation of the fuel pump
Schematic diagram of a fuel pump
The main function of a fuel pump is to transfer fuel from the tank to the engine. In injection engines, the fuel pump is connected to the fuel rail, and in carburetor engines - to the carburetor. In this case, it is necessary not only to pump fuel, but also to provide a certain pressure. Too high pressure leads to increased richness of the mixture and high fuel consumption. Too low pressure leads to a lean mixture and a drop in power. Both the first and second cases negatively affect the engine life. That is, the fact that the gas pump pumps fuel does not indicate its full serviceability.
Gasoline supply problems - common symptoms
Malfunctions of the fuel supply system are conventionally divided into 2 categories:
In the first case, the engine does not start and does not engage the starter during rotation, that is, it does not show signs of life. In such a situation, it is always easier to determine the cause of the breakdown.
When insufficient fuel enters the cylinders, the following symptoms appear:
The cause of the above phenomena may be a malfunction of the fuel pump or other elements of the system, and the primary symptoms are almost the same. To carry out an accurate diagnosis, you need to understand how the car's power system works.
Electrical circuit of the fuel pump in the injection VAZ 2110
The VAZ 2110 car with an injector system, even several years after the model was discontinued, is still very popular among car enthusiasts. The main reasons for this are the ease of maintenance and reliability of the machine. However, there are also negative aspects: the VAZ 2110 with an injector system very often has problems with electronics. The electrical circuit is quite complex for a Russian car and has 75 elements.
However, the weakest point is the fuel pump.
Its electrical circuit looks like this:
- The main one is the fuel pump relay; all the necessary fuses are installed there.
- Next, the electrical circuit diverges from one of the fuses to the diagnostic block and the device itself.
- From the next to the main relay and injectors.
- Next, the electrical circuit goes to the electronic control unit.
- Also, the fuel pump electrical circuit goes to the battery.
Thus, it turns out that the VAZ 2110 with an injector, the pump contains 4 electrical parts. In case of failures related to the operation of the pump, they should be checked first.
Principle of operation
To make it easier for you to understand the electrical circuit of the 2110 with the injector system, let’s consider its structure and the principle of operation itself.
So, the following take part in the process:
- Electronic control unit.
- Relay for turning on the fuel unit.
- Fuses that protect the electrical circuit of the device from overloads.
Wiring diagram VAZ 2110
In practice, the fuel unit starts working when the key is turned and ignites one turn. Before starting the engine, listen - at this moment you can hear the device starting to work and pumping gasoline.
Malfunctions in the electrical circuit
Now that you know the structure of the unit, let's figure out what to do if it malfunctions. So, if it shows no signs of life, the problem is most likely in burnt-out electrical parts.
You need to look for them not in the electrical unit, but directly in the interior of the VAZ 2110 with an injector system. The process looks like this:
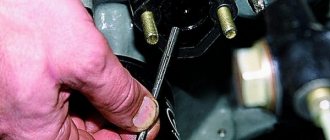
- First of all, find the fuses. They are located near the front console on the right passenger side. There you need to find the plastic shield and dismantle it. (The part is secured with three self-tapping screws).
- There you will find three fuses and the same number of relays.
- The relay located in the center feeds the fuel. To the left of it is the one that protects the injectors. It must be removed and checked for functionality. If the part is oxidized, clean the contacts. If there is no visible damage, the fuse may have blown and will need to be replaced.
If the above methods do not help, you should not interfere more actively with the electrical system of a VAZ 2110 with an injector system. Unknowingly you can only damage the car.
The fuel unit will stop working and then more expensive repairs will be required. Therefore, it is better to entrust the process to professionals.
How to check the operation of the fuel pump?
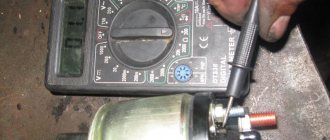
First, you should check the fuse. To do this, check the instructions for its location. Next, you should check the voltage at the pump. Before doing this, be sure to check if everything is in order with the battery. The voltage at the fuel pump terminal must be checked using a multimeter or tester. The instruction manual always indicates the required voltage.
Using a tester, check the voltage supply to the fuse. Often this is where the electrical circuit breaks.
If the search does not yield results, then the voltage should be checked on the contacts themselves. All contacts must be in place and connected to ground. A broken contact or its oxidation leads to failure of the fuel pump system. If no broken contacts are detected, but the voltage drops by more than 1 volt, then the problem is in the wiring or oxidation of the contacts. There should be no short circuit in the wiring.
If, after checking the voltage, contacts and fuse, you do not find any problems, then the problem lies in the fuel pump itself. In this case, the fuel pump will most likely require replacement. In practice, it most often turns out that replacement is a last resort. First, you should try to restore and test the fuel pump again.
Before you check the fuel pump, you need to remember that, as mentioned above, pressure is the most important characteristic of the fuel pump, so it is worth measuring its level.
How to check the pressure in the fuel rail?
You will need a pressure gauge that measures pressure in the range from 7 to 10 atmospheres. If you choose a pressure gauge with a large margin, you risk getting less accurate measurement results. Specialized stores sell a kit for measuring pressure, but you can also design your own device.
If you want to assemble the device yourself, you will also need a hose with an internal diameter of 9 millimeters. You will also need plumbing tow, with which you can seal the connection between the pressure gauge and the tube. All parts are connected and tightened using a clamp. You will also need a car spool. Next you need to perform a series of actions:
Checking the pressure in the fuel rail should occur in four operating modes of the power unit:
Fuel rail pressure measurement results
The results may vary slightly for different car models, but in general they should be as follows:
Fuel rail pressure fluctuates slightly during preparation. When you press the pedal, it suddenly takes on a value of 3 atmospheres; when you release the pedal, it drops to 2.5 atmospheres. When fuel enters the fuel system, turn off the ignition and begin observing the pressure gauge. The pressure in this case should drop to 0.7 bar and remain unchanged.
If the pressure drops to zero, there may be a problem with the fuel pressure regulator. In this case, the regulator must be replaced immediately. The cause could also be the fuel pump check valve.
It is necessary to observe the behavior of the pressure gauge even at 3,000 engine speeds. A drop in pressure will indicate a faulty fuel pump. Sometimes the fuel pump cannot reach the required pressure for a long time. In this case, the problem lies in a clogged fuel filter, which needs to be replaced, or in a dirty fuel pump mesh (read more about where the fuel filter is located).
If the above methods do not reveal a malfunction of the fuel pump, you will have to diagnose other units (DPZD, IAC, mass air flow sensor, compression in the engine and some other indicators and parts).
Checking the pump characteristics
As you can see, the main reasons for a non-working fuel pump are valves, filters, hoses, and diaphragms. At the outlet we get insufficient pressure. How to measure this pressure, and within what limits is the norm? Firstly, you need to know exactly the nameplate value of the output pressure to the carburetor of your car at idle speed. Approximately the indicator should vary from 0.2 to 0.35 atm.
Measurements are carried out using a pressure gauge with a division value of 1.6 atmospheres. If the pressure is not much less than normal, replacing individual parts may help solve the problem. But if there is a significant deviation, the VAZ 2109 fuel pump will most likely need to be replaced. Timely maintenance and rational use help to avoid this.
In addition to the pressure indicator, in order to repair a part, you should know the characteristics of the pump itself. If the linear parameters have changed, the tightness and stability of the entire mechanism may be impaired.
The rod must have a length of 82.4 mm and protrude above the gasket by no less than 0.8 mm and no more than 1.3 mm. The thickness of the closest gasket is 0.3 mm. The stroke of the rod should be in the range from 2.5 to 2.8 mm.
Features of the injection power system
The tasks of fuel pumps in carburetor and injection engines are somewhat different. If for a carburetor engine it is important to simply supply gasoline to the carburetor, then for an injection system this is not enough. The fuel pump must not only pump fuel from the tank to the ramp, but also create a certain pressure, without which the engine simply will not start.
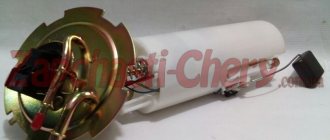
Access to the fuel pump in injection cars is also complicated by the fact that in cars of recent years of production it is mounted together with a fuel receiver and a coarse filter directly in the gas tank. This complicates the diagnosis, repair and maintenance of the entire fuel module, but simplifies the design of the pump, since the gasoline itself lubricates and cools it. But this is precisely what often leads to unit breakdowns.
Using a measuring container
If you don’t have a pressure gauge at hand, the performance of the gas pump can be assessed by the amount of gasoline pumped per unit of time. Also, having unscrewed the spool, we connect a hose to the ramp, which we lower into a container for measurement. On Kalina and Grant, the pump should pump 35 liters per hour, or 0.5 liters. in a minute. VAZ 2110 pumps 1 liter. in a minute. If the result is unsatisfactory, all filters must be checked. Under the bottom, next to the gas tank, there is a high-pressure filter. It is recommended to change it every 20 - 40 thousand km. mileage But it may turn out that replacement will be required much earlier - it all depends on the quality of gasoline. Another filter that needs to be checked is located in the tank on the fuel module.
In order to get it, you need:
- Raise the rear seat and unscrew the hatch
- Remove the fuel pump power wires
- Start the engine (to release the gasoline under pressure in the system)
- Remove the ground terminal from the battery
Only after the above steps can you finally disconnect the fuel module and remove it from the tank.
An important detail: if before the repair you refueled the car to capacity, you need to spend 10 - 15 liters before unscrewing the fuel module. Since the gasoline level will be higher, it will still spill onto the ground.
It is best to replace the intake mesh with a new one every 50 thousand km. vehicle mileage.
These are the main points regarding fuel equipment that every owner needs to pay attention to during maintenance of their car.
Purpose and principle of operation of the fuel pump
The fuel pump is designed to pump fuel from one point to another. In a car, the role of the first point is played by a fuel reservoir - the tank, and the second - by the engine, where the pumping takes place. This process occurs at a certain pressure, which is maintained by the pump reducer, which is a very important point.
Fuel pumps are divided into 2 types according to the type of drive: electric and mechanical. Inside the first there is an electric motor with a mini-pump, which operates from the mains and uninterruptedly pumps fuel into the engine. The second type is becoming increasingly rare, as it is installed on carburetor cars, and operates due to the reciprocating movement of the lever.
Cause of malfunction
A common malfunction of a mechanical gasoline pump is mechanical wear of its rod. When the fuel pump rod becomes shorter than necessary, it stops supplying fuel to the carburetor in the required quantity.
Worn suction valve or brass valve and sealing gasket on a mechanical fuel pump can be another cause of fuel pump malfunction.
The main sudden malfunction of the fuel pump on a car with an injection engine is low-quality fuel. Of course, the question of cleaning lies behind the fuel filter, but the fact is that the fuel injection system of a modern car is made in such a way that the finest filter element is installed after the fuel pump, and in front of it there is only a coarse filter mesh (by the way, it has to be changed or clean more often to avoid fuel pump malfunction). The strainer cannot ensure proper cleaning of the fuel available at our gas stations, and the accumulated dirt on the filter forces the pump to strain to overcome resistance. Which subsequently leads to a reduction in the service life of the part.
For car owners abroad, the fuel pump is more likely to fail due to wear on the manifold assembly in the electric motor than due to a dirty filter. But for our drivers, a typical cause of failure is severe wear and tear of the working surfaces of the fuel pump. This problem may be indicated by loud noise during operation, which will be accompanied by a drop in pressure in the fuel system and increased fuel consumption.
Also, if the issue concerns a malfunction of the electric fuel pump, worn wiring or oxidized terminals can play an insidious role. And when checking the pump shows that everything should work without failures, the electrical wiring will be baffled over and over again.
From all of the above, you can draw several conclusions for yourself:
Here are the basic recommendations to extend the service life and protect yourself from fuel pump malfunctions.
Checking the pump on the injection "nine"
The VAZ 2109 with an injection engine has an electric pump. It is powered by receiving voltage (12 V) from the battery. Its location is directly in the Lada gas tank. The mission of the electric pump is to deliver gasoline to the fuel rail under high pressure. Next, the fuel from the ramp enters the nozzles, which inject it into the combustion chamber.
If the injector on a VAZ 2109 does not pump the fuel pump, check the following elements:
- fuel pump relay VAZ 2109;
- fuse;
- voltage to the pump;
- wires from the mounting block to the pump;
- pressure in the fuel rail.
A working fuel pump should start working when the engine starts. The sound of its operation should be heard under the rear seat. We begin the first stage of verification.
Possible situations and your actions
We take a voltage indicator and check the serviceability of the relay and fuse, which are located in the mounting block.
If the electrical circuit connection diagram is in order, you need to check the voltage supply directly to the pump. To do this, we dismantle the rear seat of the Lada 2109 car. Under it there is the top cover of the pump and the connected wire connector from the mounting block, and the fuel line hose is also supplied here. We disconnect the contacts and unscrew the bolts on the cover.
Now you have direct access to the pump. We remove the fuel pump from the gas tank.
We measure the voltage at the fuel pump using a multimeter (tester) or a 12-volt light bulb. If the device shows that voltage is supplied to the VAZ 2109 fuel pump, the problem is not electrical. This means that the fuel system should be checked. Well, if there is no voltage, you don’t have to worry about the pump malfunctioning. Just check the integrity of the wire leading from the mounting block to the pump for damage.
On a fuel-injected "nine", the fuel level in the gas tank should be maintained at least 10 liters. This is done to ensure that the fuel pump does not suck in air under any circumstances. We check the serviceability of the pump by measuring the pressure in the fuel rail.
We connect the device to a special hole in the ramp. If the voltage is normal and the pressure gauge shows no pressure, the problem may be in the fuel filter. We check its integrity and throughput. If the filter is working properly, we check the fuel line leading from the gas tank to the ramp.
If all these parts are in good working order, we conclude that the fuel pump itself has failed. Having replaced the pump with a new one, we connect it and try to start the car. If the car starts, the problem really was in the pump. If the engine fails to start, the fuel system should be checked more carefully.
In the absence of a pressure gauge, the performance of the gasoline pump is checked by the amount of gasoline pumped per unit of time.
This check can be performed by connecting a hose to the ramp and lowering it into a container. We wait and let the fuel flow into the container for one minute. Then we check the volume of fuel in the container. It should be from 0.5 to 1 liter.
When should you check your fuel pump?
It is necessary to check all potentially faulty components one by one, and the fuel pump first.
Problems when starting and running the engine are not always associated with the fuel pump. Sometimes the signs of a fuel pump breakdown are the same as those of a faulty fuel pressure regulator , injectors or jets, spark plugs and high-voltage wiring. Even experienced specialists who know by heart all the signs of a “dying” pump cannot unambiguously determine the type and cause of the breakdown the first time, and it is necessary to check all potentially faulty components one by one. In this case, the fuel pump is usually checked first. In this case, there are two types of malfunction - the fuel pump does not work at all or does not produce the required pressure. In the first case, the malfunction can be recognized by ear, since it should start when the ignition is turned on. In the second case, you need to know how to check the pressure of the fuel pump. Here you need to use a special pressure gauge. We list the main symptoms of a fuel pump malfunction:
Using a pressure gauge
If in the event of a malfunction with the electrical supply of the fuel pump, everything is clear - either it works or not, then mechanical wear is more difficult to determine. There are several techniques for this.
The fuel pump may be faulty for two reasons - mechanical and electrical.
You can estimate the fuel pressure if you unscrew the fuel rail plug and drain gasoline from the spool. There should be a powerful jet. Next, we unscrew the spool itself and connect a pressure gauge, preferably a fuel one, but you can also use one that measures the air pressure in the tires. Turn on the ignition and see how much the pump has pumped. It must be at least 280 kPa, on some models 380 - 400 kPa. To make it clearer, this is 3.8 - 4 kgf/cm2.
Design and operation of fuel supply
The system that provides the engine with the required amount of gasoline operates according to the following algorithm:
Reference. In various car models, 2 schemes are used for installing the RTD and laying the return pipeline - in the engine compartment or directly in the gas tank. In the first case, the standard fuel pressure in the system is 2.7...3.0 Bar, in the second - 3.8...4 Bar.
A common mistake made by ignorant car enthusiasts: if the combustible mixture does not enter the cylinders, then the fuel pump is definitely not working. Knowing the design of the fuel supply, we can assume other problems:
To accurately determine the source of the problem, you need to check the operation of the electric fuel pump and other elements. It is not necessary to go to a service station - diagnostic work can be carried out in your own garage.
Causes of fuel pump failure
If the cause of the malfunction lies in the fuel pump, this does not always mean that it is faulty. The malfunction may be in one of its units and parts. For example, a fuse may blow. It is located in the fuse box, and its location may be different for each car. You can find out its location from the operating instructions. Most often it is located under the hood or to the left of the steering wheel on the driver's side.
The fuel pump, like any other device, wears out over time and fails. If there is a suspicion that the fuel pump is faulty, it should be diagnosed immediately.
Diagnostics with pressure check
A more accurate diagnosis can be made by again measuring the pressure in the system. Each of the indicators below, or more precisely, a deviation from the norm, can signal certain problems with the pump:
In the case when, when the ignition is turned on, fuel does not enter the system and the pressure gauge is silent, most likely the problem is in the electronics - a relay or fuse. If the pump does not develop the required pressure during transient conditions, the coarse filter mesh is clogged. If the fuel return hose is pinched and the pressure is below 0.4 kPa, the pump is worn out.
Fuel pump malfunctions of VAZ 2108, 2109, 21099, 2105, 2107 cars
On VAZ 2108, 2109, 21099, 2105, 2107 cars, fuel pump failure is a fairly common occurrence.
If it is faulty, the fuel supply to the carburetor is completely or partially stopped, which in some cases entails the impossibility of starting both a cold and a hot engine, the engine may also start and stall, and unstable idling is possible.
If you suspect that the fuel pump is faulty, you should first check it. Let's look at this procedure using the example of their two most common types - DAAZ and Pekar. They can be installed on both rear-wheel drive and front-wheel drive vehicles.
Checking the fuel pump of VAZ cars
1. Check the serviceability and operation of the entire fuel supply system.
Remove the fuel hose from the fuel pump discharge fitting. Press the manual fuel pump lever several times. If the fuel pump is working properly, a strong stream of fuel should spray out of it. If this does not happen, we carry out a second check.
Checking the serviceability of the fuel system of VAZ cars
2. Check the serviceability of the intake valve.
Remove the fuel hose from the fuel pump suction fitting (we now have both fuel hoses removed from both fittings). We plug it with our finger and press the manual fuel pump lever several times. You should feel a vacuum on your finger (it should be sucked into the fitting). If there is a vacuum, the fuel pump is working; if not, look for a fault in the fuel lines or gas tank.
Vacuum at the suction and discharge fittings of the fuel pump - checking the serviceability of the inlet and outlet valves of the fuel pump
3. Check the tightness of the exhaust valve.
Place your finger on the hole in the pressure fitting (which is connected to the carburetor) and press the manual pumping lever several times. A stream of air should come out of the fitting hole, which can be easily felt by your finger.
Checking the outlet valve of the DAAZ fuel pump for VAZ 2108, 2109, 21099 cars
Causes of malfunction of fuel pumps of VAZ 2108, 2109, 21099, 2105, 2107 cars
— The fuel pump strainer is clogged or deformed
Remove the fuel pump cover. We take out the filter. We clean it, wash it in gasoline, blow it with compressed air. We replace the deformed one.
Fuel purification strainer for DAAZ fuel pump
On the Pekar fuel pump and similar ones, you can remove the filter by unscrewing the suction fitting from the cap. The cover itself does not need to be removed.
— Diaphragms are faulty (thin, cracked)
A sign of their malfunction may be the presence of fuel leaks on the fuel pump body and the smell of gasoline from the engine oil in the engine. The fuel pump stops pumping. Although not necessary. Remove the upper part of the fuel pump housing. We take out the diaphragm assembly. Unscrew the nut on the rod and remove the diaphragms (there are three of them). We replace them with new ones. We assemble everything in reverse order.
Diaphragms (membranes) of the DAAZ fuel pump
There is only one diaphragm on the Pekar fuel pump. You can remove it by removing the cover. To disconnect, turn it 90 degrees.
— Fuel pump valves are faulty
Remove the fuel pump cover and strainer. Visually inspect the cavity of the fuel pump and the inlet valve. Remove the upper part of the housing and inspect the exhaust valve. If the valves are not hermetically pressed into the body, are not pressed tightly, or have lost mobility, the fuel pump must be replaced. If there is a blockage, remove it and blow everything out with compressed air.
Inlet and outlet valves of the fuel pump for VAZ 2108, 2109, 21099 cars
On the Pekar gasoline pump, both valves are located in the cover and their condition can be assessed by removing it from its body.
— The fuel pump pusher is worn out or deformed
Remove the fuel pump from the studs by unscrewing the two nuts securing it. We leave the gaskets, heat-insulating spacer and pusher in the engine. Rotate the crankshaft so that the pusher is recessed as much as possible. We measure the protrusion of the pusher above the plane of the upper gasket. It should be 0.8 - 1.3 mm. If the protrusion does not fit into this size, then we try to adjust it by selecting shims of either thinner or thicker thickness, or by changing the pusher.
Measuring the amount of protrusion of the fuel pump pusher
We only change the outer thick gasket, which is between the thermal insulating spacer and the fuel pump. Fuel pump repair kits are sold with ready-made gaskets, but you can also cut them yourself from a sheet of paronite.
Gaskets under the fuel pump
— The spring under the diaphragms broke
We remove the upper part of the fuel pump housing, the rod with diaphragms and inspect the spring. We replace the broken one.
Fuel pump return spring
Source
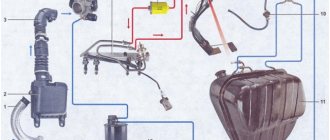
The structure of the VAZ 2114 fuel system
The fuel system of the VAZ 2114 car consists of:
- fuel module;
- fuel lines;
- injector ramps;
- fuel injectors;
- fuel filter;
- fuel control systems.
The fuel module consists of the following elements:
- fuel pump;
- fuel level sensor;
- float;
- primary fuel filter meshes.
The filter mesh located on the suction pipe of the fuel pump has a fine-mesh structure, which allows it to trap contaminant particles that can damage the structural elements of the part. A fine fuel filter housing is additionally built into the gas pipeline system.
As a rule, the design of a fine fuel filter uses a material capable of retaining on its surface the smallest particles suspended in the fuel. The injector of a modern VAZ car is a fairly reliable device that provides control over the systems responsible for ensuring the smooth operation of the car engine.
The injector of a VAZ 2114 car, in addition to elements of the fuel supply system, includes an electronic control unit, as well as a large number of sensors that transmit information about the state of the car to the control unit and allow you to control the operation of the power plant.
VAZ 2109 injector fuel pump does not pump reasons
If the starter of your car turns normally, but the car does not start, the first thing you need to do is check that the fuel pump is turned on. On domestic cars, its operation can be heard from the passenger compartment; when the ignition is turned on, a characteristic buzzing sound comes from under the rear seat or trunk. If the fuel pump does not work, you need to check the integrity of the fuses and the activation of the main relay of the engine management system and the fuel pump relay. On the VAZ-2107, VAZ-2108, VAZ-2109 and their modifications, relays and fuses are located on the shelf under the glove compartment or under it. On VAZ-2110 and similar ones, you should look in the heater console on the passenger side by unscrewing the fastening screws and removing the side cover. On GAZ cars they are located under the hood on the front wall of the cabin, closer to the passenger side.
The fuel pump relay does not turn on.
If the fuel pump does not work, then first of all you need to check the attraction of the main relay and the fuel pump relay. If the main relay does not click, then it is necessary to check its switching circuit and its serviceability. How to do this is described in the article the main relay does not turn on,
In the case when the main relay turns on, but the fuel pump relay does not, it is necessary to check the power at pins 85 and 86. When using a test lamp, its current consumption should not exceed 0.25A, otherwise damage to the controller may occur. If the control lamp does not light up on any terminal, then the relay is not receiving power. This may be caused by a blown fuse or a broken power cord.
In the case when the lamp burns brightly on one terminal, and at half-glow on the second, and the relay may be activated, you should remove the relay from the socket and connect terminals 85 and 86 with a test lamp. When the ignition is turned on, the control lamp should light up and go out after approximately 20 - 30 seconds. If the lamp lights up and there is poor contact in the connection between the block and the fuel pump relay. If the lamp does not light up, there may be a break in the wire connecting the relay to the controller or the controller itself may be faulty.
The fuel pump does not work, the relay turns on.
Checking relay power.
In the case when the fuel pump relay turns on when the ignition is turned on, but the pump itself does not work, you need to check the power at terminal 87 of the fuel pump relay. To do this, touch terminal 87 of the relay socket with the output of the control lamp connected to the vehicle ground, and the lamp should light up. If the lamp does not light, it means the fuse has blown or there is a break in the wire.
If there is power at terminal 87, you should remove the relay from the socket, and instead place a jumper between pins 87 and 30. In this case, if the pump and connecting wires are working properly, the pump should start working and if this happens, the relay should be changed. If the pump does not start working, then, without removing the jumper, you need to touch the power wire on the fuel pump with a test lamp connected to the vehicle ground.
Checking the fuel pump power circuit.
If a submersible pump is installed on the car as part of the fuel module, you need to remove the connecting connector and touch one of the thick wires. When you touch one of them, the indicator lamp should light up. If the lamp does not light up on any of the wires, then it is necessary to eliminate the break in the wire from the fuel pump relay to the module connector or the pump itself, if the pump is of a remote type. One of the reasons for the break may be the anti-theft blocking of an installed non-standard alarm system.
In the case when the test lamp lights up on one of the thick wires of the connector or one of the terminals of the remote pump, you need to connect these terminals with a test lamp to each other. In this case, the control lamp should light up. If the lamp does not light, it is necessary to eliminate a break or poor contact in the wire connecting the pump to the vehicle ground.
If, when checking the wires and relay for turning on the fuel pump, no malfunction is detected, the electric motor of the fuel pump or its connection to the module connector is faulty. It is not difficult to find the cause by removing the fuel pump module from the tank. If there is poor contact with the connector, melting of the plugs will be visible. If melting is not noticed, then to check the pump itself, you can connect it to the battery. It should be taken into account that operating a submersible pump without liquid will damage the pump. A faulty pump should be replaced.
If the engine does not pull (loss of power, dips or jerks)
| What to do if the dynamics of the car have decreased significantly, and it is no longer possible to overtake the car so quickly? There can be many reasons for this engine problem, and the main ones are listed in this table. |
| Possible cause of malfunction | Checking (diagnosis) of a malfunction | Troubleshooting methods |
| The control impulse from the DPKV arrives at the wrong time due to delamination of the crankshaft damper (the gear has moved relative to the pulley) | Visual inspection of the damper. | Replace damper. |
| The gap between the spark plug electrodes is not normal | Check the gaps with a feeler gauge. | Set the required gap by bending the side electrode, or replace the spark plugs (see which spark plugs to choose). |
| Heavy carbon deposits on spark plugs | Visual inspection. | Clean the spark plugs. Identify and eliminate the cause of soot formation. If necessary, replace the spark plugs (see which spark plugs to choose). |
| Non-functional spark plugs. | Candles are checked on a special stand. | Replace the spark plugs (see which spark plugs to choose). |
| There is no gasoline in the fuel tank | The fuel level indicator shows an empty tank. Determine the presence of gasoline by removing the fuel pump. | Pour gasoline into the tank. |
| The fuel filter is clogged, the water in the engine power system is frozen, the fuel line is pinched, or the fuel pump is faulty | The starter cranks the crankshaft, but there is no smell of gasoline coming from the exhaust pipe. (Carburetor) There is no gasoline in the float chamber of the carburetor - when you press the gas pedal there is no jet of fuel from the accelerator pump nozzle. (Injector) The presence of gasoline (under pressure) in the fuel rail can be checked by briefly pressing the spool of the fitting at the end of the rail (see about pressure in the fuel system). | Warm up the car and blow out the power system (with a tire pump). Replace the fuel pump, hoses and tubes. |
| The fuel pump does not create the required pressure in the fuel system | Check the pressure at the outlet of the fuel pump (see about pressure in the fuel system). Check the fuel pump filter. | Clean the fuel pump filter. Replace the fuel filter (see which filter to choose) and the fuel pump, which does not provide the required pressure. |
| Poor contact in the fuel pump power circuit or its relay is faulty | Checked with an ohmmeter. Check the "mass". | Clean the contacts, crimp the terminals, replace the relay (see mounting block) and wires. |
| Faulty injectors or their circuits | Check the injector windings and their circuits with an ohmmeter for open circuits and short circuits. The ECU is diagnosed at a service station. | Replace the faulty ECU (see ECU interchangeability). Clean the injectors or replace them with new ones (see which injectors to choose). Ensure contact in electrical circuits. |
| Inoperative crankshaft position sensor (CPS) or its circuit | The “Check engine” lamp is on. Check the DPKV circuit, the absence of damage to the sensor itself and the gap between it and the crankshaft damper ring gear (1±0.2 mm). Sensor resistance is 500–700 Ohms. | Restore contact in electrical circuits, replace the faulty sensor. |
| Inoperative coolant temperature sensor (DTOZH). | The “Check engine” lamp is on. If there is a break in the DTOZH or its circuit, the electric fan of the cooling system runs continuously. Check the DTOZH. | Restore contact in the electrical circuits, replace the faulty sensor. |
| The throttle position sensor (TPS) or its circuit is faulty | The “Check engine” lamp is on. If there is a break in the circuit or sensor, the engine speed does not drop below 1500. | Clean the throttle assembly, restore contact in the electrical circuits, replace the faulty sensor. |
| Inoperative mass air flow sensor (MAF) | Check the mass air flow sensor, or replace the sensor with a known good one. | Clean the mass air flow sensor, replace if necessary (see which mass air flow sensor to choose). |
| Inoperative knock sensor | If the wire is broken, the “Check engine” lamp lights up. There is no detonation in any mode. Loss of engine power. | Restore contact in electrical circuits, replace the faulty sensor. |
| Inoperative oxygen sensor or circuit | "Check engine" light is on. The integrity of the heating coil is checked with an ohmmeter, the output voltage is checked with a voltmeter (the voltmeter should be connected without breaking the circuit, for example, by piercing the wires with thin needles). | Repair the oxygen sensor. Restore the wiring, clean the air leak hole. Replace the oxygen sensor. |
| Leakage of the exhaust system (area up to the oxygen sensor) | Visual inspection at medium engine speed. | Replace the exhaust manifold gasket, tighten the seals (see replacing the exhaust manifold). |
| The engine control unit (ECU) and its circuits are faulty | Check the 12V voltage at the ECU. Replace the unit with a known good one. | Replace the ECU (see ECU interchangeability), wiring. |
| Inoperative fuel pressure regulator (FPR) | Check the pressure in the fuel rail. | Replace the regulator (see which regulator to choose). |
| The clearances in the valve drive are not adjusted (8-valve engines) | Check with a set of feeler gauges. | Adjust valve clearances. |
| Loose or broken valve springs (8-valve engines) | Inspection, measurement of the length of springs in a free state and under load. | Replace weak or broken springs. |
| Wear of camshaft cams/shafts | Visual inspection. | Replace camshaft. |
| The valve timing is off | Check the alignment of the marks on the crankshaft and camshaft. | Establish the correct relative position of the shafts (according to the marks). |
| Low compression in the cylinders (wear or damage to valves, seats, wear, sticking or breakage of piston rings) | Check compression in cylinders. | Replace rings and pistons. Cylinder repair. |
| (Carburetor) Engine is not warmed up | According to the temperature indicator | Warm up the engine at medium speed to operating temperature. |
| (Carburetor) Insufficient fuel level in the carburetor float chamber | — | Adjust the fuel level. |
| (Carburetor) The carburetor trigger or drive is faulty or not adjusted. | — | Adjust the starter or replace it. |
| (Carburetor) Excessive fuel level in carburetor float chamber | There is a strong smell of gasoline from the exhaust pipe; a cold engine starts better than a hot one. Remove the top cover of the carburetor and check the integrity of the floats, their ease of movement and the absence of touching the walls of the float chamber. To check the tightness of the needle valve, turn the carburetor cover with the floats up and pump up gasoline using the fuel pump lever. Gasoline leakage from under the needle or valve base is unacceptable. | Replace the needle valve. Adjust the fuel level in the float chamber. |
| (Carburetor) Over-rich mixture due to gasoline leaking into the engine crankcase through a torn fuel pump diaphragm | The oil on the dipstick smells like gasoline. The low oil pressure light comes on at idle speed. | Replace the fuel pump or diaphragm. Change the oil if it contains a lot of gasoline. |
| (Carburetor) The carburetor jets and passages are clogged. The jets and solenoid valve are not tightly wrapped | Inspect and blow out the channels and jets. | Wash with gasoline or acetone and blow out the jets. If they are heavily soiled, clean them with a fishing line or a soft wood needle. |
| Incomplete opening of the throttle valve/flaps | Inspection with the engine stopped. | Adjust the throttle valve drive. |
| (Carburetor) Accelerator pump or nozzle not working, carburetor fuel passages clogged | Check the pump supply and make sure there is no leakage of gasoline from under the diaphragm. Make sure that the accelerator pump lever moves freely. | Replace damaged parts, tighten threaded connections, and blow out valves. |
| (Carburetor) Incorrect ignition timing | — | Adjust the ignition timing. |
| (Carburetor) Wear, damage to the contact carbon in the ignition distributor cap. The coal spring has weakened | Visual inspection. | Replace the distributor cap or the angle with the spring. |
| (Carburetor) The resistor in the ignition distributor rotor has burned out | Checked with an ohmmeter (1 kOhm). | Replace resistor or rotor. |
| (Carburetor) Commutator faulty | Testing is carried out by installing a known-good switch. | Replace the switch. |
| (Carburetor) Weakening or breakage of the springs of the weights of the centrifugal automatic ignition distributor, the damper rings of the weights are lost, the weights are stuck | Visually and at a special stand. | Replace the ignition distributor. |
| (Carburetor) Fuzzy operation of the vacuum ignition timing regulator; when the vacuum is removed, the plate does not return to its original position, there is large play in the bearing | Determined by visual inspection. The characteristics of the vacuum regulator are measured on a special stand. | Eliminate the jam, replace the faulty vacuum regulator or ignition distributor. |
| (Carburetor) The fuel pump does not create the required pressure in the system | — | Replace the fuel pump or its diaphragms. |