DDM VAZ 2109
Not every motorist knows what kind of device the oil pressure sensor (abbreviated as ODM) is and where it is located; acquaintance with it, as a rule, occurs when the engine oil pressure indicator on the front panel lights up red and does not go out for a long time. Only then does every conscious car owner have a lot of unpleasant premonitions and unsolvable questions. Those who are not concerned about the cost of repairs immediately turn to a service station; some prefer to determine the cause of the malfunction themselves. Replacing the oil pressure sensor in a VAZ 2109 is a simple procedure and only takes a couple of minutes; this article will be useful for those who prefer to save money and figure it out themselves.
Examination
The sensor has an elastic membrane that deforms when oil pressure is applied to it. The amount of membrane deflection is reported to the rheostat when the resistance changes. This change is recorded by the car's electronic system and reported to the pressure gauge. That, in turn, shows the corresponding data on the dashboard.
Brand new device
Today, VAZ 2109 owners use two main ways to check the functionality of the oil pressure sensor. Decide for yourself which one to use.
| Verification method | Your actions |
| First way |
|
| Second way | The second method is more detailed and allows you to find out not only whether everything is okay with the sensor. You need:
|
If after the second test method the LED goes out and the sensor turns out to be working, but the lamp on the dashboard still continues to light, the reason is different. She needs to be found. This is done like this:
- Gradually increase engine speed to reach 2000 units per minute;
- If the engine temperature is about 80 degrees and the pressure gauge shows less than 2 bar, the crankshaft bearing is worn out and requires replacement;
- If the pressure gauge shows more than 2 bar, the problem is not with the bearing. Let's move on;
- Increase the speed of the power unit. If the pressure gauge shows above 7 bar, the bypass valve has broken down. Its replacement is carried out together with the replacement of the oil pump cover.
Even if, after all the above operations, the light on the dashboard stubbornly refuses to go out, you will have to contact a car service center so that you can have a comprehensive diagnosis of the car’s condition.
Location
Sensor check
In practice, there are several proven methods for checking the oil pressure sensor.
The first method involves removing the device and idling the starter. If, when the device for mechanical engine starting is turned on, oil begins to pour out from the location of the sensor, then the device is in working order.
You need to carefully inspect the sensor, then treat it with a degreasing liquid, for example, gasoline. Then the sensor must be returned to its original place. If in this case the light on the dashboard remains on, it means that the sensor has failed and needs to be replaced.
The second verification method is more thorough. In this case, you should do the following:
- Check oil level.
- Start the engine and warm up the car.
- Unscrew the sensor and connect it to the device for testing. An adapter from a pressure gauge should be installed in place of the sensor.
- Ensure that the pressure gauge is in contact with the ground (ground).
- Connect the positive LED from the battery to the sensor contact.
- Start the engine, press the gas pedal.
- If the pressure gauge shows a value of 1.2-1.6 bar, the LED will turn off; if not, then the sensor has failed.
Often a light comes on on the dashboard of the VAZ-2109, indicating problems with oil volume
The third method involves checking the oil pressure sensor using the crankshaft. To do this, you need to crank the crankshaft without turning on the engine. At the same time, pour oil into the place where the sensor was screwed in. If the light is on, it means the device is unusable and needs to be replaced.
Device
The device in question may schematically look like this:
Main elements of the oil pressure sensor:
- frame;
- wire connection location;
- thread for fixation in the cylinder block;
- diaphragm;
- a spring that resists deformation of the diaphragm;
- positive and negative contacts.
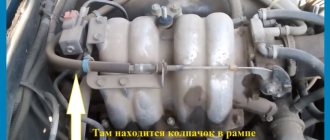
The oil pressure sensor is located on the left side on the back of the engine. This makes it fairly easy to diagnose or replace.
How to install a new one?
Installing a new oil level sensor is carried out in the reverse order:
- The first step is to put the new device in place. This must be done with the same care, since now there is a new part in the packages. I had no problems purchasing it, since the local car market turned out to have everything for the Russian automobile industry.
- The second step is fastening. The sensor must be screwed with the same bolt.
- Then you need to connect the wires that were removed to the sensor. You also need to be careful with wires.
- The last step is to return the negative terminal back to the battery. This way we will return the current to the circuit.
Replacing the sensor
The process of removing and installing the sensor is quite accessible to any car enthusiast. Before screwing in the new sensor, you need to check the markings.
Experts recommend installing a new sensor with the same markings as the old one.
- First you need to disconnect the wire with the protective cover from the sensor.
- Using a wrench, unscrew the bolt and remove the sensor.
- Install the new sensor in place.
- After this, you should tighten it until it stops with a wrench.
Finally, you should start and stop the engine several times to check its operation and absence of malfunctions.
Does the VAZ-2109 oil pressure sensor work?
To determine if it is correct, you need to check the engine oil level. To do this, you need to open the hood and pull out the dipstick. In order to check more accurately, you need to do this:
- drive into a pit and remove the protection;
- get close to the sensor;
- turn on the ignition;
- disconnect the power cord;
- Use a voltmeter to measure the voltage between the block and ground. It should show 12 volts.
If there is no voltage, then there may be a problem in the contact or a broken wire.
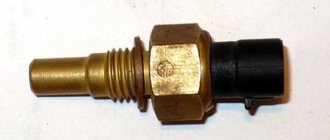
Oil pressure sensor VAZ 2109
Every modern car, including the VAZ 2109, is equipped with a variety of sensors and devices, each of which plays its own important role. One such device is the oil pressure sensor. It is located in the engine compartment. Regardless of which engine the car is equipped with, an injector or a carburetor, the sensor is located on top of the cylinder block on the intake manifold side.
A protective cover is installed on top of the oil pressure sensor. To ensure stable operation of the engine and the entire machine as a whole, it is necessary to ensure that the sensor is working properly. An oil filter is located next to the sensor.
Device DDM VAZ2109
Main components of DDM:
- Frame
- Measuring membrane
- Transmission mechanism
Operating principle of DDM
Depending on the pressure in the oil system, the membrane bends and at the same time closes or opens electrical contacts. Before checking the pressure sensor (controller), be sure to check that the engine oil level and oil filter are in order. Visually check for any lubricant leaks on the motor housing. If everything is in order, we can move on to checking the controller himself.
How to check the controller
Everything related to any pressure is usually checked with a pressure gauge:
- Screw the pressure gauge into place of the sensor and start the engine
- At the same time, at idle, the pressure gauge should show a pressure of 0.65 kilograms of force per square centimeter or more
- This allows us to conclude that the lubricant pressure is OK, but the pressure sensor is faulty, and therefore you need to urgently replace the oil pressure sensor on the VAZ 2109
When you don’t have a pressure gauge at hand, and suddenly the oil pressure light comes on in the middle of the highway, you can check the lubricant pressure controller in another way:
- To do this, you need to unscrew the sensor itself and turn the engine with the starter without starting it
- If, when the starter rotates (see Repairing the VAZ 2109 starter yourself - an opportunity to save a lot of money) oil flows from the sensor socket, it also becomes clear that the controller is faulty and needs to be replaced
After removal, carefully inspect it; if no visible defects are found, rinse it:
- It is recommended to wash with diesel fuel or gasoline
- You can inject liquids using a syringe or a powerful pump
- Now we put the controller in place and check whether the control lamp lights up
- If after washing the pressure lamp is on, buy a new controller
- Repairing the old one is pointless - it won’t work properly anyway
- And a new one costs a penny
Another way (more accurate) to check the functionality of the sensor and at the same time the bypass valve:
- We check the lubricant level in the engine with a dipstick indicator
- Top up to level if necessary
- Check again whether the lamp on the dashboard lights up (if not, then the problem is solved, if not, proceed to the next step)
- Warm up the engine to its operating temperature and turn it off
- Screw the pressure gauge into the sensor socket
- We connect the ground from the pressure gauge to the ground of the car
- We connect the control LED with the “+” terminal of the Battery and the sensor contact (additional wiring is required)
- We start the engine and press the gas so that the speed rises smoothly
- When the pressure gauge reads 1.2-1.6 bar, the LED must go out
- If this does not happen, it means that the VAZ 2109 oil pressure sensor is faulty; replacement will solve this problem
However, if the diode goes out, then the controller is working, and the lamp is on for a completely different reason, to determine it, do the following:
- We bring the engine speed to 2000
- If at its temperature the pressure gauge pressure shows less than two bar, this means the crankshaft bearings are worn out.
- If there are two bars or more, check further
- Raise the engine speed
- If the pressure suddenly jumps to seven bar, it means the bypass valve is not working
- It should be replaced with the oil pump cover together
Replacement of DDM
To perform some of the above-described checks, as well as replace the sensor with your own hands, if it is found to be unsuitable, our further instructions have been written:
- A key set to “21”, the only necessary tool, and of course a replaceable lubricant pressure controller
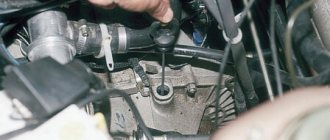
- Disconnect the wire from the sensor
Principle of operation
While the engine is running, the oil pump drives oil with the necessary force along a special oil line into which the sensor is built. Having high pressure, the oil presses on the diaphragm in the sensor and displaces it, thereby opening the contacts. At the same time, the indicator on the dashboard goes out.
If there is insufficient pressure, the sensor diaphragm does not move and, accordingly, the contacts do not open. In this case, the indicator lights up and the driver learns about the malfunction.
The VAZ 2109 oil pressure sensor has an electronic emergency operating principle. That is, it is more like an oil level sensor. It transmits information only about sufficient or insufficient level and pressure, without conveying their exact value. This feature distinguishes it from another type of sensor - a mechanical one, which is capable of indicating the degree of pressure created in the engine crankcase.
Sensor design
The oil pressure sensor in modern cars is quite simple. It includes an outer casing, a hard elastic membrane and a transfer device. The principle of interaction of the device is the interaction of oil with an elastic partition.
The membrane reacts to the force with which the oil presses on it. The oscillations of the partition, the opening and closing of the contacts of the electrical circuit, communicate with the rheostat. Changes in rheostat indicators are displayed on the dashboard of the VAZ-2109.
Replacement
So, the check showed that the oil pressure sensor is the culprit and it needs to be replaced. There is definitely no need to go to a car repair shop for this. The work is easy to do with your own hands, even for beginners in the field of self-repair of a car. Especially when it comes to repairing a car like the VAZ 2109.
Dismantling works
To replace the sensor, you first need to remove it and install a new one in place of the old device. Step by step it looks like this.
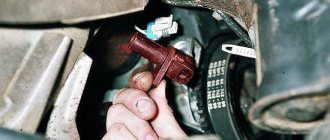
- Disconnect the negative terminal from the battery. All work related to the electrical component of the car must begin with this step.
- Disconnect the power cable with protective cover from the sensor by hand. They are connected together, so there is no point in trying to disconnect the cover separately.
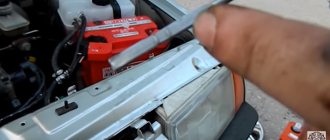
- Using a wrench, you must completely unscrew the oil pressure sensor from its mounting socket.
- Finally remove the regulator from its seat.
- Arm yourself with a new sensor, insert it into the appropriate socket. An aluminum O-ring should be included with the new device. Check this at time of purchase. You should not use the sealant from the old DDM.
- Screw the sensor until it stops using a wrench. A mistake many people make is to simply screw in the device by hand. This contact may not be sufficient, causing the oil pressure regulator to provide incorrect information.
- Return the wire combined with the protective cover of the sensor wiring to its place.
- Connect the negative terminal back to the battery and check to see if the light on the instrument panel stops lighting.
When changing the oil pressure sensor, it is strongly recommended to choose a new device whose markings correspond to the previously used regulator. Otherwise, it may simply not work or provide incorrect information.
Obviously, there is absolutely nothing complicated about replacing DDM. The greatest concern is the fact that replacing the DDM will not produce results and the check engine light will stubbornly continue to light on the dashboard. It cannot be ignored. It's better to contact a service station. Comprehensive diagnostics is an excellent solution, which at the same time will allow you to determine the presence of other faults in the systems of your VAZ 2109.
Loading …
How to replace the device yourself
If all the tests carried out clearly indicate that the VAZ 2109 oil pressure sensor is faulty, it must be replaced. It’s worth saying right away that the entire replacement process is incredibly simple and you shouldn’t call a car service center for this, since this is at least inappropriate.
All manipulations consist of removing the faulty device and installing a new one, and the step-by-step procedure looks like this:
- The first step is to disconnect the negative terminal from the battery, since all repair work begins with this step.
- Next, you need to disconnect the power cord that is connected to the protective cover of the sensor. They should be disconnected together.
- After this, use a wrench to unscrew the pressure sensor until it is completely disconnected from its place.
- Get the regulator.
- If a new sensor has already been purchased and is ready for installation, you need to insert it into the socket in which the old sensor was and, making sure that there is a special aluminum ring, get ready to install it.
- You only need to tighten the sensor with a wrench, but do not overdo it. There are 2 mistakes that motorists make. The first is to install the device manually. The second is that when tightening with a key, too much zeal is applied. You should tighten it all the way, but as soon as you feel that the key is not turning, you need to stop.
- After this, the structure of the power cord and protective cover must be returned to its place.
- And connect the negative terminal back to the battery. If the light on the panel stops lighting, it means the work was completed successfully.
We recommend reading a useful article on how you can fill the box of a VAZ 2109 with your own hands.
What is extremely important, when replacing, you should choose an exclusively new sensor and only with the markings that will correspond to the previous regulator. Otherwise, there is no guarantee that the replaced device will fully display reliable information on the panel.
It will be useful: Tires for the Lada Granta: how to choose tires, sizes and features of products from different manufacturers, pressure control and types of sensors, tips for replacing tires
Connection diagrams
Different models of oil level sensor may also differ in the connection diagram to a specific circuit. One example of their use is vehicle wiring, so the connection diagram will look like this:
Rice. 7. Connection diagram for thermal oil level sensor
As you can see in Figure 7 above, the condition is assessed immediately through the temperature and oil level sensor. Next, the signal is transmitted to the blocks for estimating both parameters. If it complies with the established algorithm, the function is transmitted to the electronic unit and is sent to the instrument panel in the form of a PWM signal. In modern cars, information about the condition of the engine is displayed on the display in front of the driver.
Rice. 8. General diagram for connecting an aircraft sensor
Unlike automobile ones, aviation models of the oil level sensor are tied to a more complex scheme, which is due to the issue of passenger safety during flight. As you can see in Figure 8, information from the measuring device enters the analyzer block, where the information is compared with the established operating parameters of the motor. If a critical threshold is exceeded, the data from the analyzer is transmitted to the correction unit, which, through a feedback system, checks the information received from the sensor. When a decrease by an unacceptable value is confirmed, the executive unit receives a command to add liquid to the tank.
What to do if the sensor lights up
If the oil pressure light on the dashboard comes on and does not go away for a long time, it can be assumed that there are problems with the engine. Sometimes this may be due to a loose wire.
There are several main reasons why the warning light on your dashboard comes on. These include:
- installation of a low-quality oil filter. Low quality filters are not able to retain oil after the car is stopped. The solution is to replace the oil filter;
- insufficient oil level. In this case, it is necessary to add oil to the required level and find the cause of the leak;
- oil pump damage. It is recommended to have this problem repaired at a service station.
Thus, the oil pressure sensor on the VAZ-2109, despite its small size, plays a rather important role in ensuring the correct and stable operation of the car.
It requires constant monitoring and, if minimal signs of malfunction appear, mandatory replacement. This is the only way to extend the life of the engine of any car and avoid unnecessary financial costs that may arise due to sensor malfunctions.
What you need to know about DDM?
If the indicator lights up indicating low oil pressure, this does not always mean that there is not enough lubrication in the system. It is possible that the DDM is faulty. In order to find the true cause, you need to know what the device is and how it can be checked.
Purpose and location
The DDM consists of a housing, a membrane and a transmitting device. The membrane becomes deformed when oil begins to press on it. Deformation of the membrane is reflected in the rheostat, whose resistance changes. The ECU records changes and reflects them thanks to an indicator on the instrument panel. The controller on the VAZ 2109 is located under the oil filter on the cylinder head on the side where the carburetor is located.
DDM location
Diagnostic features
Before diagnosing the DDM, you should check the oil level in the system using a special dipstick and an oil filter.
One of the simplest diagnostic methods is to check the presence of pressure in the lubrication system. To do this, you need to unscrew the DDM from the socket and manually turn the crankshaft several times. If grease flows or splashes out of the socket and the control light remains on, this means that the pressure is OK and the cause of the malfunction is in the controller.
The process of unscrewing the DDM from the socket
Next, you should visually inspect the device itself. If no mechanical damage is detected, it must be cleaned with gasoline and screwed into the old place. If after this the light does not go out, this indicates that the device is broken and must be replaced.
For the second method of checking, a pressure gauge is required. The controller is removed from the warm engine and screwed into the pressure gauge; the adapter from the pressure gauge is screwed into its place. The control LED is connected to the positive terminal of the battery and the controller contacts. Then the running engine should gradually pick up speed until the pressure gauge shows a value of 1.2-1.6 bar. If the controller is working properly, the LED will go out. Otherwise the device is faulty.
Replacement instructions
To replace the DDM with a VAZ 2109, you will only need one key for “21” and a new device (the author of the video is Avto_Remont).
The procedure consists of a sequence of steps:
- You need to start work by disconnecting the negative terminal of the battery.
- Next, you need to disconnect the supply wire from the lubricant pressure controller.
- Then use the key to “21” to unscrew the faulty device.
- For sealing, aluminum foil in the shape of a ring is placed in the sensor socket.
- Now the new device is screwed in.
- All that remains is to connect the wire, and this completes the procedure.
Thus, there is nothing complicated in replacing; more time is spent on diagnostics.
This is interesting: Steering wheel for Toyota Corolla 150: replacement with a multifunction steering wheel
Replacing the oil level sensor on a VAZ 2108, VAZ 2109, VAZ 21099
Where is the oil level sensor located and what does it look like? • It is located at the bottom of the car engine, and is inserted into the hole that is present in the engine crankcase, between the oil filter and the oil pan, to make it easier for you to disassemble, look at the photo below which will show the location of the sensor:
• Now let's talk about what this sensor looks like. The most standard such sensor looks like a curved tube, at the tip of which there is a float, and with the other tip it is attached to the car engine crankcase, so that you can visually understand what it looks like, see the photo below:
When do you need to change the oil level sensor? Like any other sensor, it must be replaced when it fails, here is a sign by which you can determine that the sensor has failed:
• The first and last most important sign that the sensor has become unusable is the oil level indicator lighting up on the instrument cluster, provided that the oil level in your car’s engine is normal. (For information on how to check the oil level in a car, see the article: “Changing the Oil”)
Note! This lamp will not always light up when the sensor fails; sometimes it may happen that it will not light up at all, regardless of the oil level, so you cannot partially rely on this sensor alone, and it is best to check the oil level using a dipstick. more reliable and calmer!
On a note
Don’t fall into a premature panic, draw too hasty conclusions, drive to a service station and pay money for faults that might not even exist! An emergency pressure lamp indicates a drop in lubricant pressure in the system, insufficient oil level in the engine, but it is not yet a fact that this is the reason. A fairly common malfunction is when the oil pressure sensor itself has failed and, accordingly, simply “lies.” If you don't notice this right away and don't understand the reason, you can really waste a lot of money or cause yourself more serious problems.