Replacing the drive gear oil seal of the Chevrolet Niva front axle gearbox
Tools:
- Straight box spanner 13 mm
- Driver for 3/4 socket bit
- Knob attachment 24 mm
- Large flat screwdriver
- Small hammer
- Torque wrench
- Mounting blade
- Flange puller
Parts and consumables:
- Front axle gearbox drive gear oil seal
- Sealant
- Litol-24 lubricant
- Self-locking nut for flange fastening
Notes:
Replace the oil seal with a new one if an oil leak is detected. We carry out the work on an inspection ditch or overpass.
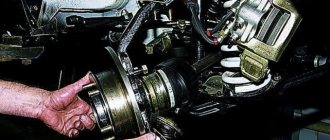
1. We disconnect the driveshaft from the front axle gearbox, as described here. We remove the housings of the internal hinges of the front wheel drives from engagement with the gears of the front axle reducer drives, as described here.
2. Using a dynamometer, we turn the drive gear clockwise by the flange mounting nut and determine the moment of its resistance to rotation (similar to the operations given in the article “Replacing the drive gear oil seal of the Chevrolet Niva rear axle gearbox”).
Note:
For clarity, we show the work with the clips and pads securing the lower cover of the gearbox housing to the anti-roll bar bar removed.
3. Insert bolts into two adjacent holes in the flange and screw nuts onto them.
4. Using a 24mm socket, unscrew the flange nut, holding it from turning with a mounting blade.
5. We remove the washer.
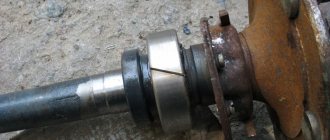
6. Remove the flange from the drive gear shank.
7. If there is difficulty, press it with a puller.
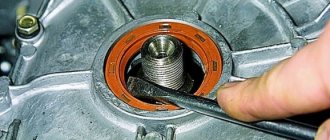
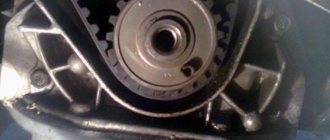
8. Use a screwdriver to pry off the seal.
9. Let's take it out.
10. After applying Litol-24 lubricant to the working surface of the new oil seal, we press it in with a suitable piece of pipe. We install the flange and tighten the flange mounting nut, checking the moment of resistance to rotation of the drive gear (similar to the operations given in the article “Replacing the drive gear oil seal of the Chevrolet Niva rear axle gearbox”).
11. We carry out further assembly in reverse order.
The article is missing:
- Photo of the instrument
- Photos of parts and consumables
- High-quality photos of repairs
Source: Chevrolet niva device, operation, maintenance and repair.
Publishing house "Behind the Wheel".
How to replace the oil seal on a Chevrolet Niva
Most Chevrolet Niva owners, due to the simplicity of the design, can independently repair their car. This is especially true for a large number of consumables, including those in the chassis of the car. One of the parts that requires periodic replacement is the Chevrolet Niva front axle oil seal. The need for repairs arises when an oil leak occurs from the axle housing and a knocking noise occurs. The main cause of grease leakage is due to a clogged breather.
It is necessary to monitor at what stage the oil leak occurs. If, after intensive movement, while the gearbox is still hot, and after it cools down, it stops, then it is necessary to clean the breather. It may be clogged with dirt, which prevents the heated air from escaping outside. Therefore, it is possible to squeeze out fluid from the gearbox, even if the gaskets are in good condition.
If the breather is working properly, but oil still comes out, then most likely you will need to replace the cover gaskets and o-rings. Typically, the design of the front axle provides for the presence of three rings: an oil seal located on the axis of the drive gear, axle bearings and oil seals for the right and left drive - the axle shaft hinge.
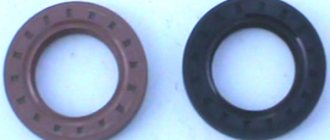
It is important to remember that the left and right oil seals are designed for different directions of rotation, so when purchasing, you should carefully check the package. The direction can be determined by the marked arrow. If installed incorrectly, there may be increased oil leakage outward due to the location of the oil scraper notches.
Front axle structure.
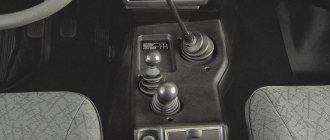
To replace the oil seal, it is not necessary to dismantle the front axle. When replacing oil seals yourself, it is not recommended to use a lift; it is better to carry out the work on an inspection pit or overpass. The rear wheels must be secured with supports. The gearbox and transfer case levers must be adjusted to the neutral position. When using a jack, it is better to hang the front part on special supports.
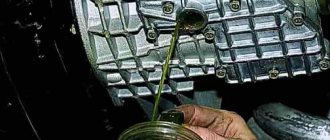
First, the replacement area is cleaned of drips and traces of technical fluids. After this, the crankcase plug is unscrewed and the oil in the gearbox is drained into a special container. After this, the plug is installed in place.
To carry out the replacement, you need to stock up on the following set of tools:
- set of socket wrenches and hexagons
- hammer and pry bar
- Screwdriver Set
- puller with two or three legs
- pipe sections equal to the diameter of the seals
- Liquid for removing oil residues, such as kerosene
- metal mesh
- rags
Article, size and manufacturers of reinforced cuffs
Initially, oil seals with an outer diameter of 68 and an inner diameter of 35.8 mm were installed in the transfer case. two types:
- 2121-2302052 — one oil seal. A similar part is installed on the drive gear of the front axle;
- 2101-2402052-01 — two oil seals in the Republic of Kazakhstan. The same part is located on the drive gear side of the rear axle.
Replacing the oil seal on the drive gear drive, main steps
- it is necessary to unscrew the bolts holding the flange, remove the cardan shaft from the gearbox
- disconnect the CV joint housing from the drive.
- you need to connect a dynamometer and determine at what moment the rotation begins. To do this, rotate the flange mount until the gears begin to move.
- bolts are screwed into adjacent holes
- Between the bolts there is a pry bar, with the help of which the flange is kept from turning.
- After this, you can remove the flange along with the washer using a universal puller.
- The oil seal from the bridge gear is replaced with a new original spare part. The sealing ring must be lubricated with grease or lithol.
- After this, it is necessary to press the ring using a pipe of a suitable diameter.
- The flange fits onto the spline connection.
- The cardan shaft is installed in place.
Replacement: step-by-step instructions
First, unscrew the bolts securing the cardan to the flange and hang the cardan shaft under the bottom. After this, you need to measure the torque of the shank using a dynamometer or canter. To do this, wind a cord around the flange, tie its end to the measuring device and pull. Memorize or write down the force at which the shank begins to rotate. This will come in handy when assembling the unit.
- Hold the flange with a wrench and unscrew the fastening nut.
- Remove the shank from the splines using a puller.
- Use pliers and a screwdriver to remove the cuff.
- Install a new oil seal and moisten its seal with transmission oil.
- Carefully slide the shank onto the slots and insert into place.
- Tighten the nut with a torque wrench with a force of 12-15 kgf.
- Check the rotation force of the shank with a cord and a canter (dynamometer).
- If necessary, tighten the fastening nut.
- Screw the cardan to the flange.
The work takes no more than two hours. After replacing the oil seal, especially if it had to be changed due to oil leakage, it is necessary to check the transmission level in the gearbox.
Replacing the Chevrolet Niva front axle oil seal.
- First you need to remove one or two drives, depending on where replacement is needed.
- After this you need to remove the locking ring
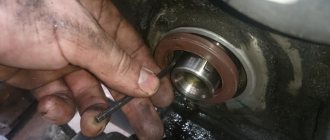
- Using a hammer, knock out the bearing. If you have problems with removal, you can use WD-40 lubricant
- The cover is removed, the old oil seal is knocked out using a pipe.
- The installation site is lubricated and a new O-ring is installed.
- the unit is reassembled.
Replacing the Niva differential lock warning lamp switch
3 differentials, one in the front and rear axle gearbox, one in the transfer case. This is a mechanical device that redistributes torque to all axes depending on the force on these axes.
If the front axle is in a snowdrift and the rear axle is on ice, the two wheels that are on the ice will rotate and you will not be able to get out of the snowdrift. In order to increase cross-country ability, the differential in the transfer case is blocked, the rotational moment is transmitted to the rear and front axles in a ratio of 50 to 50. As a result, the vehicle's cross-country ability increases significantly.
It cannot be used constantly. Because the torque on the axles is the same, when turning or slipping, they will rotate differently. The gearbox wires wear out. It is used when overcoming difficult sections of the road and must be turned on in advance. The differentials on the front and rear axles are not locked, only the inter-axle differential is locked. And the control lamp lights up on the instrument panel.
When I turn on the differential lock, sometimes it doesn't engage right away. You don’t need to pull with all your might, you need to start the car and drive back in first gear and a little forward about 2 meters and after that it should turn on. Because the differential locking clutch fits onto the front axle drive sprocket and at this moment the teeth on the gear may not match, so it does not turn on.
When is replacement required?
The replacement operation is carried out when oil leaks from the axle housing. A clogged breather causes lubricant to squeeze out.
If grease drips immediately after stopping (while the gearbox is hot), and then the flow stops, the breather must be cleaned. When it is clogged with dirt, the heated air is not released outside during movement. Under pressure, the working fluid of the gearbox will be squeezed out even through serviceable gaskets and seals.
If the breather is in order, but oil still leaks, you will have to replace damaged cover gaskets or O-rings. of them in the front axle, and they are different:
The oil seal that seals the drive gear axis is located at the rear of the axle, at the location where the front propeller shaft is attached. Oil seals for the right and left drive (inner axle joint).
Attention! The left and right oil seals are not the same; they have a direction of rotation. This must be taken into account when purchasing.
Important! The left and right oil seals are not the same; they have a direction of rotation. This must be taken into account when purchasing.
The direction of rotation of the wheel when moving forward is indicated by the arrow. If the oil is installed incorrectly, the removable notches will drive the lubricant out. To understand the device, here is the layout of the front axle:
The oil seal is replaced without removing the front axle. If the work is carried out independently, and it is not possible to use a lift, the car is placed on an inspection hole or overpass . We tighten the hand brake and install supports under the rear wheels. Gearbox and transfer case levers in the “Neutral” position. The front part is lifted with a jack and fixed on stops.
Attention! It is dangerous to work under a car that is only supported by a jack!
We clean the bridge from dirt and leaks of technical fluids. Unscrew the crankcase drain plug and drain the oil from the gearbox. Screw the plug into place.
Replacing the oil seal sealing the drive gear axis
- We disconnect the driveshaft from the gearbox by unscrewing the bolts securing it to the flange.
- We separate the internal CV joint housings from the drive gears .
- Using a dynamometer, we determine the moment at which the drive gear begins to rotate freely. To do this, turn the flange mounting nut until the gear begins to rotate. We fix the magnitude of the moment.
- We tighten the bolts into two adjacent flange holes (for fixation).
- We insert a mounting spade between the bolts, hold the flange from turning and unscrew the fastening nut.
- Remove the washer and flange from the spline joint. If it is impossible to remove it by hand, use a universal puller.
- Remove the oil seal using a flat-head screwdriver.
- We rinse and thoroughly wipe the replacement area.
- Replacement of the front axle drive gear oil seal is carried out only with original Chevrolet spare parts. To facilitate pressing, any grease (litol, grease) is applied to the sealing ring.
- We press the ring using a pipe of a suitable diameter.
- We place the flange on the spline connection and put on the washer.
- Tighten the nut to the torque determined when unscrewing.
- We fasten the cardan shaft.
Tools and preparation for replacement
To change a part, you need to install the machine on a lift or inspection pit. To replace it yourself you will need:
- new oil seal;
- standard set of wrenches;
- hammer;
- pliers;
- a powerful wrench (without it it will not be possible to unscrew and tighten the shank nut);
- large flat screwdriver;
- puller;
- universal or key for fixing the shank flange;
- durable elastic cord;
- canter scale or dynamometer;
- torque wrench.
Instead of a wrench, you can use a homemade device in the form of two M8 bolts and a wrench to hold the shank flange. With their help, it will be possible to reliably keep the part from turning. To do this you need to: insert the bolts into the holes in the flange and place the knob between them.
It is important to use this improvised device correctly. The driver must be inserted in front of the flange, not behind it.
Otherwise, you may accidentally knock down the mud deflector.
The process of replacing the front axle oil seal on a Chevrolet Niva
- We remove both drives (or the one that requires replacement).
- Remove the retaining ring and spring washer.
- Using a hammer, carefully knock down the bearing. If removal is difficult, treat with a penetrating lubricant, such as WD-40.
- Remove the bearing cap with the old seal.
- Using a pipe, knock the oil seal out of the cover.
- Lubricate the new spare part with any grease and press the o-ring into the cover.
- We assemble the unit.
We fill the gearbox with oil in accordance with the maintenance instructions, do a test drive , and check for oil leaks. As you can see, replacing the front axle oil seal is not an operation requiring a visit to a car service center. However, you should be careful and attentive when working. For convenience, when dismantling the unit, take photographs of each action. This will help avoid assembly errors.
Crankshaft oil seal Niva nqk sf (Taiwan)
crankshaft cuffs NQK SF (Taiwan)
Manufacturer NQK shan feng, trademark NQK SF. Taiwanese manufacturer. The point is this: at the beginning of 2000, all rubber production, as it was very harmful, was located in China, Taiwan, and Malaysia. 90% of cuffs, hoses, chemicals are done there. You just need to know the factory where cuffs for company items are made. NQK SF products can often be seen in boxes from famous spare parts manufacturers, but for completely different money.
Advice on how to remove drives without dismantling the Niva front gearbox
- To dismantle the drives, it is necessary to unscrew the fastenings of the gearbox (in this case, some kind of stop is placed under it).
- Then the steering knuckles are released. To do this, simply unscrew the shock absorber mount from the lower arm and the lower ball joint.
- To relieve the load, jack up the lower suspension arm.
- Unscrew the hub nut and remove the centering ring. The nut is too tight, so we use a wrench extension (for example, a metal pipe).
- We move the steering knuckle to the side. The drive can then move freely.
- To ensure free movement of the drive during removal, the gearbox must be moved back slightly.
- We remove the drive, being careful not to damage the anthers. If the boot is torn, it must be replaced.
- The procedure for removing the right and left CV joint drives is similar.
Before dismantling, it is necessary to mechanically remove dirt from the inside of the steering knuckles and from the bottom of the car above the work area. The best option is to wash the bottom with a high-pressure apparatus one day before carrying out work.
Front axle shank oil seal Niva Chevrolet
Tools:
- Straight box spanner 13 mm
- Driver for 3/4 socket bit
- Knob attachment 24 mm
- Large flat screwdriver
- Small hammer
- Torque wrench
- Mounting blade
- Flange puller
Parts and consumables:
- Front axle gearbox drive gear oil seal
- Sealant
- Litol-24 lubricant
- Self-locking nut for flange fastening
Notes:
Replace the oil seal with a new one if an oil leak is detected. We carry out the work on an inspection ditch or overpass.
1. We disconnect the driveshaft from the front axle gearbox, as described here. We remove the housings of the internal hinges of the front wheel drives from engagement with the gears of the front axle reducer drives, as described here.
2. Using a dynamometer, we turn the drive gear clockwise by the flange mounting nut and determine the moment of its resistance to rotation (similar to the operations given in the article “Replacing the drive gear oil seal of the Chevrolet Niva rear axle gearbox”).
Note:
For clarity, we show the work with the clips and pads securing the lower cover of the gearbox housing to the anti-roll bar bar removed.
3. Insert bolts into two adjacent holes in the flange and screw nuts onto them.
4. Using a 24mm socket, unscrew the flange nut, holding it from turning with a mounting blade.
5. We remove the washer.
6. Remove the flange from the drive gear shank.
7. If there is difficulty, press it with a puller.
8. Use a screwdriver to pry off the seal.
9. Let's take it out.
10. After applying Litol-24 lubricant to the working surface of the new oil seal, we press it in with a suitable piece of pipe. We install the flange and tighten the flange mounting nut, checking the moment of resistance to rotation of the drive gear (similar to the operations given in the article “Replacing the drive gear oil seal of the Chevrolet Niva rear axle gearbox”).
11. We carry out further assembly in reverse order.
The article is missing:
- Photo of the instrument
- Photos of parts and consumables
- High-quality photos of repairs
Source: Chevrolet niva device, operation, maintenance and repair. Publishing house "Behind the Wheel".
Replacing the front axle oil seal on a Chevrolet Niva
Hello! Most Chevy owners service the undemanding units of this popular car without the help of others. During intensive use, it is often necessary to change consumables, especially in the chassis. I will tell you about this type of service, like replacing the front axle seal of a NIVA Chevrolet. A replacement operation is performed when oil leaks from the axle housing. A clogged breather causes lubricant to squeeze out.
If the lubricant drips immediately after stopping (while the gearbox is hot), and then the leak stops, the breather needs to be cleaned. When it is clogged with dirt, the heated air does not bleed out during movement. Under pressure, the working fluid of the gearbox will be squeezed out even through serviceable gaskets and seals.
If the breather is in order, and the oil penetrates indifferently, you will have to change the warped gaskets of the covers, or, in other words, the O-rings. of them in the front bridge, and they are different:
Preparation and disassembly
To independently remove a leaking rear axle oil seal on a Niva Chevrolet, you will need the following tools:
- standard set of wrenches;
- slotted screwdriver and wheel wrench;
- jack;
- hammer;
- wooden stand;
- cloth gloves.
Never neglect gloves when repairing a car: they will protect your hands from damage due to accidental impacts. The height of the wooden stand should be enough to support the rear axle with the wheel removed and the shock absorber unscrewed, otherwise oil will leak from it.
Before removing the old seal, you will have to disassemble the rear hub assembly and remove the axle shaft. Disassembly is carried out in the following sequence:
- Place the car on a level surface and secure it with wheel chocks. Make sure the handbrake is turned off.
- Loosen the wheel nuts, jack up the car and remove the wheel.
- Clean the rear axle flange that protrudes beyond the brake drum from rust. Additionally, you can treat this area with WD-40 lubricant.
- Unscrew the 2 bolts securing the drum with a 12 mm wrench, then gently tap with a hammer to move it out of place.
- The drum is removed in 2 ways: by squeezing it out with the same bolts, screwed into other holes, or by knocking it with a hammer through a piece of wood. The methods can be combined, just be careful not to damage the edge of the drum with the blows.
- After dismantling, clean the seat on the axle shaft again to make the drum easier to remove.
The next step is unscrewing and removing the axle shaft. In the VAZ 2131 Niva Chevrolet, 4 bolts securing it are held on the other side by a bracket holding the shock absorber.
After unscrewing the bolts, the shock absorber will no longer hold the rear axle, and the spring will push it down, causing oil to flow.
To avoid this, you need to first adjust the stand by jacking the car higher. The rear axle “stocking” must rest with a slope in the other direction so that the oil does not leak out.
Since in a regular Niva VAZ 21214 and 21213 the shock absorber is attached to the spring cup, and not to the rear hub, there is no need to unscrew it. A stand is also not needed here; a jack is enough to lift it.
The 4 bolts holding the rear axle shaft are unscrewed with a 17 mm wrench
Pay attention to the growers: they should not get lost in the brake mechanism. If you ignore the loss of the groover and install a new one, then the old one will subsequently get between the block and the drum while driving and the wheel will jam
After unscrewing the bolts, with a sharp movement, remove the axle shaft with the bearing from the cage. If this fails, attach the wheel to the studs with 3 nuts and try to pull it. The last option is to use a special inertial puller for removal. There is also a popular method: tie the axle shaft with a rope to an iron garage door and hit it with a hammer to knock it out of the cage. But for this you need to carefully park the car closer to the gate.
Replacing the rear axle gearbox seal of a Chevrolet Niva
Replacing the oil seal
rear axle
gearbox on a
Chevrolet Niva
. Checking the breather. Oil seal no.: .
- We disconnect the driveshaft from the gearbox by unscrewing the bolts securing it to the flange.
- We separate the internal CV joint housings from the drive gears.
- Using a dynamometer, we determine the moment of free rotation of the drive gear
. To do this, turn the flange mounting nut until the gear begins to rotate. We fix the magnitude of the moment. - We tighten the bolts into two adjacent flange holes (for fixation).
- We insert a mounting spade between the bolts, hold the flange from turning and unscrew the fastening nut.
- Remove the washer and flange from the spline joint. If it is impossible to remove it by hand, use a universal puller.
7. Remove the oil seal using a flat-head screwdriver. 8. Rinse and thoroughly wipe the replacement area. 9. Replacement of the front axle is carried out only with original Chevrolet spare parts. To facilitate pressing, any grease (litol, grease) is applied to the sealing ring. 10. Press in the ring using a pipe of suitable diameter. 11. Place the flange on the spline connection and put on the washer. 12. Tighten the nut to the torque determined when unscrewing. 13. Fasten the cardan shaft.
- We remove both drives (or the one that requires replacement)
- Remove the retaining ring and spring washer;
- Using a hammer, carefully knock down the bearing. If removal is difficult, treat with a penetrating lubricant, such as WD-40.
- Remove the bearing cap with the old seal.
- Using a pipe, knock the oil seal out of the cover;
- Lubricate the new spare part with any grease and press the o-ring into the cover.
7. We assemble the unit. We fill the gearbox with oil in accordance with the maintenance instructions, do a test drive , and check for oil leaks.
When and how do you need to change the seals of the VAZ 2123 transfer case?
Reference!
Parts must be replaced if transmission oil leaks occur at the interface between the drive shafts and the transmission housing. If this is not done, the transmission will leak. Without lubrication, transfer case parts will quickly fail.
Step-by-step instructions for replacing the oil seal of the Niva Chevrolet
To work, you need to have free access to the bottom of the car. Therefore, replacement of RK oil seals will be carried out on an inspection ditch, overpass or lift.
You will need the following tool:
- hexagon 12;
- open-end or socket wrench 24;
- waste container;
- flat screwdriver;
- hammer;
- mandrel;
- syringe for filling transmission oil;
- new self-locking nuts for fastening the flanges.
The algorithm for replacing the Niva Chevrolet transfer case oil seal is as follows:
- drain the oil from the transfer case into the prepared container;
- unscrew the bolts securing the cardan, the drive shaft oil seal of which is to be replaced;
- engage the gear, lock the differential and put the car on the handbrake;
- Unscrew the nut securing the propeller shaft drive flange.
- remove the washer;
- pull the flange off the shaft;
- use a screwdriver to remove the old oil seal;
- clean the seat and apply sealant;
- lubricate the rubber seal of the new oil seal with oil;
- using a mandrel and a hammer, press the part into place;
- install the flange and washer, tighten them with a self-locking nut;
- secure the cardan.
Important! The self-locking design does not allow for reuse of parts. Therefore, the flange nuts must be replaced with new ones.
After completing the work, it is necessary to fill the transfer case with fresh transmission oil.