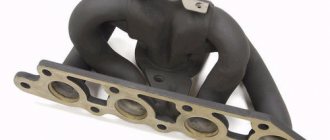
Maintenance and adjustment of DAAZ 2107
Basic maintenance and adjustment of the carburetor:
- inspection for visible defects;
- cleaning and washing the surface;
- washing the float chamber;
- cleaning the mesh filter;
- cleaning (purging) or replacing jets;
- float chamber adjustment;
- idle speed adjustment.
If you have never encountered such a task, it is better to entrust it to a specialist, but if you have at least some understanding of the principle of operation of a carburetor, you can do it yourself.
1. Let's start with the simplest thing - washing and cleaning. To do this, remove the carburetor from the engine and clean it outside.
2. To do this, it is better to buy a special aerosol with a tube. You can buy it at any auto store. The average price is a little more than 100 rubles.
3. Next, remove the cover of the float chamber and clean the float bath with a toothbrush and the same aerosol.
4. Visually inspect the float mounting bracket and check its movement.
5. We adjust the float chamber. We take the lid with the float and hang it strictly vertically.
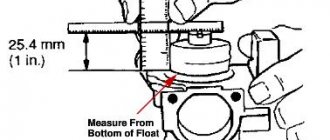
6. Measure the distance from the cover to the side surface of the float. It should be 6-7 mm.
7. If you do not have the appropriate measuring device, use a 6 mm drill bit, inserting it between the cover and the float. If the distance is greater or less than specified, we achieve the desired value by bending the bracket in one direction or another.
8. Now, in a vertical position, move the float all the way to the side. The distance between its surface and the lid should be 15 mm. If the distance does not correspond to this value, bend or bend the float tongue.
9. After adjustment, do not put the cover back in place.
10. Move on to the mesh filter.
11. Unscrew the plug and remove it. We wash with an aerosol and blow through with a compressor or pump. We put the filter back.
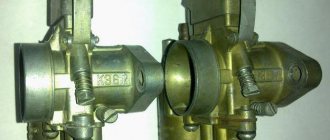
12. Now carefully unscrew the air and fuel jets.
13. We wash and blow them through, after which, without mixing them up, we put them in their places.
14. Now we assemble the carburetor and install it on the engine. All other work will be carried out when the engine starts.
15. To adjust the idle speed we need an electronic tachometer and a slotted screwdriver.
16. Use a screwdriver to tighten the screws for adjusting the quality and quantity of fuel until they stop. After this, release the quality screw by 2-3 turns, the quantity screw by 3-4.
17. Start the engine and warm it up to operating temperature. We turn it off, connect the tachometer as indicated in the photo, and start it again.
19. Now we release the quality screw (counterclockwise), and check whether these revolutions are the maximum for the quantity we have set, rotating it left and right.
21. To adjust the idle speed as accurately as possible, the use of special equipment, such as a CO2 and CH analyzer, is required. Such adjustment work can only be carried out in a specialized service.
Did you like the article? Save so you don't lose!
What is the working principle of a carburetor?
Gasoline is first supplied to the float chamber, its volume is regulated by the float.
When it floats up, the needle valve operates and closes access to fuel. In this sense, the float chamber plays the role of a toilet, and the 2107 carburetor is no different from it in this parameter. Before being fed into it, the fuel is filtered again by passing through a mesh.
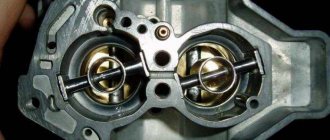
Then the float chamber, like a donor, sends gasoline into two chambers (first and second). Fuel passes through two main fuel jets. The chambers also receive air purified in an air filter, which can be preheated. The picture shows the hole diagram.
At the same time, air is supplied through air jets, which is mixed with gasoline in special emulsion wells and tubes. As a result, an emulsion is formed, that is, a mixture of air and gasoline. The picture shows a float chamber (with a screwdriver in it) and jets.
Before entering the atomizer, the fuel mixture passes through an eco-stat. At maximum power development, the fuel and air emulsion is further enriched.
The mixture then passes through special atomizers into diffusers, which prepare the final mixture by “tearing off” droplets of fuel and drawing them into a high-speed air stream, delivering the mixture precisely to the center of the mixing chamber. This is their job. The figure shows diffusers of chambers 1 and 2.
The throttle valve, controlled by the gas pedal, supplies the finished high-quality mixture directly to the cylinders.
There is a system of “idle” jets, in which fuel is taken only from the first chamber. The operation scheme of the cameras provides for the inclusion of the second camera when the unit is well warmed up at full power. The operation of the second camera is fully demonstrated when overtaking at high speed.
Effective operation of the carburetor depends on the cleanliness of the jets, the cleanliness of all working surfaces, the smoothness and evenness of all drives and rods. In this sense, the 2107 carburetor is not as picky and capricious as modern imported analogues; it works even on low-quality gasoline.
This article is part of a series of 9 lessons dedicated to 7 carburetors. To view all nine lessons, follow the link: //7vaz.ru/chto-takoe/karbyurator.html
Owners of Classic cars often encounter problems with dynamics and fuel consumption. Drivers call a car engine a heart, and a carburetor can easily be compared to a heart valve. Fuel consumption depends on the last part, and dynamic characteristics depend on its correct adjustment. In this article we will learn about how the carburetor works (VAZ 2107 DAAZ). We will also look at how to regulate it correctly.
DAAZ 1107010-20 carburetor design
A distinctive feature of this carburetor is the presence of a balanced float chamber. In addition, it includes:
- Dosing systems in two quantities;
- Diaphragm type trigger device;
- Pneumatic economizer;
- Mechanical accelerator pump with diaphragm;
- Autonomous type idle system;
- A device for ventilation of the crankcase of a car power unit.
- Main fuel jet of the first chamber;
- Adjustment screw for changing the fuel supply through the accelerator pump (UN);
- Accelerator pump bypass jet;
- Drive cam UN;
- Throttle valve return spring of the first chamber;
- Drive lever UN;
- Throttle valve limit screw of the first chamber;
- Diaphragm UN;
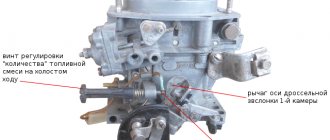
- XX mixture adjustment screw with restriction bushing;
- Underwater vacuum pipe to the ignition distributor regulator;
- Screw for adjusting the amount of mixture XX;
- Fuel jet shut-off valve XX;
- Carburetor body;
- Starter adjustment screw;
- Trigger diaphragm;
- Air starter jet;
- Carburetor cover;
- Air jet of the XX system;
- Acceleration pump nozzle;
- Main air jets;
- The economizer jet is emulsion;
- Fuel economizer jet;
- Air economizer jet;
- Emulsion tube;
- Float;
- Needle valve;
- Fuel filter;
- Housing of the fuel nozzle of the transition system of the second chamber;
- Pneumatic drive of the throttle valve of the second chamber;
- The mixing chamber diffuser is small;
- Spray;
- Air damper;
- Axial choke lever;
- Telescopic rod for driving the air damper;
- Starter rack;
- Starter housing;
- Air damper drive rod mounting screw;
- Three-arm lever;
- Bracket for fastening the return spring;
- Pipe for removing gases from the crankcase;
- Return spring for levers;
- Throttle valve drive lever;
- Throttle axis of the first chamber;
- Connecting rod for air and throttle damper drives;
- Limit lever for opening the throttle valve of the second chamber;
- Lever for interaction with the air damper;
- Rod of the pneumatic drive of the throttle valve of the second chamber;
- A lever connected to lever 49 by a spring;
- Rigidly fixed lever on axis 43;
- Adjusting screw for closing the throttle valve in the second chamber;
- Throttle valve of the second chamber;
- Diaphragm of the pneumatic drive of the throttle valve of the second chamber;
- Openings of the second chamber transition system;
- Throttle body;
- Fuel jet of the XX system;
- Check valve needle;
- Shut-off valve body;
- Electromagnetic armature;
- Electromagnet coil winding.
1111-1107010 — Carburetor VAZ Oka — 1111, Oka — 11113
The DAAZ 1111-1107010 Solex carburetor is installed on VAZ 1111 Oka cars.
Two-chamber, emulsion type with sequentially opening throttle valves. It has a balanced float chamber, a power mode economizer, an econostat, a crankcase gas removal system, a mechanical starting device, and an idle air system solenoid valve. Price - 5430 rub. Find out the exact cost of delivery by mail
Procedure for adjusting DAAZ 2107-1107010-20
Adjustment is carried out only on a serviceable and serviced carburetor. It is highly desirable to have a device that can measure harmful CO emissions. Let's look at the procedure:
- We check the level in the float chamber. This is done using a template, which you can make yourself or purchase at a specialized store.
- We check the gaps of the contact group of the ignition distributor (look in the technical book of your car) and visually inspect the spark plugs. The latter must strictly correspond to the engine model according to the heat rating.
- We start the engine and let it warm up to operating temperature.
- We use a screwdriver to adjust the screw for the amount of combustible mixture. With its help, you should set the speed within 820-900 rpm . We control their number using a tachometer (built-in or separate).
- We tighten the fuel mixture quality screw. At the same time, it is important to monitor the amount of CO in the exhaust gases (a working engine at a temperature of 20 degrees Celsius produces 0.5-1.2% CO ).
- Use the mixture quantity screw again and set the idle speed.
21083-1107010 — Solex type carburetor. For VAZ 21083 engine, 1.5 l.
Carburetor 21083-1107010 Solex is designed for installation on a 1.5 liter engine of VAZ 21083, 21093, 21099. Solex 21083-1107010 is a two-chamber carburetor of the emulsion type, with sequential opening of the throttle valves and a balanced float chamber.
There is a block for heating the throttle valve area with coolant, an economizer of power modes, an econostat, an accelerator pump with sprayers in both chambers, blocking the opening of the throttle valve of the second chamber, a starting device, etc. Price - 7410 rubles. Find out the exact cost of delivery by mail
Introduction
The normal operation of a car engine directly depends on the quality of the fuel-air mixture. On modern cars, the task of properly preparing the mixture is successfully handled by the electronic control unit, collecting information from many sensors. Although the “injector” has practically replaced carburetor engines, there are still many cars on the roads that use this particular method of preparing the mixture.
Such carburetors are installed on VAZ-2107 series cars. Although their production has been discontinued for a long time, they are still very popular among car enthusiasts. This is especially noticeable in rural areas and small towns. The reason is clear: low cost of maintenance, quick repairs, availability of spare parts.
Repairing the DAAZ 2107 carburetor yourself
Usually, when it comes to repairing the power unit and its components, car owners prefer to contact specialized service centers. However, the design of the DAAZ carburetor is simple both in design and in routine maintenance. Therefore, in most cases, the owner can perform basic repair work on the carburetor of his car himself.
DAAZ carburetor assembly
How to determine a carburetor malfunction
Depending on the external manifestations of engine operation, it is possible to identify problems that prevent the carburetor from fully performing its functions:
- The engine cannot idle, stalls (or extremely unstable engine operation is observed).
- The power unit operates normally in idle mode, but the car accelerates very slowly.
- When driving above 90 km/h, there is a sharp decrease in engine power or jerking when trying to accelerate.
- It is impossible to start the engine “cold”.
- The engine cannot be started on the first try.
- Fuel consumption while driving has increased significantly.
Thus, if the DAAZ carburetor begins to show one or more signs of these malfunctions, everything indicates that it is necessary to carry out repair work on the mechanism.
As a rule, all these signs are easily identified even by inexperienced drivers, since this does not require special equipment or specific knowledge. You can determine carburetor malfunctions based on your own sensations from driving and operating the car.
Design of the carburetor DAAZ 2107-1107010-20
The main components that directly affect the quality of the mixture:
- plastic float with needle valve. When there is a sufficient level of gasoline in the chamber, it rises and the valve shuts off the fuel supply. ;
- mixing chamber where gasoline is mixed with air;
- all kinds of channels;
- Air and fuel jets for proper mixture preparation;
- spray;
- air flow configurators, in other words - diffusers 25;
- accelerator pump.
2105-1107010-20 — Carburetor of the “Ozone” type for vehicles with a VAZ 2101, 21011, 1.2-1.3 liter engine.
Carburetor DAAZ 2105-1107010-20 Ozone is installed on 1.2 l and 1.3 l engines of VAZ 2101, 21011, 21063 cars. This carburetor is an emulsion type, two-chamber, with a falling flow.
It has a balanced float chamber, two main metering systems, an econostat, a starting device, a pneumatic drive for the throttle valve of the second chamber, and an accelerator pump. Price - 6460 rub. Find out the exact cost of delivery by mail
Principle of operation
First of all, gasoline is supplied to the chamber, before which it is filtered through a mesh. In this case, the fuel level is regulated by a float, and when the required amount is reached, the valve blocks the access of gasoline. Through the float chamber, gasoline is supplied to the first and second chambers. The air that has previously passed through the air filter also enters there. Air, already mixed with gasoline, is transferred into the chambers through jets, resulting in an emulsion. The mixture passes through the econostat and goes through the sprayers into the diffusers. The resulting finished mixture is sent through the throttle valve to the cylinders. When idling, fuel is taken from only one chamber. The second switches on only when the engine is warm and when power develops.
This is interesting: Video of repairing a trimmer carburetor with your own hands
21053-1107010-20 — Carburetor VAZ-21053-20 V=1500 DAAZ
Carburetor 21053-1107010-20 Solex is designed for installation on engines of rear-wheel drive cars VAZ 2106, 2103 and IZH 2126-030, 2717-030 with a volume of 1.6 liters (2106).
Carburetor 21053-1107010-20 emulsion type, two-chamber with sequential opening of the throttle valves. There is a float chamber, an economizer of power modes, an econostat, and a system for blocking the opening of the throttle valve of the second chamber. starting device, accelerator pump. 21053-1107010-20 Carburetor VAZ-21053 (branded packaging LADA) 21053110701020 carburetor VAZ-baker Supplier - "DZA" LLC, Dimitrovgrad Branded packaging - Lada-Image Price - 6460 rub. Find out the exact cost of delivery by mail
Setting up and adjusting the carburetor
The carburetor will work effectively only if all channels, jets are clean, there is no carbon deposits and all moving parts are in mechanical condition.
Completely dirty carburetor
More or less cleared of soot
- During a visual inspection, the first thing we pay attention to is the operation of the throttle valves. By alternately opening and closing the dampers, you can find out whether there are any mechanical jams. When operating properly, the dampers should open exactly 90 degrees.
- check the needle valve. To do this, you can lift the float and blow into the hole in the gas line; air leakage is not allowed.
- The accelerator pump is checked by pressing the pump pedal. Gasoline, previously poured into the chamber, should come out in an even and thin stream, without touching the walls of the chamber. There shouldn't be any play in the pedal either. When pressed ten times, about 8.5 ml of fuel should be pumped out of the pump nozzle.
To work with the carburetor, you will need Phillips and slotted screwdrivers, clean rags, and boxes for small parts. It wouldn’t hurt to film the entire process of disassembling the carburetor on your mobile phone camera. A repair kit will also come in handy. It costs very little, but once you get to work, it won’t hurt to replace worn parts.
Tuning the carburetor starts with something small: removing and cleaning all surfaces. Either a special spray or solvent “646”, which is sold in hardware stores, is suitable.
Carburetor cleaning spray
- Clean the float chamber in the same way. Under no circumstances should you go in there with a rag. The remaining fibers will certainly clog the jets, and the process of cleaning them will be painful and long;
- adjust the float. To do this, install the carburetor vertically, you can even use a building level. The distance from the cover to the side surface should be 6–7 mm. It is convenient to measure with a drill of the required size;
- move the float aside, the distance between the cover and the surface should be 15 mm.
- If there is a discrepancy, we achieve the desired result using a bracket;
- remove the mesh filter. We throw it in acetone, or blow it with a spray can. The same is done with jets. It is important to remember where they came from; it is very easy to confuse them during installation.
- we assemble everything in the reverse order and install it in its original place;
- First, tighten the quality and quantity adjustment screws until they stop, and then loosen them two or three turns. Let's try to start the engine. If it doesn't start, you can loosen the screws a little more. The running engine should warm up a little;
- Now turn the quality screw to reach maximum speed. Already with the quantity screw we continue to increase the speed
- in order to check whether this is the maximum speed for the set amount of fuel, we turn the quality screw back and forth. If everything is satisfactory, we tighten it to the value on the tachometer of 800-900 revolutions.
Cleaning and adjusting the carburetor, video:
21081-1107010 - Solex type carburetor. For VAZ 21081 and MeMZ 245, 1.1 l engines.
Carburetor 21081-1107010 Solex is designed for installation on a 1.1 liter engine of VAZ 21081, 21091, ZAZ 1102 Tavria cars and its modifications.
Solex 21081-1107010 two-chamber emulsion-type carburetor, with sequential opening of the throttle valves and a balanced float chamber. There is a block for heating the throttle valve area with coolant, an economizer of power modes, an econostat, an accelerator pump with sprayers in both chambers, blocking the opening of the throttle valve of the second chamber, a starting device, etc. 21081-1107010-00 Carburetor VAZ-2108 (1100 cm3 engine) .) (company packaging LADA) Price - 6780 rub. Find out the exact cost of delivery by mail
DAAZ 2107 carburetor design
The DAAZ 2107 carburetor is installed on a VAZ 2107 car. The diagram below gives an idea of its structure.
Design of the DAAZ 2107 carburetor for VAZ 2107 and VAZ 2105 cars
Previously, such a carburetor was installed on the VAZ 2105. The purpose of this unit is to mix gasoline and air in a certain proportion. The resulting mixture is then fed into the combustion chambers of the engine.
The main elements of the DAAZ 2107 carburetor are listed below:
- econostat;
- accelerator pump;
- fuel level support system;
- idle speed support system;
- engine starting system;
- jets for air and fuel;
- fuel-air mixture atomizer.
DAAZ carburetors
3 types of carburetors are produced - “Ozone”, “Solex” and “Oka”: - “Ozone” carburetors are installed on rear-wheel drive VAZ cars; — Solex-type carburetors are installed on front-wheel drive VAZ cars, classic cars and all-wheel drive VAZ cars, IZH and ZAZ cars; — Oka carburetors are installed on Oka, Gas and UAZ cars. The life of carburetors is equal to the life of the engine. The period of the factory warranty when installed in a specialized car service is 18 months of operation (with an operating time of no more than 30 thousand km). Each carburetor coming off the assembly line is adjusted on a stand until the required characteristics are obtained, which ensures high quality of the output product. Answers to questions about the design and operation of DAAZ carburetors from the manufacturer can be read here. Adjustments for OZONE type carburetors are here. Adjustments for SOLEX type carburetors here.
Symptoms of a device malfunction
Carburetor failure can look different. The most common situations in which the driver should pay attention to the condition of this unit:
- The car engine does not start even after several attempts. There may be two reasons for this: either there is no fuel-air mixture in the float chamber, or the proportions of this mixture are incorrect and it cannot ignite in time;
- the engine stalls at idle or its operation is unstable. The most common reason for this is a clogged nozzle. In addition, interruptions in the operation of the motor may occur due to damage to any o-ring or hose. Finally, such malfunctions can be caused by a malfunctioning solenoid valve in the carburetor;
- Engine idle speed is too high. This malfunction may occur due to incorrect carburetor adjustment or due to loose air dampers. It also occurs due to too high pressure in the float chamber, resulting from oxygen entering through damaged hoses or sealing joints.
Carburetor design
The unit installed on the “seven”, despite the abundance of parts, is not complicated. Knowing the structure of the carburetor, you can independently replace failed elements.
Main components of the unit:
- a float-type chamber into which fuel is dosed;
- valve to stop the flow of fuel;
- a compartment in which the mixture is mixed;
- dampers, channels, jets;
- spray;
- diffuser;
- pump to speed up the flow.
Carburetor diagram:
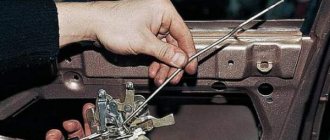
Do-it-yourself dismantling of the unit
To remove the DAAZ 2107 carburetor, auto mechanics recommend proceeding in the following sequence:
- The hood of the car is opened, the clamp on the warm air intake hose is loosened using a flat screwdriver, after which the hose is disconnected from the thermostat tube.
The air intake hose is disconnected from the thermostat - The air filter cover is removed manually. Under it there is a mounting plate, which is held on by four bolts. They are unscrewed with an 8-mm open-end wrench, after which the plate is easily removed.
The mounting plate of the DAAZ 2107 carburetor is removed manually - Now the air filter itself of the VAZ 2107 is removed.
The air filter from the VAZ 2107 is removed after removing the mounting plate - Using the same 8 key, loosen the nut on the carburetor choke cable. Then the screw securing this cable is held with a flat screwdriver, the nut 8 is unscrewed completely and the cable is disconnected from the carburetor.
The choke cable of the DAAZ 2107 carburetor is disconnected using a screwdriver - The hose through which crankcase gases are discharged is removed from the fitting of the DAAZ 2107 carburetor manually.
The hose for removing crankcase gases from the DAAZ 2107 carburetor is removed manually - Next, the wires of the microswitches of the idle economizer control system (IAC) are manually removed.
The wires of the economizer control system are disconnected from the DAAZ 2107 carburetor without much effort - The vacuum ignition timing regulator has a fitting with a vacuum hose. This hose is also removed from the DAAZ 2107 carburetor manually.
The hose of the vacuum ignition timing regulator is removed from the DAAZ 2107 carburetor by unscrewing the screws - Now you need to find the hose for the solenoid valve. It is connected to the economizer through a fitting. This hose must also be removed.
The solenoid valve control hose is manually removed from the DAAZ 2107 carburetor - After disconnecting this hose, the return spring of the solenoid valve of the DAAZ 2107 carburetor is removed from the socket.
The return spring of the solenoid valve of the DAAZ 2107 carburetor is manually removed from the socket - Use a flathead screwdriver to loosen the clamps on the fuel hoses. These hoses are then removed.
Fuel hoses from the DAAZ 2107 carburetor are removed manually after loosening the clamps - Using a 14mm wrench, unscrew the four nuts that hold the carburetor to the manifold body.
The DAAZ 2107 carburetor mounting nuts are unscrewed with a 14-mm open-end wrench - The DAAZ 2107 carburetor is removed from its original place.
After unscrewing the fasteners, the DAAZ 2107 carburetor is removed manually
Modifications of VAZ carburetors
If the car is equipped with an old engine, then the device is also of an old modification. Newer engines, which have a vacuum ignition corrector in their design, have newer, improved elements installed. This is a DAAZ 1107010 20 carburetor.
The devices are manufactured at the Dmitrov plant, where they produce not only these parts, but also other devices for cars.
This plant has been producing various types of units for many VAZ car models for quite a long time. For example, the carburetor for the VAZ 2107 is considered almost the most reliable and efficient among VAZ owners.
How to adjust the carburetor
As a rule, after removal, all parts of the carburetor are thoroughly cleaned of dirt and deposits. Let's look at the main stages of cleaning.
Cleaning the jets
Jets are thin channels in the carburetor through which air and fuel are supplied. Mechanical cleaning of these channels is strictly prohibited, so the jets can only be cleaned with compressed air. To purge the channels, motorists use a tire pump. As a rule, this is enough.
Electric car pump, which is convenient for cleaning the jets in the DAAZ 2107 carburetor
But if the carburetor is very dirty, place it in a container with kerosene for half an hour. After soaking in kerosene, even the most stubborn stains are easily removed.
Cleaning the float chamber
The best tool for cleaning the carburetor float chamber is a rubber medical bulb, with the help of which all remaining fuel, along with accumulated contaminants, is carefully pulled out of the chamber. Do not wipe the float chamber with fluffy materials, as fluff may get into the jets.
It is convenient to clean the float chamber of the DAAZ 2107 carburetor with a rubber bulb
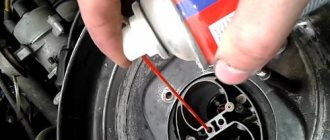
Flushing the throttle valve
The throttle valves in DAAZ 2107 carburetors are cleaned using various cleaning compounds purchased at auto stores (most often this product is WD40 liquid).
The throttle valve of the DAAZ 2107 carburetor is usually washed with WD 40 liquid
The damper itself and all adjacent structural elements are washed with liquid: small channels, valves, etc. And the crankcase ventilation channel should also be washed.
This is interesting: Repairing dents on a car body without painting
Video: cleaning the throttle valve on a VAZ 2107
2108-1107010 - Solex type carburetor. For VAZ 2108 1.3 liter engine.
Carburetor 2108-1107010 Solex is designed for installation on a 1.3 liter engine of VAZ 2108, 2109 cars. Solex 2108-1107010 is a two-chamber carburetor of the emulsion type, with sequential opening of the throttle valves and a balanced float chamber.
There is a block for heating the throttle valve area with coolant, an economizer of power modes, an econostat, an accelerator pump with sprayers in both chambers, blocking the opening of the throttle valve of the second chamber, a starting device, etc. Price - 7430 rubles. Find out the exact cost of delivery by mail
Self-adjustment of the carburetor
As a rule, when setting up a DAAZ 2107 carburetor, car enthusiasts adjust fuel consumption and idle speed. Let's look at these stages.
Idle speed adjustment steps
Setting up the carburetor in this mode is easy:
- A carburetor with a properly adjusted idle speed allows the car engine to operate stably even with very low CO levels. To do this, the car engine warms up for 10 minutes. After this, the fuel quality screw in the carburetor is turned out as much as possible.
Fuel quality and quantity screws in the DAAZ 2107 carburetor - Then, using the quantity screw, the engine speed is increased (it should be about 100 revolutions higher than normal). After this, the engine should run for 2-3 minutes. If no problems are observed with the motor, the number of revolutions is reduced to normal, but not by the quantity screw, but by the quality screw. If after this no interruptions in the operation of the motor are observed, the adjustment is considered complete. Now the car engine will operate stably even with a very small amount of CO.
Rules for adjusting fuel consumption
To change fuel consumption, you need to adjust its level in the carburetor float chamber.
- First, the top cover is removed from the carburetor.
Before starting the adjustment, remove the top cover from the DAAZ 2107 carburetor - The hole in the carburetor cap is responsible for increasing the volume of fuel in the float chamber, which is periodically closed by a spring-loaded needle valve (the tongue in the photo below is indicated by the letter A). The carburetor cover is installed vertically. The float should not touch it. After this, use a ruler to measure the distance between the float and the lid. It should not exceed 6.5 mm (the maximum permissible deviation from this value is 0.25 mm).
Needle valve of a DAAZ 2107 carburetor with an adjusting tongue marked with the letter A - If the distance between the float and the carburetor cap does not correspond to the norm, it is reduced (or vice versa - increased) by bending the above tongue of the needle valve.
- After adjusting the closing level of the needle valve, you should adjust its opening level, which also depends on the amount of free play of the float in the chamber. To do this, the carburetor cap is held vertically, but the float is moved to the other side as shown in the photo below. After this, the distance between the cover and the float is measured again. It should not exceed 14 mm (maximum permissible deviation is 0.5 mm).
Measuring the maximum opening distance of the needle valve on the DAAZ 2107 carburetor - If this distance is greater (or less) than normal, it must be adjusted using the stop located on the float bracket. This stop can either be bent or straightened.
The opening of the DAAZ 2107 needle valve is regulated by a special stop on the float bracket - Once the exact distances have been set, adjustment and assembly of the needle valve can be considered complete. The car engine will operate stably, consuming a minimum amount of fuel.
So, even a novice car enthusiast can remove the carburetor. Certain difficulties may arise only at the stage of adjusting this device, but they are also quite surmountable. All you need to do is follow the above instructions exactly.
How does the DAAZ 1107010 carburetor work?
At the moment when the flammable liquid is in the float chamber, the amount of fuel is regulated using the float. When it floats up, the needle valve will block the access for gasoline that wants to get there. In this regard, this camera is similar in principle to a toilet cistern. However, the fuel supply is not instantaneous. First, it must be passed through a series of filter elements. There the liquid can be cleared of various impurities.
The liquid will then enter the fuel chamber. There are two of them in this unit. The DAAZ 2107 carburetor has fuel jets in its design. They are necessary for the passage of fuel.
In addition to fuel jets, there are also air jets through which air flows.
The air, just like gasoline, will be passed through a series of filters to remove impurities. Through a network of tubes, air enters the fuel chamber, where it is mixed with liquid fuel.
However, this is not the end of the matter of preparing fuel for internal combustion engines. Before the emulsion enters the cylinders, it passes through the econostat. At this stage, the combustible mixture will be enriched.
Now, using the same spray system, fuel is sent to diffusers. This stage is almost the final one. The DAAZ 2107 1107010 carburetor is designed so that drops of fuel in the diffusers are attracted by a powerful air flow. As a result, the mixture of air and flammable liquid will reach the central part of the chamber, where mixing will occur.
The DAAZ 2107 carburetor, among other components, has jets that operate at idle. This mode differs in that the fuel emulsion is consumed only from the first fuel chamber. The design of the unit and the operating diagram of the chambers allow the use of the second chamber only when the motor reaches its operating temperature condition. The need for a second chamber occurs when the engine picks up speed or experiences loads.
Adjusting the DAAZ carburetor on a VAZ-2107
The main component in a car is the engine - this is indisputable. But you can safely put the carburetor in second place in importance. The main task of this part is to ensure normal operation of the power unit in a variety of operating modes (during acceleration, at idle, during starting and braking). It is in the carburetor that the air-fuel mixture is prepared, which is subsequently ignited in the combustion chamber.
A small violation in the adjustment of the device can lead to a number of negative consequences - problems with starting the engine, increased fuel consumption, deterioration in dynamics, decreased power, and so on. To prevent such problems, it is important to timely tune and adjust the carburetor.
Main types
At all times, VAZ cars were equipped with a variety of types of carburetors - Ozone, Weber, Solex and others. However, some of them are still popular today. Generally speaking, the types of carburetors are float, bubbler and needle.
Design Features
The main parts of the carburetor include the exhaust shut-off valve, the burnt fuel assembly outlet compartment, the transition chamber system, the throttle valve, the dosing system, the econostat, the float chamber, as well as the autonomous exhaust system. Each of these nodes performs its own function. We won’t delve deeply into this issue - the knowledge you’ve already gained will be enough to set it up.
Setting up the DAAZ carburetor on a VAZ-2107
Please note that the adjustment process will take some time. It is necessary to work slowly and strictly follow the instructions. Please note that the characteristics of your engine and its “gluttony”, and therefore your further costs, depend on the accuracy of the settings. The general operating algorithm is as follows:
— inspect the part for damage and defects;
— clean and rinse all parts from dirt and debris;
— clean the mesh filter;
— wash the float chamber;
— clean the air jets;
— adjust the XX carburetor, trigger mechanism and float system.
Now let's look at each stage in more detail:
- Restoring the mesh filter is performed in the following sequence:
— using a gasoline pump, pump fuel into the carburetor chamber until the shut-off valve closes;
— move the filter “cap” to the side and remove the valve;
— rinse the valve in solvent and dry (you can use a source of compressed air).
Please note that the presence of “dips” during engine operation, decreased power, and “dullness” of the car are often associated precisely with filter contamination.
- Clean the float chamber. For these purposes, use a special rubber bulb. After this, dry the product. Wiping the bottom of the float chambers with ordinary rags is prohibited. Otherwise, pieces of lint may remain at the bottom of the carburetor, which is likely to clog the jets and lead to a number of problems.
- Check the tightness of the locking needle. This can be done using a special pear. Make sure the floats are on top and replace the lid. Press down on the bulb and listen to see if air is leaking anywhere. If there is a leak, the valve body or needle may need to be replaced.
- Adjust the float system. For this:
— check what position the float is in. If it is displaced, then straighten it using a special holder;
— make sure the needle valve is closed;
— open the chamber “hatch” and move the float. Next, lightly pull the “tongue” of the bracket towards you;
— set the required distance between the float and the hatch gasket. The optimal parameter is 6-7 mm. If the measured value does not fall within this range, then adjustment is necessary. In case of immersion, the gap should be no more than one or two millimeters. Otherwise, the needle can be rejected;
- measure the gap that actually appears between the float and the needle. When the valve is open, this value should be 15 mm.
The above checks can be performed without dismantling or with dismantling the carburetor.
- Adjust the starting system. To do this job you must remove the air filter, start the car and pull the choke out about a third of the way. Your task is to achieve 3,200-3,600 rpm. As soon as this parameter is set, release the air damper and set the rotation to about 300 rpm less.
- Adjust idle speed. Tighten the quality screw completely, and then make 2-3 turns to the side in a clockwise direction. Check that the quantity screw is not fully tightened. Next, warm up the engine to operating temperature (the choke should be open). As soon as the engine has warmed up, remove the choke and listen to the operation of the power unit. If the engine starts to stall, then slightly turn out the quantity screw. If the speed is too high, then, on the contrary, screw the screw back in a little.
Your task is to set 900 rpm. By rotating the quality screw, achieve the minimum speed during stable operation (in this case, the speed may increase). After this, use the quantity screw to return to the 900 rpm parameter. If necessary, use the quality regulator again.
Carburetor DAAZ 4178
This device is used on some UAZ and GAZ vehicles. This series of devices, like VAZ units, performs the same function. The line of models is no different in design. Technologies that have already proven themselves are used here. The design includes float chambers with improved characteristics, as well as sequential throttle valve technology.
In general, this carburetor is built on the same base of standard parts as many others. Therefore, there is no need to consider its design in more detail.
How to remove a carburetor: step-by-step instructions
To remove the carburetor from the engine yourself, you will need a simple set of tools and preparation of the workplace. To carry out the procedure for removing the carburetor with your own hands, you must prepare in advance:
- 3 mm slotted screwdriver;
- 4 mm cross-head screwdriver;
- wrench 7;
- wrench 8;
- socket wrench 13.
You will need to clear a place near the hood so that nothing interferes with work. To make the procedure easier, it is recommended to unscrew the screws securing the air filter box with a screwdriver and remove it. The following steps are aimed entirely at removing the carburetor:
- First you need to disconnect the wire tip from the DAAZ solenoid valve.
- Using a Phillips screwdriver or a 7mm wrench, you need to loosen the clamp located on the fuel hose. The hose comes out of the carburetor fitting and must be removed and set aside.
- The air damper drive tip screw is also disconnected in the same way. The drive rod must be unscrewed and removed.
- A spring is removed from the first internal combustion chamber, which is responsible for opening/closing the throttle valve.
- All tubes suitable for the carburetor must be disconnected in order: first the tube that goes directly to the economizer, then the vacuum hose and the crankcase ventilation hose.
- Using a slotted screwdriver, remove the end of the throttle valve supply rod in the first chamber.
- Next, use a 13mm wrench to unscrew the 4 nuts that secure the carburetor body to the engine manifold. Three nuts are located on the outside of the device, and the fourth is on the back.
- The carburetor is removed from the studs along with the gasket on which it was installed.
Disconnecting all tubes and hoses, removing the carburetor
It is recommended to perform all actions carefully so as not to damage nearby wires and devices.
How to clean carbon deposits from jets, float chamber, throttle valve
Removing the carburetor involves carrying out related work. Most often, the carburetor and its components require cleaning and washing to remove accumulated dirt and carbon deposits . In this case, you need to know how and with what you can clean the various elements of the carburetor at home.
Cleaning the jet involves using copper wire or a toothpick. It will not be possible to completely clean carbon deposits and dirt, but it is quite possible to remove the main accumulations from the nozzle. The use of special cleaning products is not recommended. After removing dirt, you can blow out the jets with a can of compressed air or through a compressor.
The float chamber must be washed with a special carburetor cleaner. They can be purchased at any auto store at a low price. An alternative option for washing is solvent 642. The liquid is poured into the chamber, stirred periodically, and drained after two hours of operation. The camera is thoroughly wiped with a soft, lint-free cloth and dried.
The throttle valve can be washed and cleaned using cleaners or kerosene. It, along with other metal parts of the carburetor, can be lowered into a container with cleaning liquid, kept in the solution for about two hours, then blown out and wiped dry.
Carburetor adjustment
It is important to carry out adjustment work on the carburetor only after thoroughly flushing and cleaning all its components. Adjustment is not particularly difficult; it is important to simply follow the manufacturer's recommendations.
How to adjust idle speed on a DAAZ carburetor
To carry out the adjustment procedure, you will need to place the car on a level surface, then:
- Start the engine.
- Warm up the power unit to the optimal temperature.
- Turn off the engine.
- Using a screwdriver and a quality screw, set the maximum number of revolutions, and use the quantity screw to designate the value of 100 rpm as exceeding the norm.
- Start the engine again and evaluate the existing idle speed settings.
At home, you will have to carry out this procedure more than once to achieve the desired result. As a rule, service stations use a CO2 analyzer, which simplifies carburetor adjustments.
Video instruction: how to make idle stable
How to adjust fuel consumption on a DAAZ carburetor
The use of carburetor power units allows minimizing fuel consumption. However, this will require adjustment of the dosing system strictly according to the manufacturer’s instructions.
Minimizing gasoline consumption is achieved by reducing the productivity of the dosing system - its depletion can most easily be achieved by reducing the diameter of the nozzles. So, on VAZ 2105 carburetors you can install a jet with a diameter of 1.8 mm, and on a VAZ 2107 carburetor - 1.6 mm. That is, the diameter of the throughput device should be 0.05–0.10 mm less than that installed at the factory.
It should be noted that in the first days of operation after replacing the jets, jerks in the operation of the motor are possible. This is a normal phenomenon, since the entire operation of the system is adjusted to an economical operating mode.