How to install the cable?
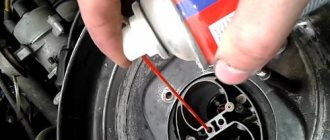
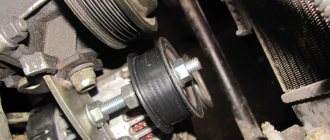
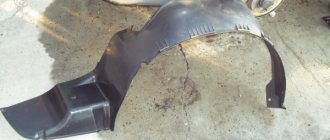
I will tell you how to replace the throttle cable on a VAZ 2110. To do this, you need a screwdriver (flat), a new cable, side cutters and pliers with flat jaws. First of all, remove the plastic engine protection. Then remove the safety bracket from the throttle assembly sector, prying it off with a screwdriver. Then we pull the cable tip out of the groove and disconnect the cable. Then remove the spring stopper using pliers (Figure 3).
And we pull out our cable from the slots of the holder (Fig. 4). We cut through the plastic clamp that tightly clamped our cable to the gas ventilation hose (Fig. 5). Next, we move the cable sheath forward (Fig. 6). We take out the cable sheath damper from the front end (Fig. 7). Disconnect the cable in the cabin under the gas pedal (Fig.
That's it, now we can pull out the cable and replace it with a new one, doing all the operations in reverse order. Do not forget to secure the cable to the gas ventilation hose with a plastic clamp.
The last step in tuning is adjusting the throttle.
Where to look for the reason
Often the cause of accelerator pedal dips is a drop in pressure in the fuel rail. For an injection car, the pressure in the ramp is considered normal at 2.8-3.2 Bar.
It is imperative to check the functionality of the sensors involved in the process of mixture formation and fuel supply to the cylinders, namely the throttle position sensor (TPS) and the crankshaft position sensor (CPS).
Failures in their operation will certainly lead to this problem. It would also be a good idea to check the performance of the injectors.
All these elements can be checked at home; it is enough to have a regular pressure gauge and multimeter on hand. With their help, the pressure in the ramp is first checked, and then the indicated sensors. Injectors are tested on special stands.
Clutch repair and replacement
Hydraulic system repair involves identifying and eliminating the malfunction. So, if the working fluid leaks, it is necessary to eliminate the cause of the leak. This reason may be wear on the cuff, wear on the working surface of the cylinder, or a leaky clutch hose. Then a replacement
an exhausted cuff, cylinder or clutch hose of a VAZ 2106, respectively. In any case, after repairing the clutch hydraulic system, it is necessary to remove air from it - bleeding the system.
The situation is more complicated with direct repair of the clutch. This type of work involves partial or complete dismantling of the gearbox, which cannot but affect the duration and labor intensity of the repair work, so it is better to carry it out with an assistant.
Work should begin by installing the car on an inspection hole, overpass or on a lift. After this, to ensure access to the clutch, the following preparatory work is carried out approximately in this order:
- in the cabin, the gear shift lever is disconnected from the gearbox;
- In the engine compartment, remove the terminals from the battery and unscrew the bolts securing the starter.
Further, if the car is on a lift, it rises. Then, in order:
- the terminals are disconnected from the reverse sensor;
- from the resonator - exhaust pipe;
- from the gearbox housing – clutch slave cylinder;
- the driveshaft, traverse and starter are dismantled;
- The bolts of the clutch casing and the mount on the gearbox are unscrewed.
READ How to install a Ford Focus 2 alternator belt
Preparations for removing the gearbox are completed and after that there are two options to choose from: dismantle the gearbox completely (which is more labor-intensive), or simply move it to a distance that allows you to unscrew the bolts securing the clutch basket to the flywheel. It must be said that if you need to replace the clutch fork or release bearing VAZ 2106
is missing, then the option of incomplete dismantling of the gearbox is quite suitable. In this case, after displacement, the box will rest on the receiving pipe.
Assembly is carried out in reverse order. When installing the driven disk, it is important not to make a mistake - its protruding side faces the gearbox. Before tightening the basket bolts, a mandrel, which represents the end of the gearbox input shaft, is used as a guide to facilitate the alignment of the clutch elements.
After completing the assembly, if the repair did not affect the hydraulic clutch system, you will only need to adjust the free play of the clutch slave cylinder pusher. Finally, we can say that when replacing a VAZ 2106 clutch, its service life will be affected by the price of the product, which in most cases indicates quality.
Determining the location of the breakdown
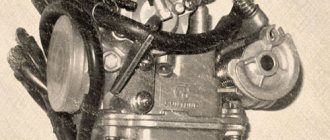
First of all, you should make sure that it is the VAZ 2107 carburetor that creates the failures, after which you can disassemble it and take measures. Failure in engine operation with a sharp increase in speed can also be caused by parts of other components:
- bad spark plugs;
- malfunction in the contact ignition system.
Typically, worn-out spark plugs do not fail immediately, but die out as the pressure in the cylinders increases. That is, at idle and low speeds the spark plug produces a normal spark, but at high speeds, when the piston manages to create high pressure, the spark appears every once in a while or disappears altogether. The same effect is observed when the throttle valves are opened sharply: the pressure in the cylinders increases, the spark goes out, and the car, instead of dynamic acceleration, goes into failure.
It is quite simple to make sure that dips appear due to candles. When you do not have the opportunity to test them under pressure, you need to replace them with a working or new set, and then check the “classics” on the go.
If everything is in order with the spark plugs, in cars with a contact ignition system you need to check the distributor elements, which may cause failures:
- Make sure that the contacts are not burnt and clean them with a file. If a recess has burned out on one of the contacts, and a protrusion has formed on the other, then the part must be replaced.
- Check the operation of the ignition timing vacuum diaphragm connected to the carburetor by a tube. You should remove the distributor cap and disconnect the tube from the carburetor, and then draw air through it with your mouth. A working diaphragm will sharply pull the contact group towards itself using a lever.
An important point: failures are more often caused by the spark plugs and the ignition system than by the carburetor, so it is recommended to check them first. When the diagnosis of the listed elements does not give a positive result, you can safely move on to the carburetor.
Disadvantages of the electronic pedal
- A slight “thought” at first when pressing the accelerator;
- The “E-pedal” does not make it possible to carry out deep tuning, since for this it is necessary to convert to a “cable” system, and this is an additional expenditure of about 20-25 thousand rubles plus a bunch of sensors and cables. Not everyone will agree to such a hassle;
- Exclusively on the first (raw) versions with “e-gas” the pedals stuck, the engine speed fluctuated and random periodic self-pressing occurred;
- Most likely the second point is to blame, which does not allow you to upgrade the car.
But what to do if an avid driver wants to drive recklessly?! Our craftsmen found the optimal solution without removing the “e-gas” - this is re-flashing the sensors and adjusting the turbochargers.
Now about the disadvantages of E-gas
- Most often email. The pedal
is criticized for its pause (“stupid”) at the start, when you press
the pedal
and try to accelerate. According to many, the engine interacts poorly with the pedal, as a result of which approximately one second is lost. Although we have learned to correct this shortcoming. - E-gas does not allow serious engine tuning, since the pedal negates all efforts. Installing a cable drive solves the problem. I would also like to note that the pedal
for specific needs. - The electronic pedal causes a lot of trouble during operation.
How to change the gasket
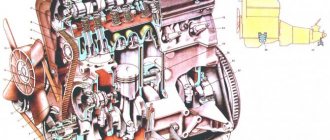
Over the years, gaskets made from a wide variety of materials were installed on DAAZ: heat-resistant cardboard, paronite, metal. The main function of the gasket is to create the most reliable and tight connection between the carburetor body and the surface of the engine intake manifold. This is the only way to ensure normal operation of the power unit.
After dismantling the carburetor, it is necessary to inspect the gasket for deformations, tears or severe dents. The manufacturer recommends changing the seal after each carburetor removal.
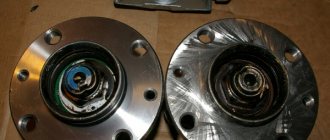
On the left - new, in the center - when dismantling the carburetor for the first time, on the right - after 3 years of operation of the car
The gasket is selected according to the type of the old one. You cannot install a gasket made of a different material or with a change in shape - it will not be able to provide an adequate joint between the parts of the mechanisms.
The gasket replacement procedure is not difficult:
- A new gasket is placed on the carburetor mounting studs.
- Before this, you need to clean the planting site from soot and dirt.
- It is necessary to install the gasket in the same position as the old one.
- Then install the carburetor on it and tighten the fixing nuts until they stop.
Possible malfunctions during fuel supply
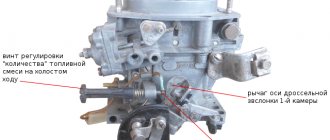
In “Ozone” carburetors installed on VAZ 2105-07 and Weber cars, found on older classic models, the accelerator pump is responsible for emergency fuel enrichment. It operates as follows: when you press the gas pedal, the sector fixed to the axis of the primary chamber presses on the lever going to the chamber with the membrane. The chamber is constantly filled with fuel, and when the lever sharply presses on the membrane, it pushes the fuel into the channel leading to the spray nozzle.
The nozzle nozzle is located near the diffuser of the primary chamber and has a calibrated hole with a diameter of 0.4 mm, directed downward. When the fuel pushed out by the membrane passes through this hole, a powerful jet is formed, bypassing the small diffuser and entering through the open damper directly into the manifold. The sharper you press the pedal, the longer the jet of gasoline lasts, providing dynamic acceleration of the car.
When you smoothly press the accelerator pedal, the lever also squeezes the membrane, but most of the fuel manages to leave the chamber through a special bypass channel, and a little fuel gets into the spout, and the stream comes out short. To prevent gasoline from constantly escaping through this channel, it is equipped with a valve in the form of a ball that closes a calibrated hole. Problems with the accelerator pump are as follows:
- membrane wear;
- clogging of the calibrated hole in the spout;
- backlash at the sector-lever-diaphragm interface;
- souring and jamming of the ball valve;
- curvature of the housing due to overheating, causing the pump chamber to become leaky.
To find out which of the malfunctions is occurring, it is necessary to dismantle the air filter and turn the axis of the primary chamber to check the presence and power of the jet. If it is not there or the fuel flows poorly, getting on the walls of the diffuser, you need to start repairs.
Troubleshooting
To carry out repairs, it is rarely necessary to remove the entire carburetor.
To eliminate most problems with the accelerator pump, it is enough to unscrew 5 screws and remove the top cover, disconnecting the engine cold start damper cable. The first step is to unscrew the nozzle of the sprayer with a flat screwdriver and thoroughly clean it with a wooden stick, followed by blowing.
If cleaning the atomizer does not help, unscrew the 4 screws holding the chamber cover and membrane, remove it together with the lever. Remove carefully so as not to lose the spring. Before doing this, you should place a rag underneath, otherwise gasoline from the chamber will flow directly onto the intake manifold. A worn or hardened membrane must be replaced, the assembly must be reassembled, and the fuel injection must be checked. If visually everything works well, then start the engine and try the accelerator pump in place at idle speed.
When fuel is visually well injected into the manifold, but when the engine is running, the failure is still present, the reason is the delay of the pump. This happens on old carburetors, where the lever pressing on the membrane has worn out. There is a backlash in the mechanism, which causes a delay. You need to replace the lever by unscrewing the chamber cover and knocking out the pin holding it.
If the previous actions did not bring results, 2 malfunctions remain, which are eliminated together in this order:
- Disconnect all pipes and accelerator linkage from the carburetor. Unscrew the 4 nuts securing the unit to the manifold and remove it.
- Disassemble the carburetor into 3 parts by unscrewing 5 screws on the top and 2 screws on the bottom. Remove the accelerator pump chamber cover.
- Level the surface of the chamber flange and cover by grinding on the side surface of the grinding wheel.
- Unscrew the bronze screw located in the wall of the unit above the pump chamber and remove the ball from the channel. Clean the channel thoroughly with a long wooden stick.
After reassembly, the carburetor accelerator pump will work clearly and without lag.
Adjusting old-style E-gas
The block cover (11183-1108500) is fixed with bolts that are inserted into oval holes. The improvement is this. to loosen the 4 screws and turn the cover in the desired direction:
- Economy mode (counterclockwise). To drive smoothly, to accelerate, you should press the pedal a little more than before. Gasoline consumption is reduced;
- Active mode (clockwise). The car reacts even with slight pressure on the gas pedal. Gasoline consumption increases. The pedal becomes more sensitive and informative.
In other words, we get the same effect as after installing JETTER (Jetter or spur).
It has been noticed that the first minutes after such settings, the idle speed may be increased (about 1300 rpm). But after a minute, the ECU gradually adjusted and the speed dropped to the usual level. If this does not happen, turn on the ignition for a minute and then start the engine.
If necessary, you can easily return to the original position (mark it in advance).
Revision process
1) First, remove the old mechanical rod.
2) Then we put the nut on the rod, where the mechanical drive used to be, and on top we put the wheel from the window regulator and lock it with a ring.
3) Next, we take the cable, make a loop and wind it with copper wire (you can also take clamps, but I didn’t have them), as shown in the photo.
4) Then we put a loop on the cable on one side, and on the other side, right on the rod, we wrap the second end of the cable with wire. That's all. Now the difference in pressure will be colossal! The pedal immediately becomes more sensitive and responsive!
Hello, once you get behind the wheel of your VAZ 2101-VAZ 2107 and press the gas pedal, you may find that the gas pedal has simply failed. In many cases, the cause of this malfunction may be a broken accelerator drive shaft. This part provides a connection between the gas pedal, in general, the gas pedal is put on the rod of the accelerator drive shaft, and the rod, or throttle drive cable.
You can buy an accelerator drive roller in almost any city in the CIS. This spare part is attached to the wall of the engine compartment, but due to the fact that the shaft rod covers the motor, it is not very visible. You can't just pull out the roller, because the gap between the motor wall and the motor itself is too narrow. The gap between the engine block and the engine shield must be increased; to do this, the gearbox will have to be raised. Please note that the gearbox itself has a crankcase - it is a black cover. You cannot put a jack under it. You won’t be able to make the gap between the motor and the wall too large, so don’t try to use the full stroke of the jack, as this will only hang the car.
The first operation to dismantle the old roller is to remove the gas pedal itself, which is placed on the rod of the roller, but is fixed on the front passenger side with a special bracket, which can be pryed off with a straight screwdriver and removed. When the pedal fixing bracket has already been removed, the pedal can be pulled out, or by lightly hitting it with a hammer towards the front passenger, knock it off the metal bar.
With the pedal removed, you will have to crawl under the car to jack up the transmission. The fact is that the gearbox is attached to the engine and, with its weight, slightly tilts the engine block itself. If you jack up the box you will be able to level the engine and accordingly increase the gap between the engine and the wall of the engine compartment.
The accelerator drive shaft is attached to the wall with two plastic clips, which are placed on studs. It remains to unscrew two nuts and you can begin dismantling the accelerator drive shaft. The first to pull out from the stud is the clip located on the passenger side - this will allow you to rotate the shaft so that you can pull it out from the second stud, and then from the passenger compartment, where the gas pedal drive lever remains.
Photo instructions for repairing a carburetor on a VAZ 2107
Checking the needle valve for functionality
This photo instruction shows the process of removing and checking the needle valve; I recommend following it in order to easily check the valve for functionality.
How to disassemble and check carburetor cover parts for malfunctions
If you need to check the carburetor cover parts, this photo instruction is for you!
How to repair the pneumatic throttle actuator on a VAZ 2107 carburetor
Has your pneumatic throttle valve on your carburetor broken? Then this instruction is for you!
Repair of the body and the process of disassembling the carburetor for a VAZ
Is it time for a hull repair? Then I recommend following the instructions below and you will not have any problems with disassembling and repairing the carburetor body.
Throttle body repair and disassembly process
Has the throttle valve exhausted its service life or has its operation simply been disrupted? Look at the photo instructions that I prepared for you!
To watch online, click on the video ⤵
Repair of the VAZ classic gas pedal. How to remove the gas pedal Read more
Installing the accelerator rod (gas pedal) on a VAZ 2106 (classic) Read more
How to remove and install the gas pedal linkage on a Niva VAZ 2121 Read more
Repair of VAZ 2103. Removing the accelerator gas roller. More details
Replacing the gas pedal VAZ 2101-06. Instead of traction, I install a pedal from 2109. Read more
#18 — Replacing the accelerator (“gas”) bracket on a classic More details
Removing the accelerator drive rod on a carburetor VAZ classic Read more
Project “Pushinka” #4 Replacing throttle rods with cables More details
How to remove the “classic” gas pedal Read more
Replacing the gas pedal on a VAZ 2107, 2101, 2106 in 5 minutes Read more
How to lighten the gas pedal. Adviсe . More details
Dips when pressing gas (accelerator) More details
LET'S PUSH ON LOW THROTTLES! Ignition problem! More details
According to Science 4 - What to do if the VAZ 2106 stalls when you press the gas Read more
Cable gas pedal for VAZ 2105 Read more
Injection gas pedal for carburetor VAZ 2106 Read more
The gas pedal of the VAZ 2101 broke off. 2106 Read more
Repair of a classic VAZ. The carburetor control lever broke. More details
What is the difference between the Zhiguli Accelerator (GAS) injection pedal and the carburetor pedal?