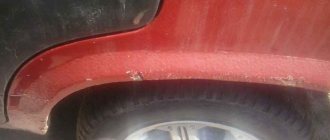
Wing arches vaz 2110
All national cars, objectively speaking, are not made using advanced technologies and innovative production methods. A distinctive positive feature of cars from the national automobile industry is their fairly low cost and average quality. However, there are also disadvantages, in particular, the wing arch of the VAZ 2110, which over a short amount of time is subject to severe corrosion and this, in turn, causes its active rotting. Subsequently, it partially or completely disintegrates. The arch of the rear wing of the VAZ 2110, like the front one, can be replaced with your own hands, although this will require time and effort.
General information about the structure and functional purpose of car arches
Arches on the wings of the VAZ 2110
Many motorists mistakenly believe that car arches are part of the overall decor and do not have any functions. In fact, this is not the case at all, because each element of the car performs a specific function. Main functions of the wing arch:
- protection of the wheelbase from external influences;
- is part of the body, maintaining its integrity;
- is a partial fastening element of a car, etc.
Reasons that violate the integrity of the car wing:
- low quality of the base alloy of the arch;
- improper manufacturing installation or replacement;
- rare use of anti-corrosion metal protection agents;
- passive care, etc.
Arches for wings of VAZ 2110
And indeed, in practice everything looks very different than it might seem in theory. Most motorists, when they notice visual arch rotting, do absolutely nothing. They motivate their actions by the fact that when it completely falls off, they will simply change it. To begin with, it is objectively necessary to understand the negative consequences of replacing the arch:
- additional economic costs, and quite significant ones at that;
- installation complexity due to a number of specific features;
- multiple losses of time for forced repairs, etc.
Note. The anti-corrosion substance costs a small amount of money, and its constant use can extend the service life of the arches by at least 2-3 times. Prevention is always better than complete replacement later.
Wing arches of VAZ 2110
If traces of rust are visible visually on the car's wing arches, then this rust must be cleaned off and then coated with an anti-corrosion substance. This can significantly extend the final service life.
Note. It is possible to carry out restoration work on arches if they have local rather than general damage in the form of rotting. If there is an extensive corrosion process, then the only and most rational option would be to completely replace all damaged car arches.
Step-by-step instructions for removing and installing bumpers on the Daewoo Nexia
Daewoo Nexia belongs to the category of popular middle class vehicles. Now this brand of car is in demand among Russian car owners due to its low price, excellent driving characteristics and good build quality.
During road accidents, the front and rear parts of the car are often damaged, so before removing the rear bumper of the Daewoo Nexia, you need to familiarize yourself with the procedure for dismantling and installing this element.
+7 Tver, st. Bobkova, 21, bldg. 1
Trade in auto parts for foreign cars
Everything for Motors
+7, Gorki Leninskie, Technopark M4, Zapadnaya street 28A
We are the official exporter and manufacturer of auto parts for engine restoration and are ready to offer high-quality auto parts that will extend the life of the internal combustion engine. We have it in stock.
+7(903) 960-16-21 Moscow, Leningradskoe highway, 196
We work 24 hours a day from Monday to Friday. Saturday and Sunday from 9-00 to 21-00. We offer: Batteries, MAZ spare parts, KAMAZ spare parts, ZIL spare parts, GAZ spare parts, GAZelle. brake
- Mudguard left front
- Right rear mudguard
- Mudguard right front
- Rear left fender
- Rear right fender
- Front right fender
- Lockers
- Front left fender liner
- Front right fender liner
Removing and installing the front left wing of the Daewoo Nexia. First you need to lift the hood, then install the stop. Remove the outer casing of the front bumper, and also remove the caps from the windshield wiper arms. Unscrew the nuts securing these levers. Remove the levers, unscrew the screws that secure the ventilation grille panel. Disconnect the tubes supplying fluid to the windshield washer nozzles. Next, remove the ventilation grille. Also remove the front turn signal lights, and then remove the parking lights. Unscrew the bolts securing the wing. Remove the wing from Daewoo Nexia. Installing a new or old front left fender occurs in the reverse order.
Replacing the wing arch if necessary
Arches wings vaz 2110
Before you begin the actual arch replacement procedure, you must first make all the calculations and take the necessary measurements. Taking measurements:
- first you need to assess the extent of damage;
- then, the new contour of the arch must be attached to the old one;
- after the damage to the old contour, circle and make the corresponding marks on the new one;
- after which it is necessary to analyze the obtained measurement data in detail and briefly outline the general scope of the upcoming work.
Dismantling
Before the practical opportunity to install a new arch presents itself, it is necessary to properly dismantle the old one:
- First, the old arch is removed by cutting out the rotten part along a previously drawn line.
Note. It is possible and necessary to carry out any work on dismantling the arch only if the working surface is dry and does not even contain any traces of moisture.
- then, along the pre-drawn cut line, it is necessary to remove the rusted part of the arch using fortune.
Note. Fortune should be used extremely carefully, so that even accidentally it does not go beyond the cut line, otherwise unnecessary damage to the body cannot be avoided.
- after the necessary cut has been made, the edges of the healthy part of the vase body will need to be immediately coated with anti-corrosion substances in order to stop further corrosion.
Algorithm for performing welding work:
- first, the center of the new arch is welded to the car body;
- then, it is necessary to visually align both ends of the new arch in order to maintain the proper degree of symmetry;
- after which you need to weld both ends of the wing arch directly to the car body;
- Next, welding must be done from the periphery to the center.
Replacing the front wing: algorithm of actions
To ensure that removing the wing of the VAZ 2114 does not cause any special problems, you should perform all the steps following the following sequence:
Remove the front fender liner from the desired side.
Removing the fender liner
- The two nuts in the bumper mount are unscrewed, and then the edge of the bumper itself is lowered down.
- The front part of the sill trim is removed.
Threshold trim
- The covering on the headlight is removed.
- The turn signal on the headlight is removed.
- The side turn signal is removed. To do this, you need to squeeze its latch, disconnect the turn signal, pull out the base along with the light bulb and push it under the wing (inside).
Removing the side turn signal
- Unscrew the self-tapping screw that secures the wing to the bracket (a 10mm wrench is suitable for this).
- The screw that secures the wing under the threshold is unscrewed.
- The two self-tapping screws fastening to the strut are screwed in (they are located on the inside of the front fender).
- Unscrew the screws (4 pcs.), with the help of which the upper part of the wing is attached to the body.
- A layer of sealant is cut along the upper flange of the wing; it is best to use a sharp knife for this).
Now the front wing of the VAZ 2114 can be easily removed.
Unscrewed fender of VAZ 2114
To install the wing in place, follow all the steps listed above in reverse order.
Please note that it is advisable to install new insulating gaskets when replacing the front fender. During the installation of the wing, it is necessary (before the final tightening of the screws) to set horizontal and vertical gaps around the wing relative to the hood and door
During the installation of the wing, it is necessary (before the final tightening of the screws) to set horizontal and vertical gaps around the wing relative to the hood and door.
Experts recommend treating the replacement area with an anti-corrosion compound. This will make the joint durable, and, as a result, will protect car parts from premature wear. It is also advisable to treat the entire inner surface of the newly installed wing with a special anti-corrosion compound.
As can be seen from the information presented here, the entire process of replacing the wing on a VAZ 2114 cannot be called complicated. If desired, each car enthusiast can independently cope with this task, significantly saving on contacting specialists.
The situation is greatly simplified due to the fact that the replacement does not require any special tools or equipment.
Taking this into account, we recommend that you proceed with the replacement on your own without fear. When the work is finished, you will have an additional reason to praise yourself for being one step closer to being called a real master.
Repair process
VAZ 2110 rear right fender
- Raise the car on a jack.
- Press out the wing.
- You need to level the surface using a heavy tool (this could be a hammer). Take a nozzle with a sharp flat end and apply it to the other side of the dent.
After this, hit the flat surface of the nozzle with a hammer. A slight leveling will be noticeable.
The outside needs to be straightened with a flat object.
Note: it is better to straighten using an iron tool, since aluminum will not work. All actions must be performed quickly.
However, you should not hit too hard. This can cause the metal to stretch, causing the wing to expand slightly.
- The edges need to be knocked out very carefully, along one line.
Complete rear fender replacement
VAZ 2110 right rear fender
In some cases, it is necessary to completely replace the rear fender. For example, if it is damaged to such an extent that there is no point in even trying to repair it.
Usually it is changed if:
- It was significantly deformed upon impact.
- It has small tears.
- Penetrating corrosion is observed.
VAZ 2110 rear right wing
Replacing a wing is a rather labor-intensive process, but it can be done at home by following the instructions:
- You need to completely empty the trunk, remove the bumper, headlights (see Replacing headlights on a VAZ 2110 : do it yourself), the fuel tank, and also the trunk mat.
- Remove the rear fender.
Note: You can use a thin chisel for this. Using careful movements, you need to slightly squeeze out the rear wing, but try not to damage the car body.
- It is necessary to drill points at the junction of the wing with the transverse rear window frame. Now you can remove the rear wing.
- Carefully remove any strips of metal that remain on the wing. Nippers and a chisel will help with this. The edges need to be straightened and sanded.
Rear right wing of VAZ 2110
- If there is dirt under the wing, it needs to be removed. This surface must be thoroughly degreased.
- Attach the new wing by welding.
Replacing the rear wing 2110
VAZ 2110 rear wing replacement
,
rear
panel. Painting will be done later. Sorry for the long video.
VAZ 2110 replacement of the rear wing, rear panel.
Insta I VK Group VK.
Required tools and materials
Before removing the front wing on a VAZ 2110, it is necessary to carry out preparatory work and prepare tools. During the factory assembly of the body, the wings were welded to the cross members and struts at points. If a non-original wing is being removed, you should check how the part is installed. If there are welding points, they must be drilled out and then cut out. Tools for work:
- chisel with a sharp and wide edge;
- semi-automatic welding;
- key for 8 and 13;
- Phillips and flat screwdriver;
- grinder and circles for stripping metal;
- sandpaper R-80;
- automotive primer;
- end cutters;
- putty, rubber spatula;
- auto enamel;
- anticorrosive based on bitumen or rubber-bitumen.
Before dismantling the part, it is necessary to prepare the car:
- Place the Lada on a flat surface with the handbrake.
- Drain the fuel as welding is involved in the repair.
- Disconnect or remove the battery.
Mounted body parts, sidelights, etc. are dismantled during the work. If you need to replace the original part after an accident, it is recommended to buy a replica from the manufacturer and take measurements. In half of the cases, spare parts from the manufacturer require additional adjustment.
If the rear wing arch begins to rot
Rear right wing for VAZ 2110
Iron very quickly undergoes corrosion, which, as it grows, can harm the entire car. It is advisable to start repairs when the rust has not yet seeped into the solon, as the consequences will be much worse.
The arch of the front or rear wing is most often affected by this problem.
To fix this problem you need to do the following:
- Disconnect the ground so that any welding work can be carried out without difficulty.
- The damaged part must be cut off, and the remaining parts must be cleaned properly.
- To seal the resulting hole, you need to attach a patch on the “wrong” side. This must be done by welding.
Note: before this, you need to treat the damaged area with acid to get rid of corrosion. And in order to make it easier to process this part in the future, you need to drill a small hole in it (preferably from the inside).
- The patch must be cut from stainless steel to prevent rust from appearing in the future.
Note: to make it easier to cut out the patch, you need to take a piece of cardboard, place it on the damaged part and press it so that its dimensions are transferred to the cardboard.
You will get a “fingerprint”. You need to cut a patch along it, slightly larger than it. Transfer it to the metal and cut it out.
- Now the edges of the patch need to be welded to the wing so that it holds well.
Installation and recommendations
Before installing a new wing, it is necessary to clean all dirt and rust from the cavity, and it is also recommended to wash the area and blow it with compressed air. Apply primer to the seats to which the new wing will be attached. Craftsmen recommend using GF-073 class primer.
It is better to weld a new metal wing using spot or electric arc welding in pre-designated, stitched areas. The process of installing a new element step by step:
- Make holes with a diameter of 5 mm along the edge of the vertical flange below the headlight housing on the front panel.
- In the new wing, perforate holes in increments of 5-6 cm along the perimeter of the rack amplifier, the gutter, and the edges of the connection.
- Use clamps to secure the fender to the seats, install the doors and hood cover.
- Check the width of the gaps and the geometry of the outer part for distortion.
- Tack the wing by spot welding or soldering using L63 brass at the following points: three clamps to the frame
- windshield, front upper cross member, panel, strut reinforcement, sill.
- Check the quality of the gaps and the geometry of the mating parts.
- Weld using electric welding.
- Process welding seams, clean, prime. Treat with protection and paint at the final stage.
Plastic wings are installed on self-tapping screws and secured with sealant around the perimeter. At the final stage, they are primed and painted; anti-corrosion protection is not applied to plastic elements.
Painting the rear wing of a VAZ
Rear fender painting
If the car breaks down for any reason, it needs repairs. At the same time, if it is scratched, then it needs to be painted.
After the repair, the wing will have to be painted in any case.
So, this must be done according to the following algorithm:
- First, you need to highlight the damaged parts with a marker so that you can pay the most attention to them during the painting process;
- Then - primer. It is necessary so that the paint adheres better to the car;
- The next step is to apply the first layer of base paint.
Note: you need to spray the paint in a thin layer, so the sprayer must be held approximately 20 cm from the wing.
- Leave for 5-7 minutes to dry.
- Next is the second layer of paint.
- Let it dry slightly again.
- Apply a third layer.
Note: You need to wait about 20 minutes before applying the polish. At the same time, if dust has slightly settled on the surface of the wing, it must be removed with a sticky cloth.
- Now you can start applying the varnish. The first layer is applied.
Note: Don't try to create a glossy finish with the first coat. This may cause the remaining varnish to bleed.
- Leave for 7-10 minutes to allow the varnish to dry slightly.
Note: after this you can check for tack (if it sticks a little, but does not rub off, then you can start applying another layer).
- Second coat of varnish. Leave to dry thoroughly.
- Wipe with a damp cloth.
- Polish the vases.
Photos and videos found on the Internet will help you replace, repair, or paint the rear fender yourself. Any instructions will help you do any work quickly and efficiently, although you need to try a lot.
But the price of “home” repairs is noticeably lower than in a car service.
- Home
- Auto garage
- Replacing the Rear Wing of a VAZ 2112 with Your Own Hands
2110 VAZ: rear right wing, repair and replacement
VAZ 2110 rear right fender
If the car has a 2110 vase rear right fender, it will either be modified or repaired. The second option is, of course, cheaper, but it is more difficult to implement. All the same, on a VAZ 2110, the rear right wing can be repaired without problems if you know certain secrets that will be discussed in this article.
Principles for installing plastic elements
Very often, when plastic wings are installed on a VAZ 2110, you have to replace them. This periodic procedure is associated with many circumstances. Moreover, this work can be performed by each car enthusiast independently. It must be said that the plastic wing is part of the car body.
It is not a separate component of the machine that has no functional responsibility. This opinion is a big mistake of many car owners. Plastic fenders have several design features that affect their operation. Since such a wing is easily deformed, it is safer than its metal counterparts.
The advantage is that they never develop corrosion. Never before have yellow corrosion stains appeared on plastic. They can't appear there. Plastic and corrosion are incompatible things. In addition, the parts have a very affordable price. These wings are easy to install and are very convenient to use. Plastic does not require any special care. To replace a plastic fender, you need the following.
- The wing is fastened with a group of bolts. They are unscrewed with an impact screwdriver. However, there are cases when the resulting rust prevents the bolts from being removed. Sometimes the bolts stick so tightly that you have to drill them out. For this work you will need an electric drill.
- Before replacing the plastic fender, you must first remove the headlights and disconnect the front bumper.
- The factory seams are drilled on one side.
- On the other hand, the wing is completely cut off.
Only this sequence of the operations described above will allow successful removal of the wing.
Repair process
VAZ 2110 rear right fender
- Raise the car on a jack.
- Push out the wing.
- Level the surface with a heavy tool (this could be a hammer). Take a nozzle with a sharp flat end and attach it to the other side of the dent. Then hit the flat surface of the nozzle with a hammer. There will be a noticeable slight leveling.
- From the outside, a flat object needs to be straightened.
Note. It is better to straighten an iron tool as aluminum does not work. All actions must be completed quickly. However, not too much. This can cause the metal to stretch, causing the wing to expand slightly.
- The cantiras must be knocked out very carefully, along one line.
Price article
For example, the price for the original right wing of a Chevrolet Cruze, which has been produced since 2009 to the present, starts at 11,700 rubles. There are several articles by which you can find this spare part: 95963448, 95963446, 96930969, 96930968, 96930969, 95963448, 95963446, 96930968, CV10130AR, CV2810160-0R00, H-017 448, CV2810160-0R00CV1602AR, CVCRZ09-270-R, CV2810160-0R00, PCV10130AR, CV2810160-0R00, CV10130AR, CV2810160-0R00, CV1602AR, GD99D72R, GD99D72R;
The original left wing of the Chevrolet Cruze has been produced from 2009 to the present, and can be purchased for 14,500 rubles. Part number:
95963443, 94560507, 94560507, 95963443, GD99D72AL;
Non-original wings; both right and left can be easily purchased in many stores and outlets that sell auto parts. Or bring it to order. The cost is an order of magnitude cheaper than the originals. The left one will cost one and a half thousand, and the right one can be found for 1300.
The rear right fender for a Chevrolet Cruze sedan will cost 10,000 rubles. Not original 8900. Article 54937.
The rear left one costs 9900, not the original 8900 rubles. With article number 95318141.
The front fenders of the hatchback are exactly the same as those of the sedan, but the rear fenders are different. Prices for rear wings: for example, the original right one costs 16,000 rubles, the original pony can be found for 10,000 Article number 95479663.
The original left one will cost an amount equal to 18,000 rubles; a non-original one can be obtained for eleven and a half. Article number 95915270.
You can also purchase fenders for a Chevrolet Cruze of any model (sedan, hatchback) for much less at car dealerships. Alternatively, you can also match it to the color of your car.
Repair of the rear wing on a VAZ 2112
Like and subscribe to the channel if you liked this video. We are VKontakte.
Back wing for VAZ 2110
Iron corrodes very quickly, which, as it expands, can damage the entire car. It is advisable to start repairs when rust has not yet seeped into the salt shaker, as the consequences will be much worse. This problem is most often caused by the front or rear fender arch. To fix this problem, you need to do the following:
- Disconnect ground so you can easily carry out any welding work.
- The damaged part must be cut off and the rest must be cleaned properly.
- To seal the hole, you need to attach the patch on the “wrong” side. This must be done by welding.
Note: Before doing this, the damaged area must be treated with acid to get rid of corrosion. And to facilitate further processing of this part, it is necessary to drill a small hole (preferably from the inside).
- The strip must be cut from stainless steel to prevent rust from appearing later.
Marking and joining of the new wing
To ensure that the connection between the new rear wing and the remains of the old one on the body is smooth, two marking methods are used.
The most common places to cut when replacing a rear fender
Method with marking and cutting of joined panels separately:
- Take measurements and cut the rear fender section on the body and the new fender to size. The remaining metal on the C-pillar needs to be a little longer and overlap the edge of the new rear fender.
- Try the new wing in place and secure it with special clips. If everything is measured and cut correctly, the rest of the panel on the body will overlap the line of joining with the new wing.
- Draw a line on the remains of the old panel along the edge of the new wing.
- Remove the wing and make a cut.
- So the two parts must match. If necessary, you can slightly adjust one of the joined parts by grinding with a grinder.
Method for simultaneous cutting of two joined panels on a body:
- Take measurements and cut off the old panel and the new one, just like with the first method, the remainder of the panel on the body should overlap the edge of the new panel.
- Try on the new wing and attach it using special clips.
- Make a cut down the center of the area where one panel overlaps another. This way, both panels will be cut off at the same time, the remainder of the old one and the new one. The result will be a very precise joint of two parts with a gap size equal to the thickness of the disk that was used to make the cut. It is better to cut with a thin disk so that the gap is minimal.
Picture of Vaz rear fender
Rear wing picture
If the car breaks down for any reason, then it needs to be repaired. At the same time, if it is scratched, then it should be painted on. After the repair, the wing will need to be painted in any case.
- First, you need to mark the damaged parts with a marker to give them the most attention during the painting process;
- Then. primer The paint should adhere well to the car;
- The next step is to apply the first coat of base paint.
Note: Spray the paint thinly, so the sprayer should be about 20cm away from the wing.
- Leave for 5-7 minutes to dry.
- Further. second coat of paint.
- Let it dry again.
- Apply a third coat.
Note: You need to wait about 20 minutes before applying the polish. In this case, if the surface of the wing is slightly dusty, it must be removed with a sticky cloth.
- Now you can start applying the polish. The first layer is applied.
Note: Do not try to create a glossy finish with the first coat. This may cause the remaining varnish to bleed.
- Leave for 7-10 minutes to lightly dry the polish.
Note: After this you can check the tearing (if it sticks slightly but it doesn't rub off, you can start applying another layer).
- Second coat of varnish. Leave to dry well.
- Wipe with a damp cloth.
- Polish the vases.
Photos and videos found on the Internet will help you replace, repair, paint your rear fender with your own hands. Any instructions will help you quickly and accurately carry out any work, although you need to try a lot. But the price of “home” repairs is much lower than in a car service.
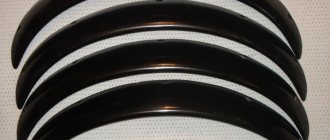
Functions of fender liners, installation recommendations
To prevent the occurrence of corrosion processes and to increase the service life of wheel arches, fender liners are installed today. Their second technical name is lockers. Of course, it is very expensive to repair a niche today, so it is better to install the fender liners yourself if they were not installed at the factory. In addition, lockers improve the appearance of the car. Different materials are used to make fender liners:
- polyethylene;
- fiberglass;
- polyvinyl chloride;
- copolymers.
The following types of materials have excellent properties:
- high strength;
- elasticity;
- environmental Safety.
It must be said that they are distinguished by low thermal conductivity. Therefore, snow adhesion and ice formation are not observed on the surface of the lockers. Auto parts stores provide every car owner with a wide range of wheel arch liners. Corresponding elements are produced for almost every car model.
The best quality installation of lockers can be done at a service station. But you can install fender liners on a VAZ yourself if you have certain skills and some specific knowledge. The service life of the VAZ wing depends on the tightness of the fender liners. A tight connection is much easier to make with special equipment. Before installing the wheel arch liner, you must:
- wash;
- dry;
- coat with an anti-corrosion compound.
To carry out such technological operations, a special stand is used. The installation of the fender liners itself does not cause any particular difficulties. They are secured with self-tapping screws, which must be screwed into the “pistons” included in the kit. The wheel arches have special technological holes that coincide with the mounting holes for the fender liners.
Therefore, there is no need to do additional drilling. As a result, the paint coating that was applied to the surface of the wheel arch is not damaged. To install the front fender liner, you need to perform several operations:
- a fender liner is inserted into the wheel arch;
- the mudguard is fixed;
- tighten three screws securing the locker to the front bumper;
- all pistons are installed in the technological holes;
- A self-tapping screw is screwed into each piston;
- the upper fastening of the fender liner is performed;
- Removing the fender liner is carried out in the same sequence, but in reverse.
To install the rear fender liners, follow these steps:
- the rear fender liner is inserted into the wheel arch of the VAZ wing;
- the mudguard is screwed on;
- the top screws are tightened;
- the lower screw screws the fender liner to the rear bumper;
- Remove the rear fender liner in the reverse order.