Suitable types of glue
In practice, adhesives that contain polychloroprene or polyurethane are most often used.
Based on polychloroprene
Polychloroprene-based adhesives contain a solvent, resins or metal oxides that increase bond strength and resistance to temperature changes. During the gluing process, local heating with a hairdryer may be recommended, which accelerates polymerization and gives a strong connection. Once the reupholstery is completed, the car is ready for use in 30 minutes.
Popular brands of adhesives:
- "Glue-88". Advantages: suitable for all types of cladding, stable at high air humidity. Disadvantages: weak fixation, toxic odor during operation.
- "GTA Boterm". Advantages: resistance to temperature fluctuations and high humidity. To activate the connection, heat up to 60 degrees is required.
- "Mah." Forms a good connection, heat- and moisture-resistant. The disadvantage is the high cost.
- "Kaiflex K414". One-component composition, UV resistant. The strength of the connection is achieved due to the cold welding effect.
Expensive brands of adhesives are used by professionals.
Polyurethane
Polyurethane adhesives are universal and provide strong fixation of the base and material. The drying period allows you to correct defects in the upholstery. Brands of polyurethane-based adhesives used in reupholstering ceiling panels:
- "Moment". For reupholstery, universal varieties are used - “Moment Crystal” and “Moment-1”. Adhesive compositions have good adhesion, are moisture resistant, and can withstand temperatures from -40 to +100 degrees.
- "Titan" Specialized glue has a viscous consistency and sets quickly. The composition gives a strong connection, is non-toxic, colorless, retains properties from -30 to +60 degrees, and is moisture resistant.
- "Demoskol". Colourless, stable in humid environments, withstands mechanical and thermal stress.
See also
Description and properties of polymer glue, types and instructions for application
Polyurethane adhesives are available ready-made in convenient packaging.
Alternative options
Adhesives in aerosol form are used for finishing car showrooms. Advantages of adhesive compositions:
- economical;
- do not spread;
- leave no traces;
- give an even coating.
The disadvantage is the high cost; skills in application are required due to the high drying speed.
Tkanoff › Blog › What kind of glue is needed for reupholstering a car interior?
The best adhesive compositions for car interior trim
To make it easier for you to navigate the existing compositions, we will look at each type of work that is carried out when upholstering the interior, and tell you what glue can be used for each of them:
For repairing floors and panels
fits SAR 306. It easily copes with rubber with a fleecy top, leather, fabrics and parts made of TPR, PVC, polyurethane, hard plastic. This glue can be black, white, transparent. Resistant to high temperatures. Apply in 1 layer to both surfaces, after drying, activate with a hairdryer at a temperature of +80°C. Buy glue SAR 306: ecokoja.ru/soputstvuiushchie-tovary/clei/sar/
The new product from the Tkanoff brand, T-glue, has also proven itself in professional tuning. In terms of characteristics, it is a complete analogue of the famous SAR 306, and has a number of advantages: This glue is frost-resistant and fireproof. If applied on one side, the elements to be glued can be connected after 3 minutes; if applied on two sides, after 10. Forms a high-strength, water-resistant adhesive seam that does not dissolve oil, acid, or gasoline.
For interior decoration, upholstery of rubber parts, foam materials
Temperature-resistant liquid Mah is suitable. It must be applied to both surfaces to be glued: dry for 30-60 minutes, then heat in an oven or hairdryer to 100°C, combine and put under a press for 1-2 hours.
For covering seats, ceilings, curved surfaces
It is better to use T-glue Auto. It is especially good for gluing eco-leather, leather, suede, ceiling fabrics, and for parts with complex terrain, for example, dashboards and other plastic elements. Apply to both surfaces in an even layer. No need to heat it with a hairdryer. Buy T-glue for cars: ecokoja.ru/soputstvuiushc…tovary/clei/kley-tkanoff/
For gluing plastic, metal elements, glass. A good option is Kleiberit. It is water and heat resistant and can withstand sudden changes in weather conditions. Apply evenly to both surfaces, which are connected 10-15 minutes after the formation of the adhesive film. Final strength is achieved after 3 days.
High-quality aerosol formulations with excellent properties include T-glue spray, Tuskbond, Fentac, MultiSpray. We do not recommend using 88 glue - it has a poisonous, toxic odor and its gluing is short-lived.
Source
Preparatory activities
The reupholstering process begins with dismantling the ceiling panel through the passenger door in the cabin. The seat is first removed. In some cases, it is recommended to remove the windshield. The lampshade, plugs, visors, and handles are removed from the ceiling. The freed panel is removed from the grooves and transferred to the room where the reupholstery will take place.
The old casing is completely removed using abrasive detergents. Remains of glue are cleaned off using a solvent. The surface is dried.
Features of repair work
Before you begin the actual repair work, you should prepare what you need. We will need:
- fabric material;
- glue;
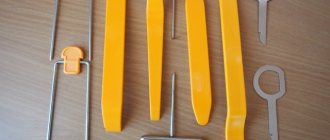
- Screwdriver Set;
- degreaser;
- fine-grained sandpaper-abrasive;
- hard and dense sponge;
- rollers (they are used to level the surface);
- masking tape;
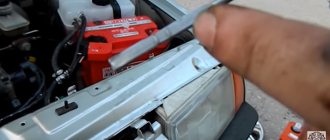
- construction hair dryer;
- additional plugs (when dismantling the car ceiling, the plugs break off, so they need to be replaced).
Re-gluing the ceiling does not take much time.
Carrying out a complete re-upholstery of a car ceiling is a fairly simple procedure. First, the old ceiling is dismantled, the remaining coating is removed and the work surface is thoroughly cleaned with a hard sponge. It is necessary to completely remove all glue residues and degrease the surface. Then grinding is carried out with an abrasive.
The glue is applied in the center of the working surface in 2-3 strips up to 10 cm wide on the left and right sides. The prepared fabric is carefully smoothed with a roller. Then it is leveled and the edges processed. Excess residues are trimmed off. The renovation is completely completed after the structure is installed in its original place and the caps, lighting and other decor are installed.
How to properly glue the ceiling in a car
You can start gluing from the central part (in this case an assistant is needed) or from the edge (you can do it alone). When tightening from the center, the glue is applied in small strips (up to 10 centimeters in length and width). The material in this place is pressed tightly.
The next area is treated with an adhesive composition, and the fabric is straightened onto it. In areas of bends and protrusions, the upholstery should be fixed to the panel with particular care. Along the edges, the material is folded under the ceiling, glued, and the excess is cut off. Then holes are made for fasteners and the panel is installed in place.
If the constriction starts from the edge, then the edge protrusion and ¼ of the panel surface are coated with glue. After carefully fixing the material on the adhesive base, the rest of the panel is coated and the gluing process is completed. The choice of tightening method depends on the material: thin is glued from the edge, denser - from the center.
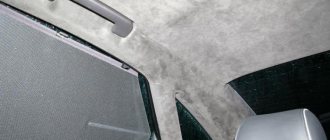
Removing the headliner
To properly repair a car's ceiling trim, it must be dismantled.
To do this, you need to remove all the plastic trim parts that are adjacent to the ceiling trim and interfere with its removal. It is also necessary to remove the interior lighting lamps (in the front part), sun shields, plastic handles and all the clips that hold the trim. The lampshade, which is located in the middle part, should be removed last, as it will keep the casing from falling down while you unscrew and dismantle all other parts. Each car has its own characteristics of removing various elements, so if difficulty arises, it is better not to apply excessive force, but to find instructions on the Internet. Sometimes it is enough to know in which place you need to insert a flat-head screwdriver to make the part give way. To remove the removed trim from the interior, it may be necessary to remove the front passenger seat.
So, when all the edges of the ceiling trim are free from fastenings, you need to unscrew the interior lamp and pull the trim out of the cabin to the workplace where it will be repaired. On cars with a fifth door this will be easier to do, but on sedans you will have to contrive to stick the headliner through the door. To remove the removed trim from the interior, you may need to bend (or twist) it a little. Here you need to be careful not to bend it too much.
It may be necessary to dismantle and remove the front passenger seat from the passenger compartment so that it does not interfere with the removal of the headliner from the passenger compartment.
Choosing ceiling fabric for reupholstery
The material for the ceiling must be externally consistent with the interior upholstery. For example, eco-leather will be combined with genuine leather, flock - with velor. For homogeneous materials, the main thing is to choose the lining for the ceiling exactly or one tone lighter.
See also
Which glue is better to glue seeds to paper and the choice of means for making crafts
Flock
The material resembles velor in appearance, but is much cheaper and more practical. Artificial material is obtained by gluing crushed fibers from wool, cotton, and synthetics onto a base fabric. To reupholster the ceiling in the car interior, mixed and polyester flock is used.
The composition of the mixed flock includes: nylon (lint), cotton with synthetics (base). Polyester flock is similar in properties to mixed flock, with the exception of the color range (available only in black). Flock is the most popular material for covering car showrooms. Causes:
- practicality (easy to clean, does not deform, does not fade in the sun, can withstand temperature changes);
- safety (non-flammable, does not emit harmful fumes);
- tactile and visual appeal;
- affordability.
A special feature of the use of upholstery material is the prohibition on the use of cleaning products containing alcohol and acetone. To avoid the accumulation of static electricity, it is recommended to use special means.
Eco leather
Eco-leather differs from leatherette in higher quality. The material consists of 2 layers: polyurethane (texture like natural leather) and cotton/polyester (base). Polyurethane is a durable, non-toxic, breathable polymer. Dyeing and embossing give it a resemblance to genuine leather.
The advantages of eco-leather are:
- in elasticity, protecting against tears;
- wide range of colors and textures;
- hypoallergenic;
- non-flammability;
- dirt- and water-repellent properties;
- preservation of color when exposed to sunlight;
- resistance to temperatures down to -40 degrees;
- accessibility for processing.
Disadvantages of the material in comparison with other covering fabrics:
- mechanical damage leads to unusability (loss of attractive appearance);
- non-repairability if the polyurethane layer is destroyed;
- heats up in the sun.
When cleaning the coating, do not use metal brushes, abrasives, or products containing chlorine.
Leather
For car dealerships, they use special auto leather, which is stronger and more expensive than leather for shoes and clothing. Genuine auto leather is an expensive material used in premium models. Unlike artificial turf, it has a number of significant disadvantages:
- has high thermal conductivity (the ability to heat and cool strongly);
- does not allow air to pass through well;
- difficulty in care.
See also
Types of the best UV adhesives for glass and rules for use at home
The main advantage of natural material is prestige for the owner.
Alcantara
Alcantara comes in two types: Italian and self-adhesive. Italian material has textile or foam rubber on the reverse side. Self-adhesive Alcantara has an adhesive base. The material was developed specifically for finishing car showrooms. The fabric looks and feels like suede (the self-adhesive pile is longer) and has the following characteristics:
- moisture resistant;
- easy to clean from dirt;
- fireproof;
- does not fade in the sun;
- does not tan in the cold;
- does not crack due to temperature changes;
- wear-resistant.
The material is available in a wide range of colors.
Carpet
Carpet (car carpet) is available in three modifications, determined by the length of the pile:
- There is no lint. Dense, soft, elastic fabric.
- Pile length – 6 millimeters (tufted carpet).
- Pile length – 10 millimeters (premium material).
Advantages of synthetic fabric:
- resistance to moisture, high temperature, UV radiation;
- not electrified;
- non-toxic;
- wear-resistant.
Features of application: you cannot use hot-melt adhesives that require heating above 50 degrees.
Preparing for work
The preparatory stage is no less important than the choice of material and glue, otherwise nothing will work. First of all, you need to remove the ceiling, and this is not easy. Some owners consider it necessary to remove the windshield, but in reality it is optimal to remove the front passenger seat and pull the roof out through the rear door.
Dismantling
First of all, the ceiling is inspected. However, you should not lose sight of important details:
- is there a backlight;
- will the racks interfere with the removal of the ceiling frame;
- whether there are visible clips, including their device;
- how the handles are attached to the ceiling.
As a rule, it becomes necessary to remove the panels covering the racks - they should also be covered in the shade of the ceiling covering. The front elements are secured in self-latching connectors - just carefully pry them with a screwdriver and they will come out of their sockets. There is no need to completely remove the side pillars; just remove the seat belt fasteners and move them slightly to the side.
Next, you should remove the visors and ceiling handles, unscrew their fastenings, and remove the interior lighting. Next, find all the fastening elements of the ceiling covering, and, depending on the type of clips, select the appropriate tool. It could be a screwdriver or a knife. Sometimes it is convenient to use pliers or scissors. They must be removed from the edges to the middle, otherwise you can simply break the frame. Here you will need an assistant - he will hold the hanging part of the ceiling. Then all that remains is to pull it out.
Cleaning procedure
Old material, including foam rubber, must be removed using a solvent and a sponge. When the fabric is not removed, you can moisten it with solvent. It is better to test in advance on an inconspicuous area to avoid damage to the frame. It is worth considering that the new material will stick well only to a rough surface.
Troubleshooting procedure
If there are cracks, wrinkles, frayed edges and other defects, you need to mark all noticed problem areas with a marker. Based on how badly the frame is damaged, it either needs to be repaired or a new ceiling is purchased. Repairs are carried out using epoxy resin, fiberglass, and the algorithm is as follows:
- On the back side, the damaged area is protected with sandpaper.
- Apply a small layer of resin and place a fiberglass patch on top.
- The procedure must be repeated once or twice so that a strong layer is formed.
- Now you can move on to the front part of the frame - clean the damaged area and putty.
If the frame is severely damaged, the above manipulations will be of no use - it’s cheaper and easier to simply replace it.
General rules for the procedure
The ceiling panel is removed, the pillars and sun visors are unfastened. If the “original” upholstery does not have bubbles, then the new material is glued on top of it. The ceiling panel is primed with glue. When the adhesive dries, the procedure is repeated. The glue is applied to the prepared material and spread over the surface of the panel, leaving no folds or bubbles.
If there are bubbles, remove the old coating from the panel. The surface is cleaned, primed with adhesive, and new fabric is glued on.
Criterias of choice
Car upholstery today can be done by hand. For such purposes, special fabrics and materials are used, which can be found in detail on the relevant websites. An important attribute when solving such problems is glue, which should be selected based on the substance for which it is intended. Often several standard materials are used here:
- leather (natural or substitute);
- textile;
- combinations of substances.
It should be noted that if several substances are used simultaneously during finishing, adhesive compositions must be selected based on this factor.
Cost of reupholstery
The exact amount of cash that will go towards upgrading the interior depends on several factors - the quantity and price of the chosen fabric, the quality of the adhesive. Many sedans will require 5 m2 of fabric, but when it comes to large cars, you will need half as much material. In any case, the selected fabric must be taken with a margin (30-40%).
The price of upholstery with genuine leather starts from 2.5 thousand rubles. Covering the ceiling with natural material will cost 12.5 thousand. Alcantara fabric will cost noticeably less - 900 rubles per rm, carpet is even cheaper - 200 rm. Now about the glue - for a jar of 88 compounds you will have to pay 250 rubles, while high-quality compounds will cost much more.
That is, with only 1,500 rubles on hand, you can already reupholster the interior ceiling covering. We can only hope that the material will last a long time, although there is no certainty. It’s a completely different matter when spending 5-6 thousand. The fit will be reliable.
At the same time, even the most expensive option (a combination of genuine leather and good glue) will end up being cheaper than going to a car repair shop to reupholster the ceiling. There they can demand up to 30 thousand rubles, and this is already a more impressive amount.
Useful tips: we analyze the main mistakes
According to experts, the main and main mistake of novice craftsmen lies in the incorrect selection of glue. An unsuitable adhesive base can ruin the entire work, and if the glue is not resistant to high temperatures, the fabric will simply slide off the frame when the machine is running. Also, many inexperienced car enthusiasts do not follow the instructions for covering the ceiling with fabric. Remember that you should start pasting and re-upholstering from the center of the working surface. Otherwise, it will be difficult to align it, and subsequently bubbles will appear, and the fabric itself will move away from the frame.
Rules for choosing material for plywood car ceiling
Before studying the question of how to glue the ceiling in a car, you should first purchase suitable fabric for upholstery. Car owners can choose from a wide range of materials shown in the table.
| Textile | Advantages | Flaws | Notes |
| velours | affordable price, soft and pleasant to the touch, large selection of textures | short-lived - lasts only 2-4 seasons, easily torn and scratched | velor is easy to care for - no need to buy expensive products |
| flock | low cost, original in texture and colors, good sound insulation | difficult to work with and requires several stages of surface treatment | during processing, flock acquires an exclusive and expensive look |
| eco leather | high levels of moisture and heat protection, easy to care for, lasts up to 7 seasons of active use | absorbs all odors, including unpleasant ones, low safety margin | high-quality eco-leather is difficult to distinguish from natural leather, so the interior can be given an expensive look |
| leather | long service life - up to 10–12 years, durable and environmentally friendly | the most expensive interior trim option | In order not to damage the expensive material, it is better to entrust the reupholstery of the ceiling with genuine leather to professionals |
| Alcantra | elastic and stable during use, soft and silky structure, wide selection of shades | high price | Alcantra is a synthetic material made from thin microfibers - this gives the upholstery a high margin of strength |
| carpet | most affordable, pleasant fleecy surface, does not fade, easy to care for | quickly accumulates dust and rolls off | synthetic fabric with decorative pile surface |
To reupholster the ceiling, you need to choose high-quality glue