On Lada cars, wheels come in several types, namely 13th and 14th radius. Recently, AvtoVAZ has been installing 14th wheels on its cars; they have a more modern structure. Ventilation appeared, which reduced the temperature load of the brake mechanism.
In earlier versions of Lada cars, regular 13-radius wheels were installed; they do not have holes for ventilation. The lack of ventilation holes resulted in overheating and rapid wear of the pads and discs.
Do-it-yourself step-by-step replacement of brake discs on a Lada Granta
If the parts do not correspond to the specified dimensions from the manufacturer, a reasonable question arises - grind or change. Grooving for a ventilated brake disc is possible if the remainder is at least 4 mm. Since if a part is worn out, the manufacturer revokes the warranty, many advise replacing it with a new one.
Many owners of cars with a disc brake system are interested in how often it is necessary to change its consumable parts. On a Lada Granta, replacing brake discs is a key maintenance step.
When to change?
In what cases are brake discs replaced?
Over time, the brake discs of the Lada Granta become unusable. They have their own wear and tear period. Discs should be replaced in the following cases:
- The degree of disc wear is above the permissible norm. If the car uses the most ordinary brake discs, then they need to be changed if the wear size is 10 millimeters. For ventilated discs it is 17 millimeters. A ruler or caliper is used to determine the level of wear.
- if the brake discs burst. There is no point in repairing them. Therefore, it is better to replace them with new ones.
- presence of chips and cracks. In some cases, motorists still continue to operate their car if small cracks form on the brake discs. However, this is not safe. It's better to replace them immediately.
If, after purchasing a brand new brake disc, small cracks are noticed on it, then do not despair and throw away your purchase. The problem is solved with the help of a turner that can turn the entire disk. In this case, there will be no trace of cracks.
Procedure for removing old brake discs on Grant
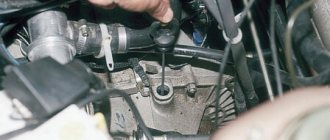
First of all, we tear off the front wheel mounting bolts, and then jack up the car. Then completely remove the wheel from the car. Next we will need a torx t12 socket to unscrew and remove the caliper. Then we hang it in such a way that there is no load on the hose.
Then, using a 7 key, unscrew the two guide pins that secure it to the hub.
After this, we apply penetrating lubricant on the reverse side, since, most likely, the disc is stuck to the hub.
After waiting a few minutes, you can begin to dismantle the disk, using either a special puller or a hammer and a wooden spacer.
After several attempts, most likely you will still be able to cope with this job.
Removing the Lada Granta caliper
You will need : lift the front of the car and remove the wheel, prepare a 14mm wrench, an 18mm socket and a large screwdriver.
To remove the caliper, proceed in order:
- Slide the block inward, thereby pushing the working cylinder piston into the cylinder. This can be done using a large screwdriver, which must be inserted between the inner brake pad and the brake disc.
- Remove the brake hose holder from the bracket on the shock absorber strut.
- Loosen the hose end on the working cylinder.
- Remove the two bolts securing the shoe guide to the steering knuckle. Remove the Granta caliper by unscrewing its working cylinder from the tip of the brake hose.
Immediately plug the hose end hole using any available means to prevent brake fluid from escaping.
Installation of the Granta caliper is carried out in the reverse order. Before installation, screw the brake hose end into it and tighten it. When installing the caliper, make sure that the brake hose is not kinked. After installation, be sure to check the brake fluid level in the master cylinder reservoir and bleed air from the brake system.
Replacing brake pads on Lada Granta
Selecting brake pads for Lada Granta
Brake pads are a consumable part of the car, in other words, they are changed quite often. The front brake pads bear the brunt of the load when braking, so they wear out three times faster than the rear ones.
Not only the braking efficiency, but also whether they will creak during operation depends on the quality of the brake pads. Do you know which front brake pads are best to choose?
Lada Priora, Granta, Kalina cars are equipped with the same brake pads having catalog numbers: 21100-3501080, 21100-3501089.
The brake pad consists of a metal plate and a special lining made of friction materials. The quality of this material determines the wear resistance, rigidity and friction coefficient of the brake pad. The higher these important parameters, the better.
Original or non-original
There is an opinion that original brake pads are more effective, and their service life is much longer than non-original ones. In addition, original brake pads are made without the use of asbestos, which is hazardous to the environment. Why do many people choose non-original brake pads? The main reason is the low price for acceptable quality. And in some cases, for a low price you can find non-original brake pads that are not inferior in quality to the original.
Replacing rear brake pads in Lada Granta
Replacement of rear brake pads, disassembly and assembly of the rear brake mechanism of Lada Granta.
If they are worn out, and this usually happens after a mileage of 60,000 km.
1. Securely secure the car so that it does not roll away.
2. Remove the handbrake from the brake and make sure it is in the down position.
3. Raise Grant using a jack.
4. Remove the rear wheel.
5. Using a 7mm spanner, unscrew the two guide pins.
6. Remove the brake drum. If the drum cannot be removed, then turning it, hit the drum with a hammer through a wooden block and remove it. We don't press the brake.
7. Using a screwdriver, remove the spring from the upper block, then remove the spring.
8. Remove the upper spacer bar.
9. Also, using a screwdriver, remove the spring from the lower block, and remove the spring.
10. Using a screwdriver, remove the guide spring. On Grants with ABS, special brake pads are installed with a slot for the wheel rotation sensor.
11. Remove the front block and lower the block.
12. Remove the manual brake pad drive lever from the parking brake cable hole.
13. Straighten the cotter pin and pull it out of the hole in the “manual drive” lever of the parking brake. We also remove the washer from the finger.
14. Take out the lever and finger. We install the manual drive lever on the new block in the reverse order and install the new blocks in the reverse order.
Which disks to choose for replacement
The following disks are installed:
| R13 | R14 | R15 | |
| What models were they installed on? | Eight-valve engine, standard | Sedan and liftback, sixteen-valve engine, “standard” and “norm” equipment | Sedan, liftback, sport. Luxury and sport trim levels |
| Peculiarities | The disc is significantly smaller than the boot | Disc and boot are the same size | Installed only on luxury and sports versions |
| Acceptable wheel size | R13 and > | R14 and > | R15 and > |
The cheapest thing would be to supply the same ones. If your car has thirteenth brakes and you don’t have enough of them, you can install R14. Users who have practiced this replacement note a significantly reduced braking distance. The Lada Granta Sport is equipped with size 15 brake discs.
Determine what you need a car for. If it’s a quiet ride in the city and on the highway, any regular wheels without grooves or perforations, size 13-14, will do. You can get inexpensive ones from Daewoo or similar in price. Parts from previous models - 2110, Kalina and Priora - will fit. Replacing Lada Granta brake discs is not required if the car is operated in normal mode.
Dimensions
The Granta is suitable for R13, R14 and R15 wheels. The main thing is that the wheel size matches or is larger. In the case of the above-mentioned installation of R14 to 13 wheels, you will have to change the wheels themselves.
The most famous manufacturers
Well-known suppliers include Brembo, Bosch, Masuma, EBC Brakes, Schneider, TRW, SAT. Most of the products from these brands are intended for sports use and are not needed by the average driver. Therefore, it makes no sense to replace the brake discs on the Grant with models from well-known brands for normal driving.
Let's summarize
As you can see, the process of replacing brake pads is not complicated; it is important to initially understand how to fix it. The work will not take much time - half an hour, and the second or third time you will do it even faster. Pay attention to the sounds when braking: if there is a whistle, grinding or creaking, you feel kickback in the pedal, the system begins to “beat” - it’s time to install new pads. Practice shows that on a Lada Granta, for a driver with a calm driving style, the service life of the kit increases to 50 thousand kilometers, for motorists and reckless drivers it decreases to 30 thousand kilometers.
Installing new drives
- Install the new disc and align the holes in it and on the hub.
- Fit and then tighten the guide conical studs.
- Install the stationary part of the caliper on the hub by tightening the two bolts with a key to “17”.
- Install new brake pads. Please note that the piston will need to be completely recessed in the caliper. Otherwise, new pads cannot be installed.
- When replacing Kalina brake discs, be sure to check the condition of all elements - this will allow you to avoid repairs for a long time.
- To recess the piston, you need to unscrew the bleeder fitting a little.
- Place the moving part in place; the guides must be treated with silicone grease. It is able to withstand high temperatures, unlike “Litol” or “Shrus”.
- Tighten the two bolts and, if necessary, hold the nut from the inside with a “17” wrench.
- Bend the edges of the metal plate.
At this point the repair is complete, you can install the wheel and enjoy the ride. When braking, the car will not pull to the side.
Possible difficulties and solutions
Difficulties in dismantling a worn element may arise at the initial stage - bending of the edges of the plate. It is not always possible to successfully catch the edge and bend the material in the desired direction. If the owner cannot get a grip with pliers, you can use a rigid screwdriver or pliers, placing the working rod in the eye, after which the lever method is used to bend it.
- It is always better to use original spare parts or suitable replacements;
- The rear wheels are securely fixed with wheel chocks;
- Replacement is carried out only comprehensively;
- After completing the procedure, it is necessary to monitor the brake fluid level.
You should not worry if you experience an unpleasant sound after replacement. New elements should get used to the brake discs after several thousand kilometers.
The following video will help every Lada Granta owner learn the step-by-step work of replacing front brake parts with current examples.
Security measures
You cannot use a faulty jack or load a working one more than the carrying capacity according to the passport. It may not support the weight of the vehicle. Before work, the jack must be inspected and the mechanism checked for functionality. If the surface is uneven, you need to place wooden planks under the jack. It is strictly not recommended to crawl under the car.
Do not put your head or hands into the wheel arch. If the jack tips over, there is a risk of serious injury.
Now we can say with confidence that replacing brake discs on a Lada Grant is a simple process, accessible to anyone who owns a car. Timely replacement of worn parts is the key to your safety. Don't put it off for too long.
Source
Preliminary operations
Before starting the replacement itself, it is necessary to carry out the following work:
- The brake fluid level is monitored. If it exceeds the standard, the excess volume is pumped out, since there is a risk that after installing new pads, the liquid will simply squeeze out.
- The rear wheels of the vehicle are secured with chocks or other anti-rolling devices.
- The bolts securing the wheel rims are loosened.
- A jack is placed under the desired wheel, after which the car is raised and the wheel is dismantled.
- The necessary tools are laid out, as well as a new set of pads.
- Turn the steering wheel in the direction you want to replace it. It will be more convenient to work this way.
Replacement
If your discs have worn out or you want to install sports ones from a well-known brand, it’s time to start replacing them. It is carried out in several stages. If you have a tool and a jack, it can be done in any garage.
Discs are always replaced in pairs, even if the second one is slightly worn. Otherwise, braking becomes uneven, and one wheel slows down more than the other, which can lead to the car skidding.
The process of replacing Lada Granta disks
Along with the discs, the pads are also changed. Usually they wear out at about the same rate; it’s easier to do it at the same time. If the discs survive another run of the pads, you can wait to replace them.
What tools are needed
You will need a set of tools in the form of wrenches, a jack and a wheel wrench. Brake cleaner, slide lube, and copper grease will also come in handy. A thread locker wouldn't hurt either.
How to jack up a car
The machine must be parked on a level surface such as asphalt or concrete. Jacking on gravel or sand is not permitted. The jack may fail, it will slide off the car, scratching it, and there is a risk of injury to whoever is under the car.
If everything is covered with plastic, you can install a cushion under the lever. Raise the car on the jack slowly. When the required height is reached, secure the jack. It is better to install a safety stand. If it is not there, when removing the wheel, place it under the body next to the jack.
Removing the wheel
Before jacking up, the wheel nuts must be loosened. Sometimes they are closed with caps - they need to be removed. Use a wheel wrench to unscrew the nuts counterclockwise. When the wheel begins to wobble when unscrewing the last nuts, carefully pull it towards you and remove it, placing it on the floor.
Removing the pads and cylinder
Brake pads are replaced when the thickness of the friction part is less than 1.5 mm. Visually inspect them through the caliper window and measure them after removal. If the size is below the minimum, they definitely need to be replaced.
First you need to use pliers to bend the locking plate securing the cylinder to the guide pin and unscrew the screw securing the guide pin itself. Then remove the bolt with the plate, open the bracket to remove the pads.
Replacing a Lada Granta disc close up
Measure the thickness of the pads. If they are still ok, clean them and set them aside for later installation. The brake pedal cannot be pressed when the bracket is rotated relative to the guide - the piston may simply fly out of the cylinder.
When the wheel is removed, fill everything with brake cleaner, then carefully wipe the structure. Cleaned parts will be much easier and more enjoyable to work with.
Removing the caliper
Removing the disk
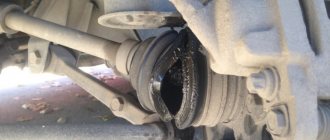
Once the caliper is removed, you can begin to remove the brake disc. Its central part is attached to several screws that need to be unscrewed. Some types are additionally attached to the hub with a central nut.
What to do if the disk cannot be removed
If the brake disc is stuck to the hub, the legendary WD-40 will help. Apply a sufficient amount into the cavity between the hub, wait a while, then rock the disc. If that doesn't work, try giving it a few light blows with a hammer through a block of wood. If you still need the disc, you need to do this carefully so as not to drop it or damage the edges.
Preparing to install a new drive
Before installing a new drive, prepare everything for installation. It is highly advisable to sand the hub to remove rust, then coat it with a layer of copper grease. This way it will be preserved and will not rust, and it will look more pleasant in appearance. All bolts should be cleaned with a wire brush and lubricated with thread locker to prevent accidental loosening.
Installing a new drive
Before installing a new disk, it must be cleaned of possible corrosion. This can be done using brake cleaner. Apply generously to the work surface, then wipe thoroughly with a cloth. The surface may need to be further cleaned.
Installing a new drive
When the work surface is clean, remove the liquid with a fresh rag. You cannot leave it on the disc - it can react with the brake pads, causing them to oxidize.
Installing the caliper
Installation of the brake caliper occurs in the reverse order of removal. The bolts on the fastening locking plates must be locked, otherwise they may come loose on bumps. If you are changing a caliper, be sure to look where it is placed. Parties may differ. After installation, you need to check the operation of the caliper by pressing the brake pedal. You need to carefully check for brake fluid leaks so that you don’t have to disassemble everything again later.
Installing the cylinder and pads
The brake cylinder is installed in the reverse order of its removal. Before installation, clean and lubricate moving parts. Everything is the same with the pads. Before installing them, press the brake cylinder rod inside the body, and then install the pads themselves. Install new pads and close the bracket. Do not forget to tighten all the bolts - one loose bolt can lead to a serious accident.
Wheel installation
When installing the wheel, make sure that all bolts are free of rust and lubricated with thread locker. You need to tighten it well, but not excessively - there is a risk of breaking the bolt or simply not being able to unscrew it later.
Installing wheels on Lada Granta
The use of cordless impact wrenches is strictly not recommended. The torque on the chuck is clearly not enough for tightening; there is a risk of the wheel uncoupling from the car while driving and its subsequent autonomous travel.
Removing the car from the jack
Before removing the car from the jack, check that all work has been completed. Raising the car on a jack again and looking for a support point is not the best idea. If everything is fine, lower the car smoothly. It’s not worth placing your limbs, much less your head, under it.
How to replace brake discs on a VAZ 2190?
Note! Before you start work, keep in mind that the discs are changed in pairs and therefore immediately calculate the money (By the way, the brake pads also need to be changed), but this must be done only because each disc is different and if one is left with wear and tear, then If you install a new one, then immediately uneven braking will occur (the car moves away from straight-line motion), and of course, the new brake disc will wear out much faster, because all the force during braking will be applied to it and not to another disc with wear (see. "The principle of operation of a brake caliper")!
1. First, remove the corresponding wheel (see “Proper removal of wheels on a car”) and then remove the brake pads by unscrewing the necessary bolts and folding the caliper bracket (Read the article: “Replacing brake pads”), after this operation, find the brake the hose is screwed to the brake caliper (For clarity, it is indicated by a green arrow), after finding it, move your eyes a little higher (In this case, you will need to look at the brake hose) and look for the place where the hose is attached to the strut using a rubber holder (there will be a slot there) , pull it out (This way the hose will start to dangle), and when everything is finished, unscrew the two hex head bolts and grab the caliper with your hands, completely remove it from the brake disc and hang it on a spring, using a metal wire or something like that (see large photo).
Note! You only need to hang the brake caliper for this purpose, because if you don’t do this, it will hang on the brake hose (And you didn’t disconnect it) which may break; if it breaks, the hose will have to be replaced with a new one, and when suspended, the hose will hang freely and make sure that it does not bend yet, if you decide to disconnect the hose and completely remove the caliper (For example, to replace the brake hose, we will assume that you have found cracks on it that are unacceptable), then after these operations do not forget to bleed the entire brake system on the car or if the hose does not disconnect, or for example, when disconnecting it, you plug it with some kind of plug, and after disconnecting the hose from the brake pipe and plugging it with a plug, you can not bleed all the wheels, but only perform the one on which all the work was done and some other nuance, if you decide not to remove the pads (you don’t want to change them, for example), then you will need to act as follows, when removing the brake caliper, firstly, it may not come off (the pads will be clamped), in this case, take a powerful screwdriver and using it as a lever (Putting it on the brake disc), press the inner brake pad inward (So that they are not in a clamped state) as shown in the photo below and that’s it, you can remove the caliper together with the pads from the brake disc of the car!
2. Now spray WD-40 liquid on the guide pins that secure the brake disc, clean the brake mechanism from dirt using a wire brush and proceed to removal, the brake disc on the right and left sides is attached only to these two guide pins, turn them out (see photo 1) and try to remove the disc with your hands first, if it doesn’t work, then take a hammer and a small wooden board and, using it, knock the brake disc out of its seat and remove it from the car, but only when you hit it, strike in different places so that it is removed evenly, and if you have a rubber hammer, then do the work without a plank at all, and just use a hammer, because it will not cause such serious damage as a metal one.
Dismantling of mechanisms
Before replacing the front brake discs with Kalina, you need to disassemble the entire assembly. To do this you need to follow a few simple steps:
- Loosen the bolts on the wheel and lift the side to be repaired using a jack.
- Remove the front wheel completely and lower the car onto a secure support. Try to carry out all work on supports; jacks, even the most reliable ones, should not be trusted.
- Now you need to disassemble the brake mechanism. Bend the metal plate that secures the bolts on the caliper at the top and bottom.
- Unscrew the two bolts using a 17mm wrench. If the nut turns inside, hold it with a second wrench at “17”.
- Disconnect the hose from the stand so as not to tear it during work.
- Lift the caliper and move it to the side. Screw it to the body, as far as possible from the work site.
- After this, remove the front brake pads.
- Remove the two bolts that secure the caliper housing to the hub.
- Using a “12” key, you need to unscrew the conical guides that secure the brake disc
. If you can't unscrew them, treat them with penetrating lubricant.