To control the fuel system of a car with gas equipment, a gas-gasoline switch is installed in its interior. Models of HBO buttons vary depending on the type of engine of the machine.
Fuel switches for gas installations can be divided into 4 types:
- A key intended only for carburetor engines. Included in the 1-2 generation HBO set, has an index - G;
- toggle switch for an injection machine with the 2nd and 3rd generation of gas equipment, marked with the index - W;
- universal 2nd generation HBO switch for injector and carburetor;
- switch button gas petrol 4th generation.
Operating principle and differences between buttons
The 1-2 generation button on the carburetor has two working positions and one neutral.
1st generation HBO button for carburetor
- I – the engine starts and runs only on gasoline (gas valve is closed, the red light is on).
- II – The internal combustion engine switches to gas, while the gasoline electric valve closes and the green lamp lights up.
- 0 (Neutral) – serves to burn gasoline from the carburetor float chamber.
Changing the fuel type should only occur through the neutral position. If you turn on the gas right away, two types of fuel will enter the combustion chambers and the engine will most likely stall.
Some copies also have an additional button in the cylinder for pre-start supply of a portion of gas, which is needed to enrich the mixture when starting a warm engine on gas (for example, Lovato, Logo buttons for a vacuum reducer).
A key such as, for example, Stag 2-G already has a pre-start function built into it, with the ability to adjust by time.
In the injection version, instead of the middle position, there is an automatic mode (on some types, such as Stag 2-W, it can be extreme). In this position, the engine starts on gasoline, and when a certain engine speed is reached, the gas supply is automatically turned on.
Button for switching gas petrol 2nd generation to injector
The transition speed is regulated using a potentiometer on the side surface of the housing. This key can also come with a level indication.
The universal option involves installing a toggle switch on both the injector and the carburetor. The transition between modes is carried out using a jumper/jumper on the case (example SVG switch).
Universal switch
The 4th generation HBO button has an LED indication and 2 operating modes on/off. In the on position, the gas turns on automatically after the reducer-evaporator warms up to 35-45˚C. The temperature is programmed in the controller at .
Button signals using Stag as an example:
- LED is on/off – the engine is running on gas/gasoline;
- blinks at intervals of 1 second. – the engine is not warmed up;
- flashes every 2 seconds – the system is ready to switch to gas;
- blinks every 4 seconds – the tank has run out of fuel;
- the buzzer beeps three times - the system switches from gas to gasoline due to lack of fuel;
- three short signals 1 long – ECU (control unit) error;
- two short beeps 1 long beep (with the ignition off) – maintenance of gas equipment is required.
In addition, in the fourth version, gas equipment is available for gas. The mode is activated as follows: hold the button with the ignition off until the LED lights up continuously. Then, without releasing the key, we start the engine. Deactivation occurs after stopping the internal combustion engine.
Types of buttons (video):
Selection table (with approximate prices):
| Name/labeling | injector/carburetor/generation | Level indication, +/- | Price in rubles |
| REG OMVL Dream XXI King | engineer/4 | + | 1020 |
| Logo 145 | engineer/4 | — | 280 |
| Logo 101 | carb./1.2 | — | 470 |
| Atiker (K01.003.000.020) | carb./1.2 | + | 600 |
| Stag 2-G | carb./1.2 | — | 550 |
| AEB 722 | carb./1.2 | + | 1050 |
| Tamona K-5 | carb./1.2 | — | 520 |
| Lovato | carb./1.2 | — | 590 |
| Torelli | carb./1.2 | + | 630 |
| Stag 2-W | engineer/2 | — | 600 |
| Tamona in-3 | engineer/2 | — | 540 |
| Stag LED-401 | engineer/4 | + | 750 |
| Stag LED-300 | engineer/4 | + | 580 |
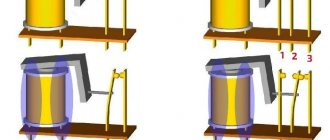
Gas-gasoline switching device
The difference between a gas complex mounted on a carburetor and equipment intended for installation on an injector lies initially in the fact that in power plants with separate injection, the supply of the gasoline mixture is turned off almost instantly. The fuel type switch on direct injection engines is equipped with three fixed positions: 1st position – operation on a gasoline mixture; 2 position – operation on gas engine fuel; 0 position – operation in automatic fuel type switching mode. The mode in position 0 creates additional convenience when operating and driving the car. When this mode is activated, the electronics, based on sensor readings, decide when to change the type of fuel supplied to the engine.
Gas-gasoline switching device
Before parking the car for a long time, the carburetor must be filled with gasoline, so you should switch the engine to a gasoline-air mixture in advance. There is no need to do this for an injection power plant, so manual switching is not required; the automation independently makes the necessary switches.
Source
Connection diagram of the 2nd generation HBO button to the injector
Installing and connecting the 2nd generation HBO button with your own hands on a car with an injector sometimes causes difficulty.
In fact, everything is much simpler than it seems. The factory instructions for installing the switch indicate the following pinout:
- the white wire should go to the level sensor (if such a indicator is installed);
- yellow goes to the positive of the gasoline valve (if there is emulation of gasoline injectors, this wire is not connected);
- blue connects to the positive terminals of the gas valves and the additional remote with filter. The injector emulator also cuts into this circuit;
- red goes to the positive terminal of the ignition coil (necessarily with a fuse);
- black - mass;
- brown to the negative terminal of the coil.
Injection circuit
It’s hard to disagree with the first three points. But for the rest we will make recommendations:
- The red wire is best connected to the positive side of the ignition switch. Because the coils may have voltage surges. In order not to disassemble the panel, the contact can be found on the fuse block.
- The black wire should only be attached to the car body, like all negative equipment cables.
- Brown, must be wound onto the central high voltage wire of the coil.
It is advisable to do 10-15 turns, without using electrical tape. The electrical tape dries out over time and falls off; it is better to make a knot similar to tying a fish hook.
Correct connection of the brown wire
If the ignition system consists of separate coils, it is necessary to wind the wire onto the first two armor wires (for a more accurate signal), without breaking the brown one, i.e. first to the first then to the second.
After connecting the button, it must be adjusted. Periodically increasing the engine speed with the accelerator, it is necessary to smoothly turn the potentiometer screw clockwise and back. It is necessary to ensure that the gas supply is turned on in the “automatic” mode when the tachometer reading is 2000-2500 rpm.
Fuel switch
Gas/gasoline switch is a device designed to switch the operating mode of a vehicle from one type of fuel to another at the moment when a certain number of vehicle engine revolutions is reached.
Switch K-5 Tamona All switches are divided into three main groups.
1. For injection engines. This type of switch has three positions: petrol, gas and automatic mode. 2. For carburetor engines with the installation of an electronic gearbox. In these switches, the “GAS” position is equipped with an automatic shutdown of power from the shut-off valves. 3. For carburetor engines with the installation of a vacuum reducer. And on this gas-gasoline switch there are two toggle switches. One for switching the type of fuel, the second for pumping gas before starting the engine.
The cost of switches usually does not exceed 1000 rubles.
Switches, options and costs All switches come with a wiring diagram and mounting kit.
Connection diagram of the 2nd generation HBO button to the carburetor
For a carburetor engine, the connection looks similar:
- Red - through the fuse to the ignition coil/switch.
- Light blue (blue) – gas valve positive.
- Yellow – positive of the gasoline valve.
- Black – minus (car body).
- The brown one goes to the ignition coil armored wire. It is needed to transmit an impulse to the key, which determines whether the motor is running or not.
Carburetor diagram
If you still have questions about connecting or selecting buttons on the HBO, ask them in the comments. We will be happy to answer them.
Let's consider the basic installation rules based on the electrical connection diagram for the TE-PM gas computer.
Connecting the common wire (ground)
gas computer follows the standard connection of the ground wires to the car body. As an alternative, it is possible to connect the common wire to the battery negative. The positive wire is connected through a fuse to the car's power circuit, where + 12V appears when the ignition is turned on. It is very convenient to use the positive wire of gasoline injectors for this. In most cases, when the ignition is turned off, the plus does not disappear immediately. At the same time, the control button continues to work. This is completely acceptable. It is highly undesirable to use the plus of the ignition system to connect to the positive. It has low current and contains significant voltage ripple, leading to noise. Some gas computers, for example TE-STREAM, also have a second power cord. It connects to the positive of the battery.
Connection to petrol injectors
can be through standard connectors (BOSCH standard or Japanese) or directly into the break of control circuits (shown in the diagram). With connectors, this work is completed faster, and with direct connection it is much neater and more beautiful. Especially when the inserts are made in the harness at a distance from the injectors themselves. In “Japanese” connectors there is no single standard for the location of the positive and control wires. Therefore, we will have to deal with this further. The harnesses of our (TE) computers can be either with or without connectors. This is determined in advance and discussed with our local partners.
Connection to gas injectors
, as a rule, does not cause problems.
The main thing is that the number of the connection channel to a specific gasoline injector matches the number of the gas injector. The order in which the cylinders are counted in the engine does not matter. The gas temperature sensor
and the MAP outlet (cross) are located in close proximity to the gas train. Sometimes this sensor is located on the ramp itself (OMVL), then the crosspiece can be omitted.
Connecting the wire to the lambda probe
is optional. All auto-calibrations and collection of map points will occur normally. The connection is only necessary for visual observation and to analyze the operation of the system. Connection to wide-range lambdas is not provided. On V-twin engines, one of two lambda probes must be connected.
Level sensor
can be high-resistance (0-30 kOhm) and low-resistance (0-90 Ohm). Two-wire, resistive. Other types of sensors require an additional power wire.
Gas and temperature valve wires go to the reducer
. The blue wire is connected to one valve terminal and at the same time this wire goes to the multivalve valve. The second valve terminal is connected to the nearest ground. The gearbox temperature sensor is connected via a connector or directly by soldering wires.
Do not confuse the connection of the MAP sensor connectors and the diagnostic connector
. The diagnostic connector wire is much shorter than the MAP sensor wire. On some computers, a control button cable can also be connected to the diagnostic connector. At the same time, the gas computer can work with only one device: either a button or a diagnostic adapter.
High gasoline prices force motorists to look for alternative options that allow them to save at least a little on fuel and protect their budget. In this case, most often the only solution is to install gas equipment on your car. Today, many service stations offer a similar service, but if you have some knowledge, installation can be done without outside help. As for the type, it is better to install 4th generation gas equipment.
Advantages
When compared with previous versions of the fourth generation HBO, it has a number of advantages:
The system's gearbox quickly responds to vacuum and maintains a normal pressure level (regardless of the operating mode of the power unit). This is possible thanks to the installation of a wide 2nd stage aperture and well-designed feedback;
There is always a stable pressure at the outlet of the system, which allows you to use gas economically. In addition, the motor operates stably, high-quality acceleration is ensured, and there are no “pops”;
Gas does not enter the cooling system in any way, due to the lack of connection between the diaphragms and the coolant cavity;
The gearbox warms up very quickly. This is possible due to the high level of heat transfer of the ribbed surface;
Valves and gearboxes are made of reliable materials, not plastic (as was the case in previous generations). Consequently, even when operating in unfavorable conditions, the system clearly performs its functions;
The gearbox life is about 7-8 years, which is ensured by the use of high-quality rubber and casting;
Installation of 4th generation gas equipment is significantly simplified thanks to the use of special cone couplings. To do the job, it is enough to have the most common tool. In addition, this feature simplifies further maintenance and repairs;
The fourth-generation LPG gearbox is distinguished by the presence of 4-dimensional adjustment, two of which are clearly set at the factory (there is no need to adjust them). All that is required is to adjust the idle speed;
The gearbox is fastened at three points, which simplifies the search for a place to install the unit and guarantees a high-quality connection to the body.
Installation of 4th generation gas equipment: step by step
Let's take a quick look at the steps you will need to go through when installing the system yourself. This will allow you to develop your strategy and complete installation and adjustment work as quickly as possible.
So let's get started:
- Purchase the equipment necessary for installation:
HBO kit (choose it based on your car brand). It consists of wiring harnesses, “brains”, a valve, many hoses, nozzles, gas temperature and pressure sensors, a button and, in fact, the gearbox itself. The equipment may, of course, vary;
Balloon. There are many execution options here. But if your goal is compactness, then it is better to give preference to a torus-shaped balloon. For example, you can choose a Turkish Atiker cylinder with a capacity of 54 liters. Its size is 630 by 225 mm;
Multivalve, which includes the device itself and a remote system for refueling;
Gas level sensor - connects to the “brains” of your gas equipment. Its task is to show the remaining fuel in the cylinder;
Universal programmer (without its help, setting up the “brains” is impossible);
A disk with instructions, diagrams, firmware, and so on. In principle, after studying this material, a lot will become clear to you;
Injector harness.
Most often, this equipment is sufficient. Costs may vary. Here a lot depends on the kit and the cost of the cylinder itself. On average, total expenses are about 20 thousand rubles.
Although, you will still have to buy something else - a copper hose with a diameter of 8 and 6 mm and a length of 1.5 meters and 8 meters, respectively, a pressure sensor and a connector for this sensor. Additionally, this is about 1,500-2,000 rubles.
- Install the cylinder. It is very important here that the hole with the multivalve is located on the side (towards the fuel filler hole).
- Install the multivalve. It is attached directly to the cylinder with bolts (by the way, the latter must be tightened in a strictly defined order).
- Install a level sensor, which is necessary for the normal operation of the indicator on the fuel switch button. This unit is installed directly on the multivalve (installation details depend on the features of the kit).
- Install a solenoid shut-off valve. Its task is to open when a corresponding signal is given from the “brains” of the HBO and remain closed when the corresponding command is not received.
- Install lines and filling device. Please note that there are often two highways. One is the main one, and the second is the filling station. Use pre-purchased tubes for these purposes. Copper tubes can be connected using a special copper bolt and barrels. As for the VZU, it is advisable to place it near the main filler neck. But here it’s up to you to decide where it will be more convenient.
After installing the lines, it is mandatory to check them for leaks. For this you will need a compressor. Pass 5-6 atmospheres through the system and check for the presence (absence) of etching from the tubes.
- Install the gearbox. Its place is in the engine compartment. Most often the unit is located near the radiator. It is very important that the outlet is at the top and directed in the direction of travel. In addition, the gearbox must be below the coolant level. Otherwise, it will be very difficult to crash into the cooling system.
- Mount the injectors and cut them into the manifold.
- Assemble the low pressure line - connect the nozzles and the reducer using a hose.
- Fill the tank and perform pressure testing.
- Install the “brains” and manufacturers of wiring connections (this work can be done before crimping).
- Adjust the system operation and check the engine operation in various modes.
Conclusion
Of course, installing 4th generation gas equipment is a very complex and time-consuming process. It is very important to carefully read the installation instructions and strictly follow all recommendations. As a rule, it may take a beginner several days to install and configure the system. But this is the case when haste is unnecessary. If you have doubts about your abilities, it is better to turn to specialists. Good luck.
Modern 4th generation gas equipment is currently the most optimal and reliable option for various mobile gas systems. In it, the supply of the gas mixture to the injectors of each cylinder of the internal combustion engine is carried out and controlled separately.
65 liter gas cylinder inside the trunk. There may be round cylinders. Filler neck inside the trunk, which still has plenty of space inside
Features of the operation of 4th generation gas equipment
The equipment allows for combined power supply of the engine with gasoline and gas. Switching from one power mode to another can be done from the cabin manually, as well as automatically. The small control panel contains an LED gas level indicator and a fuel switch. The usual location of the control panel is under the steering column on the left near the headlight adjustment control.
The gas indicator contains four green LEDs and one red, located in one row. When one green LED lights up, it indicates the presence of 10 liters of gas. Usually this reserve is enough for 100-120 km. The red LED lights up to indicate the presence of emergency fuel remaining, which may be enough for 50-80 km. It warns you about the need to refill gas at a gas filling station.
A separate red LED, located in the upper corner of the remote control and operating in a flashing mode, signals that the engine is currently running on gasoline, but the system is preparing to switch to gas fuel. This happens every time the engine is started until it reaches normal temperature and warms up well.
Button for switching engine power mode and gas quantity indicators
Since the engine has both a gasoline and gas power supply system, such duplication doubles the reliability of its operation. In addition, the mileage on one refueling with gasoline and gas fuel increases significantly. This is beneficial on long trips through sparsely populated areas, where the network of gas stations is sparse and of poor quality. Also adding the ability to increase protection against car theft is an easily removed and installed switch, the removal of which blocks the supply of gasoline and gas to the injectors.
The 4th generation LPG is especially beneficial for car owners whose engines are equipped with an expensive fuel injection system for exhaust gas purification. It not only provides significant savings on expensive high-octane AI-98 fuel, but also saves resources. This equipment is intended for vehicles that meet environmental requirements Euro-3 and higher. It has a pulsed gas-air mixture injection system, which operates under the control of a separate control unit interfaced with a microprocessor. processes microprocessor commands and generates control signals that open electromagnetic gas injection injectors and block gasoline mixture supply injectors.
The concentration of the supplied fuel mixture is controlled by a system of sensors that determine:
- gas pressure;
- reducer temperature;
- gas temperature.
If the supply gas pressure drops below a threshold value, the electronic unit automatically turns off the gas injectors and opens the gasoline injectors, switching the engine to gasoline power.
HBO options: from mechanical to electronic
Propane and methane as motor fuels have their adherents as well as their opponents. Both give a lot of arguments confirming the correctness of their point of view. One thing is indisputable - gas kits allow you to spend your car budget more economically when installed on any power unit: gasoline and diesel, carburetor or injector, equipped with turbine or compressor supercharging. The modern gas equipment market offers an assortment of gas installation kits that is difficult to describe.
Gas motor fuel for refueling cars
Gas engine fuel began to be used to refuel cars at a time when the carburetor was the only unit supplying the fuel mixture to the engine, and such an innovation as an injector was just beginning to be mentioned as an innovative alternative to the traditional method of powering an internal combustion engine. Since then, several generations of gas equipment have changed, each of which represents a logical follow-up to the development of fuel supply systems in automobile power units.
- HBO of the 1st generation was used on cars whose engines had a carburetor as a power supply. This earliest version was not equipped with any instruments and systems of electrical, much less electronic control. All adjustments and settings were made mechanically: using screw jets. Currently, this early generation of HBO is not used.
1st generation HBO is suitable for everyone
- Installation complexes of equipment of the 2nd generation received an oxidizer in their composition. The inclusion of such a sensor in the equipment initiated communication during the operation of the power plant. The oxidation sensor is mounted on a carburetor or injector and is equipped with a fairly simple electronic control system. Gas engine fuel is supplied by a dispenser, the adjustment parameters and settings of which are set and carried out through communication with electronic devices designed to monitor the degree of enrichment of the fuel mixture. The equipment model with an oxidizer works more economically, which significantly reduces the cost of purchasing liquid and gas fuel.
How to install 2nd generation HBO
- The third generation of equipment occupies a transitional position between the second and fourth generations. It works on vehicles whose engines are powered by an injector, although some craftsmen have managed to equip a carburetor with this circuit. The scheme meets more stringent environmental requirements, but its construction is quite complex, and it does not work completely reliably.
- 4th generation gas complexes are the most common scheme of the gas equipment systems used. Installation kits require integration into power plants with separate injection. This model works with the same system that controls the injector. The supply of the fuel mixture to the internal combustion engine is carried out by gas injectors, which are regulated, configured and controlled by the computer. Switching to operate on gas engine fuel or on a gasoline-air mixture can occur not only with a manual button, but also in automatic mode - depending on the degree of temperature heating and the engine crankshaft speed.
4th generation gas complexes
- The fifth generation of gas cylinder kits works with power plants of cars with a direct fuel injection system. The main difference between the 5th and 4th generations is the physical state of gas engine fuel - gas is supplied by injectors in the liquid phase. The low distribution in Russia is explained by the low quality of gas motor fuel.
Composition and operation scheme of 4th generation gas equipment
HBO includes three components:
- Cylinder for refilling liquefied gas;
- Multivalve;
- Gas preparation, distribution and injection unit.
The multivalve is installed on the neck of the gas cylinder. It is designed to ensure filling of the cylinder and economical and safe consumption of gas while powering a running engine. It includes:
- 3 valves – inlet (filling), outlet (consumable) and emergency (high-speed);
- cylinder refill indicator;
- fuel intake pipe.
The high-speed valve ensures that the flow channel is closed in the event of a rapid gas leak when the connecting tube from the cylinder to the engine is broken or damaged.
The gas preparation and distribution system consists of:
- a single-stage reducer when using propane or a two-stage reducer for methane. The reducer ensures the transfer of fuel from liquid to gaseous state. A two-stage reducer also reduces gas pressure;
- nozzle ramp with jets;
- filter for gas purification.
The engine is designed to start on gasoline. Gas starting is an abnormal mode and is allowed if the gasoline system is faulty. However, it creates a large load on the gearbox diaphragm and significantly reduces its service life. When the engine warms up steadily to 20-300C, it automatically switches to gas power. When gas pressure drops to a threshold value, the engine automatically switches back to gasoline power. At the same time, a special sound signal is generated, warning the driver about the lack of gas.
The 4th generation gas system does not allow the appearance of various pops in the fuel intake channel, characteristic of poorly synchronized mechanical supply systems. Therefore, it can be safely mounted on engines with plastic manifolds and systems with adjustable gas mixture supply geometry. After installing the equipment, it is imperative to adjust the ignition timing, since the combustion time and octane number of the gas are large. It requires earlier ignition, i.e. greater advance angle.
Video: What types of HBO are there? Generations of HBO
The industry produces special spark plugs for gas systems, although ordinary gasoline spark plugs work well with gas equipment. The ignition angle is adjusted using an electronic variator. The car owner can use chip tuning capabilities to change the average engine characteristics set by the manufacturer, as well as set a different temperature for automatic switching of the power mode.
To increase the reliability of the engine, extend the life of the injectors and gearbox and protect them from debris that gets into the cylinder when refueling from old containers at gas stations, experts advise using additional filters.
Injector operation emulator
When installing LPG, the gasoline supply is interrupted by turning off the injectors. The standard ECU initiates injector shutdown as a break in the injectors, turns on the fault lamp (Check Engine) and puts the engine into emergency mode (the latter rarely happens).
The injector operation emulator is used to prevent the ECU from seeing the injectors breakage.
Let's look at its diagram.
Injector operation emulator circuit When running on gasoline, the circuit is closed, and when running on gas, the circuit opens and runs through the load resistors, thereby not indicating to the ECU that the wires are broken.
The emulator is selected according to the number of engine injectors, usually 2, 4, 6 injector models.
The cost of such an emulator is within 1500 rubles.
Advantages of fourth generation gas equipment
The 4th generation HBO has a number of undoubted advantages compared to its older predecessors. These include:
- Maximum engine efficiency due to the accuracy of formation of the required gas mixture for each operating mode.
- Smooth operation of the power unit, complete absence of “pops” characteristic of early types of gas equipment.
- High degree of environmental friendliness of the engine, meeting Euro 3/4 requirements, due to complete and high-quality combustion of fuel. In this case, the actual reduction in engine power is no more than 2%.
- The versatility of the equipment allows it to be installed on almost all brands of modern cars due to software and hardware compatibility with the EOBD self-diagnosis system.
- Unified block connectors, eliminating equipment installation errors due to personnel inattention and reducing its labor intensity.
- High reliability of equipment operation and affordable price obtained through the use of modern production technologies.
Main problematic issues related to the operation of gas equipment
During the operation of a car with 4th generation gas equipment, a deterioration in its dynamic characteristics may be observed. The reasons for this phenomenon may be:
- malfunction of the gearbox or its incorrect setting, including the dispenser;
- filter clogging;
- reduced temperature of the gas-air mixture (typical for the winter period of operation);
- excessive enrichment of the mixture due to low gearbox temperature.
Something else useful for you:
If the car takes a long time to start, the reason for this may be:
Video: 4th generation LPG on Suzuki Grand Vitara new
- a malfunction of the gearbox diaphragm or its incorrect setting;
- defect of the flow solenoid valve (mechanical armature jamming or the presence of a short circuit of the turns);
- failure of the electronic unit, expressed in the absence of a permitting signal for gas supply or in the generation of an incorrect signal that does not correspond to the required amount of fuel;
- a malfunction of the starter, which “lowers” the battery voltage during startup, as a result of which the solenoid valves do not operate;
- wear of the piston and cylindrical surfaces of the engine, leading to a decrease in pressure in the cylindrical heads;
- if a vacuum reducer is used, then an additional reason for poor starting may be that insufficient vacuum is created in the inlet manifold due to the need for suction. In such cases, a separate electromagnetic pump can help out, providing forced fuel supply.
Maintenance of fourth generation gas equipment
1. Required to be performed weekly:
- external inspection of the system tightness, absence of gas leaks. A leak can be detected by the characteristic smell of an odorant and using a soap solution. Leakage can occur through cracks in the tubes, worn seals or loose tube clamps;
- removal of accumulated condensate in the gearbox through a special bottom plug. Untimely draining of condensate can lead to its coking and clogging of the drain hole, which subsequently, when condensate accumulates, leads to disruption of the normal operation of the evaporator reducer.
2. Required to be performed monthly: cleaning or replacing the filter. To do this, you need to disconnect the inlet tube from the filter and dismantle the filter. Clean or replace the filter element. There is a small magnet inside which should be replaced after cleaning the filter. 3. The gearbox should be disassembled and cleaned once every two years. In this case, care must be taken not to dent or tear the membrane. After cleaning and assembling the gearbox, be sure to check for leaks.
Increasing fuel prices are forcing most ordinary motorists and experienced motorists to think about finding an alternative that allows them to save on fuel in order to save money. One of the most profitable, economically feasible and simple options for saving money on fuel is the installation of a gas cylinder installation.
Today you will learn: how to install LPG on a car with your own hands, what parts and spare parts are needed, reviews from car owners after installing LPG.
Today, such a service is offered at almost every service station, however, having certain knowledge, minimal experience and direct hands will help you save money and install LPG yourself, without resorting to the help of specialists. Today, one of the most stable installations is 4th generation gas equipment. Most experts advise installing this particular installation.
List of equipment for installing gas equipment with your own hands
1
.
HBO kit. The choice of kit directly depends on the make of the car. The main set consists of wires, a computer, harnesses, hoses, valves, injectors, gas temperature sensors, pressure sensors and a reducer. In some cases, the equipment may differ. 2
.
Gas cylinder. When installing gas equipment, most motorists try to achieve compactness. To do this, you should use cylinders in the form of a torus. One of the most popular on the modern market is the Atiker cylinder, measuring 630 by 255 mm, holding 54 liters of blue fuel. 3
.
Multivalve. The package of modern multivalves includes the device itself, a remote system for refilling cylinders and tubes. 4
.
Gas level sensor. A device that connects to the computer of a gas cylinder installation. The main task of the sensor is to display the remaining fuel in the cylinders. 5
.
Universal programmer. Used to debug and configure the computer. 6
.
Computer and disk with setup instructions. On the disk you will find firmware, instructions and diagrams. 7
.
Injectors, harnesses. 8
. Set of tools.
This is a minimum list of equipment that will be enough to install gas equipment with your own hands. Depending on the vehicle, the cost of equipment may vary. In most cases, the amount depends on the brand, type, manufacturer, configuration and model of the cylinder. Installation of 4th generation gas equipment will cost approximately 20 thousand rubles.
In some cases, the standard equipment of HBO is not enough and the motorist has to purchase:
✓ 2 copper hoses (6 and 8 mm in diameter, 1.5 and 8 m long; ✓ pressure sensor; ✓ connector for connecting the sensor to the LPG computer.
Hoses and pipelines
Made of copper and can withstand pressure of 45 bar, from 6 to 8 mm in diameter. The cylinder is connected to the multivalve and reducer through this particular pipeline.
Copper pipes, options and cost The pipe must be secured to the bottom of the car, far from the exhaust pipe and the car suspension.
There should be elastic pads at the attachment point to dampen vibration.
A pipeline with a diameter of 8 mm is supplied to the filling line. For all other ligaments - 6 mm.
The rubber hose is used to install the antifreeze connection from the point of insertion into the line to the gearbox and to install the connection between the gearbox and the injectors.
Rubber hoses, options and costs All prices are indicated for 1 meter.
Installation process of gas equipment
When installing a cylinder, it is extremely important to carry out calculations, according to which the hole with the multivalve should be located on the side of the car, namely, towards the fuel filler cap. The multivalve is installed directly to the LPG cylinders using bolts, after which the level sensor should be installed. It is installed directly on the multivalve, depending on the specific configuration of the kit.
Next, you should install a solenoid valve, which will open when an impulse is supplied from the “brain” of the installation. After this, it is necessary to install the fuel line and the device for filling gas into the cylinders. In most cases, the 4th generation LPG equipment includes two lines: the main one and the refueling line. To ensure them, copper tubes should be used, the fastening of which is ensured by barrels and copper bolts. It is advisable to secure the VZU in close proximity to the filling neck.
Having installed the lines, it is worth checking for their tightness using a compressor. You need to pass a pressure of 5-6 atmospheres through the system, checking for etching from the installed tubes.
A gearbox should be installed under the hood, the unit of which in most cases is located near the car radiator. The outlet of the gearbox should be at the top and directed forward. The gearbox itself should be placed slightly below the level at which the coolant is installed for more convenient access to the cooling system.
Having mounted the injectors and cut them into the manifold, you should start assembling the low-pressure line, and then connect the injectors and the reducer using hoses from the standard LPG kit. Pressure testing should only be carried out with the tank filled.
Installation of control systems and connection of the wiring of the central distributor can be done before and after crimping. Next, you should check the operation of the engine in various modes and configure the operation of the LPG system.
Installation of gas equipment, especially the 4th generation, is a complex and labor-intensive process. It must be carried out in accordance with all the standards and requirements presented in the instructions, and also follow the recommendations from the brain disk. Installation of such an installation by a novice may take several weeks, but an experienced technician will be able to switch the car to gas in a matter of days.
Multivalve and Ventilation unit
A multi-valve is installed together with the cylinder. It prohibits filling the cylinder above 80%. Cylinders should not be 100% full.
Free space is necessary in the cylinder to ensure safety. Even if the cylinder is heated to +70 C, which is impossible even if the machine is used harshly, the liquid will fill the residual volume.
Multivalve TOMASETTO 315/30 class A Multivalves, options and cost The cost of a multivalve is within 2000 rubles. There are options for 1500 rubles.
The multivalve also performs other functions:
- Filling during refueling
- Gas level detection
- Gas supply
- Shutting off the gas supply
- Refill volume limitation. (up to 80%)
The multivalve is installed in the ventilation unit. It avoids possible gas accumulation as a result of any unforeseen circumstances.
Ventilation chamber TOMASETTO
The removable cover provides easy access to the multivalve.
Ventilation chambers, options and cost On average, a ventilation chamber will cost 300 rubles.